
Jim Lahey’s Overnight, No-Knead Bread
This post may contain affiliate links. Please read my disclosure policy.

On Wednesday November 8, in his New York Times column, “The Minimalist,” Mark Bittman enthusiastically describes a slow-rise, no-knead bread making process.
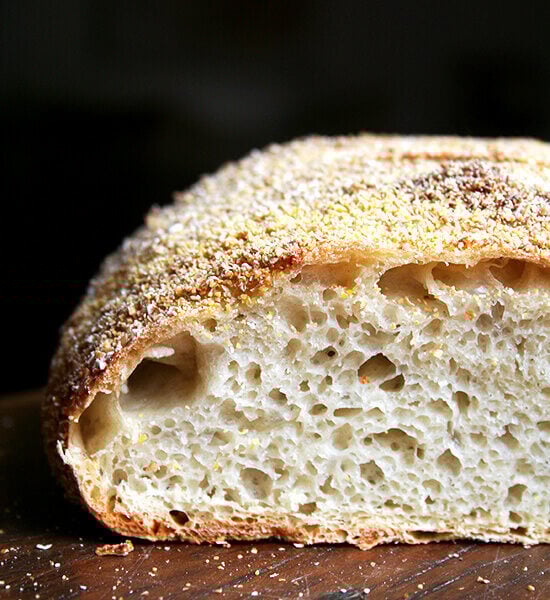
Since reading the article, I’ve made the bread twice, and both times have been very pleased with the results. A rustic boule emerges from the oven truly appearing as though it had been produced in a professional bakery. The crust is thin and crisp and the interior moist and airy.
The no-knead loaf looks beautiful and comfortably feeds ten people for dinner. The next day, it makes delicious toast and sandwich bread, and moreover freezes beautifully.


Jim Lahey’s Overnight No-Knead Bread
- Total Time: 22 hours
- Yield: 1 loaf
Description
Adapted from “The Minimalist,” The New York Times: Dining In November 8, 2006
Note: I’ve adjusted the recipe by adding a touch more salt than suggested in the article, and adding a half a teaspoon of sugar, which I think has improved the bread’s flavor. Be sure to read the recipe through entirely before endeavoring to make this bread: you need 12-18 hours initially in rising time and 2 more hours subsequently for a second rise.
Ingredients
- 3 cups bread flour, plus more for dusting
- ¼ tsp. instant yeast
- 1¾ tsp. table salt
- ½ tsp. sugar
- Cornmeal, wheat bran or oat bran as needed
Instructions
- In a large bowl, combine flour, yeast, salt and sugar. Add 1 and 5/8 cups water, and stir until blended. Dough will be sticky. Cover bowl with plastic wrap and let rest 12-18 hours at room temperature.
- After the 12 hours, or when the surface of the dough is dotted with bubbles, lightly flour a work surface and place dough on it. Sprinkle a little more flour on the dough and fold it over on itself once or twice. Cover loosely with plastic wrap and let rest about 15 minutes.
- Meanwhile, lay a clean kitchen towel (not terry cloth) on a counter or tabletop in a draft-free area. Generously coat it with cornmeal, wheat bran, oat bran or any combination of the three. After the 15 minutes, using as much flour as necessary to keep dough from sticking to your fingers and the work surface, quickly shape the dough into a ball and place seam side down in the center of the prepared towel. Dust with more cornmeal, wheat bran or oat bran. If the towel is large enough, fold the sides up over the bread so that it is completely covered. If the towel is too small, cover with another towel. Let rise for another 2 hours.
- Forty-five minutes before the dough is ready, preheat the oven to 450°F. Place a 6- to 8-quart heavy covered pot (cast iron, enamel, Pyrex or ceramic: I’ve used a ceramic Emile Henry Dutch oven and a circular Pyrex baking dish) on a rimmed sheet pan and place in the oven while it heats. When dough is ready, carefully remove pan and pot from oven. Slide your hand under towel and turn dough over into pot, seam side up. This is tricky. The first time I made this I clumsily flopped the dough into the pot and it lay seam side down. If this happens, just leave it: there is no way to fix it without burning yourself, and it ultimately does not matter. So, try your best to let the dough fall seam side up, and don’t worry and if it lands seam side down. Cover with lid and bake 30 minutes. Remove lid and bake another 15-30 minutes or until it sounds hollow when tapped. Remove from oven, and turn out onto a cooling rack. This makes a mess. Placing the cooling rack inside another rimmed sheet pan helps catch the crumbs that fall out of the baking vessel.
- Prep Time: 5 minutes
- Cook Time: 45 minutes
- Category: Bread
- Method: Dutch Oven
- Cuisine: American
This post may contain affiliate links. Please read my disclosure policy.


36 Comments on “Jim Lahey’s Overnight, No-Knead Bread”
Your no-knead bread sounds fabulous. I will make it as soon as the Emile Henry double oven arrives. I plan on making the bread for Christmas gifts. Your site is simply unbelievable and of course, it is bookmarked.
A
This is seriously the best bread ever. It is the first time my bread comes out the way i wanted it. I was worried about the second rise after reading the other comments, but had no problems. I did the second rise in the oven (twin eyelevel oven). It is also very hot here in South Africa at the moment so maybe that helped. Thank you so much for posting this recipe.
Marilize — so happy to hear this worked out for you! I wish it were as warm here as in South Africa! I’m not a winter person 🙂
Oops and now i see i posted this commented on the wrong recipe. Wanted to comment on the bread made in the Pyrex bowl. 🙂
I want to use whole wheat flour. Can I replace the bread flour 100% with whole wheat flour?
Appreciate a reply.
Thank you!
Hi Kathy! The dough will be very dense unfortunately. You could replace some of the flour with whole wheat flour (like a cup), but if you replace all of the flour, I think you will be disappointed.
I came late to this post. But it’s worth knowing that the method found on The Fresh Loaf website works just as well. It eliminates dealing with a schorching hot pot. You just put the loaf into a cold dutch oven for its final rise. When it’s risen, cover the pot and put it in a preheated oven. The loaf will rise abundant bake just as well as trying to get it into a hot pot. It will work well with your mother’s artisan bread too, and give it a crisp crust.
Jane, thank you for this!! What a smart idea to let the loaf make its second rise in the cold pot … can’t wait to try.
So good. So easy. Thanks for sharing this one. Next stop…the famous peasant bread!
Woohoo!! Makes me happy 🙂 🙂 🙂
I don’t have the types of pots mentioned – can I use a stainless steel pot?
I think as long as it’s oven safe and has a lid, you’re good to go!
A wonderful bc rusty bread and super easy!
My first rise was for 12 hours but would make it 18-24 hours next time. Added some fennel seeds for flavour and would try freshly cut rosemary next time. I didn’t use a cloth, I used parchment paper. I cooked it in my stainless steel big pot (with a baking sheet underneath) would use a slightly smaller pot next time to maintain the shape.
So happy to hear this, Deepa!
Hi. I am late to this site. But I tried your refrigeration technique for focaccia and it came out beautifully. Thank u for that! I am in Singapore and weather is always warm. Do u think it is ok to put this dough in fridge overnight and continue the first rise next day? Not sure how that affects total proofing time for first rise.
Yes, absolutely! I would increase the yeast to 1 teaspoon yeast if you are going to stick it in the fridge.
Why do flour the top of the dough before folding it onto itself? Seems like this would make it harder to stick it to itself and would add unnecessary flour to the center of rhe loaf??
It’s just to minimize the stickiness … you don’t have to do it if you are comfortable handling sticky dough.
I remember when the Lahey/Bittman article was published, I was so excited and set out to try it immediately. I had the same seam side flop but got a decent result. The hot pot idea always bothered me because I tended to get burned when I forgot I was a hot pot (during the pandemic I realized that came with not being a seasoned cook/Baker and now I rarely burn or cut myself by accident). Your peasant bread helped me get to a place that when I tried this again, I felt more comfortable with every step and had much better success. Bittman was my go to guy back then.
Bittman was my guy for soooo long. It was so sad when he left. Alas. Anyway, so great to hear you had success with this and that the peasant bread played a role in that. Somewhere, tucked in some cookbook no doubt, I still have that Wednesday New York Times food section featuring this recipe. Such a good one. Thanks for writing, Frank!
This recipe is so easy to make and so very delicious. I make it for people and share it with friends all the time. Everybody likes the taste and the consistency. Best recipe ever!
So nice to hear this, Jean 🙂 🙂 🙂 Thanks for writing!
Tried this twice and make bread often. Not enough yeast in recipe. I had to add 1 1/2 teaspoons??
Are you using instant or active dry yeast?
hello, thanks for the clear directions! I made this loaf and it came out really nice but i was not able to get an ear on it. It is about 80% hydration…
I did the first rise for 15 hours at room temp, then shaped it and proofed for 1.5 hours, then shaped it one more time and was able to form more tension the second time, and let this proof again for 1.5 hours. I scored the bread with a razor blade but it felt kind of pointless because it felt like a very wet dough and it was kind of warm. The bread came out nicely in my dutch oven and i got something like a very tiny micro-ear lol. I am really wanting to get an ear. Is 80% hydration too high to get an ear? Or should i incorporate the refrigerator at any point to help with firming up the dough before scoring? how would you alter the recipe/process if i wanted to end up with an ear? Thank you so much for your help
Also, if i want to incorporate the refrigerator at any point during this recipe, how should i do that? so i can have more control over the temperature if it is super hot/humid in my house during the summer, etc. how would this affect the amount of yeast / and timing of each step? Thank you!!
I think incorporating the fridge is your best bet. I would transfer the shaped bread to the fridge immediately after shaping it. I might consider lining a bowl or storage vessel with a sheet of parchment paper, placing the shaped round on it, covering it tightly — it should be air tight to prevent it from drying out — then on baking day (24 hours later or so), remove it once your oven has preheated, score it, and bake it immediately. In other words, score it cold, then bake it immediately… no room temperature rise after it comes out of the fridge.
Ok thank you so much for your very clear explanation, i will do it exactly how you said. by the way, in the summers my house gets super hot and humid. instead of a 12 hour rise at RT is there a way to make this dough and put it straight into the fridge for the first rise? Is there any way i can do an entirely fridge or at least mostly fridge bread? and then perhaps the final proof at RT? You have been the only source that i trust for making bread for years now! Lol. thanks again.
Hi! I think you potentially could do the rises in the fridge, but it is a much smaller amount of yeast (as opposed to my focaccia recipe) so the first rise will likely take much longer. If you’re OK with that go for it. I worry about the final proof at RT only because it might be hard to score. The beauty of scoring cold dough is that it’s easy to score and you might get a better ear.
Thanks for your kind words!
Question, I tried to focaccia bread recipe and it is amazing. I’m blown away, so I’m feeling a little more confident and I want to try this recipe for the best for per bread but I don’t need a loaf that feeds 10 people. It will go bad before it could possibly get used up in this house could I make half a recipe which clearly I could but how long would you bake it
I would bake it covered for 20 minutes; then uncovered for 15 to 20 minutes.
Hello, Alexandra and thank you for your website. I have been baking my own bread, rolls, and pizza dough since 1967 and then happened upon Jim Lahey’s recipes a few years ago (see his book, My Bread). It changed my entire way of baking bread. It also seems that this revolutionary approach (slow, no knead) has been adopted by every serious bread baker, whether using yeast or sour dough. Did Jim Lahey start this method or has it been around for hundreds or thousands of years? In any case, he does not add any sugar to his recipes (unless a sweet loaf) and neither have I. My breads rise wonderfully every time and the sugar is not needed. The simplicity of his approach and explanations, and the simplicity of his equipment, makes bread baking approachable and affordable for everyone who loves bread.
Agreed! I should revisit this recipe and omit the sugar — I never use sugar anymore with my slow-rise breads or sourdough breads. I don’t think Jim Lahey invented the slow-rise method, but he (and Mark Bittman) certainly popularized it.
Hi Ali….good morning from Broadstairs in Kent, UK. I sent a message yesterday about the wetness of the cinnamon brioche dough but baked it this morning. Wow! How fantastic! We loved every last crumb though we didn’t finish it all as it was too much for us. I take back the 3 stars and give it a definite 5, likewise this recipe for Jim Lahey’s bread which I’m about to put in the oven (second time around. the first time I made half quantity just to be sure and that’s all gone!) Love your website and have tried most of your bread recipes, all have been great! So just wanted to say thank you and keep up the good work. All the best, Jackie
Hi! And no worries at all — that brioche dough is very wet and can be tricky to handle. Also, I do think the UK flour absorbs water differently. When I’ve troubleshooted with people in the UK about bread recipes, so often the solution has been to hold back some of the water. So even though those brioche buns turned out well for you — which I’m so happy to hear! — you might still be able to hold back some of the water, which will make the process easier for you and will likely not affect the outcome noticeably. Thank you for your kind words 🙂 🙂 🙂 I’m goin to post your comment over on the cinnamon brioche recipe, too, as well as this response.
Please put weight (grams) numbers.