
Artisan Bread In Five Minutes A Day, Seriously
This post may contain affiliate links. Please read my disclosure policy.
 Last week, NPR aired a brief program about rising food prices and how people are changing their behavior as a result. Listeners called in sharing their money-saving secrets: Some people had begun fishing and hunting, others had begun walking or riding their bikes to market, and others had begun learning to make dishes from scratch. One man resolved to learn how to bake bread.
I thought this last idea sounded a little odd. With bread often being one of the least expensive items at the market, surely, I thought, their are better ways to save money.
I decided to investigate. Over the weekend, I made a visit to Henry’s Market (to purchase goat’s milk for a rosemary-gelato round two attempt) where I recorded some prices. A one-pound loaf of La Brea bread (the gourmet bread created by Nancy Silverton sold at grocery stores nationwide) costs on average $5.35. (To give you a range, the least expensive La Brea Country White Sourdough loaf cost $3.99 a pound and the most expensive Olive loaf cost $6.99 for 14.5 ounces.) Now, La Brea bread is one of the more expensive varieties of bakery-style bread found at grocery stores, but it’s also one of the best, and I’ve chosen to use it as the measure in this experiment for that reason.
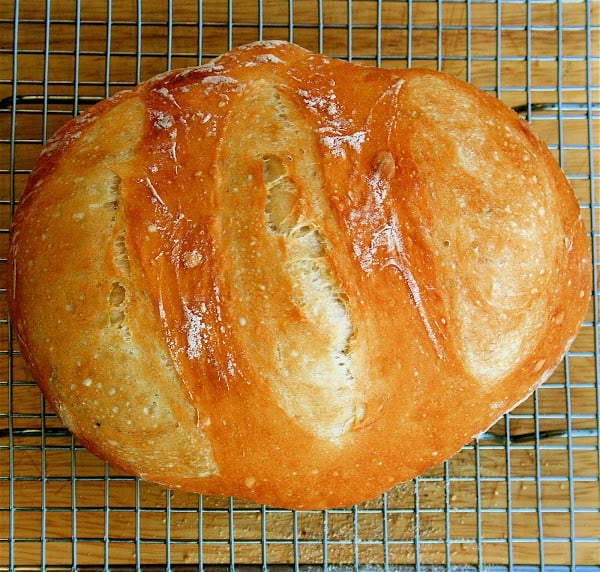
Now, on to Artisan Bread in Five Minutes a Day. I’ve been meaning to open this book since receiving it at Christmas from my father-in-law, who had read about it in this November 2007 NYTimes article: “Soon The Bread Will Be Making Itself”. Seriously, after I made the initial batch of starter, the bread took no more than five minutes of active time to prepare. (Plan on a 40 minute rise plus a 30 minute bake). And the result? Five stars. Ben and I ate almost an entire one-pound loaf in one sitting.
Preparing the loaves is so simple that I made bread on both Saturday and Sunday nights of this weekend, and I still have enough starter to prepare two more loaves this week. The starter keeps for at least two weeks in the refrigerator. This method, created by Jeff Hertzberg, a physician from Minneapolis, entails no kneading and can be prepared by the most novice of bread makers. If you have any inkling to learn to make bread or if you are a pro and desire a simpler method, buy this book: Artisan Bread in Five Minutes a Day: The Discovery That Revolutionizes Home Baking.
So, what does one of these loaves cost to prepare? Using the price of flour given by the American Farm Bureau — a 5-lb. bag of flour costs on average $2.39 — and prices for yeast and salt listed at Henry’s Market — a 3-lb. pound box of kosher salt costs $3.49 and a three-pack of yeast costs $2.39 — a one-pound loaf of homemade artisan bread costs about 60 cents to prepare from scratch. (Flour costs about 3 cents per ounce; yeast, 35 cents per teaspoon; and salt, 1 cent per teaspoon.) Using Henry’s Market prices, too, this estimate of 60 cents is likely on the high side.
The average price of a loaf of La Brea bread is almost nine times more expensive. Even the cheapest loaf of bakery-style bread, priced at $1.29 a pound, costs over twice as much as a loaf of homemade bread. Upon closer analysis it seems the man who called into the radio program actually might be on to something.
Even if saving money is not your goal, however, give this recipe a stab purely to experience how truly simple bread making at home can be. I’m dying to try other recipes in this book such as roasted red pepper fougasse, Italian semolina, and sun-dried tomato parmesan but for now, I’m extremely happy with the results of this master boule: It’s perfectly salty, moist and airy and delectable all around.
We ate three-quarters of this loaf in one sitting. It’s so yummy!
The Master Recipe: Boule
- Yield: 4 1-lb loaves
Description
Adapted From Artisan Bread in Five Minutes A Day by Jeff Hertzberg and Zoë François
Ingredients
- 3 cups lukewarm water
- 1½ T. granulated yeasts (1½ packets)
- 1½ T. kosher or other coarse salt
- 6½ cups (29.25 oz.) unsifted, unbleached, all-purpose white flour, measured with the scoop-and-sweep method
Instructions
1. Warm the water slightly: It should feel just a little warmer than body temperature, about 100ºF.
2. Add yeast and salt to the water in a five-quart bowl, or preferably, in a resealable, lidded (not airtight) plastic food container or food-grade bucket. Don’t worry about getting it all to dissolve.
3. Mix in the flour: Add all of the flour at once, measuring it with dry-ingredient measuring cups, by gently scooping the flour, then sweeping the top level with a knife or spatula; don’t press down into the flour as you scoop or you’ll throw off the measurement by compressing. Mix with a wooden spoon. If necessary, reach into your mixing vessel with very wet hands and press the mixture together. Don’t knead! It isn’t necessary. You’re finished when everything is uniformly moist, without dry patches. Dough should be wet and loose enough to conform to the shape of the container.

4. Allow to rise: Cover with a lid (not airtight) that fits well to the container you’re using. Allow the mixture to rise at room temperature until it begins to collapse (or at least flattens on the top), approximately two hours. You can use a portion of the dough any time after this period, but fully refrigerated dough is less sticky and is easier to work with. So, the first time you try this method, it’s best to refrigerate the dough overnight before shaping a loaf.

On Baking Day:
5. Sprinkle the surface of your refrigerated dough with flour. Pull up and cut off a 1-pound (grapefruit-size), using a serrated knife. Hold the mass of dough in your hands and add a little more flour as needed so it won’t stick to your hands. Gently stretch the surface of the dough around to the bottom on all four sides, rotating the ball a quarter-turn as you go. The correctly shaped final product will be smooth and cohesive. The entire process should take no more than 30 to 60 seconds.

6. Place the shaped ball on a cornmeal-covered pizza peel. (If you aren’t planning on baking the bread on a pizza stone, just let the dough rest on a cornmeal-covered cutting board. Allow the loaf (uncovered) to rest on the peel for about 40 minutes.

7. Twenty minutes before baking, preheat the oven to 450ºF, with a baking stone placed on the lowest rack. (If you don’t have a stone, don’t worry.) Place an empty broiler tray for holding water on any other shelf that won’t interfere with the rising bread. (This helps to make the crust crispy, but your bread will still be delicious if you omit this step.)
8. Dust the top of the loaf liberally with flour, which will allow the slashing knife to pass without sticking. Make several ¼-inch-deep slashes across the bread. (Again, if you omit this step, your bread will taste the same.)
9. With a quick forward jerking motion of the wrist, slide the loaf off the pizza peel and onto the preheated stone. (Alternatively, butter a Pyrex dish or baking pan and place the bread in the pan.) Quickly but carefully pour about one cup of hot tap water into the broiler tray and close the oven door to trap the steam. Bake for about 30 minutes, or until the crust is nicely browned and firm to the touch. Allow to cool completely, preferably on a wire rack.
If you bake frequently, purchase yeast in bulk bags and store in your refrigerator or freezer in an airtight container. You’ll save a ton of money:


Here are two shots of an unslashed loaf baked in a buttered one-quart Pyrex dish. The difference in crust texture, in my opinion, is indetectable. If you don’t have a pizza stone and don’t feel like going through the trouble of a steam tray, this method, outlined in the recipe, works just fine.

This post may contain affiliate links. Please read my disclosure policy.


173 Comments on “Artisan Bread In Five Minutes A Day, Seriously”
This is perfect to go with the lentil soup your posted the other day! I’m going to try both this and the soup and let you know how they come out. I actually made bread about a month ago and it wasn’t half bad 🙂
Wow Alexandra, beautiful loaves. Thanks for trying our method– I’m Jeff Hertzberg, one of the co-authors of the book. Come visit us on the web at http://www.artisanbreadinfive.com, and you can post questions into any “Comments” field, or into the “Bread Questions” field on the left side of the homepage.
Jeff Hertzberg
http://www.artisanbreadinfive.com
I don’t know how old you are, but not old enough to make this type of bread, it’s been made well into the thousands of years.
I SO need to get this book! I don’t know what’s taken me so long! Your bread looks absolutely beautiful!
Not that I disagree with the premise that homemade bread will be less expensive than store bought bread, you left out a number of costs. To cite a few: electricity and/or gas (oven, refrigerator, lights, air conditioning), the capital cost of the equipment involved (stove, pans, etc), the allocated cost of your “production facility” (a house or apartment for you, a factory for a commercial bakery), transportation costs (for you to purchase the raw ingredients), the value of your time vs wages paid for the bakery. I could go on with other costs (real estate taxes, insurance, …).
But, back to the bread, it looks and sounds delicious!
Ali- You have no idea how much I value this post! I’ve heard people talk about this bread cookbook before, but you’ve seriously convinced me to buy it. I can’t tell you how many times I’ve picked it up at Borders and then left without buying it! Thanks for the ‘push.’ Looks like your loaves turned out great! How cool that JH commented!
What a wonderful article you have written!
I have the book and am obsessed with it (bread has always been an obsession anyway!).
I stumbled across your blog and am now looking forward to reading other entries of yours.
Keep us updated on the other breads in the book!
Ali – This bread is delish! I had the starter in my fridge for a week and we had fresh bread several times. Amazing.
Okay, so I’ve been reading your blog for a while. The pictures are always amazing and the recipies sound devine. I want to try just about everything you’ve ever posted, which leaves me quite backlogged.
Anyway, this weekend I finally dusted off a few of your recipes that I’d bookmarked and tried them, including this bread recipe.
Why did I wait so long? Everything was fantastic.
This is seriously the easiest recipe I’ve ever made. For anything. Ever. I was shocked. I kept checking back thinking that I must have forgotten something. But no. And it was super tasty. I think I’m a homemade bread convert.
Keep the inspiration coming!
LVH — I am so glad you like the bread. Every time I make it, too, I wonder if it really is going to turn out OK. But it does! Always. I am hooked on this method.
Okay, since someone said it’s easy, I’ll just have to overcome my bread- making anxiety and start with this recipe.
I love your blog Ali, great photos and beautiful food you have here! If only I could overcome my cooking-beyond-the-ordinary anxiety!
Thanks for the cost breakdown! I gave a recipe a whirl myself this week. Success! Great posting.
Jessbcuz — I’m so glad you found success! I am loving this method of making bread!
MMMMM – those picturs of your bread are enough to inspire! I’ve been reading a bread book – I picked up at the local library sale and contemplating when to try my hand at bread baking…. Well you just did it. Your blog is beautiful – thanks. Alvin
Alvin — Good luck with your bread making adventures! And let me know if you have luck with the Artisan Bread in Five technique. I have received some reports about not getting enough rise, especially after a week or more in the fridge. I have had pretty good luck so far, and I hope you do too!
I know this is an old post, but I’ve just started looking through your blog and couldn’t resist this recipe. My husband feels the need to eat bread with everything–he even asks for bread when we are eating Chinese, Thai, Japanese you name it. Anyhow, this recipe looks amazing as I haven’t yet had much luck baking bread–I only tried twice.
Hey there,
I’ve just started playing around with this recipe (got it from a different source, but it’s the same thing). Your loaves look gorgeous. One question: Did you ever get it to develop a sour flavor?
-JJ
Any guesses how much the oven costs to bake the bread? Seems like it would be a big part of the overall cost.
Also, I have heard that the yeast from one batch of dough can be saved and used in the next batch. Is this true?
Go to a hardware store and look for Unglazed Quarry Tile. It works great as a breadstone and costs about $1.
Matthew — I don’t think you can reuse yeast because that would already be incorporated into the bread, but you can save a piece of unbaked dough, and use it like a starter. So, every time you go to make a new loaf, you would add more flour, water and yeast to that starter, mix it all together, and before shaping and baking your loaves, you would reserve another small piece of dough to use at a later date. Does that make sense?
In regard to the cost, do you mean, how much does the oven itself cost? Or how much does it cost every time you bake a loaf of bread as in the cost of wood, etc? Those are both good questions and definitely costs to consider.
Do you mean how
Oven doesn’t count towards the cost unless you only use the oven for baking bread. If you already have an oven that you use regularly for other things, it just counts as part of the sunk cost of being housed.
I’d agree with counting the extra gas/electricity used in lighting the oven, etc.
I made this bread last night and was in love! I never want to buy bread from the store again.
Great blog! Cant wait to try more of your recipes. I’m planning on trying mandy’s spaghetti sauce recipe later this week 🙂
Hi, Alexandra!
About how many loaves do you get off this batch? Do you use it down to the end, then start over or do you add to it?
Zoe — Are you having trouble getting a third rise out of your batch? This has happened to me, too.
To answer your questions, however, I generally get 3 to 4 loaves out of one batch, and I do use it all. Recently, because the third batch does tend to be a bit stubborn, I let it rise on the counter for longer than usual before baking.
Your question makes me think, however. It might be better to just add more flour, water, etc. (a whole new batch of dough) to the remaining bit of dough and go from there.
Ali
(alexandra’s kitchen … i’m just not logged in)
Hi, Ali!
I just started my first batch yesterday and let it rise… have not baked off any yet (hopefully tonight I will!).. just thinking about the bread and wondering if, like sourdough- you could keep a bit of the original “starter” and add to it. I’m no baker- though I love cooking- but I know that sourdough is best retaining a starter… I thought I’d ask you as my breadmaking experience has been in my breadmaker primarily up until now.
Thank you for the quick answer- and maybe I will try baking off a few loaves then adding to the starter!
Zoe, read the reviews at amazon. One of the reviewers mentioned a method to retain some dough and give it a nice sourdough flavor.
I’ve been baking sourdough (no yeast) for over a year using 25lb bags of bread flour from Costco. Today’s price was $6.69 per bag, or 1.7625 cents per ounce. The most expensive thing about my bread is giving loaves to my friends. They love it! When we are invited to dine, I bring a fresh baked loaf of bread instead of wine. I know it’s good because it disappears off the plate so fast. I bake two loaves once or twice a week alternating between a walnut & cherry bread, and a healthy bread with whole wheat, millet, seseme, germ, cut oats, etc. Baking your own bread is a joy, and it is so healthy!
Tom
one of my viewers told me about this book and i just found your blog from the Bitten blog, so i need to go get this book. thanks for writing bout this. i like your style and approach here.
thx, eric.
Ali, when you bake in a Pyrex container, do you have something covering it to keep in the natural steam from the bread?
Hi Erin,
When I use a pyrex dish for the Artisan Bread in Five (or any bread recipe, actually) I do not cover it. Just make sure to liberally coat the inside of the bowl with room temperature butter — this adds a nice flavor and also prevents sticking.
Good luck!
Ali
Thanks for this posting Ali! I just discovered the ABin5 this last weekend. Tried my first small loaf Saturday, baked 4 cinnamon buns Sunday morning in an 8″ square pyrex dish and used the rest on a larger loaf for sandwiches for today. I’ve ordered two books, one for me and one for my daughter for Christmas. Love the ease of the method and having dough for fresh bread available. Pizza will be next!