
Artisan Bread In Five Minutes A Day, Seriously
This post may contain affiliate links. Please read my disclosure policy.
 Last week, NPR aired a brief program about rising food prices and how people are changing their behavior as a result. Listeners called in sharing their money-saving secrets: Some people had begun fishing and hunting, others had begun walking or riding their bikes to market, and others had begun learning to make dishes from scratch. One man resolved to learn how to bake bread.
I thought this last idea sounded a little odd. With bread often being one of the least expensive items at the market, surely, I thought, their are better ways to save money.
I decided to investigate. Over the weekend, I made a visit to Henry’s Market (to purchase goat’s milk for a rosemary-gelato round two attempt) where I recorded some prices. A one-pound loaf of La Brea bread (the gourmet bread created by Nancy Silverton sold at grocery stores nationwide) costs on average $5.35. (To give you a range, the least expensive La Brea Country White Sourdough loaf cost $3.99 a pound and the most expensive Olive loaf cost $6.99 for 14.5 ounces.) Now, La Brea bread is one of the more expensive varieties of bakery-style bread found at grocery stores, but it’s also one of the best, and I’ve chosen to use it as the measure in this experiment for that reason.
Now, on to Artisan Bread in Five Minutes a Day. I’ve been meaning to open this book since receiving it at Christmas from my father-in-law, who had read about it in this November 2007 NYTimes article: “Soon The Bread Will Be Making Itself”. Seriously, after I made the initial batch of starter, the bread took no more than five minutes of active time to prepare. (Plan on a 40 minute rise plus a 30 minute bake). And the result? Five stars. Ben and I ate almost an entire one-pound loaf in one sitting.
Preparing the loaves is so simple that I made bread on both Saturday and Sunday nights of this weekend, and I still have enough starter to prepare two more loaves this week. The starter keeps for at least two weeks in the refrigerator. This method, created by Jeff Hertzberg, a physician from Minneapolis, entails no kneading and can be prepared by the most novice of bread makers. If you have any inkling to learn to make bread or if you are a pro and desire a simpler method, buy this book: Artisan Bread in Five Minutes a Day: The Discovery That Revolutionizes Home Baking.
So, what does one of these loaves cost to prepare? Using the price of flour given by the American Farm Bureau — a 5-lb. bag of flour costs on average $2.39 — and prices for yeast and salt listed at Henry’s Market — a 3-lb. pound box of kosher salt costs $3.49 and a three-pack of yeast costs $2.39 — a one-pound loaf of homemade artisan bread costs about 60 cents to prepare from scratch. (Flour costs about 3 cents per ounce; yeast, 35 cents per teaspoon; and salt, 1 cent per teaspoon.) Using Henry’s Market prices, too, this estimate of 60 cents is likely on the high side.
The average price of a loaf of La Brea bread is almost nine times more expensive. Even the cheapest loaf of bakery-style bread, priced at $1.29 a pound, costs over twice as much as a loaf of homemade bread. Upon closer analysis it seems the man who called into the radio program actually might be on to something.
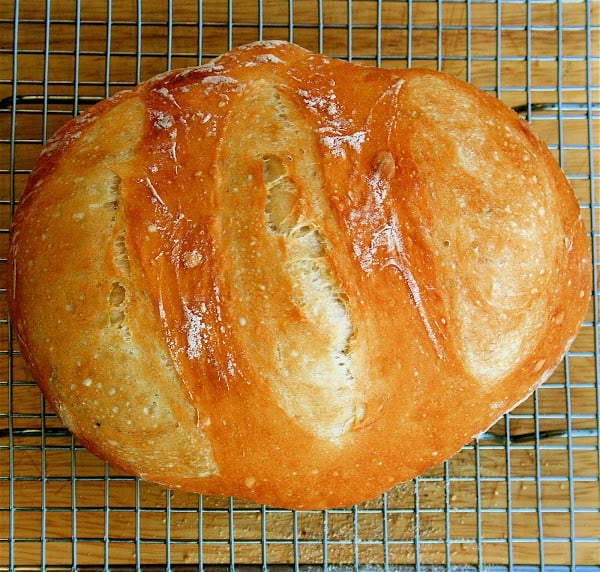
Even if saving money is not your goal, however, give this recipe a stab purely to experience how truly simple bread making at home can be. I’m dying to try other recipes in this book such as roasted red pepper fougasse, Italian semolina, and sun-dried tomato parmesan but for now, I’m extremely happy with the results of this master boule: It’s perfectly salty, moist and airy and delectable all around.
We ate three-quarters of this loaf in one sitting. It’s so yummy!
The Master Recipe: Boule
- Yield: 4 1-lb loaves
Description
Adapted From Artisan Bread in Five Minutes A Day by Jeff Hertzberg and Zoë François
Ingredients
- 3 cups lukewarm water
- 1½ T. granulated yeasts (1½ packets)
- 1½ T. kosher or other coarse salt
- 6½ cups (29.25 oz.) unsifted, unbleached, all-purpose white flour, measured with the scoop-and-sweep method
Instructions
1. Warm the water slightly: It should feel just a little warmer than body temperature, about 100ºF.
2. Add yeast and salt to the water in a five-quart bowl, or preferably, in a resealable, lidded (not airtight) plastic food container or food-grade bucket. Don’t worry about getting it all to dissolve.
3. Mix in the flour: Add all of the flour at once, measuring it with dry-ingredient measuring cups, by gently scooping the flour, then sweeping the top level with a knife or spatula; don’t press down into the flour as you scoop or you’ll throw off the measurement by compressing. Mix with a wooden spoon. If necessary, reach into your mixing vessel with very wet hands and press the mixture together. Don’t knead! It isn’t necessary. You’re finished when everything is uniformly moist, without dry patches. Dough should be wet and loose enough to conform to the shape of the container.

4. Allow to rise: Cover with a lid (not airtight) that fits well to the container you’re using. Allow the mixture to rise at room temperature until it begins to collapse (or at least flattens on the top), approximately two hours. You can use a portion of the dough any time after this period, but fully refrigerated dough is less sticky and is easier to work with. So, the first time you try this method, it’s best to refrigerate the dough overnight before shaping a loaf.

On Baking Day:
5. Sprinkle the surface of your refrigerated dough with flour. Pull up and cut off a 1-pound (grapefruit-size), using a serrated knife. Hold the mass of dough in your hands and add a little more flour as needed so it won’t stick to your hands. Gently stretch the surface of the dough around to the bottom on all four sides, rotating the ball a quarter-turn as you go. The correctly shaped final product will be smooth and cohesive. The entire process should take no more than 30 to 60 seconds.

6. Place the shaped ball on a cornmeal-covered pizza peel. (If you aren’t planning on baking the bread on a pizza stone, just let the dough rest on a cornmeal-covered cutting board. Allow the loaf (uncovered) to rest on the peel for about 40 minutes.

7. Twenty minutes before baking, preheat the oven to 450ºF, with a baking stone placed on the lowest rack. (If you don’t have a stone, don’t worry.) Place an empty broiler tray for holding water on any other shelf that won’t interfere with the rising bread. (This helps to make the crust crispy, but your bread will still be delicious if you omit this step.)
8. Dust the top of the loaf liberally with flour, which will allow the slashing knife to pass without sticking. Make several ¼-inch-deep slashes across the bread. (Again, if you omit this step, your bread will taste the same.)
9. With a quick forward jerking motion of the wrist, slide the loaf off the pizza peel and onto the preheated stone. (Alternatively, butter a Pyrex dish or baking pan and place the bread in the pan.) Quickly but carefully pour about one cup of hot tap water into the broiler tray and close the oven door to trap the steam. Bake for about 30 minutes, or until the crust is nicely browned and firm to the touch. Allow to cool completely, preferably on a wire rack.
If you bake frequently, purchase yeast in bulk bags and store in your refrigerator or freezer in an airtight container. You’ll save a ton of money:


Here are two shots of an unslashed loaf baked in a buttered one-quart Pyrex dish. The difference in crust texture, in my opinion, is indetectable. If you don’t have a pizza stone and don’t feel like going through the trouble of a steam tray, this method, outlined in the recipe, works just fine.

This post may contain affiliate links. Please read my disclosure policy.


173 Comments on “Artisan Bread In Five Minutes A Day, Seriously”
I LOVE this recipe!! THANK YOU! It was my first time making homemade bread and it turned out incredible! I put cheddar, garlic & herbs de provence in my bread 🙂 Very tasty!
Alex — Amazing! What a wonderful combination!
I told myself last week that my goal is to bake some bread.. I am a bread making virgin!! I decided that this is the one I want to make! Wish me luck 🙂
Katey — good luck! And if you want an even simpler recipe, try this one: https://alexandracooks.com/2012/11/07/my-mothers-peasant-bread-the-best-easiest-bread-you-will-ever-make/
OMG!! This recipe is truly a revelation!!! Your step by step instructions are clear concise and easy to follow and your pictures… fantastic!! Thanks for the inspiration!!(baking more bread was my one and only New Years resolution, and um, its June… LOL)
Wonderful to hear this Heidi!
OK so I decided to try this after I tried your mother’s Peasant Bread which was a hit! I took half the dough that I made last night and made rolls for dinner. My husband loved Them. This morning I am taking another portion of the dough and rolled it out and made the sticky rolls. They are rising right now and I am popping them in the oven shortly. Thank you for inspiring me to pick up a rolling pin and try it. I’m crossing my fingers to see if they turn out…I’m hoping they will.
Polly, wonderful to hear this. HOw did they turn out?
Your father-in-law put me onto your blog! I have loved all the recipes. I have attempted bread many times with poor results but am going to try this today.
I am afraid to try the chocolate cake, dick said it was fabulous and I am afraid I will eat the entire thing! Maybe when the family comes home.
Thanks for all the work!
Kathy, hi! It is so nice to hear from you, and I am so happy to hear that you have loved the recipes. My father-in-law is the best — am I not the luckiest daughter-in-law? I think I need to start paying him for the PR work he has done 🙂 Did you start the bread? You might want to try this one first: https://alexandracooks.com/2012/11/07/my-mothers-peasant-bread-the-best-easiest-bread-you-will-ever-make/ It’s SO easy, and it doesn’t require making a vat of dough and storing it for so many days. All you need are a couple of small pyrex bowls. Let me know if you have any questions with either of these recipes. Thanks for writing in!
Hi. I have just made the dough and it is currently doing its 2 hour rise on the bench. Once it has risen, can i bake a loaf straight away or does it HAVE to be refrigerated for a while first??
And if i am baking a loaf straight away, does it have to sit on the board for another 40 minutes as per step 6 in your instructions, or is that only for dough that has been refrigerated?
Hi Alison,
You can bake a loaf today after the first rise, but the dough is definitely easier to work with after it has been refrigerated, but if you are up for tackling this today, go for it!
Do let it rise a second time for 40 minutes.
Can the dough be frozen for later use ? There are only two of us and while I’m sure I could justify a great olive oil for dipping and eating the whole thing, it might throw my weight off a good bit !
Haha, I know, I have been eating bread (gluten free for experimental purposes only) all day long these past few days, so I hear your concern. Alas, I cannot say. I have frozen a different no-knead dough that is very wet in texture, and it bakes off beautifully in loaf pans. I just bring the dough to room temperature and bake it off in loaf pans once it begins rising again. I can’t say it will work here, but I think it’s worth a shot.
So I have this bread in the stove, finally. I really hope it tastes good bc it didn’t take 5 mins. I dont think it’s right you call it that. There are so many steps and to refrigerate over night? That’s not 5 minutes. And I was a bit confused when you tried giving directions on making it into a smooth ball.
The idea is that after you take the time to mix the dough and store it, the hands-on time is only five minutes a day. Sorry the bread didn’t work out for you!
Well, I was (and still am) excited to try this recipe. I love bread. No other way to put it! It was really easy to follow this recipe and the loaf turned out beautifully, until I tasted it! Very salty! I was quite surprised. So, I mixed up another half batch and quartered the level of salt and still way too salty. I tried again, this time barely a pinch of salt. Tasted the dough, still salty, but could be residual? I’m letting this last batch rise and will bake it to see how it turns out. Hopefully better than the first, because I really want that bread!
Thanks again for this post. Awesome find. If necessary, I will keep working with the recipe until I get a dough I like.
LOVE this recipe! I made it for my first ever attempt at scratch bread making last week and it was 100% easy and successful! I’m about to do a second batch but am curious about freezing baked loaves. Please forgive if you’ve already addressed this question-I looked through the comments and didn’t see this question. When you take a loaf out of the freezer, do you warm it in the oven or just leave on the counter before serving? If you suggest over, at what temperature and for how long? Thank you for your help!
I know you posted this a LONG time ago, but I have a question, in case you are still checking comments. If I am using active yeast (but not instant), do I need to proof the yeast? I’m looking forward to giving this a try. Just made your thyme dinner rolls for thanksgiving — everyone loved them! Thanks!
Made your grandmother’s peasant bread and lived it. Really is the simplest, tastiest bread you can make. Have another batch rising now. Thanks so much!!
Yay! So happy to hear this, Lisa!
It truly is. I make it so often that I can do it by heart at this point. It’s so easy and tasty that I always give one of them away at work and people think I’m some kind of amazing baker.
I make this bread a lot! I work 12 hr shifts, 14 on and 7 off. I make the dough when I get home, after I shower, feed the animals etc… I throw the dough in the fridge and when I wake up and start getting ready for work, the bread is baking and finished as I leave. Then I have fresh bread when I get home for my lunches… I have taken a load to work with just some oil and vinegar too!
I have added roasted garlic and cheese to the dough with excellent results! Though I only use 5 cups of flour , because the dough is really dry and crumbly if o use 6.5 cups.
A loaf!!!! Not a load! Lol
Great recipe! Just curious to know if you’ve ever cooked a 2lbs loaf and if so does the baking time change?
I haven’t, but I imagine if you baked it for about 45-55 minutes, it would be fine. Good luck!
The more you make this, the easier it gets. Experiment! Yesterday, I tried it with 1 cup of Walnut flour, 1/2 cup of Flax flour, 2 cups Artisan flour, and 3 cups of Kamut flour. I used 2 packets of yeast. 1 and a half tablespoons of coarse salt.
Mixed all dry ingredients in large container and then added 3 cups of lukewarm water, stirring to mix thoroughly. Let stand for 2 hours to rise. Then divided mass into two boules, waited about 30 min, and baked for 30 min at 450. Great, fluffy, flavorful bread rich in omega 3’s. Enjoy!
Nice! Sounds so good. I love walnut bread.
I am dying to try your recipe, but have a question before I do. When you are preheating it says to put the stone on the bottom rack. Do you bake the bread on the bottom rack right above the heating element? Thanks in advance!
Hi Georgia! I don’t actually use a stone anymore … I prefer the heated Dutch oven method described in this post for Jim Lahey’s No-Knead Bread. But if you are using a stone, I think you could place it on any rack in the bottom third or even the middle of the oven.
Hi Alexandra, If you make the big batch of dough, can you mimic the peasant bread with your baking instructions ( temp and time ) so that you can make your peasant bread in 5 minutes a day? How big of a piece do you grab off the batch to put in the qt Pyrex bowl (1/2 – 2/3) full? and how high up the bowl till you know when to toss it in the oven.
Hi Peter, I bet you could! I would pull of about 500 g of dough for each 1-qt bowl — do you have a scale? If you don’t have a scale, I would fill the bowls 2/3 full. As always: be sure to grease the bowl well with butter. From there, I think it’s just a matter of being patient and letting the dough rise till it crowns the rim of the bowl. This can take a long time if it’s cold out and if the dough has been cold, so just be patient. Good luck!
I love this bread but do you realize you have Tablespoons and not teaspoons listed for the salt? Against my better judgement I’ve followed this recipe to a “T” – perhaps you meant little t? It’s very salty!
Hi Kelly! A tablespoon is actually accurate. Did the bread taste salty or just the dough?
I just made this and it turned out great! My loaf turned out crusty and moist and I love that I barely had to put any effort into it.
The only thing is that I wish I had used more salt. I used Morton’s and followed the recipe exactly and I think next time I will double the amount.
What brand of Kosher salt do you use?
I like more salt, too. I use Diamond Crystal.
This is the absolutely best recipe for high altitude bread!!! I live in Denver and, in 36 years, have NEVER been able to make bread that rises like this does. I had to tweak the recipe for high altitude; i.e. using only 1 tsp yeast and adding the maximum amount of salt recommended but it turns out wonderful everytime. I’ve made cinnamon rolls, dinner rolls, all kinds of breads and they all turn out GREAT. There is only one problem; the bread will not toast. I’ve put it on the longest time in my toaster and also toasted it twice and still it is not brown. But, guess I’ll just have to live with that because I’ll keep using this recipe. I ABSOLUTELY LOVE IT!!!!
Try the rye bread – it’s yummy! I’m making two large loaves rather than four small. I’ll bake off the second tomorrow morning to take with for the cousin who’s making a corned beef dinner, The hardest part has been finding rye flour. I want to make the semonlina bread next as it’s no longer available here. This is bread baking at its easiest!
I should have noted that I don’t add water to the oven, instead using the roasting pan method. I spray the loaf and the inside of a roasting pan with water and place the pan over the loaf. Bake that way for 20 min, then uncover and bake 10-15 min longer, or until the bread registers 190+ on an instant read thermometer. I also let the shaped loaf rise for 90 min. before baking.
Thank you for this, Jane! I’ll definitely give the rye bread a try.
Awesome recipe and soooo easy!!
Can this recipe be halved?
Yes!
I’ve made the deli rye from this book and it was very good. I made half a recipe so as to have a good sized loaf. I also used a brotform for the final rise. Finally, because pouring hot water into a hot pan sounds like an invitation to a burn, I used the roasting pan lid method of baking a’la Northwest Sourdough. Preheat the lid of a large roaster for about 5 minutes, spray your loaf liberally with water before you put it in, cover it with the lid, bake about 15 min. The lid traps the steam. Uncover and bake another 10-15 min or until the internal temp is 190. I like an aggressive crust and often leave the loaf in a little longer. It doesn’t dry out. I see that the author covers this method on p 20 of the book.
Great to hear this. Thanks for sharing, Jane!
hello! i’ve made this bread three times before and every time the dough rises weirdly, almost like a mushroom cloud? i was wondering if you know why that is?
Hi Holly! I have to be honest … I haven’t made this recipe in ages, so I don’t feel well equipped to troubleshoot. If you are looking for an excellent, artisan style bread, I would try this one: Jim Lahey’s Overnight No-Knead Bread
What is T.? Table spoons? My bread looks and smells lovely.but came out on the salty side.
Hi Liliana! T = tablespoon. 1 tablespoon = 3 teaspoons. Hope that helps! I now weigh salt, and on average, I would say 1 teaspoon = 5 grams salt.
Hello I am new to keto eating. Yes like many I do miss my breads. Can you please help me with this recipe conversion for keto?
Hi Linda! I am not the one to ask regarding anything Keto … so sorry! But I know there are fantastic resources out there for keto bread … good luck in your search!
I’m a BIG fan of your peasant bread and have taught my 7 year old son to make it too! We make it at least once a week. How does the taste and texture of this bread compare to the peasant bread? It almost seems like it’s too much work when compared to your peasant bread.
Hi Elaine! I have to be honest, I never make this bread anymore. I loved it when I first learned it, but I do find the peasant bread simpler and I think the flavor is just as delicious as well. I would stick to the peasant bread 🙂 🙂 🙂 And yay for teaching your 7-yr old son to make it.
Hi, Ali! Your mother’s peasant bread was the very first bread I’ve ever made from scratch, and it was great! I’m just starting to go through your other recipes now. Quick question: What does it mean for a container to be “lidded but not airtight”? And do you still want it not airtight while resting in the refrigerator, too? Thanks so much!
Hi Gerry! So nice to hear this. I think the idea with a lidded but not airtight vessel is that you want to allow some air to escape so that the vessel doesn’t explode. This is why using a glass vessel with a gasket seal and clamp is not advised. You can use a glass lid without a seal and clamp because some air will escape. I have a few Cambros that have plastic lids that I close pretty tightly and they work just fine — it just shouldn’t be super duper sealed, if that makes sense.
Hope that helps! Also, if you are looking for a “artisan” bread style bread, this is my favorite recipe: Jim Lahey’s Overnight, No-Knead Bread