
Gluten-Free Peasant Bread Recipe
This post may contain affiliate links. Please read my disclosure policy.
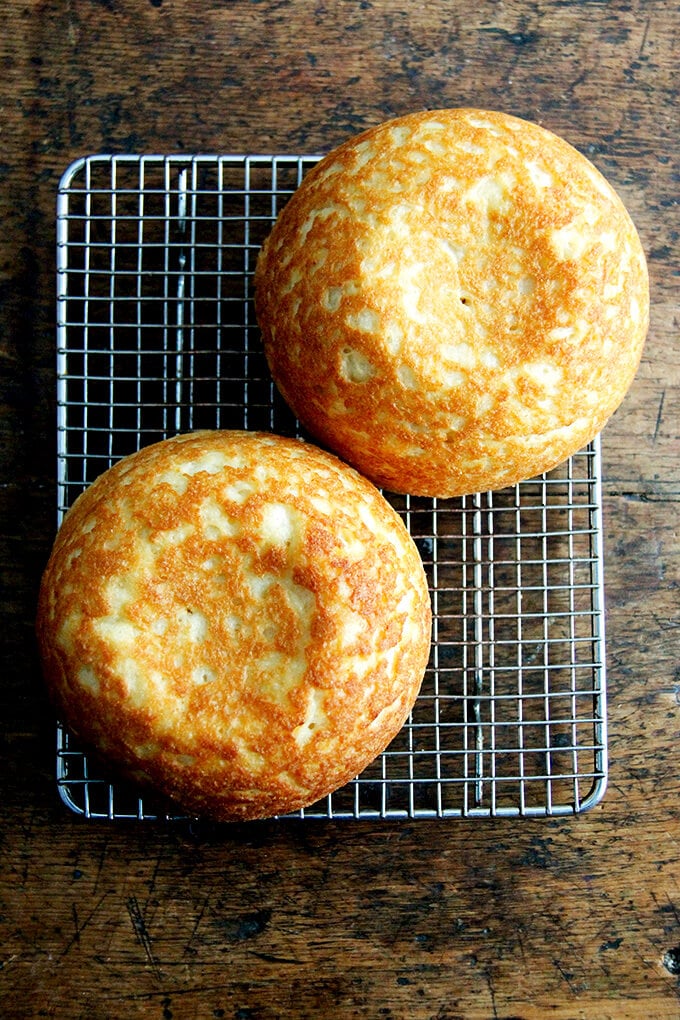
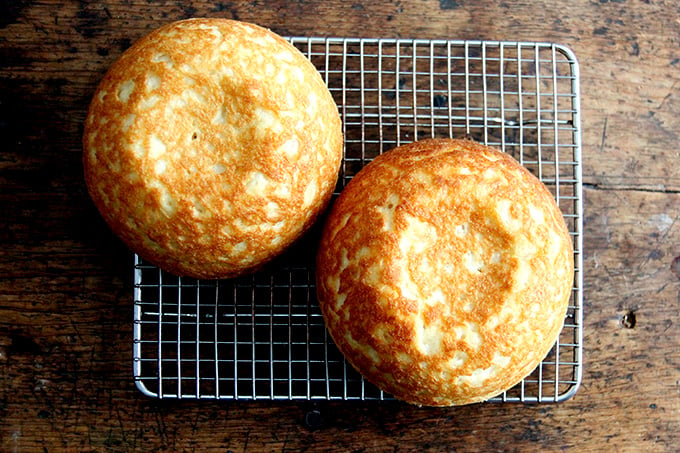
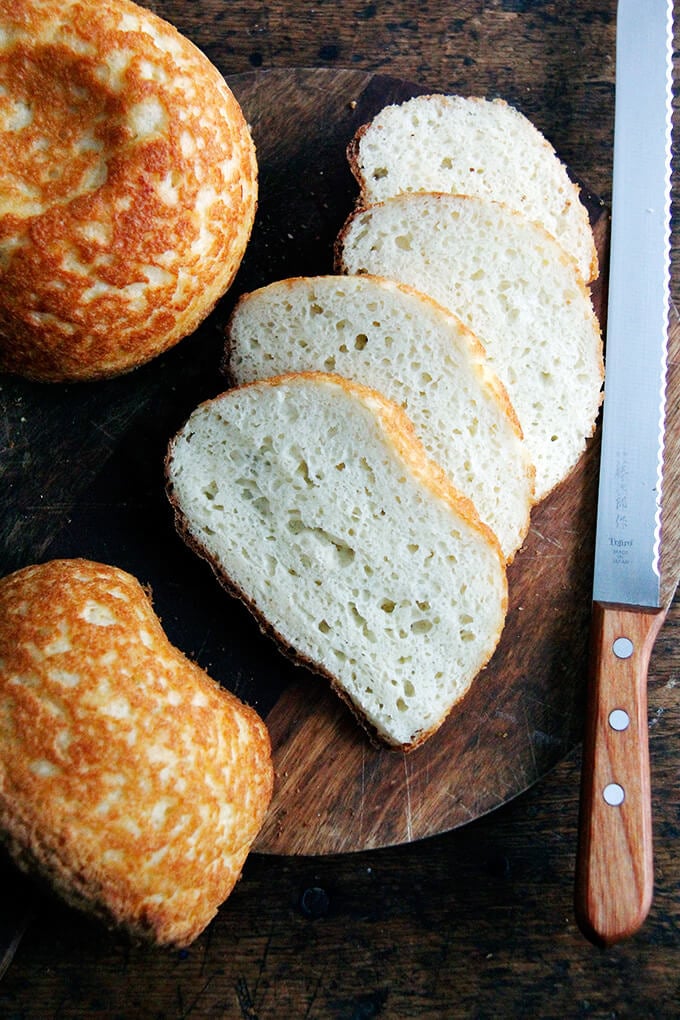
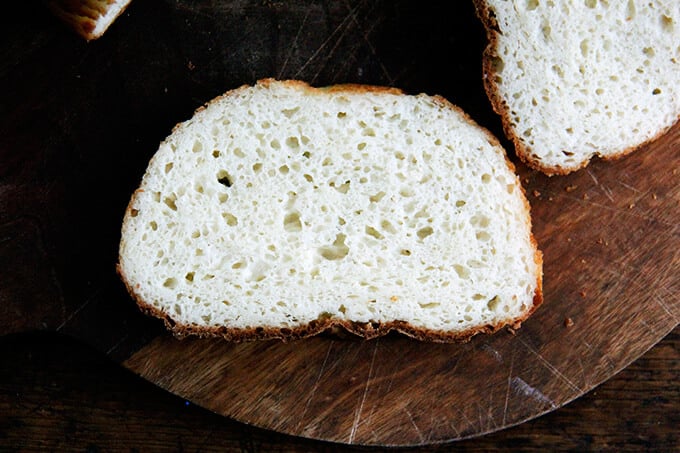
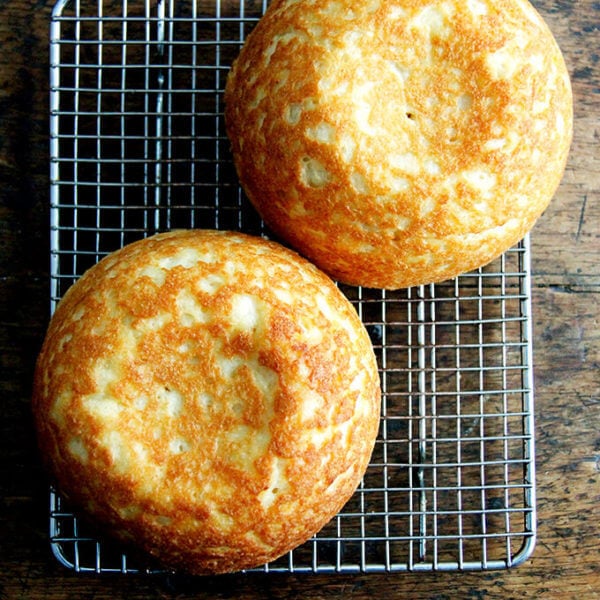
This gluten-free peasant bread has such a nice texture — soft and spongy, light and moist — and moreover, when sliced, the pieces hold their shape. Bread lovers, even those not adhering to a gluten-free diet, rave about the texture and flavor of this bread. This recipe comes from my cookbook, Bread Toast Crumbs!
For the past year, the most frequent question asked on this blog is this: Can the peasant bread be made gluten-free?
Everyone knows someone — a friend, an uncle, a cousin — recently diagnosed with Celiac disease who has had to forget bread as he/she once knew it.
You might have this friend, this uncle, this cousin. I do. And you might want to treat him/her to a loaf of freshly baked bread but you don’t know where to begin.
This is the position my mother found herself in a month ago while preparing for the arrival of her brother-in-law, who had recently adopted a gluten-free diet. Panicked by the thought of serving dinner without warm, fresh bread on the table, she called asking if I had ever successfully made the peasant bread gluten free. I answered as I have to everyone who has asked thus far: no, not yet.
It seemed like a good time to take an earnest stab at making a gluten-free peasant bread. Unfortunately, a respectable loaf did not materialize before my uncle’s arrival, but one has since.
Gluten-Free Bread Baking Tips
- For every cup of flour (128g), use about a teaspoon of xanthum gum.
- For every 2 cups of flour (128g), use 1 egg.
- Use a little more yeast proportionally to help lighten the bread’s texture.
- Use a high-quality gluten-free mix, such as C4C or King Arthur Flour. If your gluten-free flour mix contains xanthum gum, no need to add additional.
Gluten-Free Peasant Bread Recipe
- Total Time: 2 hours
- Yield: 2 loaves
Description
From my cookbook, Bread Toast Crumbs.
For best results, use a digital scale. It makes all the difference with bread baking.
Note: If you are using a different brand of gluten-free flour, you may not need all of the liquid. Because all gluten-free flours and mixes absorb water at a different rate, you may find your dough to be much more liquidy than mine — this is due to the flour. This is what I suggest: add the liquid a little bit at the time, mixing with a spatula to combine. Reference the video to see what the dough should look like as far as texture goes.
Loaf Pan: I have not tried this yet, but someone emailed me recently letting me know she bakes the entire batter in a 9×5-inch loaf pan, so if you don’t have the 1-quart Pyrex bowls, know that a 9×5-inch loaf pan is an option.
Ingredients
- 4 cups (500 g) gluten-free flour—my favorite is Cup4Cup, see notes above if using a different type of gluten-free flour
- 2 teaspoons (10 g) kosher salt
- 2 1/4 teaspoons (8 g) instant yeast
- 2 cups (455 g) lukewarm water
- 2 tablespoons (42 g) honey
- 2 eggs lightly beaten
- 2 tablespoons (28 g) olive oil or grapeseed or other neutral oil
- 1 teaspoon (4 g) white wine or cider vinegar
- softened unsalted butter for greasing
Instructions
- In a large bowl, whisk together the flour, salt, and instant yeast. In a medium bowl, pour the water over the honey and stir to dissolve. Add the eggs, oil, and vinegar. Add the wet ingredients to the dry and mix with a spatula to form a batter. (See notes above if you are using a different brand of gf flour.)
- Grease two 1-quart oven-safe bowls (or a 9×5-inch loaf pan, see notes above) with the softened butter—be generous. Divide the dough evenly between the prepared bowls. With wet hands, smooth the surface of the dough. Let the dough rise in a warm or draft-free spot for 30 to 45 minutes, until the top of the dough just crowns the rims of the bowls — this may take longer… just be patient and wait till the dough crowns the rim: it might take as long as 2 hours if your kitchen is cool. Halfway through the rising, set a rack in the middle of the oven and preheat it to 425 degrees F.
- Transfer the bowls to the oven, and bake for 15 minutes. Reduce the heat to 375 degrees F and bake for 17 to 20 minutes more, until golden all around. Remove the bowls from the oven and turn the loaves out onto the cooling racks. Let the loaves cool for at least 20 minutes before cutting.
- Prep Time: 15 minutes
- Cook Time: 40 minutes
- Category: Bread
- Method: Bake
- Cuisine: Gluten-Free
This post may contain affiliate links. Please read my disclosure policy.


528 Comments on “Gluten-Free Peasant Bread Recipe”
Namaste GF Flour, I get 2 5lb bags on Amazon for $40, is what we use and there is nothing i can not make with it including bread, i would love to try this recipe, i just use the regular recipe, i dont have to follow GF recipes with this flour, i works jut like regular flour. There is a organic GF version also.
I love this recipe! Is it possible to bake one large loaf, instead of the two smaller ones from this recipe? I’d like to have sandwich-sized slices. I’ve found I need to give the bread more rising time than indicated in the recipe, and I follow your advice to bake at 425 throughout, rather than lowering the temp part way through baking. My gluten-free husband is thrilled with this bread. Even earlier failures were good – I just turned the flattish loaves into zweiback-like crunchy crackers!
Wonderful to hear all of this! I think you could use a larger pan or a loaf-style pan, but I would make sure it’s large enough: you would need a 10x5x5-inch pan for this amount of dough. There are loaf pans made specifically for gluten-free breads. Since you have a g-f husband and are committed to g-f baking, it might be worth looking into. I love the USA pans.
This is the same flour I use .. have you successfully made this gf bread ? I can’t seem to get it right !!
I made this bread over the weekend. I followed the instructions exactly, using the same ingredients (C4C and Saf Instant yeast). SO easy – even easier than I imagined after reading the recipe! And the bread turned out beautifully. I don’t eat gluten-free, but I hosted friends who do, and we all agreed it was delicious. The best part: we only ate one of the loaves, so I’m enjoying the rest of the bread as toast all week.
I live in Denver, at 5280′, and it worked perfectly as-is. I didn’t make any high-altitude adjustments.
Five stars!
Wow, amazing! So great to hear all of this Christina. Baking at altitude is tricky; g-f baking is tricky; the combination might deter some all together. So happy this worked out 🙂
Spectacular, what a perfect way to spend a chilly damp fall day making soup and this GF bread. Thanks awesome momma for filling my home with warmth today.
Awww Lindsey, it’s so nice to see your name here 🙂 🙂 🙂 Wishing you a happy happy Thanksgiving. Grateful for you and your family. xoxo
Loved this recipe, made it twice now with ease and great success. Whole family (even those not gluten free) loved it! Can I scoop this into a muffin tin to rise and to make small rolls instead? Or after it rises, can you tear little balls off to bake rolls? I know the timing would be different, less.
Wonderful to hear this! I think you probably could make rolls — no knead to let the dough rise once before shaping into smaller rolls. I would try the muffin tin. Mix the dough, portion into muffin tins, and let it rise. The worry with free-form baking with g-f bread is that there just isn’t enough strength in the dough to keep the shape. Hope that helps!
So I decided to try and turn this recipe into rolls….
I used 6 extra large muffin tins and using a large ice cream scooper I filled them with half the dough. The other half I baked as usual in a glass bowl. I followed the recipe as written for the muffin tins and the rolls turned out beautifully and delicious!!
They are so cute and ‘rustic’ looking. I took a picture of them and can send it to you if you’d like.
Thanks again for this awesome recipe!!😀
I would love to see the picture if you have time: alexandra@alexandracooks.com So happy to hear all of this, Julia! Smart to use the jumbo muffin tin 🙂
Hi Alexandra,
I’ve made this bread many times and love it, thanks so much for posting it!!
I would really like to Try this recipe for making rolls instead of loaves. Do you have any suggestions on baking time?
Thanks so much,
Juliaz
So happy to hear this Julia! I think baking time will be roughly the same. I worry about the potentially frustrating step of trying to form this g-f dough into rolls. I just don’t know how they’ll hold up.
Do you still recommend using a tsp of xanthum gum for every cup of GF flour?
Michelle, maybe! The truth is that when I do gluten-free baking, I only use Cup4Cup gf flour now, which means xanthum gum is unnecessary. That said, with other mixes, it might be a good idea — it certainly couldn’t hurt. I should note, however, I don’t do too any gluten-free bread baking apart from this recipe, so I am maybe not the best person to ask on this subject. Hope that helps somewhat.
I adore this recipe. My bread tasted like bread!! It was a wonderful texture, soft on the inside and crispy on the outside. Thank you!
Tried making this recipe today. for GF flour, I only have Bob’s Red Mill all purpose flour – ie without xantham gum. So I put in 3 tsps, as an experiment (since I know too much of the gum can make the bread, well, gummy!)
The batter was v wet but the loaves looked lovely when I took them out of the oven. However, an ominous sign was how they began to collapse under their own weight, almost immediately, after I turned them out onto the rack.
Fast forward 6 hours: I got home from work, sliced the loaves – and sure enough, there were large moist/gummy areas in each. Mostly down by the bottom! So that made me think they were at least partially raw, and that in turn made me wonder what happened.
I think 2 potential culprits =
1) more xantham gum needed. I only used 3 tsp, for the reasons outlined above – do I need 4 instead?
2) longer rise needed. Because I had to go to work right after baking, I only let the loaves rise for 35 min. Though that is within the window in the recipe, I wonder if a longer rise would help. they did get some good height in the oven, but they had that tear on the side that indicates “under proving” (as GBBO would have it).
Anyway, sorry for the lonnnng post. I’m just curious as to what people think. I’d like to get this recipe right, since the bit of bread I tried (from near the top of the loaf, where it seems more baked) tasted delicious!
Hi Sarah! OK, a few options:
1. Try another teaspoon of xantham gum.
2. Let the rise go longer and wait for the visual cue of the dough rising above the rim of the bowl before sticking the bowls in the oven … this can take an hour, especially when it’s cold out.
3. Try Cup4Cup flour … I don’t do too much gf baking, but I’ve had the best results with that brand.
4. Maybe bake the loaves a little longer. Is your oven generally accurate? How long total do you think you baked the loaves?
Also: are you using a scale to measure the flour?
Instead of the gum can u use arrow root starch?
Hi Lori, I don’t know … I always use cup4cup flour mix these days, so I haven’t experimented with alternatives to xanthan gum. I just did some googling, and it looks as though there are many alternatives to xanthan gum, but it’s not necessarily a 1:1 swap. This is the only gf bread recipe I bake, which is to say, I am not an authority on gf bread baking … I would reach out to someone whose focus is gf bread baking. It’s such a tricky one to master. Wish I could help more!
Can this be made with almond flour
I don’t think so … I highly recommend using Cup4Cup or KAF gluten-free flour (measured with a scale!) to start; then you can try mixing it up based on your results. I think almond flour will make for a very crumbly or very dense dough.
I don’t have any 1 quart oven safe bowls and haven’t been able to find any. Any ideas!
You can order them directly from Pyrex or you can use the 1-qt and 1.5 qt bowls from this set: 3-Piece Pyrex
Is it possible to make this with flax eggs? My husband has just about every food allergy possible, the big ones being gluten, dairy and eggs.
I’ve been trying to find a bread recipe that works!
Britany, I made my loaf using The Plant Based Egg, added to the dry ingredients, plus the appropriate amount of extra water to the wet ingredients to replace the moisture from the eggs.
I use The Plant Based Egg in place of xanthan gum whenever I have to mix up a DIY flour blend like I did for this bread (I don’t stock Cup4Cup, so I had to follow a recipe for Mock C4C). The thing about The Plant Based Egg is that, if I use it to replace the xanthan gum in the flour blend, I then MUST use it to replace the eggs in the recipe–else the end product will be remiscent of a brick.
(You can buy The Plant Based Egg at Amazon. No I was not paid to write this comment. I simply like the product!)
I’m totally going to check out The Plant Based Egg … thank you! I’ve never heard of it.
Hi Alexandra,
I have not made this bread yet, but have a question. What is the difference between active dry yeast and instant yeast? Can I use active dry yeast for this recipe, since I already have it on hand?
Thank you!
Yes, you can! I would combine the lukewarm water with the honey, and sprinkle the yeast over top. Let it stand till it gets foamy, 15 minutes or so, then proceed with the recipe.
Thank you! I will try this.
This is the BEST gluten free white bread recipe I’ve ever tried! I made this today to have with the white chicken chilli I had cooking in the slow cooker. I sliced it right away after taking it out of the oven. I can actually slice it thinner than I usually can with the average home made loaf; it’s not very crumbly, especially in comparison with the average GF bread; the mouthfeel is AWESOME, slightly chewy, just like really good homemade bread; and it is about as dense as a non-GF home made bread.
Mom (non-GF, but an eager guinea pig) raved about it. Daddy said “eh it’s ok,” which is actually a compliment.
This is definitely a “do-again” recipe! I’ll be using it to make sandwich buns, I think.
Some changes i was forced to make: I don’t keep C4C flour on hand because, in my experience, it isn’t quite “all purpose.” However I did have glutenfreeonashoestring’s recipe for “mock cup for cup,” so I mixed that up. Since I also don’t have xanthan gum, I used The Plant Based Egg in the flour blend, which necessitated using it to replace the eggs too (i added the appropriate amount of extra water to replace the moisture of the eggs). And i didn’t have vinegar or lemon juice, but i noticed a jar of pickles, so I used a teaspoon of pickle juice. Can’t taste the pickle, which is good because I hate them.
I am so happy to hear this, Sarah! Thanks so much for writing and for sharing your changes …it’s so helpful for others to hear especially in regard to the egg replacement. Thanks!
Have you made this in a loaf pan? Would that work? don’t have oven safe bowls.
Yes! What size loaf pan do you have? I would suggest nothing smaller than a 10×5-inch pan for the whole batch of dough. If you have a smaller loaf pan, be sure to fill it no higher than 3/4 full.
I think it’s a 8.5×4.5 – good call on the 3/4 full, I’ll try that. Thanks!
Great!
I tried this recipe in half and put it into a 1 qt pyrex bowl, but it spilled over the edges in the oven, any suggestions? (I used Active dry yeast and had to add xanthum gum to it because I used Bob’s Red Mill Gluten free flour)
Hmmm… strange. How high had the dough risen in the bowl before you stuck it in the oven? Two thoughts: don’t let it rise as high next time; use a larger bowl. Do you have a 1.5 qt bowl? Sorry for the trouble! I’ve never had an issue with spilling with this one, but I always use SAF instant yeast, and I use Cup4Cup … subtle details with bread can make big differences sometimes.
followed recipe however it never turned into dough. Just a very wet batter; like a cake batter. I will see if it rises but I doubt it will turn into anything edible. Not sure what I did wrong.
Did you use a scale to measure the flour? Also what brand gf flour did you use? All gf flours absorb water at different rates. Next time, I would mix up the wet ingredients, and add them slowly to the dry. Reference the video so that you can see what texture the dough should be. It’s definitely wet, but it’s not pourable.
This was my first time in a LONG while making bread & it turned out fantastic! Thankfully a friend had some yeast and thankfully I was looking for GF flour when I went to the store (all the regular flour was gone thanks to COVID 19). It was comforting at at time like this to bake. It took me back to when I was a little girl making bread with my grandmother!
So, if you have yeast and flour, I recommend baking and maybe sharing with those who don’t. My friend did the drop and run method of bringing me over some yeast! Challenging times can bring people together in significant ways even when we’re physically distancing. 🤗
I’m so happy to hear this, Kim. And yes, it is heartening to see how baking and cooking has connected people during these troubling times.
This was the first homemade bread I have had since I was diagnosed as allergic to wheat. Absolutely delicious. Thank you for a fabulous recipe.
So happy to hear this, Debbie!
hello i made this once and well the ”batter” came out to look like a dough of bread yet i followed the recipe and it wasn’t as liquidy as yours was in the video???
Hi Jeremie! It no doubt has to do with the type of gluten-free flour you are using. What brand are you using? And are you using a scale to weigh the flour?
If I am using a 9 x 5 loaf pan do I still use the same baking instructions of 425 and then reduce? I see in your non-GF version there are different baking times/temperatures if using loaf pan vs pyrex 1 qt bowls.
I would reduce to 375ºF after 15 minutes. Hope I’m getting to you in time!
Yay!!! finally!! I only had two cups left of my cup4cup, because I had attempted many different recipes!! yours is delicious!! I forgot to turn the oven down after 15 minutes, but luckily no burning and the bread is delicious, moist, great texture!! Now I need a sourdough option!!!
Thank you – sooo good and EZ!!!
best – Maria
Wonderful to hear this, Maria! I have yet to venture into the sourdough gluten-free world, but I would imagine this would be pretty easily adaptable once you get a gluten-free sourdough starter going??
I tried this recipe last week. It didn’t rise at all. I was thinking maybe because the yeast wasn’t proofed. Trying again this week,but proofing yeast separately. It is halfway through rising but it still isn’t. Any suggestions? This bread is good, but dense.
What kind of yeast are you using? Are you ensuring the water isn’t too warm?
Sometimes this dough definitely takes longer to rise, especially in a cold kitchen. I’m likely too late here, but if you have the time, just be patient with the rise … let it crown the rim of the bowl before sticking it in the oven.
What size bowls are you using?
Hi,
Can you freeze half of the dough for later? If so, when do you freeze and what would be the process to bake after frozen?
Thanks!!
Hi Laura! I haven’t tried with this recipe, but I have with pizza dough. I freeze after the first rise with pizza dough, but for this recipe, that would mean after you mix the dough. So, you would plop half the dough in a buttered bowl and plop the other half in an airtight vessel and transfer to freezer immediately. Frozen dough an take 2 days to thaw in the fridge or 1 day at room temperature. I would thaw it completely in the airtight container; then transfer to buttered bowl and proceed with the recipe.
Just a heads up: I cannot make any guarantees here as I have not tried this. The eggs concern me a little bit.
Thanks!
Made the bread for the first time and it was delicious even to those in our family who eat gluten!
Wonderful to hear this, Laura!
I think it would be wise to bake it. Cool it and then freeze it.
Hi, I’ve followed this recipe exactly but used a 10×5″ loaf tin and it looks fantastic, however, sliced it in the middle and it’s completley raw and still sort of batter like.
Any ideas what I can do next time to stop this happening? But still using a loaf tin!
Hi Milly! I would increase the baking time by at least 15 minutes. If you have an instant read thermometer, you can test the bread with it. It should register 205ºF or above.
Best tasting gf bread recipe that I’ve tried. I keep most of the sliced loaf in the freezer & toast a slice or two as I need it. Easy recipe, well worth making again!
Wonderful to hear this, Char!
Can I bake this in a Dutch oven? I don’t have oven safe glass bowls. 😞
How big is your Dutch oven? I think it might be too big for this recipe.
I’ve tried your recipe about 6 times now. First time had a great result, but since I’m getting Mixed results. My bread seems to sink in the middle within minutes of coming out the oven, also there seems to be a large gap between the crust and the main part of the bread, And that no matter what I do, the bread remains doughy at the bottom. I did switch from glass bowls to bread baking tins as our bowls aren’t big enough to give a decent sized loaf. Could this be something to do with the results?
Hi Dawn! Are you using a scale to measure the flour? And what type of gf flour are you using?
I am going to try this recipe and use Doves Farm plain flour (that’s all I have). Do I need to add baking powder e Xantham gum? And if so, how much of each?
Thank you!
Nicola
No baking powder. I would check the ingredient list, and if there is no xanthan gum on the ingredient list, I would use 4 teaspoons.
Word of caution here: every brand of gf flour absorbs water differently, so I would mix your wet ingredients; mix your dry ingredients; then slowly add the wet ingredients and stir until the dough looks like the dough in the video — it’s a wet dough, but it shouldn’t be like batter.
This recipe is AMAZING! It is so simple, and fool proof! I have made it so many times and am so grateful for it! Thank you so much!
Wonderful to hear this, Krystal!
Hi Ali,
How would your mixing directions change if one were to use a KitchenAid mixer? And which type of attachment would you choose (not the dough hook of course)? (Can’t rate yet b/c I am about to make it!)
I think I’d just use the paddle attachment!
Also! I keep meaning to add notes to the recipe, but word of caution here: every brand of gf flour absorbs water differently, so I would mix your wet ingredients; mix your dry ingredients; then slowly add the wet ingredients and stir until the dough looks like the dough in the video — it’s a wet dough, but it shouldn’t be like batter. You may not need all of the wet ingredients.
What brand of gf flour are you using? And are you using a scale?
I’m using Cup4Cup and I do have a scale. I will also be using dry active yeast. I’m pretty sure the liquid ratio will work out since I’m using the same flour. 🤞
perfect!
Just an update for you and those reading. The dry active yeast substitution and the mixer use came out amazing! This recipe was a hit with my wife (and that’s the best praise of all ;)). Also, I did add a hint of dried rosemary…
Wonderful to hear this, Alex! Thanks for reporting back! Dried rosemary sounds so good.
I sincerely almost cried when I first tried this. It was my first-ever attempt at making a GF yeast bread… something I thought I’d never eat again, bc GF bread is generally not very good. Holy cow. I’m so excited!
I’ve been experimenting with GF baking lately, and really wanted to try to make a yeast bread. This is the first recipe I’ve tried. I made it exactly as described (using a GF all-purpose flour blend I found at Walmart, because they didn’t have Cup4Cup), except I needed to give it about 45 minutes to rise. I did half in a Pyrex bowl as described, and the other half in a muffin tin to make rolls (I made about 10 rolls- 425 for 15 minutes, then 350 for 5 minutes) and brushed both rolls and bread with melted butter when I was done. Even my kids, who aren’t GF, were surprised and are begging for more as we speak. I don’t know what the texture is like once it’s cooled all the way, but fresh out of the oven with butter, it is indistinguishable from classic home-baked bread in both taste and texture! Well done!
Oh Katie, yay! I’m so happy to hear all of this. Nice job letting the rise go longer … I think it’s important to be patient at this step to ensure the bread isn’t too dense in the end.
This recipe was so easy and I am a gluten free beginner baker. It turned out perfect.
I’ve tried three other recipes that were dense or dried out. I will keep using your recipe.
Thank you.
Wonderful to hear this, Dorothy!