
Gluten-Free Peasant Bread Recipe
This post may contain affiliate links. Please read my disclosure policy.
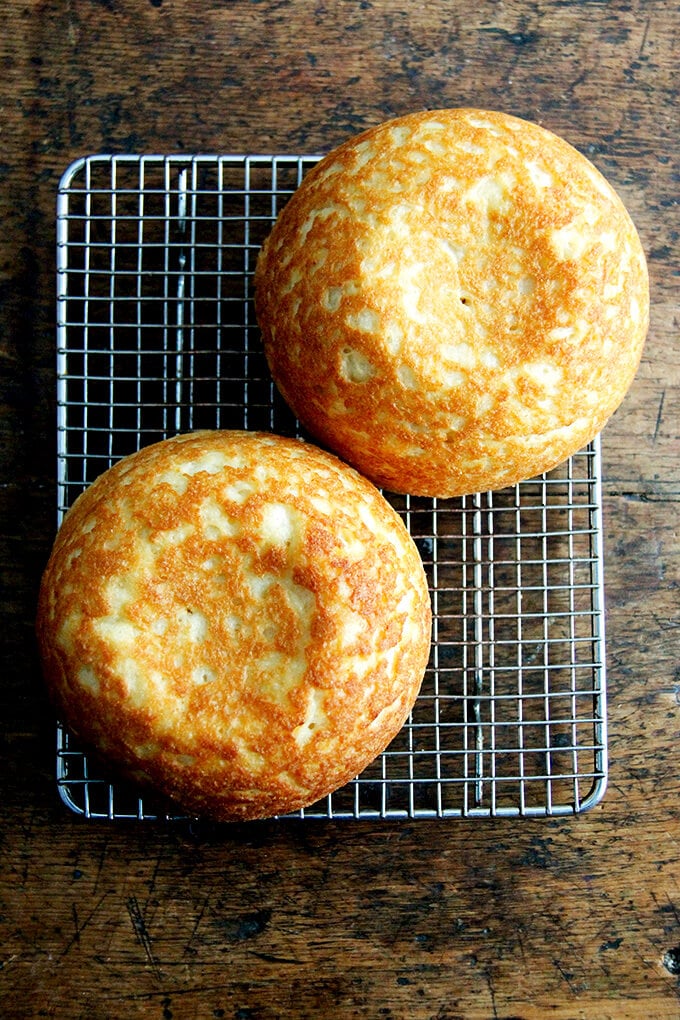
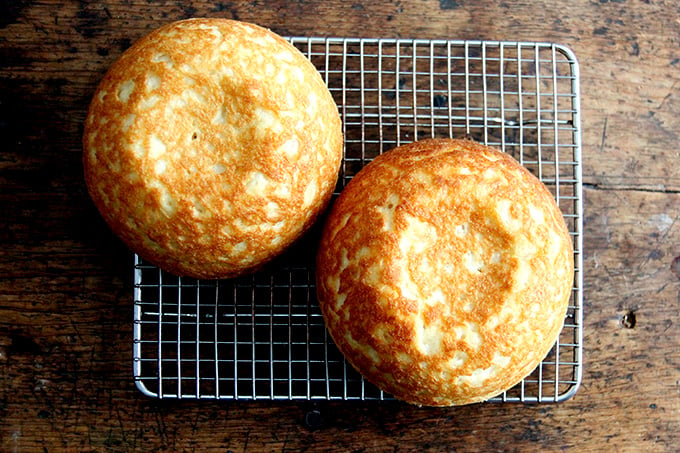
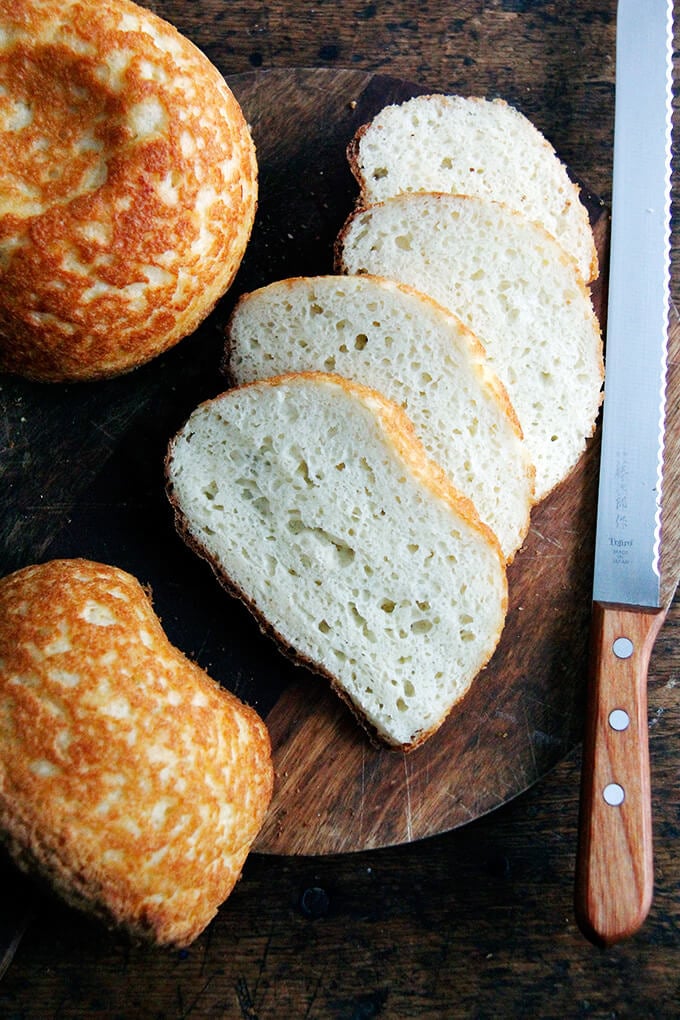
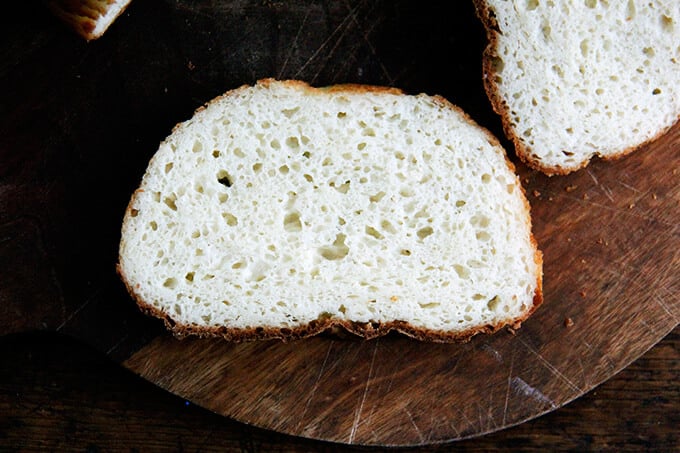
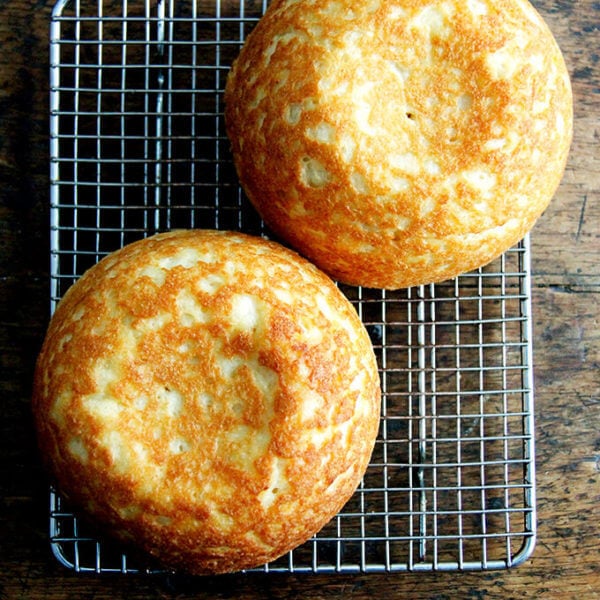
This gluten-free peasant bread has such a nice texture — soft and spongy, light and moist — and moreover, when sliced, the pieces hold their shape. Bread lovers, even those not adhering to a gluten-free diet, rave about the texture and flavor of this bread. This recipe comes from my cookbook, Bread Toast Crumbs!
For the past year, the most frequent question asked on this blog is this: Can the peasant bread be made gluten-free?
Everyone knows someone — a friend, an uncle, a cousin — recently diagnosed with Celiac disease who has had to forget bread as he/she once knew it.
You might have this friend, this uncle, this cousin. I do. And you might want to treat him/her to a loaf of freshly baked bread but you don’t know where to begin.
This is the position my mother found herself in a month ago while preparing for the arrival of her brother-in-law, who had recently adopted a gluten-free diet. Panicked by the thought of serving dinner without warm, fresh bread on the table, she called asking if I had ever successfully made the peasant bread gluten free. I answered as I have to everyone who has asked thus far: no, not yet.
It seemed like a good time to take an earnest stab at making a gluten-free peasant bread. Unfortunately, a respectable loaf did not materialize before my uncle’s arrival, but one has since.
Gluten-Free Bread Baking Tips
- For every cup of flour (128g), use about a teaspoon of xanthum gum.
- For every 2 cups of flour (128g), use 1 egg.
- Use a little more yeast proportionally to help lighten the bread’s texture.
- Use a high-quality gluten-free mix, such as C4C or King Arthur Flour. If your gluten-free flour mix contains xanthum gum, no need to add additional.
Gluten-Free Peasant Bread Recipe
- Total Time: 2 hours
- Yield: 2 loaves
Description
From my cookbook, Bread Toast Crumbs.
For best results, use a digital scale. It makes all the difference with bread baking.
Note: If you are using a different brand of gluten-free flour, you may not need all of the liquid. Because all gluten-free flours and mixes absorb water at a different rate, you may find your dough to be much more liquidy than mine — this is due to the flour. This is what I suggest: add the liquid a little bit at the time, mixing with a spatula to combine. Reference the video to see what the dough should look like as far as texture goes.
Loaf Pan: I have not tried this yet, but someone emailed me recently letting me know she bakes the entire batter in a 9×5-inch loaf pan, so if you don’t have the 1-quart Pyrex bowls, know that a 9×5-inch loaf pan is an option.
Ingredients
- 4 cups (500 g) gluten-free flour—my favorite is Cup4Cup, see notes above if using a different type of gluten-free flour
- 2 teaspoons (10 g) kosher salt
- 2 1/4 teaspoons (8 g) instant yeast
- 2 cups (455 g) lukewarm water
- 2 tablespoons (42 g) honey
- 2 eggs lightly beaten
- 2 tablespoons (28 g) olive oil or grapeseed or other neutral oil
- 1 teaspoon (4 g) white wine or cider vinegar
- softened unsalted butter for greasing
Instructions
- In a large bowl, whisk together the flour, salt, and instant yeast. In a medium bowl, pour the water over the honey and stir to dissolve. Add the eggs, oil, and vinegar. Add the wet ingredients to the dry and mix with a spatula to form a batter. (See notes above if you are using a different brand of gf flour.)
- Grease two 1-quart oven-safe bowls (or a 9×5-inch loaf pan, see notes above) with the softened butter—be generous. Divide the dough evenly between the prepared bowls. With wet hands, smooth the surface of the dough. Let the dough rise in a warm or draft-free spot for 30 to 45 minutes, until the top of the dough just crowns the rims of the bowls — this may take longer… just be patient and wait till the dough crowns the rim: it might take as long as 2 hours if your kitchen is cool. Halfway through the rising, set a rack in the middle of the oven and preheat it to 425 degrees F.
- Transfer the bowls to the oven, and bake for 15 minutes. Reduce the heat to 375 degrees F and bake for 17 to 20 minutes more, until golden all around. Remove the bowls from the oven and turn the loaves out onto the cooling racks. Let the loaves cool for at least 20 minutes before cutting.
- Prep Time: 15 minutes
- Cook Time: 40 minutes
- Category: Bread
- Method: Bake
- Cuisine: Gluten-Free
This post may contain affiliate links. Please read my disclosure policy.


524 Comments on “Gluten-Free Peasant Bread Recipe”
I can’t explain how much I love this gf bread! So easy to make, and the best taste and texture of any gf bread I have made or bought. Stays good for days! Thank you!
So great to hear this, Valerie! Thanks so much for writing 🙂 🙂 🙂
Hi Ali,
Is it necessary to make in 2 bowls? I’m wondering if I can use my cast iron Le Creuset.
Looking forward to making bread.
Regards,
Maureen
Not necessary! The shape will just be different. How large is the Le Creuset?
5 quart. I was hoping to make one larger as opposed to 2.
Thanks so much for replying 😊
That should be great! Just butter it well 🙂
Thank you so much! I will let you know how it turns out.
Hello Ali… I have your “Bread Toast Crumbs” cookbook and absolutely love it. I’ve made everything in the cookbook… except the gf version of the peasant bread. Our neighbor next door has a 10 year old boy that was diagnosed with Top 8 allergies. I would love to make the peasant bread for him since we enjoy it so much. I have all the ingredients I need, but was wondering if I could grease the bowls or bread pan with coconut oil. Have you ever come across this question? I reviewed the comments and didn’t see anything. I am asking because I have had the pleasure of the breads sticking once… bummer! Since the gf ingredients are a bit pricey, I don’t want to waste anything. Thanks for your help!!
Hi Marilyn! Apologies for the delay here. Thank you for your kind words regarding BTC … means a lot. You are too sweet to want to bake for your neighbor. You can use room temperature (as in solid) coconut oil… be generous! Or you can use vegan buttery sticks, which is what my vegan friends use.
Sticking is such a bummer! Good luck with the g-f bread. The ingredients are so pricey. Hope your neighbor loves it 🙂
Excellent, so glad I found this recipe!
Great to hear, Susan!
Hi, I am a “skip right to the recipe” kind of gal, but you have made me want to learn by how successful your recipes are and all the tips you provide. I am NOT a baker at all, but I am considering buying your book just to become more well rounded in the field.
I am making your mothers peasant bread for my family and this gf recipe for me. I opted of for C4C because of the dairy content. I have King Arthur flour but it is a 1:1 ratio. On the package it recommends not to be used for bread making. I also have Bob Mills AP flour. Which one would be a better option?
hi! and thank you 🙂 🙂 🙂
Can you clarify? You do not want to use Cup4Cup, correct? And so you’re deciding between KAF and Bobs Red Mill gluten-free flours? I have use KAF’s gluten-free flour — the blue box. It works great. I haven’t made it in ages, I must confess, bc I usually use Cup4Cup. I’m sure Bob’s would be great, too. With bread baking, gluten free or otherwise, it’s all about experimenting and adapting based on your results. Good luck!
When using KAF all purpose GF flour, how much xantham gum would you use and would you also decrease the amount of liquid lukewarm water? Any other modifications? Your help is greatly appreciated. Thank you.
Hi LG, I’m not sure. Does KAF’s gf flour not have xanthan gum? I don’t keep xanthan gum on hand, so honestly, I wouldn’t add it. If you have it, however, the rule is: For every cup of flour (128g), use about a teaspoon of xanthum gum. And for the water, this is what I suggest: add the liquid a little bit at the time, mixing with a spatula to combine. Reference the video to see what the dough should look like as far as texture goes.
I’ve made this recipe many times with Bob’s Red Mill GF 1 to 1 Baking Flour (NOT their GF All-Purpose Baking Flour, which is heavier and includes bean flours), and it’s always turned out great. Look for the one in the light blue bag.
Great tip! Thanks for sharing, Nancy!
Ali, any suggestions for someone that can’t have gluten dairy or eggs ? Thank You
Hi!
Can you use this recipe to make pizza?
Thanks!
Anne
I have never tried, but I think it’s worth a shot… are you making pan pizza or free-form pizza?
I was thinking about making a free form one. I’ll try it and see how it goes.
This bread is amazing. I made it today, delicious . Will never use another recipe this will be the go to . Thank you so much .
Great to hear, Pat! Thanks so much for writing 🙂 🙂 🙂
Where can I find 1quart Pyrex ovenproof glass bowls? I’ve looked everywhere.
Thanks!
Hi! https://www.pyrexhome.com/product/1-quart-mixing-bowl
I’ve made the regular tons of times because my daughter and I love it. My son in law is gluten free and today I tried that one for him. One loaf was plain and one had roasted garlic and Italian Seasoning on top. HE LOVES IT! Can I make the gf into rolls in a muffin pan also?
Great to hear, Gayle! I think you probably could use a muffin pan — I would be sure to not fill each cup too high. Try 1/2 full at the most, let rise till it reaches the top, then bake.
It was so helpful with all the suggestions. I made regular Peasant Bread for my family. I like this content.
Hello there, what kind of oven safe bowls do you use for this recipe?
Hi! Pyrex 1-qt bowls.
Amazing! Thank you soo much for this recipe. I am doing this weekly!
So nice to hear this, Dina!
Hello! This bread has been a game changer for me. It is the only bread I will eat now! However, what are your suggestions for storing? It never seems to be as good the next day, no matter how I’ve been storing it. I’m hoping to make it for Thanksgiving but I’m not sure if I will be able to manage cooking it the day of.
Your advice is appreciated!
Hi Deeyah! I use a ziplock bag and store at room temperature.
I have IBS and cannot have honey. Can sugar be used as a substitute? If not, what do you recommend?
Yes, use sugar!
Excellent!! Best GF bread
Great to hear, Donna!
I love this recipe…even I can make it! Lol I was wondering if it can be put in the freezer?
Thank you for a great recipe.
Yes, absolutely! It freezes beautifully. Let it cool completely; then transfer it to an airtight bag before transferring it to the freezer. Always reheat or toast day-old (and beyond) bread before serving.
I made half the recipe with my kiddo for bread baking PreK lesson and it was delicious and so easy! I used too big of a container for half the recipe so it was fairly flat, but still delicious and great texture. Gonna try it again with the Pyrex bowls or load pan. Thanks for sharing this recipe!
Great to hear, Sami! Thanks for writing 🙂
Hey I made two recipes. This one and another highly reviewed recipe for a friend who is gluten free and does not enjoy the store bread that is available. I consider myself to be a great bread maker, it is daunting to work with gluten free but your recipe was amazing to read, I enjoyed your tips and notes and your bread won hands down with my friend. I will be baking it regularly for her. Thank you
So nice to hear this, Adele! Thanks so much for writing and sharing your notes. Your friend is lucky to have you!
Hey there.
My boss/work sister is GF and DF so I’m super happy to have found this. I make peasant bread 1-2 times per week for my family and I’m making loaves for my team for Christmas. I messed up and used active dry yeast instead of instant. I’m sitting here now with it in a warm spot to rise….please tell me I didn’t waste all these beautiful and expensive ingredients by using the wrong yeast?! Please advise.
Hi Kat, I’m likely too late here. My suggestion would just be to wait it out. The active dry yeast will just be slower to activate if you didn’t bloom it first. If it’s taking too long, you could transfer the dough to the fridge and pick up where you left off the following day. What did you end up doing?
I’ve made this bread twice and it is GREAT. You would have no clue it’s GF. I can’t get over how easy and delicious this recipe is. Thank you!!
Great to hear, Stacy! THanks so much for writing 🙂 🙂 🙂
This bread was delicious, and made my gluten free friend so happy! Can you make gluten free focaccia with this recipe using the refrigerator rise method that you use in yourr focaccia recipe?
Great to hear, nan! Regarding the focaccia, I think you could try, but I don’t think the dimples will hold because this “dough” is more like batter.
Hello, I am going to try this but I just want to know if it is the Cup4Cup multipurpose flour blend? Thanks.
Yes!
I’m confused.
The GF recipe only has one rise? Batter goes straight into the bowls for 1 rising and gets baked?
Why not rising twice like regular bread?
Can the regular recipe work with just 1 proofing time too?
Because there is no gluten develop here, there is no need for a double rise — the rises with regular bread help gluten develop. It’s not necessary here. You cannot do the regular recipe with only one rise.
I struggled so hard with this and I had such high hopes!!! I love all your bread recipes! My husband just went gluten free so I figured this would work beautifully but my bread just NEVER cooked. It was completely gummy in the center despite all the extra baking time I kept trying to give it. It’s basically dough. And I followed exactly except for using the Costco cup for cup gf flour which is what I had in my pantry. Is that the culprit? Anything else it could be?
It’s likely the flour. Was the batter very wet? Did you let it rise before putting it in the oven? So sorry this one didn’t work out 🙁
Excellent!!!! I thought the reviews may have been exaggerating… they WEREN’T! This bread is THE BEST!!! I used a 2Q Pyrex instead of 2 1Q Pyrex dishes, and it worked a charm! I want to try adding cheddar cheese next time.
Great to hear, Ashley! Thanks so much for writing. Cheddar cheese will take it over the top! And will make it brown so nicely, too 🙂
No more outrageously expensive store bought breads for me! I made 1/2 the recipe and baked it in a small loaf pan and my sister and I love it! I cooked a thin slice in a buttered skillet this morning and topped it with a fried egg. Delicious! I don’t think it has enough structure to make stand alone rolls but do you think it might work if the batter is baked in a cupcake tin or ramekins??
Great to hear, Denise! I think ramekins or a cupcake tin will work well! Thanks for writing 🙂
I made the GF Peasant bread with Better Batter flour. The moisture content of the bread seemed ok. The bread was delicious right out of the oven – tore into it after a few minutes of waiting. It was actually very dense. I tried it a second time and added 2tsp of baking powder, thinking it would add more air bubbles and make a lighter bread, but it didn’t. And it stuck a bit to the glass bowls. I’ll make it again and just try letting it rise a bit longer.
Great to hear, Jeff! Thanks for writing and sharing your notes.
I made this using a 9 x 5 loaf pan. It turned out great. I really like the fact that it holds it shape when you cut it. Texture is good and tastes great. Thank you.
Great to hear, Kim! Thanks so much for writing and sharing this 🙂
My sister and I now make this bread at least once a week. Sometimes we make it in loaf pans, sometimes in bowls, and today in small springform pans for buns! They turned out beautifully. I generally make mine with Cup 4 Cup and she uses Better Batter flour. I use olive oil and she uses melted butter. No matter how we make it, it’s great! Thank you for such an easy and versatile bread.
Wonderful to hear this, Denise! Thanks so much for writing and sharing your notes. So helpful for others!