
Homemade Sourdough Bread, Step by Step
This post may contain affiliate links. Please read my disclosure policy.
If you love fresh sourdough bread with a golden, crisp crust and a light, airy crumb, this recipe is for you. It’s one of the simplest homemade sourdough bread recipes, and one of the best, too. It requires only 25 minutes of hands-on work and no autolyse or preferment. Below you will find guidance for every step of the way. 🍞🍞🍞
⭐️⭐️⭐️⭐️⭐️ Review:
“Absolutely the best sourdough recipe EVER! I have been baking bread for years (sourdough included,) and things were many times hit or miss. Not with your recipe. You have nailed it. I thank you!” — Rosemary Patterson
This post will show you how to make the simplest of simple sourdough breads. There is no autolyse or preferment, which means the dough itself comes together in less than five minutes.
For those intimidated by sourdough bread baking, this recipe, as well as this sourdough focaccia recipe, are the recipes I suggest making first, both for their simplicity and flavor. Another great beginner’s bread recipe to try is this overnight, refrigerator focaccia or my mother’s simple peasant bread recipe, both of which require minimal effort but yield spectacular results.
This post is divided into 13 sections:
- What is Sourdough Bread?
- What is a Sourdough Starter?
- How to Feed a Sourdough Starter
- When is My Starter Ready to Be Used?
- Equipment
- How to Make Sourdough Bread: A 5-Step Overview
- How this Sourdough Bread Recipe Differs From Others
- Simple Sourdough Bread: A Step-by-Step Guide
- #1 Sourdough Bread Baking Tip
- Troubleshooting: Where Sourdough Goes Wrong
- Sourdough Baking Resources
- Other Sourdough Bread Recipes to Make
- Sourdough Bread Baking Schedule
What is Sourdough Bread?
Sourdough bread is bread that has been leavened naturally, meaning it has been leavened by a sourdough starter as opposed to by commercial yeast or a chemical leavening agent such as baking powder or baking soda.
What is a Sourdough Starter?
A sourdough starter is a fermented mix of flour and water containing wild yeast and bacteria (lactobacilli). Provided it is healthy and active, a sourdough starter is what will make your bread rise.
You can make a sourdough starter from scratch in just about a week. I only recommend doing so if it currently is summer (or a very warm fall) where you are. While it is immensely satisfying to build a starter from scratch and subsequently use it to make a beautiful loaf of bread, I am a huge proponent of purchasing one for a few reasons, namely: when you purchase a starter, you are guaranteed to have a strong, vigorous starter from the start. In other words, you can start baking with confidence right away.
Here are three online sources for reasonably priced sourdough starters:
How to Feed a Sourdough Starter
In order to keep your starter alive, you have to feed it — it’s not unlike having a pet, but know this: caring for a sourdough starter is akin to caring for a very low maintenance pet, one that requires feeding only once every two to three weeks to stay alive, but one that requires feeding much more regularly if you like to bake frequently.
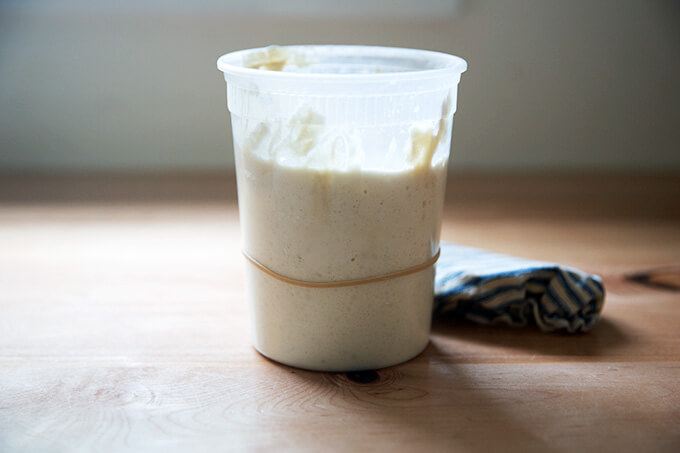
When I am not baking regularly, I store my starter in the fridge in the above-pictured vessel with its lid on. As noted above it can hang out there for 2-3 weeks (if not longer) without being touched. To wake it up or activate it, I like to feed it twice before using it. Often I’ll remove it from the fridge after dinner and feed it: this involves discarding most of it and replenishing it with equal parts by weight flour and water. (Please read this post, which explains in detail how to activate, feed, and maintain a starter.)
I will repeat this process in the morning — discard most of it; then replenish it with equal parts by weight flour and water. By midday, or when my starter has doubled in volume, it is ready to be used.
To store your starter, you should feed it, let it rise till it nearly doubles; then cover it and stash it in the fridge for 2 to 3 weeks until you are ready to use it again.
How Do I Know if My Starter is Ready to be Used?
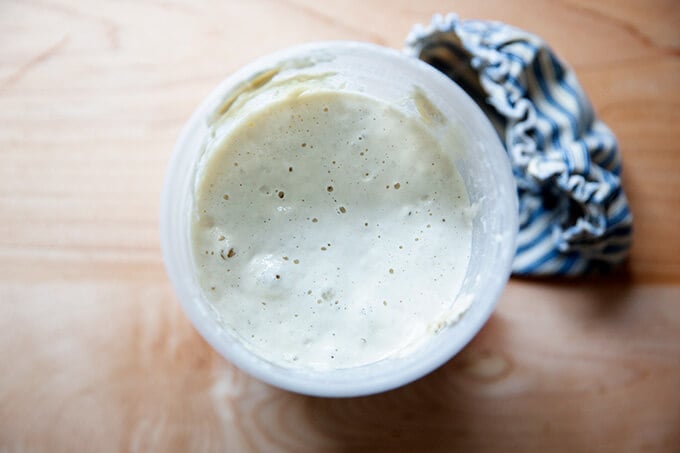
If your starter doubles (or triples!) in volume within 4 to 8 hours after a feeding, it is ready to go. And ideally, you want to use your starter 4 to 8 hours after you feed it or when it has doubled. Every time I feed my starter, I place a rubber band around the vessel it is in to mark its height. This helps me see when it has doubled in volume and is, therefore, ready to be used.
If your starter is not doubling within 4 to 8 hours of feeding it, you should spend a few days strengthening it. This will involve discarding most of it — truly, don’t be afraid to be aggressive with how much you are discarding — and replenishing it with equal parts by weight flour and water. If you do this twice a day for several days, your starter will be in great shape.
What Equipment Do I Need?
At a minimum, you’ll need:
- a sourdough starter (see above)
- flour, bread flour if possible, my preference is King Arthur Flour
- salt
- water
Ideally, you’ll also have:
- digital scale
- straight-sided vessel for monitoring the bulk fementation
- bench scraper
- flour sack towels
- parchment paper
- banneton, such as this one or this one
- razor blade
- heavy lidded vessel, such as this one or this one
How to Make Sourdough Bread: A 5-Step Overview
There are essentially 5 steps to making sourdough bread. Each of these steps is explained in more detail below.
- Mix the Dough: This is simply a matter of combining water, sourdough starter, salt and flour in bowl, and stirring to form a sticky dough ball.
- Bulk Fermentation: This is just a fancy name for the first rise. During the first two hours of the bulk fermentation, you’ll perform a series of stretches and folds, which will give the dough strength and elasticity.
- Shape + Bench Rest: This step ends the bulk fermentation. You’ll shape the dough, let it rest, then shape it once more.
- Proofing the Dough: In this recipe, you’ll cold proof the dough in the fridge, ideally for 24 to 48 hours, though you can get away with a shorter proof.
- Scoring + Baking the Dough: After the dough has proofed, you’ll turn it out onto a piece of parchment paper, score it; then transfer it to a preheated baking vessel.
How This Sourdough Bread Recipe Differs From Others
This recipe differs from others in three main ways:
- No Autolyse. Why? I’ve never found employing an autolyse makes a big difference in the final texture of the bread, and I find the process of doing an autoylse frankly to be kind of a pain. What is an autolyse? Autolyse is a technique that calls for mixing flour and water together and allowing them to sit for several hours before adding the salt and sourdough starter. This process allows gluten to develop in dough prior to mixing. It also makes the dough more extensible. This is due to the hydrating effects of soaking the flour, as well as — and this is getting a bit scientific — from the enzymatic activity of protease, which breaks down some of the gluten that forms as the dough hydrates. This process weakens the dough’s elasticity, in turn increasing its extensibility. If you are after a super open crumb, autolyse is something to consider.
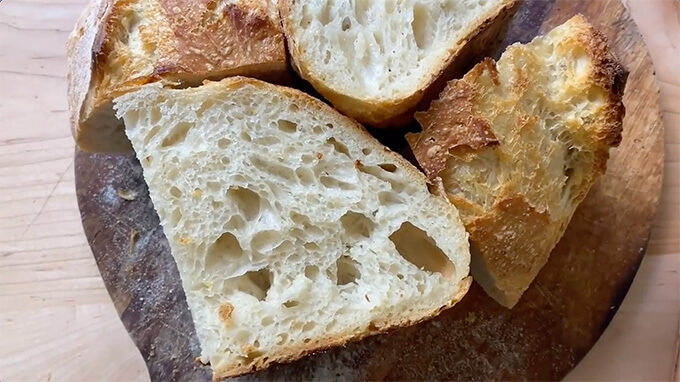
- 50% (roughly) Increase in Volume. If you come from the yeast-leavened bread world, you are accustomed to letting your dough double in volume during the first rise. When I first got into sourdough, I was applying this same method, and while I had success, I realized I was often letting my dough overferment — I was pushing the bulk fermentation too far. As soon as I stopped the bulk fermentation when the dough increased by 50-75% in volume, I got a much better oven spring.
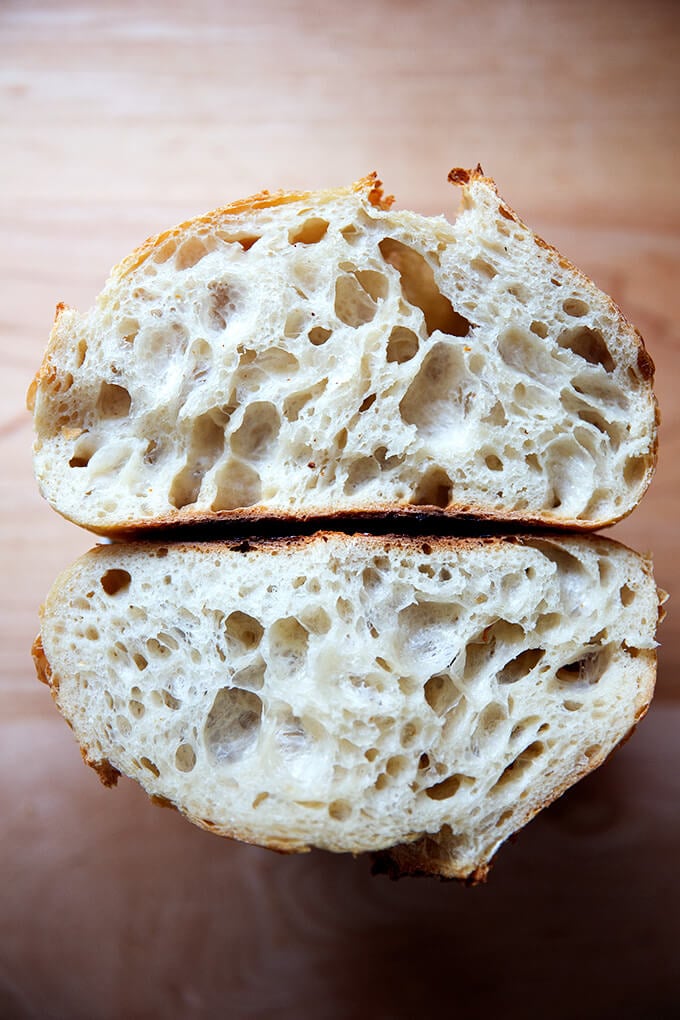
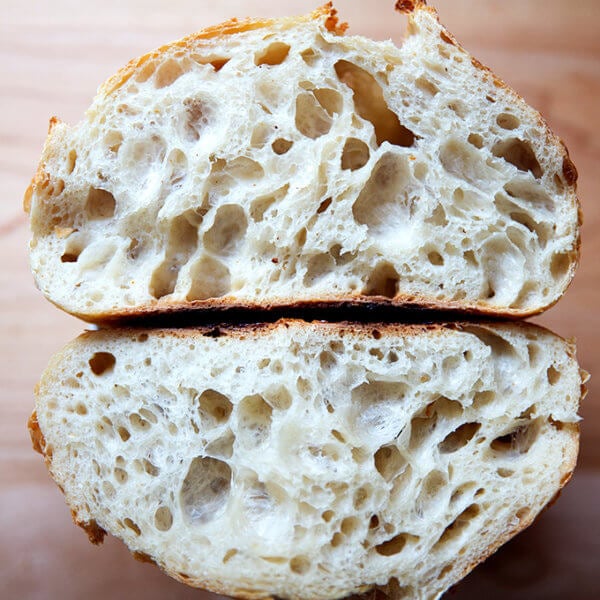
- Long Cold Proof. After the bulk fermentation, you’ll shape the dough, and store it in the fridge ideally for 24 hours but it can hang out there for 48 hours or even a bit longer. This long, cold proof will make for a much lighter, open, airy crumb. (Note: If you were to leave the dough in the fridge for 12 hours or less, which you can do, the crumb will be tighter and denser.) After you remove the dough from the fridge, you score it, and transfer it immediately to the oven — there is no need to do a room temperature proof first.
Simple Sourdough Bread: A Step-by-Step Guide
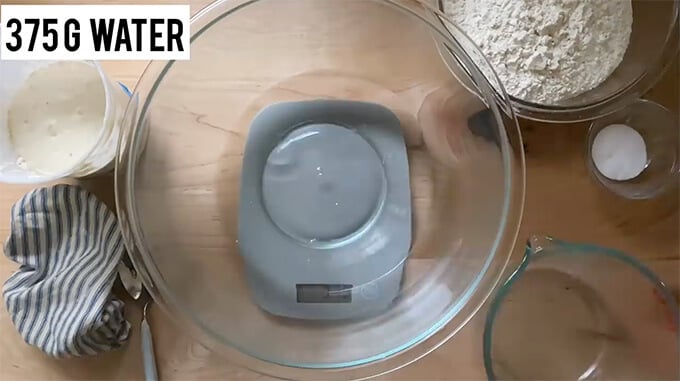
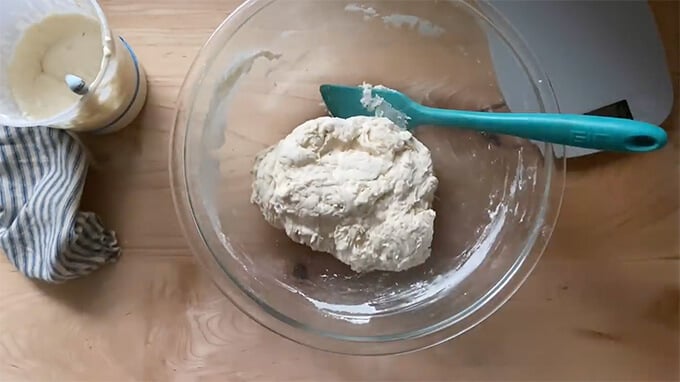
Mix the dough.
To start, pour 375 grams of water into a bowl:
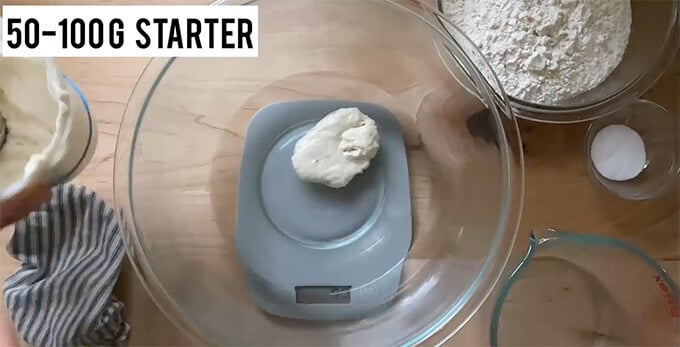
Add 50 to 100 grams of sourdough starter.
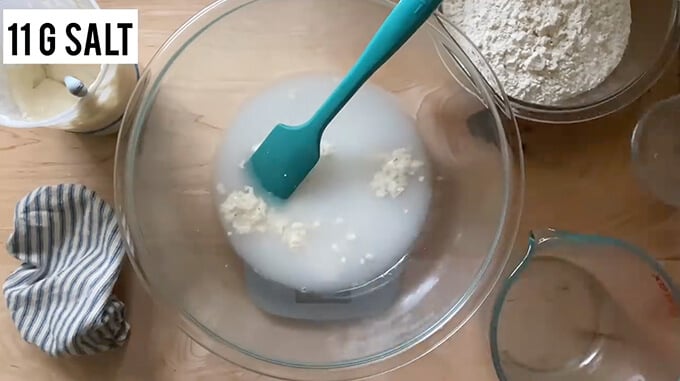
Stir to combine; then add 11 grams of salt:
Finally, add 500 grams of bread flour:
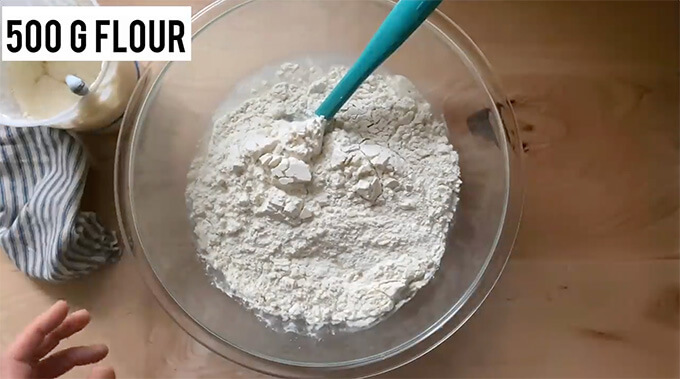
Stir to combine:
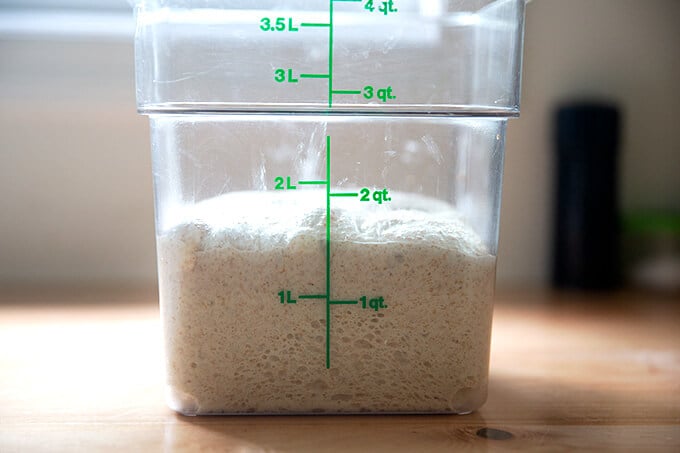
Let it Rise. (Bulk Fermentation)
Transfer the dough to a straight-sided vessel. Cover it, and let it rest for 30 minutes.

Perform a set of stretches and folds:
If time permits, perform four total sets of stretches and folds every 30 minutes for the first 2 hours. You should notice the dough getting stronger and more elastic with every set of stretches and folds. This is the 4th set:
After the 4th set of stretches and folds, cover the vessel — I love these Dot and Army cloth bowl covers for this — and set it aside until it increases in volume by 50% or so.
How long should the bulk fermentation take?
The time will vary depending primarily on the strength of your starter and the temperature of your kitchen. Rather than rely on a time period, however, you should rely on visual cues.
This video shows the dough nearly doubling (increasing by 100%) in volume, but the more I bake sourdough, the more I realize I have better success when I stop the bulk fermentation when the dough increases by 50%. It may take some trial and error to know what works best for you. You may find a 75% increase in volume is best or you may find that to be too long. Sourdough is all about experimenting and adapting based on your experiences.
Shaping
Turn the dough out onto a lightly floured work surface:
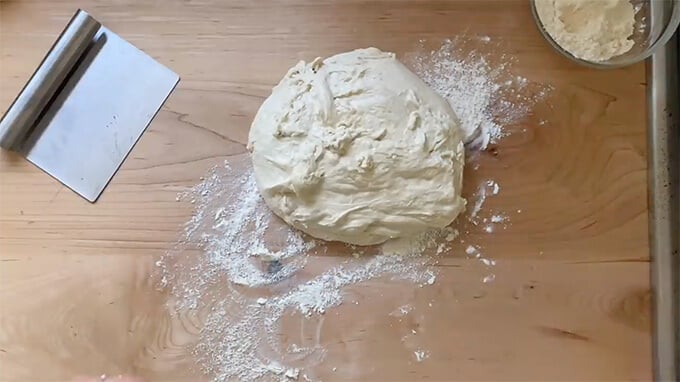
Shape the dough gently into a round and let it rest for 20-40 minutes. This is called the bench rest.
Meanwhile, prepare a bowl or banneton with a flour sack towel and rice flour.
Proofing
Shape the round again; then place in prepared bowl for proofing. Transfer to fridge for 12 to 48 hours.
Bake It.
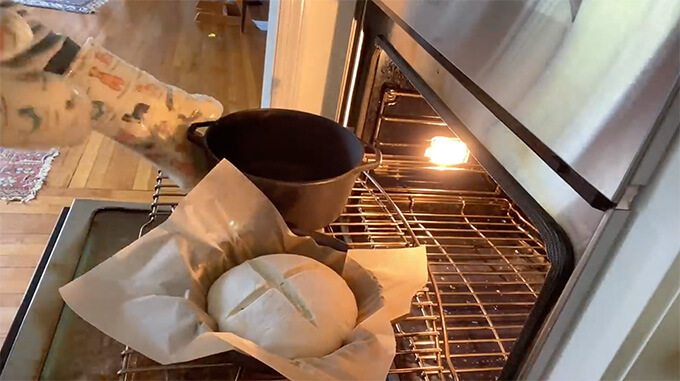
Remove bowl from fridge, and turn it out onto a sheet of parchment paper.
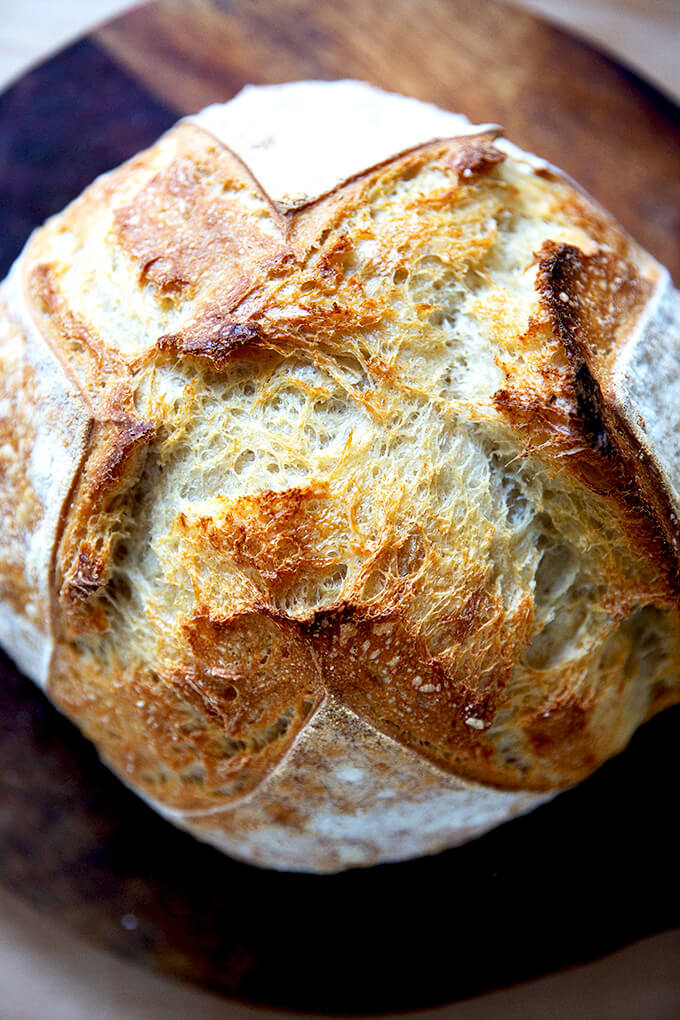
Score it.
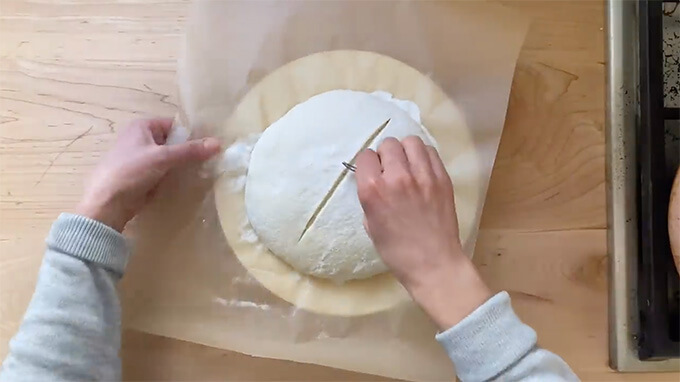
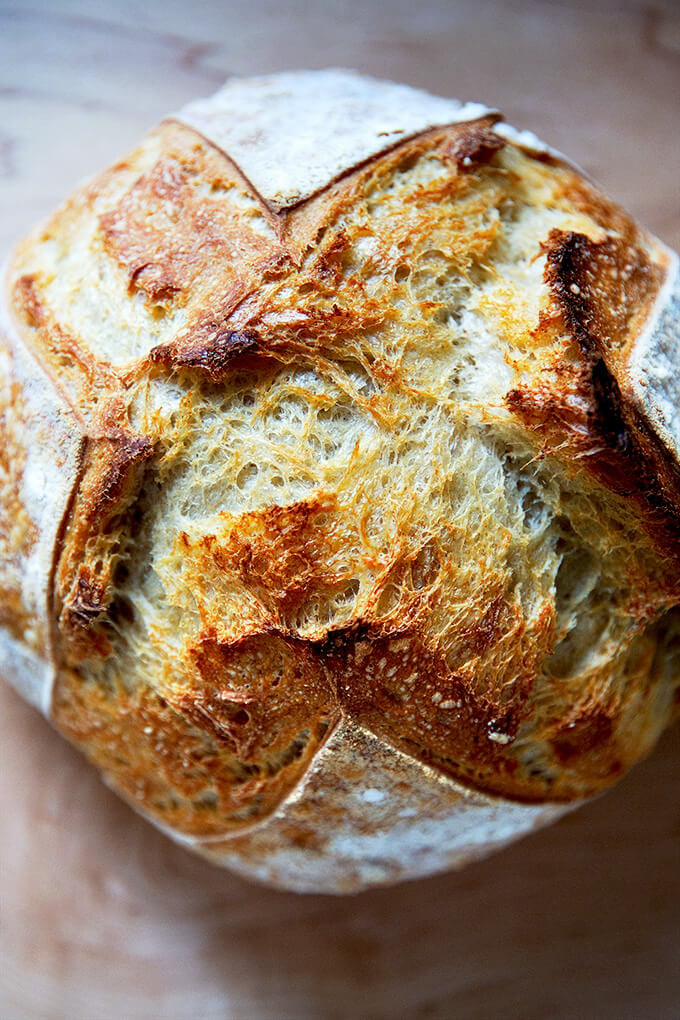
Transfer to preheated Dutch oven. Bake covered at 450ºF for 30 minutes; uncover, lower the temperature to 400ºF, and bake for 15 minutes more:
Remove from oven and let cool one hour before slicing.
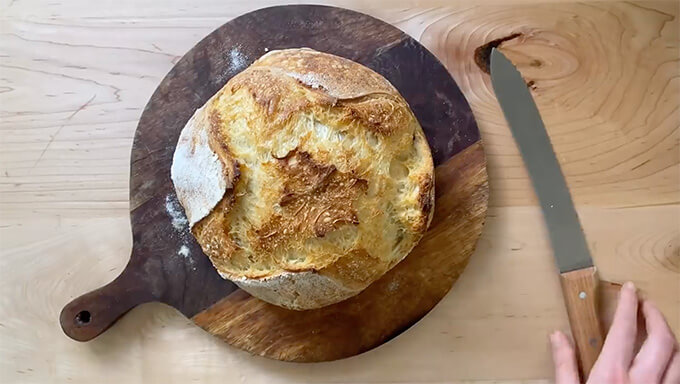
You’ll need a sharp knife (like this one or this one) when it’s time to slice:

#1 Sourdough Bread Baking Tip
The refrigerator is your friend. Use it.
The most common mistake I see people make when making sourdough bread is letting the bulk fermentation go too long. They mix the dough at night; then wake up to dough that has tripled in volume and is a sticky mess.
To prevent over fermenting your dough, use your refrigerator as needed. After you complete the 4 sets of stretches and folds, you can put your dough in the fridge at any time. If you are tired and need to go to bed, transfer the dough to the refrigerator; then pick up where you left off in the morning: remove the dough from the fridge and let it continue to rise until it increases in volume by roughly 50%.
To accurately gauge when your dough has risen to roughly 50% in volume, I highly recommend investing in a straight-sided vessel such as this 4-qt Cambro (or this one, which is BPA-free!). When dough rises in a bowl, judging when it has risen sufficiently is tricky. There’s no question with a straight-sided vessel.
Troubleshooting: Where Sourdough Goes Wrong?
If you have ever had trouble baking sourdough bread, your issues likely stem from one of four places:
- Using a weak starter or not using starter at its peak.
- Using too much water relative to the flour.
- Over fermentation: letting the bulk fermentation (first rise) go too long.
- Using too much whole wheat flour, rye flour, or freshly milled flour.
I address each of these issues in this post: Why is my sourdough so sticky? 4 Common Mistakes, so please give it a read if you’ve had trouble with sourdough bread baking.
Sourdough Resources
- Sourdough Troubleshooting: This post addresses 4 common mistakes people make when baking sourdough bread and answers many FAQ’s as well.
- The Nutritional Benefits of Sourdough Bread + 6 Healthy Toast Topping Ideas
- Feeding Your Sourdough Starter
- Essential Equipment For Sourdough Bread Baking
- A tip for getting a more open crumb? Shape a batard as opposed to a round:
Other Sourdough Bread Recipes to Make
- Simple Sourdough Focaccia
- Sourdough Bread, Whole Wheat-ish
- Simple Sourdough Pizza
- Sourdough Detroit-Style Pizza
- Simple Sourdough Sandwich (or Toasting) Bread
- Sourdough Ciabatta
- Two Sourdough Discard Recipes: Sourdough Flour Tortillas & Irish Soda Bread
Sourdough Bread Baking Schedule
If you are new to sourdough bread baking, the timing of it all may feel overwhelming — you may find yourself asking: How can I do this without baking at midnight?
It’s a very good question! As noted above, your biggest friend when it comes to sourdough bread baking is your refrigerator. If after you’ve performed your stretches and folds, you don’t have time to stay up for the dough to complete the bulk fermentation, stick the vessel in the fridge and pick up where you left off the next day or the day after that.
Here is a rough schedule I like to follow. Adapt it to work for you:
Wednesday Evening: Remove starter from fridge. Feed it by discarding most of it and replenishing it with equal parts by weight flour and water.
Thursday Morning: Feed starter by discarding most of it and replenishing it with equal parts by weight flour and water.
Thursday Afternoon: Mix dough, let it rise. On Thursday evening, when the dough has completed the bulk fermentation, I’ll shape it and stick it in the fridge to proof. (As noted: If the dough hasn’t completed the bulk fermentation, I’ll stick the vessel in the fridge, and pick up where I left off the following day.)
Friday Evening or Saturday Morning: Score and Bake it. There is no need to let the dough come to room temperature before baking it. Simply remove it from the fridge, turn it out, score it, and bake it!
Homemade Sourdough Bread, Step by Step
- Total Time: 18 hours 45 minutes
- Yield: 1 loaf
Description
Inspired by The Clever Carrot
If you are new to sourdough, watch the step-by-step video here: Simple Sourdough Bread or in the post above.
Troubleshooting: If you have issues with your dough being too sticky, please read this post: Why is my sourdough so sticky? The 4 common mistakes.
Notes:
- You need an active sourdough starter. I have had success activating starters from:
- As always, I highly recommend investing in a digital scale before beginning any bread baking adventure.
- This is the Dutch Oven I use for sourdough bread. I used this Dutch oven for years, and it’s a great one, too.
- Flour sack towels are a great investment because they ensure your dough will not stick while it is proofing.
- I love using rice flour for dusting (as opposed to ap or bread flour) because it doesn’t burn. When you use a flour sack towel, however, you don’t need to use any flour.
- Find all of my sourdough essentials here: Essential Equipment For Sourdough Bread Baking
- I love a high-hydration dough, and I have great success using 380 grams of water in this recipe, so feel free to play around and push the hydration here.
- Salt: I have had success using both kosher salt and fine sea salt here. When I use kosher salt, I use the Diamond Crystal brand. When I use sea salt, I use the Baleine Fine brand. Regardless of the brand, I use 12 grams.
- Shaping: If you’re looking to get a more open crumb, try shaping a batard (as opposed to a round). Watch this video for guidance. Also: The recipe below follows the traditional shape once, rest, then shape again method. I often skip the preshape now and simply shape the dough once. I still get a nice open crumb.
How much Sourdough Starter to Use?
- Because my kitchen is cold for much of the year, I like using 100 g (1/2 cup) of starter as opposed to 50 g (1/4 cup). When determining how much starter to use, consider a few things: If you live in a warm, humid environment, 50 g should suffice. If you plan on doing an overnight rise, 50 g also should suffice. If you want to speed things up or if you live in a cold environment, consider using 100 g starter. Note: If you use 100 g of starter, your dough may rise more quickly, so keep an eye on it. As always, rely on the visual cues (increasing in volume by 50%) when determining when the bulk fermentation is done.
- A straight-sided vessel makes monitoring the bulk fermentation especially easy because it allows you to see when your dough has truly doubled.
Ingredients
- 50 – 100 g (1⁄4 – 1/2 cup) bubbly, active starter — I always use 100 grams, see notes above
- 375 g (1 1/2 cups plus 1 tbsp) warm water, or more, see notes above
- 500 g (4 cups plus 2 tbsp) bread flour
- 9 to 12 g (1.5 – 2.5 teaspoons) fine sea salt, see notes above
Instructions
- Make the dough: Whisk the starter and water together in a large bowl with a fork or spatula. Add the flour and salt. Mix to combine, finishing by hand if necessary to form a rough dough. Cover with a damp towel and let rest for 30 minutes.
- Stretch and fold: After 30 minutes, grab a corner of the dough and pull it up and into the center. Repeat until you’ve performed this series of folds 4 to 5 times with the dough. Let dough rest for another 30 minutes and repeat the stretching and folding action. If you have the time: do this twice more for a total of 4 times in 2 hours. Note: Even if you can only perform one series of stretches and folds, your dough will benefit. So don’t worry if you have to run off shortly after you mix the dough.
- Bulk Fermentation (first rise): Cover the bowl with a towel and let rise at room temperature, about 8 to 10 hours at 70°F (21°C) or even less if you live in a warm environment. The dough is ready when it has increased by 50% in volume, has a few bubbles on the surface, and jiggles when you move the bowl from side to side. (UPDATE: In the past I have recommended letting the dough rise until it doubles in volume. If you’ve had success with this, continue to let the dough double. Recently, I have been stopping the bulk fermentation when the dough increases by 50% in volume, and I feel I am actually getting better oven spring in the end.) (Note regarding timing: If you are using 100 g of starter, the bulk fermentation may take less than 8 to 10 hours. If you live in a warm, humid environment, the bulk fermentation may take even less time. In the late spring/early summer, for example, my kitchen is 78ºF and the bulk fermentation takes 6 hours. It is best to rely on visual cues (increase in volume by roughly 50%) as opposed to time to determine when the bulk fermentation is done. A straight-sided vessel makes monitoring the bulk fermentation especially easy because it allows you to see when your dough has truly increased in volume by 50%.)
- Shape (See notes above): Coax the dough onto a lightly floured surface. Gently shape it into a round: fold the top down to the center, turn the dough, fold the top down to the center, turn the dough; repeat until you’ve come full circle. If you have a bench scraper, use it to push and pull the dough to create tension.
- Rest: Let the dough rest seam side up rest for 30 minutes. Meanwhile, line an 8-inch (20-cm) bowl or proofing basket with a towel (flour sack towels are ideal) and dust with flour (preferably rice flour, which doesn’t burn the way all-purpose flour does). Using a bench scraper or your hands, shape it again as described in step 4. Place the round into your lined bowl, seam side up.
- Proof (second rise): Cover the dough and refrigerate for 1 hour or for as long as 48 hours. (Note: I prefer to let this dough proof for at least 24 hours prior to baking. See video for the difference in the crumb of a loaf that has proofed for 6 hours vs one that has proofed for 24 hours. If you choose to proof the dough in the fridge for an extended period of time, you may want to tuck it into a loosely tied bag — produce bags from the grocery store are great for this purpose — to ensure the dough does not dry out. The original recipe calls for a 1-hour rise, and if you have had success doing that, by all means, keep doing it.)
- Place a Dutch oven in your oven, and preheat your oven to 550°F (290°C). Cut a piece of parchment to fit the size of your baking pot.
- Score: Place the parchment over the dough and invert the bowl to release. Using the tip of a small knife or a razor blade, score the dough however you wish — a simple “X” is nice. Use the parchment to carefully transfer the dough into the preheated baking pot.
- Bake: Lower the oven to temperature to 450ºF (230ºC). Carefully cover the pot. Bake the dough for 30 minutes, covered. Remove the lid, lower the temperature to 400ºF (200ºC) and continue to bake for 10 – 15 minutes more. If necessary, lift the loaf out of the pot, and bake directly on the oven rack for the last 5 to 10 minutes. Cool on a wire rack for 1 hour before slicing.
- This loaf will stay fresh up to 3 days stored at room temperature in an airtight plastic bag or container. It freezes beautifully, too.
Notes
- This recipe has been adapted from Artisan Sourdough Made Simple. Changes I have made to the original recipe include:
- Using 11 g salt as opposed to 9 g.
- Performing 4 stretch and folds during the first 2 hours of the bulk fermentation, which build strength in the dough.
- Doing a cold proof for at least 24 hours before baking, which produces a lighter airier crumb. In the video, you can see the difference between the crumb of a loaf that has proofed for only 6 hours vs a loaf that has proofed for 24 hours.
- Finally, I like preheating my Dutch oven, which makes a crisper crust.
- Prep Time: 18 hours
- Cook Time: 45 minutes
- Category: Bread
- Method: Oven
- Cuisine: American
This post may contain affiliate links. Please read my disclosure policy.


2,990 Comments on “Homemade Sourdough Bread, Step by Step”
Thank you for sharing your recipe! I’m new to the whole sourdough process and your tutorial is perfect for me! I love the video too since I’m a visual person. My family and I love the finished product! Thanks again!!
Great to hear, Maureen! Thanks so much for writing 🙂 🙂 🙂
Have you ever added inclusions? Like chocolate chips or cheddar? At what point in the stretches and folds would you add them?
Yes! Add them after you’ve done two sets of stretches and folds.
I just want to say that this was the first sourdough bread recipe, i have tried a lot, that has turned out amazing!
I have made a regular size loaf and a half loaf and it has worked both times spectacularly!
Thank you so much.
Great to hear, Racheal! Thanks for writing 🙂
Excellent recipe, worked perfectly, used 100g starter, 9g salt, didn’t autolyze. It had an open crumb and a perfect crust. Thank you!!!!!
Great to hear, Jodi! Thanks so much for writing 🙂 🙂 🙂
Love this! My dough went to 50% in 4 hours so I put it in the fridge shortly thereafter.
The best sourdough! 4 days later on the counter in a zip lock bag and it is still fresh and moist!
Wonderful to hear, Joanna! Thanks so much for writing and sharing these notes.
My dough comes out of the refrigerator pretty dense and stiff. Should I let it warm up and rise before baking?
You shouldn’t have to! Shaped sourdough loaves don’t change much visibly in the fridge but lots of things are happening below the surface.
I’ve been using this for about a year now and it’s the one that was the easiest to follow. I make it weekly. Can you be specific what are some yummy add ins? How much to add and also what adjustments do I have to make with the amount or types of flour if I’m doing add ins? Do add ins change baking times? I have some rye flour and would like to venture into trying some of that too but don’t know ratios or any adjustments that should be made.
Hi Pam! I have been meaning to do a post on this… stay tuned. In the meantime: I wouldn’t add more than 1.5 cups of nuts/dried fruit and no more than 1/2 cup seeds. Rye can be tricky: I wouldn’t add much more than 1/2 cup.
Hoping to do a blog post on this soon.
Thank you so much for this amazing recipe! It was my first time trying sourdough and it turned out wonderful! I couldn’t believe it after reading so many horror stories online of bread baking gone bad. Thank you for such a great recipe!☺️
Great to hear, Michelle! Thanks so much for writing 🙂 🙂 🙂
I’ve just put my dough in the fridge to cold rise overnight for the 24 to 48 hours. However, during this whole process it’s been quite sticky and wet. My starter is active and doubling within 4 hours, so it’s active. I used bread flour, with a little hole wheat and a little all purpose mixed in as I ran out of regular bread flour. My question is, can I add, or should I add, more flour tomorrow morning (in about 10 hrs), to have a less sticky, more sturdy boule? It’s a little slack and puddley as is. But it isn’t over fermented, no alcohol smell. And I shaped it before it entirely doubled. Advice much appreciated!!! 😁❤️
Hi Bea! I wouldn’t add more flour at this point. I’m just not sure you’ll be able to add enough to make a sturdy boule. A few thoughts: next time around, start with less water. For this time around, you could simply turn the dough out, roll it into a coil, and let it proof at room temp for 4-6 hours in a loaf pan. OR push on and try to shape a boule depending on how the dough firms up in the fridge.
Why do you discard the starter rather than using it? If you use starter frequently and replenish it as you go do you ever have to discard parts of it? Thanks.
Hi Robert, I discard the starter when I remove it from the fridge, and then I discard it (or use the discard in other recipes) when I feed it again. I do this to achieve a very strong starter with a nice amount of acidity.
Tried your recipe a few times in a row. Love the simplicity of it. The bread is so good! My family thinks it’s the best bread ever. Thanks to your recipe, I get to bake frequently for my loved ones.
THANK YOU!!!
Wonderful to hear this, Oksana! Thanks so much for writing 🙂 🙂 🙂
Thank you so much! I am new to baking sourdough but your blog plus videos make things so much easier! Thanks for your help! I’ve got one question for you. When you do step 6 proofing for second rise, do you have to put your dough in an airtight container? Or is it ok to put it in a proofing basket covered with cloth as it is in the fridge for 24 hours? Thank you in advance!
Great to hear, Mae! For the cold-proof, I do like to stick the whole basket into a produce bag, which I then tie. It helps prevent a crust from forming on the dough. It’s not entirely necessary especially if the dough is wrapped in a flour sack towel, but for the added assurance, I like to use the bag.
I tried so many sourdough recipes and this is the one that FINALLY WORKED OUT! I’m so proud of my loaf! Thank you Ali!!❤️
Yay! Great to hear, Taisa! Thanks for writing 🙂
I’ve read dozens of sourdough tutorials and watched many videos. Yours is by far the best! Easy to follow and your video is perfect. It’s short and to the point.
Having kids in the background reminds me of me when I had young kids.
Thank you for dumbing down sourdough for me! Others made it too confusing.
So nice to read all of this, Audrea 🙂 Thanks so much for writing.
This is my go to sourdough recipe and we love it! I made it and in the chaos of life, forgot about it in my fridge… 5 days later I remembered it and was going to bake or do I need to discard it?
Bake it! It might be past prime, but there’s no real way of knowing unless you bake it. Unless, of course, you turn it out onto the parchment paper it is puddly in texture. No harm in giving it a shot!
This page is so helpful! I have tried to make sourdough many times and it’s never worked for me, until now! The advice on adjusting timings for the temperature of your home, and the tips on what to look out for to know the dough is ready helped me to make an amazing loaf. Thank you!
Yay 🙂 🙂 🙂 So great to read this, Katherine! Thanks so much for writing and sharing all of this.
I’ve been using your recipe for over a year and it is always absolutely perfect! My question is if I want to make two smaller boules what time would you suggest for baking. Thanks!
Great to hear! I would try 20 minutes covered; then uncovered for 10 to 15 minutes or until browned to your liking. Good luck!
Unbelievably good! I have been using your recipes ever since I have started baking sourdough and again, this did not disappoint. 5 stars all the way around! Can’t wait to make ciabatta and baguettes!
Great to hear, Andrew 🙂 🙂 🙂 Thanks so much for writing.
My first time making bread and I nailed it with this recipe! Thank you!!!! Will be making again and again. Xx
I don’t know how and I don’t know why but this loaf turned out soooooo good! I tried sourdough bread a few years ago and it was blah to say the least. I followed a pretty complex recipe and was thinking “I’ll never be able to get this down!” I ended up just doing discard recipes and then gave up all together. I stumbled upon your recipe and decided to give it a go again. Wow! My husband and I loved it. And it was such an easy follow. I discovered I didn’t have a Dutch oven that could take the heat so I just put it in a bread pan top rack with a shallow pan of boiling water at 450 for 20, removed the water pan and baked another 20. Crust was thin and crunchy and inside was light and fluffy. I’ll definitely be keeping you mr recipe in our weekly family rotation! Thank you!
Great to hear! Thanks so much for writing and sharing your notes. So often I find, especially with sourdough, the more complicated recipes just don’t deliver. Glad you had success with this one!
OMG I have been trying to get a good sourdough recipe for more than 10 years. Follow the steps and have patience, it will pay off. I did 2 loaves at once, froze the second..Amazing!
Yay! Great to hear. Thanks for writing 🙂
What if I dont have a Dutch oven??
You could use a preheated sheet pan with a metal bowl turned over the top.
Hello. This is the best recipe I have used. I’m loving it. If I was to cut this dough in half to make 2 smaller loads, do you think the cooking time would be the same in the oven?
I think slightly less: try uncovering after 20 minutes; then keep an eye on the loaves and remove them when they are browned to your liking.
I followed this recipe for my first sourdough loaf and it turned out SO WELL! Crumb turned out incredible. Thank you Alexandra for another great recipe! The video was super helpful. Other recipes I saw online were quite intimidating so I appreciate how easy this was to follow. Thanks again!!
Great to hear, Annalisa! Thanks so much for writing. So glad the video was helpful 🙂 🙂 🙂
You make this look so easy! Your recipe seems really straightforward, and the short video clips are very helpful. I particularly like that there is no talking in the videos. What you show us is more than clear and words aren’t needed. Just bread and the sound of kids playing in the background. Perfect. I am excited to try my hand at sourdough bread now.
Thank you, Matt 🙂 So nice to read all of this. Good luck on your sourdough journey! Let me know if you have any questions.
I really like this recipe and have used it many times. I do have a quick question though; If I’m doing two baking sessions back to back, do I need to preheat up to 550 again, or just up to 450? Or will just 500 be okay?
I think you can just get the oven back to 450 and have success. Only one way to find out though! But I think it should be fine — your Dutch oven will be nice and hot, and as long as your oven does get to 450, I don’t see why there would be any issues.
Great tutorial. A couple of comments, though. I realized after I had mixed the dough that since I used 50g not 100g of starter, I probably should have reduced the initial amount of water I used. As a result, it was stickier than I wanted it to be, but it did eventually come together with a couple of tablespoons of flour. The other point had to do with my own fear that it was going to stick to the flour sack cloth in the proofing basket – I used too much rice flour to dust the cloth and after a very long rise in the fridge, it wound up toughening the crust by absorbing too much moisture. The crumb was wonderfully open and light, but the crust was tough and chewy. Next time, I’ll use a lighter hand in dusting the cloth.
Ali, I have made this bread a few times and we love it. The crumb, however, is always a bit wet. I am wondering why this is and how to avoid it. Would you be able to help me figure it out?
Hi! Are you using a scale to measure? The easiest solution is to simply cut back some of then water. Try holding back 50 grams of water the next time you make it.
AMAZING!! This was my first sourdough attempt ever & it’s just so delicious. I almost cried when I lifted the lid & seen how beautiful it turned out. I did pre heat my Le Creuset/Dutch oven & used the higher ratio of starter & salt as you suggested. I also allowed it to cold proof in the fridge for 15hrs. I wish I could add a photo because I can’t believe my eyes, it’s so beautiful 🖤Thank you for sharing your recipe & all the tips.
*Question:
I’m wanting to bake the same recipe but in 2 smaller vessels for mini loaves, rather than one large loaf…how much should I reduce the initial covered/ high temp bake?
So great to hear, Tina! For smaller loaves, try 20 minutes for the initial bake 🙂
So, for the 75% hydration should that factor in the starter as well since it is flour and water? I also have the Artisan Sourdough Made Simple book. I like your changes and did basically the same before reading your post. But as I have been playing around with hydration, some recipes will add the starter into the equation and some don’t. It is part of the dough so I feel like it should be factored in.
Hi Christin! The starter definitely should be factored in, and when I calculate hydration now, I always do account for it. For this recipe, if you use 100 grams of starter at 100% hydration, the hydration of the bread will be 77% hydration.