
Simple Sourdough Focaccia: A Beginner’s Guide
This post may contain affiliate links. Please read my disclosure policy.

Sourdough is having a moment. Longtime sourdough bakers may cringe at this proclamation, just as our grandparents likely roll over in their graves when they hear “toast” is a thing.
But it’s true. I cannot open a magazine without seeing a feature on a bakery and its naturally leavened loaves; I cannot scroll through Instagram without seeing a crumb shot of a halved sourdough miche, a beautiful web of irregular holes, or an intricately scored, thick-crusted boule being presented like Simba to the animal kingdom.
My interest in sourdough in recent months has been spurred by a number of requests about how to make my mother’s peasant bread with a sourdough starter. Initially, I thought why? The beauty of the peasant bread is that it doesn’t require a starter or a long rise or any fussy techniques; it can be on your table start to finish in three hours. Everyone will rave.
Over the years, I’ve been able to answer questions relatively easily about how to make the peasant bread morph into something else: a boule with a thick crackling crust — thank you Jim Lahey — or a thinner round to use for pizza or something palatable for the gluten-free crowd.
But achieving that sour taste — even a subtle sour taste — is something yeast, even with a long slow rise cannot achieve. And, moreover, natural leavening is natural leavening — no yeast allowed.
So I began experimenting. I tried reviving my old starter, long neglected in my fridge, and when it proved altogether spent, I ordered one from Breadtopia. I followed the instructions to activate it, and within a day, I had a vibrant, bubbling starter.
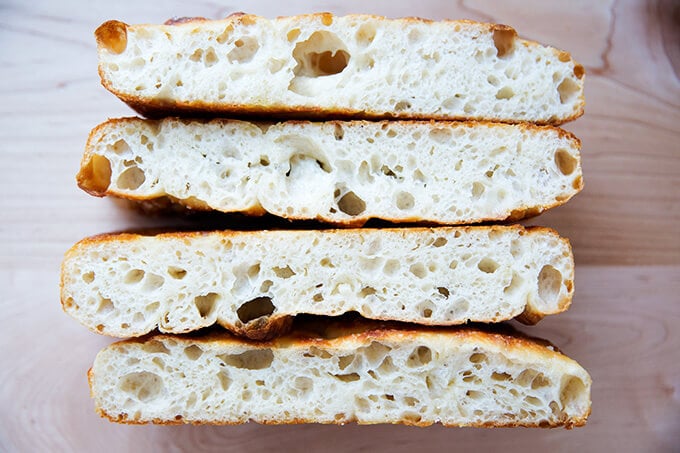
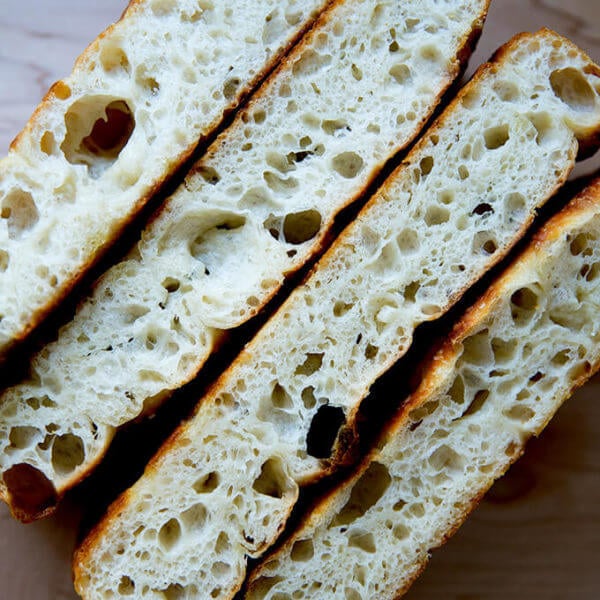
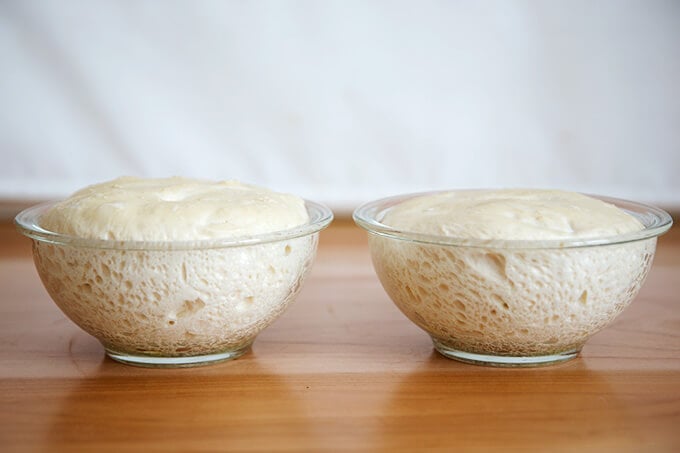
After a bit of trial and error, I soon found a nice rhythm, mixing the dough in the afternoon, letting it rise all evening, splitting the dough into two portions and plopping each into a buttered Pyrex bowl in the morning. By early afternoon, the bread was ready to bake. The resulting loaves looked just like the peasant bread, golden crusted, soft crumbed, but with a nice subtle sourness. (Photo below.)
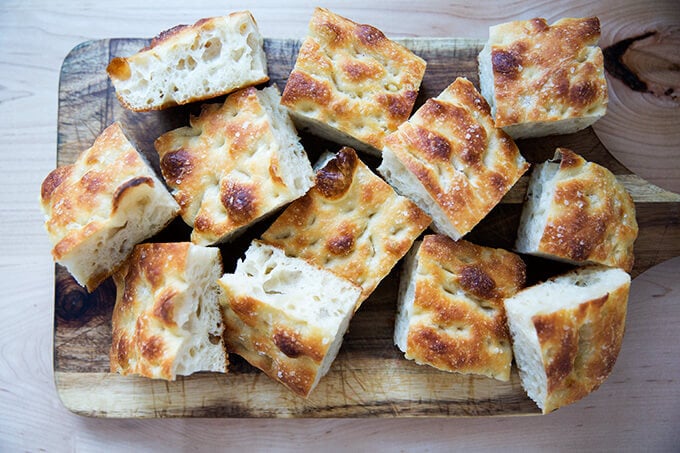
Using the sourdough peasant bread proportions, I decided to make focaccia, my favorite, a bread I love for so many reasons: its versatility — sandwich bread, appetizer, dinner bread — and its flavor and texture: the oil-crisped crust, the generous amount of salt, the chewy crumb.
I also think focaccia is an ideal bread with which to begin a sourdough journey. Why?
- First, it requires no special equipment — not a Dutch oven or a Baking Steel to create a thick crust; not two Pyrex bowls to create a golden, less-thick crust. You likely have a 9×13-inch pan somewhere in your kitchen. This is all you need.
- Second, it requires no tricky shaping technique on a floured work surface. Shaping free-standing sourdough boules is an art and it takes practice and repetition. It’s a beautiful thing when you get the hang of it, but it can be frustrating until you do.
- Third, it requires no scoring. With focaccia, you don’t need a razor sharp lame — you use your fingers to dimple the dough.
For those intimidated by sourdough bread baking, this recipe, as well as this simple sourdough bread recipe, are the recipes I suggest making first, both for their simplicity and flavor. Another great beginner’s bread recipe to try is this overnight, refrigerator focaccia, which requires minimal effort but yields spectacular results.
Curious about Sourdough? Let’s Start From the Top.
You need a sourdough starter, and you can make a sourdough starter from scratch in just about a week. I only recommend doing so if it currently is summer (or a very warm fall) where you are. While it is immensely satisfying to build a starter from scratch, there is no shame in buying one for a few reasons, namely: when you purchase a starter, you are guaranteed to have a strong, vigorous starter from the start.
I’ve purchased sourdough starters from King Arthur Flour and also from Breadtopia. Both were easy to feed and activate. Once your starter arrives, follow this guide on How to Activate, Feed, and Maintain A Sourdough Starter.
Four Reasons to Buy (or Procure) a Starter
- First, if you’re curious about sourdough, get to it! Making a starter from scratch takes weeks. I did it once many years ago following the instructions in Tartine Bread, and after nearly losing my mind, I literally jumped for joy when I dropped a spoonful of my starter into a cup of water, and it floated. Making a starter from scratch is a really cool exercise, and it’s something to be proud of should you succeed (or not!), but why not start experimenting with an active sourdough starter while you build a starter from scratch on the side?
- Second, feeding a mature starter will help you understand how to build one from scratch. You’ll observe how a starter rises and falls, what happens when you feed it more regularly, what happens when you neglect it, how it smells at various stages, etc.
- Third, they’re relatively cheap (or free if you get one from a friend).
- Fourth, maybe you embark on a sourdough journey and decide it isn’t for you. Why go through the trouble of building a starter till you know you enjoy the process of sourdough baking?
Begin with an Easy Recipe
As noted above, I think focaccia is a perfect sourdough-bread-baking starting point. It will teach you the fundamentals of working with sourdough without the potentially frustrating steps of shaping, scoring, and baking with a Dutch oven. The recipe below also can be baked in a loaf pan, another great option if you do not want to deal with shaping and scoring and Dutch ovens.
PS: Whole Wheat(ish) Sourdough Bread recipe
PPS: Essential Equipment For Sourdough Bread Baking
How to Make Sourdough Focaccia: A Step-by-Step Guide
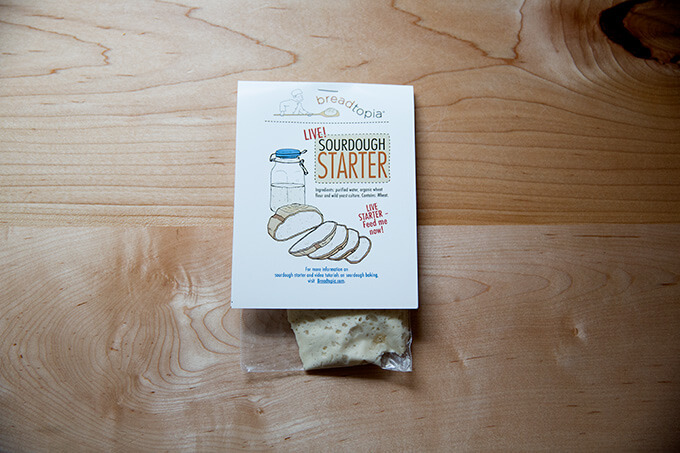
Get a starter. If you don’t have a starter and don’t have a friend who can lend you one, I recommend buying one. I bought mine from Breadtopia, and I’ve managed to keep it alive for 6 months now. Score!
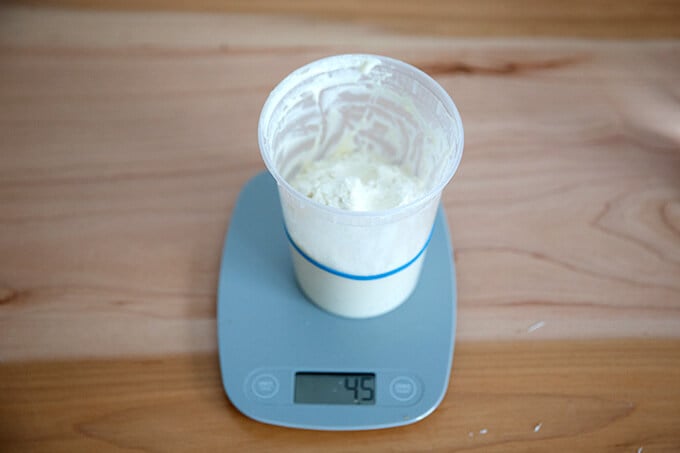
I store my starter in this quart container. When I’m ready to use it, I discard some of it, and add about 45 g flour…
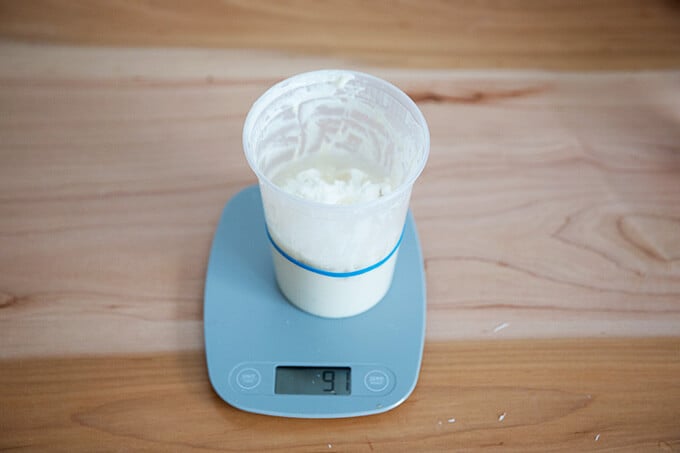
… and 45 g water. You don’t have to be exact, but when you’re getting started, I think it’s helpful to weigh both the water and flour. Depending on how long the starter has been in the fridge, it may need one or two feedings before use.
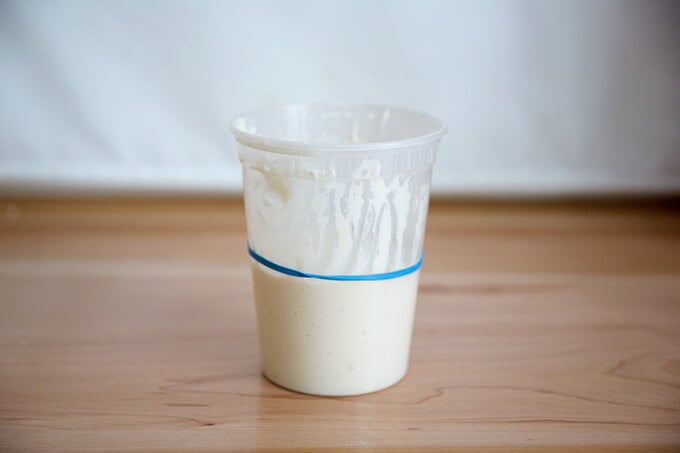
If you stick a rubber band around your starter vessel, you’ll know when …
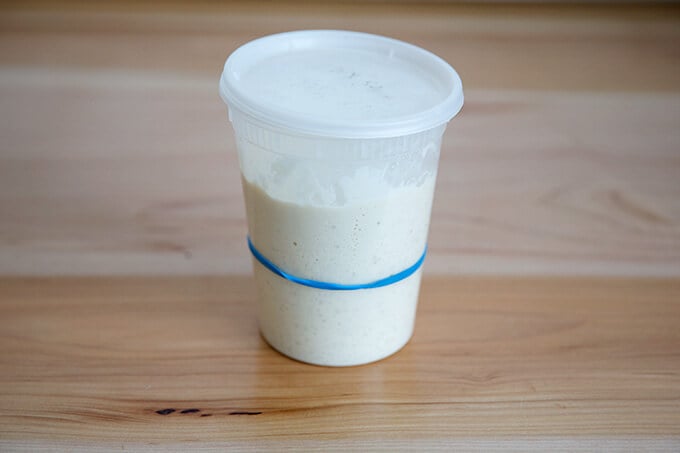
… it has doubled and is ready for use.
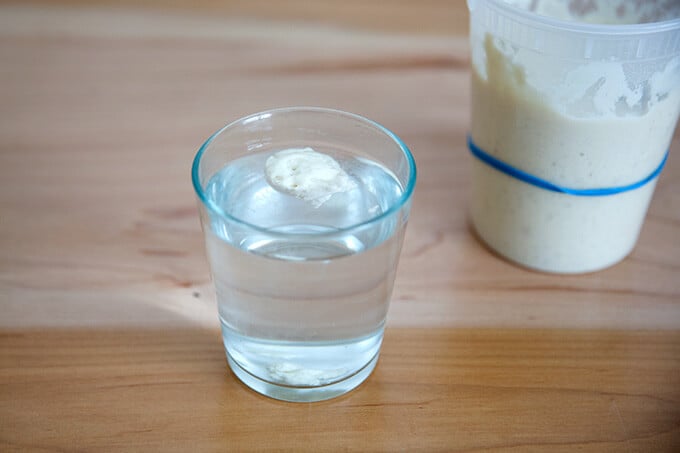
If you need reassurance as to if it’s ready, you can do the float test: drop a spoonful of starter into a glass of water. If it floats, it’s ready.
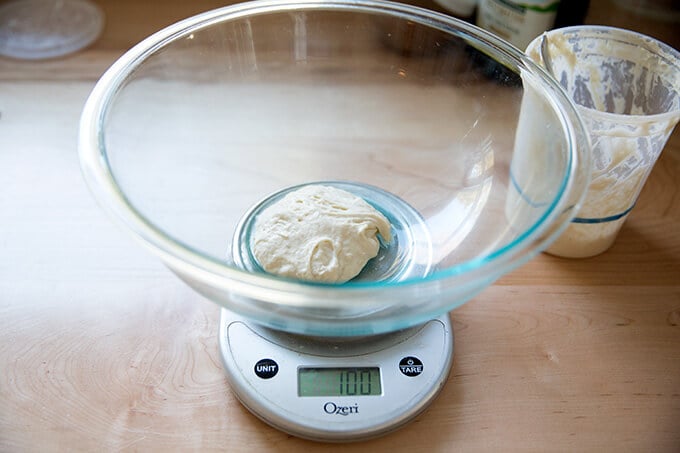
As with all bread, when mixing sourdough doughs, it’s best to weigh everything with a digital scale. Start with 100 g starter.
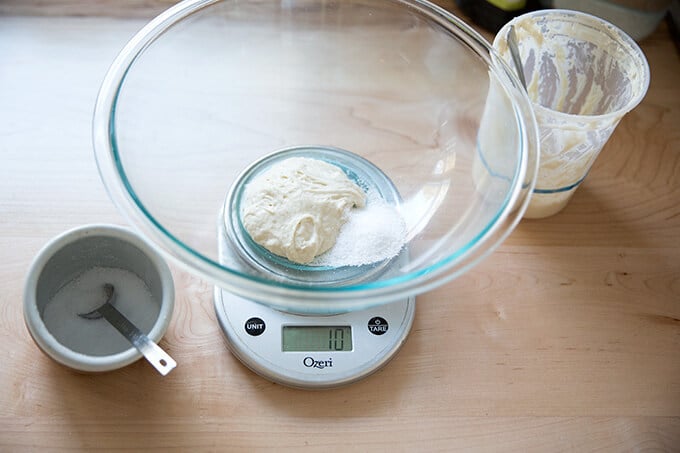
Add 10 g kosher (or other) salt.
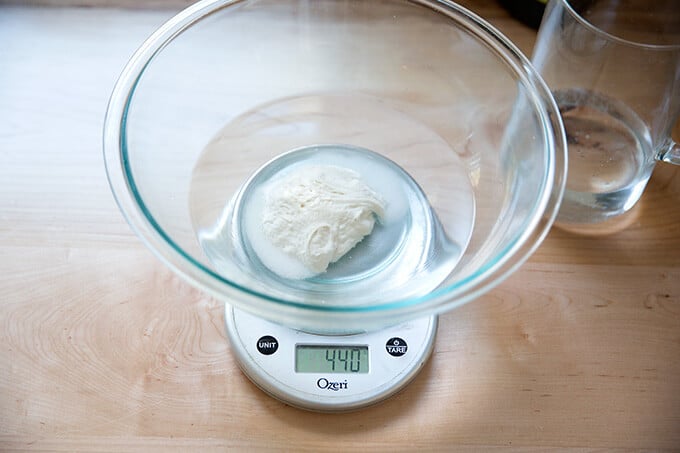
Add 440 g water. (See recipe notes: If you live in a humid environment, you may want to use less.)
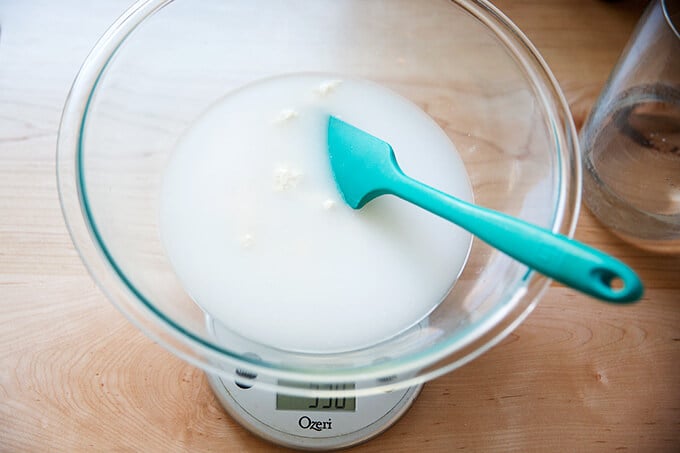
Stir to combine.
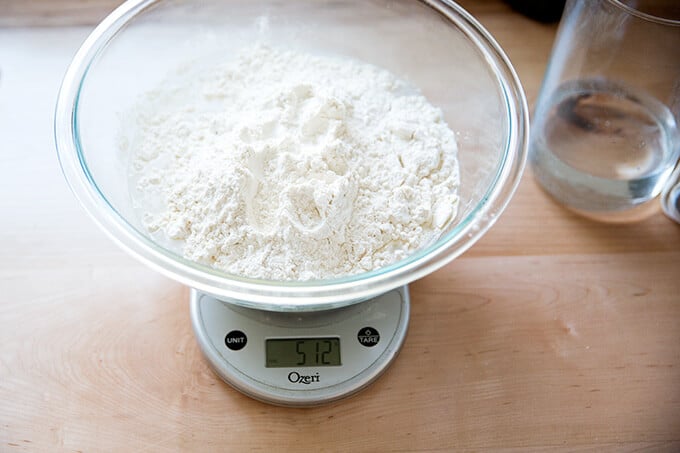
Add 512 g bread flour.
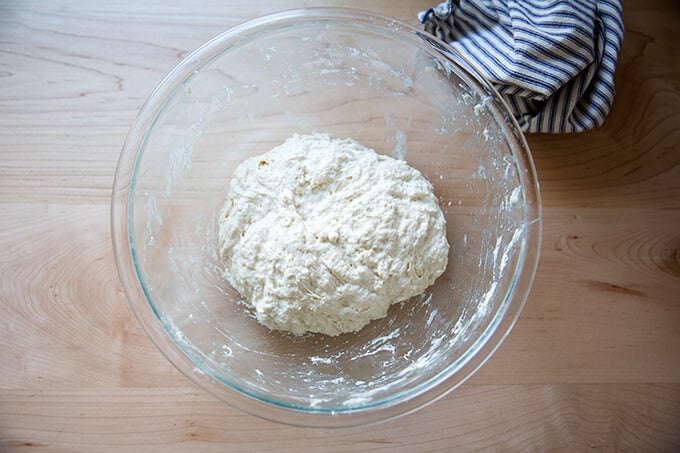
Stir to form a sticky dough ball.
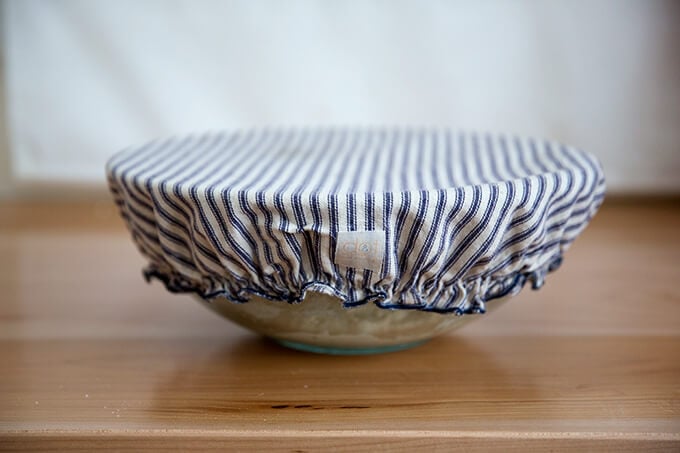
Cover with a towel or bowl cover, and let rise for 8 – 18 hours at room temperature (times will vary depending on the time of year and how warm your kitchen is … in the summer, this may take only 4 hours):
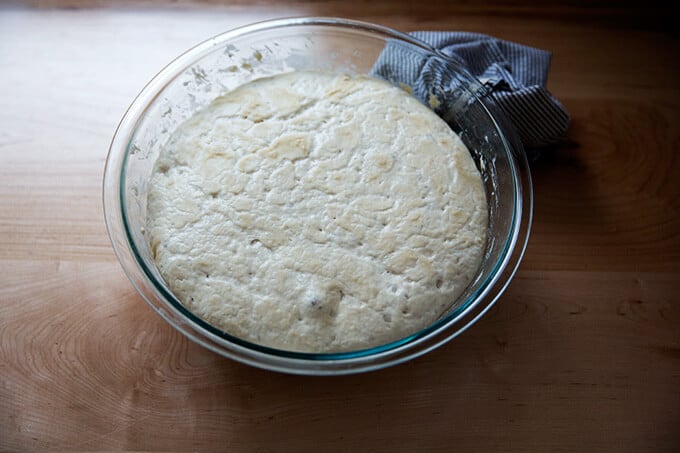
When it doubles …
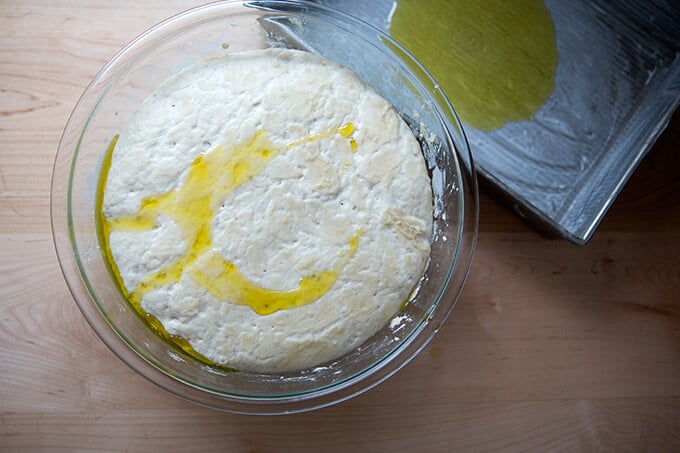
… drizzle it with some olive oil.
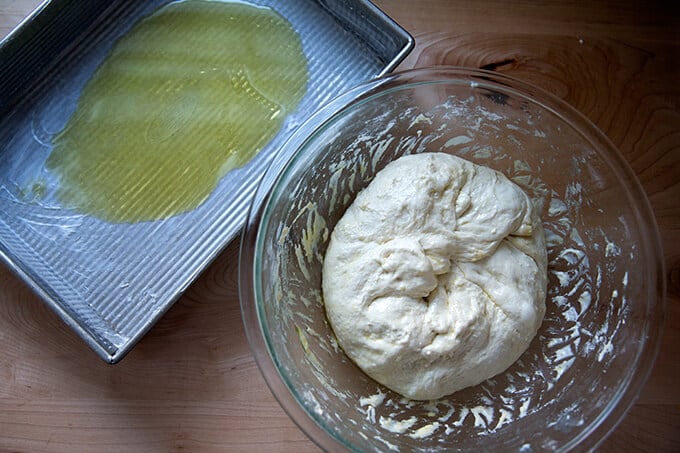
Deflate the dough by pulling the sides into the center.
Dough, ready to make it’s second rise, which will take 5-6 hours. Love this USA Pan.
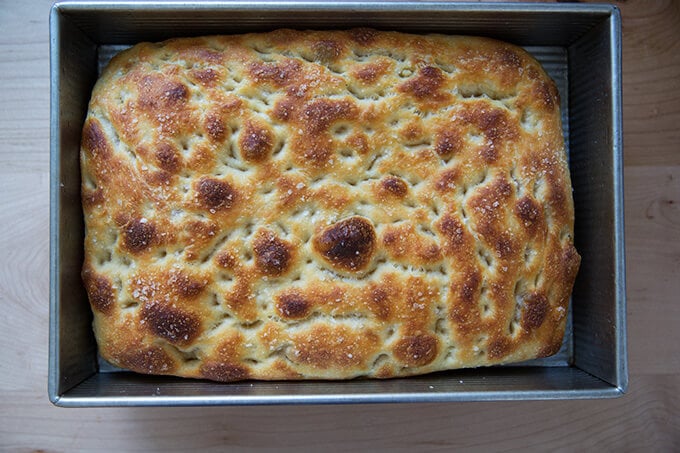
After 5-6 hours, the dough is ready to be dimpled and stretched and salted. Bake at 425ºF for 25 minutes.
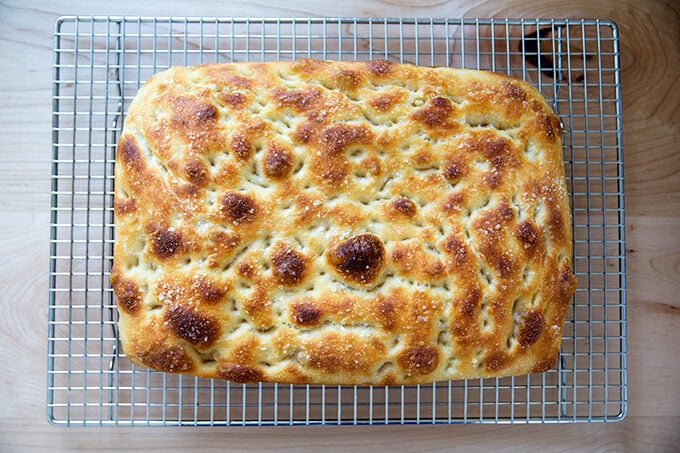
Just-baked sourdough focaccia:

Simple Sourdough Focaccia
- Total Time: 24 hours 25 minutes
- Yield: 1 loaf
Description
Adapted from my favorite yeasted, slow-rise focaccia recipe — overnight refrigerator focaccia — this recipe replaces the yeast with a sourdough starter.
UPDATE: Video guidance is here! Watch up above or click the link below in the recipe card.
What you need to make this recipe…:
- …a sourdough starter. I bought mine from Breadtopia. It was easy to activate. There are no instructions on the package itself; follow the instructions on the video here.
- …time. Once your starter is ready to go, this recipe requires an initial 4- 18 hour rise, followed by a second 4- to 6-hour second rise. After the initial rise (depending on the time of year and temperature of your kitchen), you can deflate the dough, and stick it in the fridge for 8 to 10 hours (maybe longer), which might help you regarding your schedule. Keep in mind, when you remove the dough from the fridge and transfer it to a pan, it will still need to rise for another 5- to 6- hours.
- …water. Apparently, chlorine in water can adversely affect sourdough. Leaving water at room temperature for 24 hours will allow most of the chlorine to escape.When I am in the habit of making sourdough bread, I fill a large pitcher with water and leave it out at room temperature. I use this for my sourdough breads and starter. Truth be told, I’ve used water straight from the tap and have not noticed a difference.
Water quantity: Depending on where you live and the time of year, you may need to cut the water back. If you live in a humid environment, for instance, I would suggest starting with 430 g water. If you are not using bread flour, you also may need to cut the water back a bit.
Timing:
The more I make sourdough, the more I realize so much depends on the time of year and the temperature of my kitchen. In the summer, because it is so warm, the first rise (bulk fermentation) takes between 4 – 6 hours; in the winter the first rise takes 12 – 18 hours.
The key with this recipe is to make sure the first rise doesn’t go too long — you want the dough to nearly double. A straight sided vessel (as opposed to a bowl) makes gauging the first rise easier. (Note: If your dough rises above double, don’t despair … recently my dough tripled in volume during an overnight rise, and the resulting focaccia was still delicious, light, airy, etc.)
A few thoughts: If you are making this focaccia in the summer (northern hemisphere), use 50 g of starter and check the dough every couple of hours. If you are making this in the winter, use 100 g of starter, and plan for a long first rise.
Troubleshooting: If you have issues with your dough being too sticky, please read this post: Why is my sourdough so sticky? The 4 common mistakes.
Flour choice:
- I’ve been using King Arthur Flour’s special patent flour — bought a 50-lb. bag of it at Restaurant Depot. Its protein content, 12.7%, is the same as the protein content of its bread flour. I also have used all-purpose flour (11.7%) with success, but I recommend bread flour, which seems to be more reliable for people especially those living in humid climates. If you only have ap flour on hand, you may consider reducing the water a bit — bread flour absorbs slightly more liquid than all-purpose flour.
Ingredients
- 50 g – 100 g (1/4 to 1/2 cup) active starter, see notes above
- 10 g (about 2.5 teaspoons) kosher salt
- 430 – 440 g water (1.75 cups – 1.75 cups + 2 tablespoons), room temperature, see notes above*
- 512 g (about 4 cups) bread flour, see notes above
- 3 tablespoons extra-virgin olive oil, divided, plus more for drizzling
- Nice, flaky sea salt, such as Maldon
Instructions
- Place the starter, salt, and water in a large bowl. Stir with a spatula to combine — it doesn’t have to be uniformly mixed. Add the flour. Mix again until the flour is completely incorporated.
- If time permits, perform one “fold”: 30 minutes after you mix the dough, reach into the bowl and pull the dough up and into the center. Turn the bowl quarter turns and continue this pulling 8 to 10 times. See video for guidance.
- Drizzle with a splash of olive oil and rub to coat. Cover bowl with a tea towel or bowl cover and set aside to rise at room temperature (70ºF/21ºC) for 4 to 18 hours (the time will vary depending on the time of year, the strength of your starter, and the temperature of your kitchen — in summer, for instance, my sourdoughs double in 6 hours; in winter, they double in 18 hours. Do not use an oven with the light on for the bulk fermentation — it will be too warm. It is best to rely on visual cues (doubling in volume) as opposed to time to determine when the bulk fermentation is done. A straight-sided vessel makes monitoring the bulk fermentation especially easy because it allows you to see when your dough has truly doubled.).
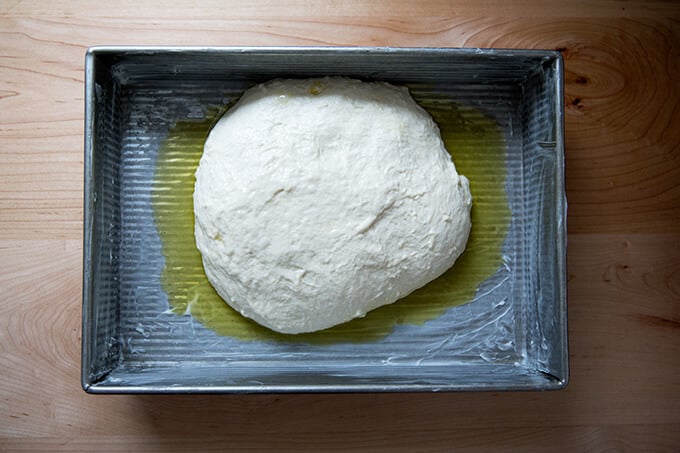
- When dough has doubled, place 2 tablespoons of olive oil into a 9×13-inch pan. (I have been using this USA Pan, which I love. I have had no sticking issues. If you are using a glass pan, you may, as a precaution, want to butter it it first — I have had disasters with bread sticking when I’ve used oil alone with other baking vessels.)
- Drizzle dough with a tablespoon of olive oil. Use your hand to gently deflate the dough and release it from the sides of the bowl. Gently scoop the dough into the center of the pool of oil in your prepared pan. Fold dough envelope style from top to bottom and side to side to create a rough rectangle. Turn dough over so seam-side is down. Video guidance here.
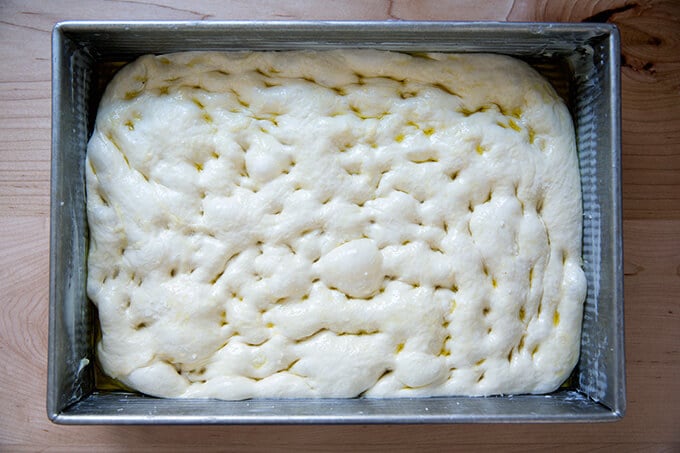
- Rub top of dough with oil. Leave alone for 4 to 6 hours, uncovered, or until puffy and nearly doubled.
- Heat oven to 425ºF. Rub hands lightly with oil, and using all ten fingers, press gently into the dough to dimple and stretch the dough to nearly fit the pan. Sprinkle generously with sea salt. Transfer pan to the oven and bake for about 25 minutes or until golden all around. Remove pan from oven and transfer bread to a cooling rack. Cool at least 20 minutes before slicing.
- Prep Time: 24 hours
- Cook Time: 25 minutes
- Category: Bread
- Method: Oven
- Cuisine: Italian
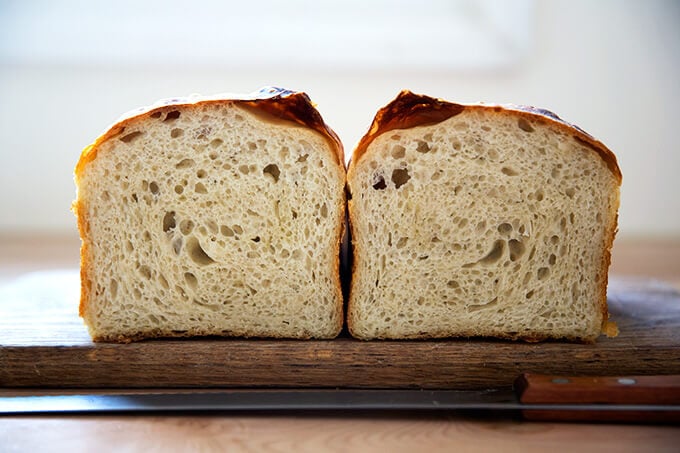
Incidentally, this same recipe can be used to make sandwich bread. You need one large loaf pan, 10×5-inches, such as this one.
As noted above, this same recipe can be baked, like the original peasant bread recipe, in buttered Pyrex bowls. More on this soon.
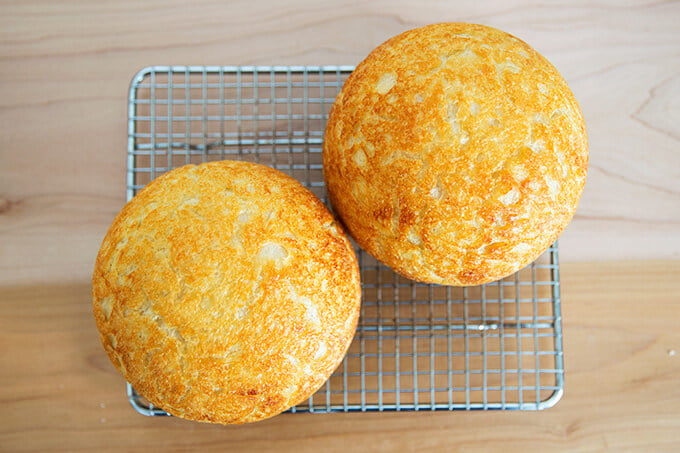
Just-baked sourdough peasant bread.
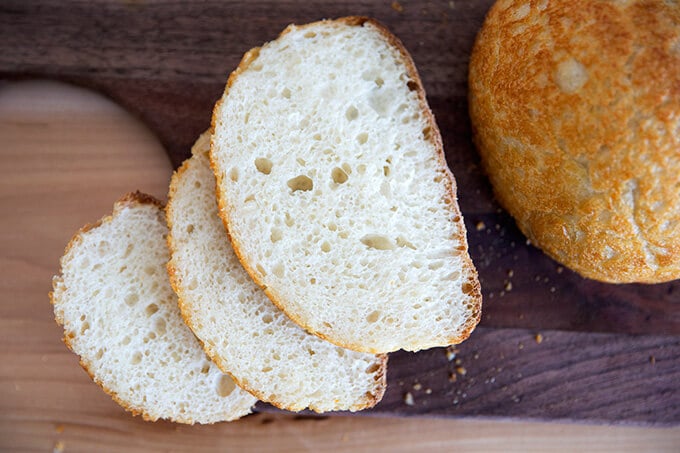
Sliced sourdough peasant bread.
This post may contain affiliate links. Please read my disclosure policy.


1,237 Comments on “Simple Sourdough Focaccia: A Beginner’s Guide”
I picked up your book for the quick bread recipes and I love them. I recently got a bread machine second hand for the same reason- quick and easy homemade bread. One of my bread machine books has recipes for sourdough bread using a starter that you make from active dry yeast and feed with equal parts (in cups not weight) flour, water, and some sugar. The bread machine loaves are baked with this starter and added commercial yeast. I’ve tried to start a starter with wild caught yeast as you describe here, but the fussiness of it all made me give up. I’m wondering if you know anything about the sort of starter I’m using and how it’s different from sourdough risen without commercial yeast. I haven’t tried my starter with your peasant bread recipe yet, but maybe I should!
Hi Chiara! So happy to hear this re book. Thank you 🙂
Regarding your question about the starter, I think the perspectives vary. Purists would say that a true sourdough starter would not contain any commercial yeast (active dry or instant) — it would be made purely from wild yeasts. And some would say that sugar doesn’t belong in a starter either. That said, I’ve seen many starter recipes that call for feeding with a little sugar or honey, so again, there are a wide range of thoughts on this subject. How are your loaves turning out? Are you getting a nice sour flavor?
The loaves are wonderful. Not too sour, but I think that has to do with the development of my starter. I generally find sourdough easier to digest, so it’s nice to have a simple homemade alternative that doesn’t require picking up a bread baking tome to figure out. I have three young kids at home and now is not the time in my life to figure out sourdough, unfortunately:)
So happy to hear this, Chiara! And I hear you … the more I dig into sourdough, the more overwhelming/intimidating I find it becomes. I like simple. Next up, I’m hoping to work some freshly milled flours into the dough. Thanks for taking the time to write, little ones and all 🙂
Hi there. What size pyrex bowls are you using here? Does the focaccia recipe make one or two of those loaves? Thanks!
Hi! The Pyrex bowls are each 1-qt. They’ve become a little harder to find and more expensive, but they’re out there. The recipes makes 1 focaccia or 2 Pyrex bowls or 1 large loaf pan. Hope that makes sense. Let me know if you need clarification.
Girl, am in LOVE with your mom’s peasant bread in Pyrex bowls. (Isn’t EVERYbody???)
Cannot wait for your sourdough version….
Drooling already….Mic
Yay!! Hope you love it. Can’t wait to hear how it turns out.
Hi
Do you have a gluten free version?
No, I’m afraid I don’t. If you’re looking for a good gluten-free bread, however, I would pick up a bag of Cup4Cup gluten-free flour — that’s the brand I love the most — and start with this recipe: gluten-free peasant bread
Wow, One of the best sourdough start up walk through articles that I have found. Wonderfully explained and the pictures are stunning. Thank you for sharing and this has totally inspired me for the bread dish this Sunday! Awesome work and thanks again.
Awww, thanks. Good luck on Sunday. Let me know if you have any questions. I’ll be sourdough baking this weekend as well. 🙂
I am just starting on the sourdough adventure. I bought my starter from breadtopia through Amazon. I thought it wasn’t going to grow, but now I have about a half quart of healthy looking starter. You said that when you are ready to bake you throw out half of the starter and add flour and water. Is that after you remove what you need for your current baking?
I’m still a loyal devotee of your peasant bread variations — especially the quinoa and flax, oatmeal, and rye (oh, I have never had such good rye bread!). But adding sourdough will be a grand thing to do also. Thanks, Alexandra!
Hi Sunie! This is so much fun! OK, so I store my starter in the fridge. When I want to use it, I take it out, discard most of it (maybe 75%?) then add equal parts by weight flour and water. Within 6 hours typically, the starter has doubled. If it hasn’t, I’ll feed it again, without discarding any of it.
After I use it for whatever bread I am using, I typically feed it again before storing it in the fridge.
Does that make sense? Please let me know if not! And thank you re peasant bread 🙂 🙂 🙂 I am loving exploring the world of sourdough, but if anything, this sourdough journey has made me appreciate the peasant bread even more.
One final note: I have been using bread flour for this focaccia. I did this unintentionally — bought a 50# bag of KAF’s special patent flour from restaurant depot and didn’t realize this had the same protein content as bread flour. There’s no marking on the bag. But, this is what I used while experimenting, so it’s what the recipe is designed for. Bread flour or ap flour doesn’t make a difference in the peasant bread, but I’m finding it does for the sourdough.
What’s the cook time for the focaccia in the loaf pan? Is it the same?
Thanks!!
Hi! I do 15 minutes at 425F, then lower the heat to 375F and continue baking for 25-30 more minutes. I’ve been checking the baked bread with my instant read thermometer—if it’s 207ºF or above, it’s good.
Dope thanks!
I love this sour dough focaccia! I also made the dough and let it rise in bowls, and one day, I baked half as focaccia in a quarter sheet pan and half in a pyrex bowl. Every loaf was a success. If you live in a humid climate as I do, you might use a little less water, so the dough isn’t quite as slurpy, but really it doesn’t matter. It all bakes really well. The taste is almost sour sweet, although there’s certainly not any sugar in it. My husband who doesn’t like sour dough bread loves this bread. It’s fun to make and once you have a routine, it’s easy to work around. If you have to go out, you can always slow down the rise by putting the bowls in the fridge. Another great variation on your peasant bread, Alexandra!
Great to hear this, Mary!
Good morning, Alexandra! Just home from Easter holiday and discovered this post. You always explain and describe THE best… Thrilled to find you using sour dough. My starter is from one 65 years old (from a friend and from her family) and I’ve had mine almost 20! Sooo basic and useful for a family. Might you please convert these weights to cups so that I might try this soon?Absolutely love focaccia and a version of sourdough that I don’t have. Thanks you.
(Pssst. IF you might want my recipes, I would be happy to share hard copy by mail… Just send address by email and I will copy for you. Some are so old, they don’t copy well enough using my iPad…)
Ellen, hello! And sorry for the delay here. Just updated the post so that in includes volume measures in addition to the weights.
WOW: that is crazy about your starter. So fun. And I would love some of your recipes! Thank you for sharing 🙂
I’ve been trying out many different recipes, and this one is by far the best. I had to substitute some of the bread flour with AP flour because I didnt have enough, but the texture was still awesome. My starter is a whole wheat one, and it seemed perfect. This is my new go-to recipe, and I’ll be making it at least once a week. Thank you!
So happy to hear this, Danielle! I love this one, too … so pillowy 🙂 🙂 🙂
Hi Ali, did you cover the focaccia when it was resting in the sheet pan? If not, would it dry out during its second rise? Incredible website, looking forward to trying out many recipes, thank you!
Hi Nunzia! I do not cover for the second rise. It’s coated in olive oil, so it won’t dry out. Thank you for the kind words 🙂 🙂 🙂 Let me know if any other questions arise.
Hi, I’ve been making sourdough for a while now. This is the first time I’ve tried focaccia. The dough was very wet, which I expected, and the fermentation was very slow, so I got a really nice flavour. I’m not sure if the texture is how it should be as it was very gummy, is this normal? It was airy as a sourdough should be but I’m not keen on the gummy, almost slimey texture (a bit like a British crumpet). Any advice?
Hi Hannah! Question: are you measuring the flour with a scale? I imagine you are, but I always have to ask before I start troubleshooting. The dough definitely is wet, but I haven’t experienced the gumminess. Do you live in a humid area? My first suggestion would be to cut the water back. Try cutting it back by 55 g (which is about a quarter cup) and see how you like the results.
Great recipe, I’ve used it countless times now and it’s almost always come out perfectly. I must say, I usually halve the recipe because I prefer a thinner end result. I get requests to make this frequently from family and friends, thank you!
So happy to hear this, Alicia! Great to know that a half recipe works.
This focacchia is absolutely delicious! It was my first experience with sourdough, and it worked out perfectly! The focacchia did a nice surprise for my wife, and we had a lovely Italian dinner at home. I kept the dough in a microwave with the lamp turned on, which makes enough some heat, so only after 3 hours the dough doubled in size! The second rise took about 2 hours – pretty quick! I also have to highlight, that this recipe required minimal labor. It’s hard to beat the taste to labor ratio of this recipe!!
So happy to hear all of this, Roman!!
I tried this recipe twice but both times the dough were running and not formed. I do use a scale and bread flour, so not sure what I did wrong. Help!
Hi Pam! Question: Do you live in a humid climate? Also, do you know the protein percentage of your bread flour? Great to hear you are using a scale. I think the first thing you should do is cut the water back by 1/4 cup or about 70g. Second: how long roughly is the first rise going? If you have a straight-sided vessel to let the dough rise in, you can more accurately gauge when the bulk fermentation is complete, but the goal is to deflate the dough and get it into the pan just as it doubles in volume or just before. I have more details about my sourdough process on this post, which might be helpful to read before proceeding.
Are you going to do a Sourdough Peasant Bread recipe soon as you said (“More on this soon” at the bottom of this post)? Would love to know if I can use this recipe & do the same thing by putting in Peasant bowls, let it rise etc. What would the Bake time be for them? Same? I do like these bowls as I can eat one bread & freeze the other or gift it. Thanks so much for your bread recipes as they are so easy to follow along as well as vids! Love your simpleness!
Hi! I need to do a more extensive follow-up post, but I essentially use this recipe: https://alexandracooks.com/2019/04/17/easy-sourdough-sandwich-or-toasting-bread/ but I split the dough in half after the first rise and place it in the buttered bowls, where it then rises again. This second rise in the bowls can take 4-5 hours or (less or more) but as with the regular peasant bread, I just do it to eye: when the dough crowns the rim of the bowl, I stick the bowls in the oven. Let me know if there is anything else! I will try to do a follow-up post soon. Thank you for the kind words 🙂
Would you say the bake time is the about the same?
So far I’ve made your peasant bread (love, Love, LOVE!), focaccia, sourdough focaccia, sourdough wheat white, naan bread, etc. Can’t decide which is my favorite!
Thank sooo much!
So happy to hear all of this! Yes, bake time is the same: 15 minutes at 425ºF and 17-20 minutes at 375ºF. Happy baking!
Thanks so much for your time. I’m excited to try this! Will do my best to report back! You’re da best kook…as my kids would say when they were little 😉
PS: My daughter is gluten free & I made her your gluten free peasant bread when she came home this past weekend. She said it has so much more flavor than any she’s had. I was grinning from ear to ear when she said that…if she only knew (teheehee) how easy it is. Of course she wants the recipe
Yessss…success! I did! It worked Alexandra! So simple & yet sooo food! Thank you!! Would a 1/2 c of Sprouted flour be good in this?
Wonderful! And yes, I think 1/2 cup of sprouted flour would be delicious!
Hi!
I normally never stop and write reviews but for this, I had to.
This bread is absolutely FANTASTIC!!! My family won’t stop talking about it:)
It was so easy to prepare, and not fussy at all. I did have to add a bit more flour than it called for, but that could have been because i put the full amount of sourdough starter in and I also used bread flour. I also sprinkled a bit of rosemary over the top. It turned out golden and crispy on the outside but still chewy in the middle with just the right size bubbles!! I served it with homemade Beef Stew, and it was so yummy!!
Definately will be adding this to my sourdough recipe book.
Thank-you so much for this wonderful recipe!
So happy to hear this, Anna! And yes, I think adding more flour or using less water is critical for some people especially if they live in humid environments … are you, out of curiosity, in a humid place? So happy to hear this turned out well. It’s one of my favorites.
I live in southern Maine 🙂 My weather channel says:35% humidity. Not sure if that is a lot or not!
However, i learned that as long as it is a sticky dough, it will bake wonderfully.
Just about to bak it now. I mixed up two batches last night and we will have them with dinner (spaghetti and meatballs). Everyone can’t wait!
Thanks again!
Anna
I have no idea if that is humid or not either 😂😂😂 So happy to hear all of this. Spaghetti and meatballs sounds so good right now. Comfort food at its best!
Hi! I’ve just entered the sourdough world and I’ve looked and made a lot of research and your website is the best. You make it seem so easy and fun. Thanks a lot. I’m making focaccia on sunday, yohoo!
Wonderful!
I really love the simplicity of this recipe. So good! Only request is to have the video links updated. I’ve tried to follow all the video links on the recipe for turning the dough out and they all are said to be unavailable. Do you have a YouTube channel? I have been watching a lot of sourdough videos. Love learning more about sourdough and all it entails!
Hi Candice! I do have a youtube channel, and I have a ton of sourdough videos on this post: Easy Whole Wheat(-ish) Sourdough but I’m confused about the links on this post …. going to find and edit now. Stay tuned!
Delicious! Just starting out with sourdough & the taste of this was perfectly balanced & just sour enough. Mine didn’t get much of a rise and was a bit denser than I think it should’ve been — any ideas what could have gone wrong? It’s winter, but I did let it proof overnight (~18 hours). I used AP flour and used 420 grams of water.
*Sorry, I used 430 grams. Thank you, looking forward to trying again!
Hi Elle! I just did this last night, too 🙂 When you let it rise for 18 hours, how much did it rise? Did it double or triple? Are you using a straight-sided vessel for the bulk fermentation? Also, how long did you let the second rise go?
On my first rise, it probably more than doubled (definitely not tripled) but perhaps it proofed too long; unfortunately, I don’t have a large straight-sided vessel like you suggest but I know that would be much easier to judge growth that way. On my second rise, I gave it ~4 hours. Making bread involves so many minor decisions…! Trying again today with a more modest first rise (~10 hours) so fingers crossed for a slightly fluffier result.
Sounds like you’re doing everything right, Elle! ALSO: I added a video this morning, so check it out because it might help you as a reference point in terms of dough texture, etc. You are so right about all of the minor but critical decisions. Happy Baking!
This was absolutely fantastic and so easy. Your instructions are excellent, especially all your notes about flours and timing. I used AP flour and baked in a glass dish, well buttered as you recommended, and it turned out wonderfully. Thank you!
So happy to hear this, Sarah! 😍😍😍😍
I appreciate your video. No rambling on and on that only draws attention from what is really happening. The focaccia looks delicious.
Thank you, Linda… means a lot 💕💕💕
Hi. This turned out delicious. However, baking it for 25 min wasn’t nearly enough. Left it in for ~35. It still wasn’t quite as dark as yours and was undercooked (doughy/gummy) inside – though crunchy outside and delicious! I’ll try again.
Hi Sarah! Glad it was still delicious despite the doughy-ness. Glad you’ll try again! Questions: does your oven typically run cool? Do you have an oven thermometer? Also: do you live in a particularly humid area? I ask only because if yes, you might consider reducing the water. Finally: what material is the pan you are using.
Thank you so much for the detailed step-by-step guide along with this recipe. I watched your videos, studied your photos, read your other posts, followed this recipe, and the end result for my first attempt at sourdough baking was an incredibly delicious focaccia!
Oh Yay! Sheila, I’m so happy to hear this 🎉🎉🎉
It has been 24 hours and my dough has only risen 50%. We used our strong sourdough starter. It’s growing but it’s just extra slow. How long should I let it go for? Our kitchen was relatively cold last night so we’ve moved it to the oven (not on).
I tested my sourdough starter, too, and it floated. There are bubbles (so it’s growing).
Are you using a straight-sided vessel to gauge the growth? If it’s growing, I’m inclined to tell you to let it go a little longer. Did you make any changes to the recipe? What type of flour are you using?
You can also email me a photo: alexandra@alexandracooks.com
Thanks, Alexandra!! — it was at about 75% of doubling (in a straight sided jar) after and I went ahead and decided to do the second proof. The dough is really runny/soupy, more like a batter. I do not live in an unusually humid environment. I used KA bread flour, and followed the recipe to a T. I wasn’t able to fold the dough though because of how runny it was. I’m going to let it do a second rise (or see how far we can get it) and then try baking it. And if it doesn’t work, I’ll try again. 🙂
Ok, so interesting, Audrey. It sounds as though you are doing everything right. And typically, the dough is less wet with bread flour.
When you mixed the dough up, did it look like the dough in photos or in the video? Glad you’re moving forward… keep me posted. The second rise has been taking about 6 hours for me in my cold kitchen.
Interesting indeed! The dough looked like it looked in the photo and when I did the fold at 30 min it was a little sticky, but not overly so. Will definitely keep you posted!
OK, yes, please do!
Interesting indeed! The dough looked like it looked in the photo and when I did the fold at 30 min it was a little sticky, but not overly so. Will definitely keep you posted!
I’m very excited to try this recipe!!! Thanks for the thorough, easy to understand instructions!
I am wondering if you have every tried to sub in a small amount of semolina/durum with the wheat/bread flour. Any thoughts on this?
Yay! I have not used semolina in this specific recipe, but I have with others, and I love its flavor/color. Go for it. I might start with only 50 g and depending on how you like it, adjust with more or less from there.
Ali–it has been too long! just wanted to pop in and say that I have a batch of the focaccia in the oven as we speak. I combined your recipe with Samin Nosrat’s recipe, which basically means I added a little honey to the dough and used a brine over the top before baking. It’s super bubbly and I cannot wait to use it for sandwiches! I hope you are all well and once again, thank you for the amazing work you do!
Oh Tracey, HELLO!! It is sooooo nice to see your name here. I’m so happy to hear all of this … I have yet to try that salt water brine. I loved that episode of SFAH. Sending you so much love 💓💓💓
Love this. Changes noted below.
1) 1 hour autolyse before adding salt. I really, really, really believe this is critical to proper gluten development. Really. ESPECIALLY if you’re using AP flour.
2) Total of 5 rounds of stretch-and-fold before heading off the the fridge for overnight fermentation. Again. Gluten development.
3) As mentioned above, overnight bulk proof in the fridge. This helps develop the flavor. If you rush your bulk, don’t be surprised if your bread doesn’t taste sour at all.
4) Allow dough (still in proofing container) to come to room temperature (~2 hours) before dumping into baking vessel with oil.
Remaining steps as outlined above.
Resounding success. Perfect appearance, smell, mouthfeel, and taste!
One thing I’ll mention for those that may consider an earthenware baking vessel – plan to cover the top of the focaccia with foil and continue baking until an instant read thermometer reads 207. It may appear beautiful and golden after 30 minutes, but it will NOT be done in the middle.
Don’t say I didn’t warn you….
Thank you for all of this Santos! So happy to hear it was a success and thank you for sharing your notes regarding autolyse and fridge ferment — so helpful for people. Also: investing in an instant read thermometer was one of the best things I did for bread baking — having that assurance that it’s done upon seeing 207ºF is everything. Thanks for writing!
Wow 🤩 it’s awesome 😎!
Yay 🙂 🙂 🙂 So happy to hear this Lily.
At which rise are people putting this is the fridge? Can I get to the second step when it is in the 9×13 pan and put it in the fridge then? Sourdough doesn’t rise in the fridge usually so would I take it out and let it sit the 4-6 hours untouched?
Yes, exactly! I’ll add a note to the recipe.
When you stick it in the fridge in the 9×13 pan, be sure the dough is covered with oil. I would cover the pan as well to prevent the dough from drying out. And yes, next day, remove from fridge and don’t touch it for at least 4-6 hours. Because the dough will be cold, it may take longer at room temperature than 4-6 hours … but as always, rely on the visual cues. If your kitchen is warm, the timing might stay the same.
Oh. My. Word. I just made this for the first time (used Santos’s suggestions since I was using AP flour) and it is hands down the BEST thing I’ve ever baked! I ended up using 420g water (didn’t see your reply to my other comment until too late) and texture was perfect. Baked in a 9.5 x 13.5 glass pyrex–it needed 35 mins uncovered and 5 mins covered with foil to bring it to 207F (I’m in Denver in case altitude may have something to do with that). Astonishingly good. I am in heaven. Thank you!!!
Oh Gwen! So wonderful to hear this. And I’m so glad Santos’s tips helped. Yay 🍞🍞🍞🍞🍞 Great to hear this worked at high altitude, too.