
Easy Sourdough Sandwich Bread
This post may contain affiliate links. Please read my disclosure policy.
As I mentioned a few weeks, a number of requests about how to make my mother’s peasant bread with a sourdough starter encouraged me to dip my toe into the wonderful world of naturally leavened breads. You can read more about that experiment here, which led to this simple sourdough focaccia recipe, an adaptation of my favorite yeasted, refrigerator focaccia.
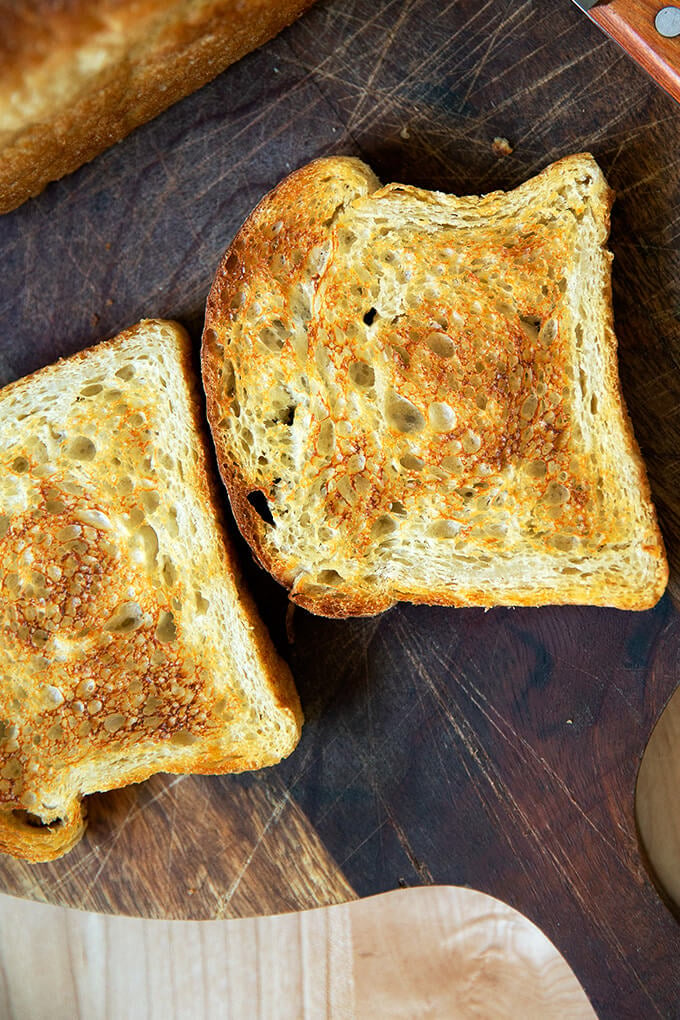
It also led to this sourdough toasting bread, which is essentially the same formula, just baked in a different vessel and without the slick of oil and sprinkling of sea salt on top. I’ve been making this bread even more often than the focaccia these days because I love the shape: it’s so nice for morning toast and for sandwiches.
PS: How to Build a Sourdough Strater from Scratch
PPS: How to Activate, Feed, and Maintain A Sourdough Starter
Simple Sourdough Toasting Bread: What You Need
- A sourdough starter. I recommend buying one (read why here). But if you’re up for it, you can make one from scratch in just about a week.
- Time. As with the focaccia, this bread rises first for about 6 to 18 hours (depending on the time of year and strength of your starter), then again for another 4 to 6.
- A large loaf pan. I’ve been using this 10 x 5-inch loaf pan. If you only have two smaller loaf pans, such as 8.5 x 4.5-inch pans, you’ll need to split the dough in half after the first rise.
That’s it! Ready? Here’s the play-by-play:
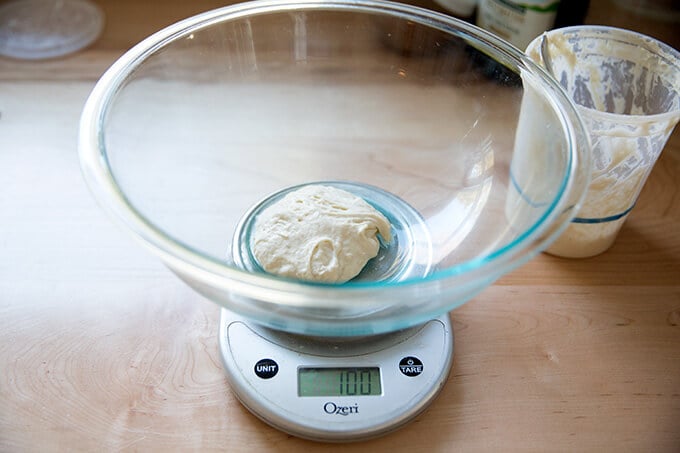
As always, when mixing sourdough doughs, it’s best to weigh everything with a digital scale. Start with 100 g starter. (If this looks familiar, it is: this is the same basic process for the sourdough focaccia.)
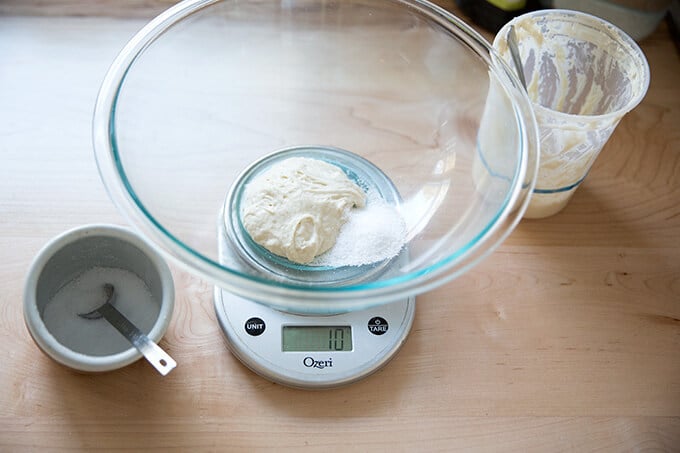
Add 10 g kosher (or other) salt.
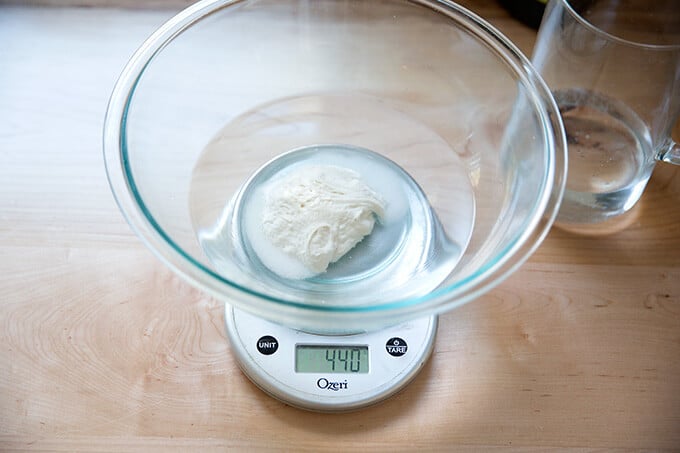
Add 430 g water. (Or less, see recipe for notes.)
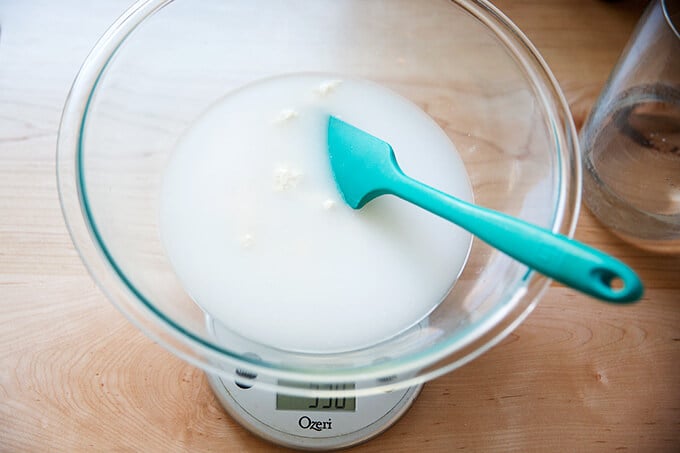
Stir to combine.
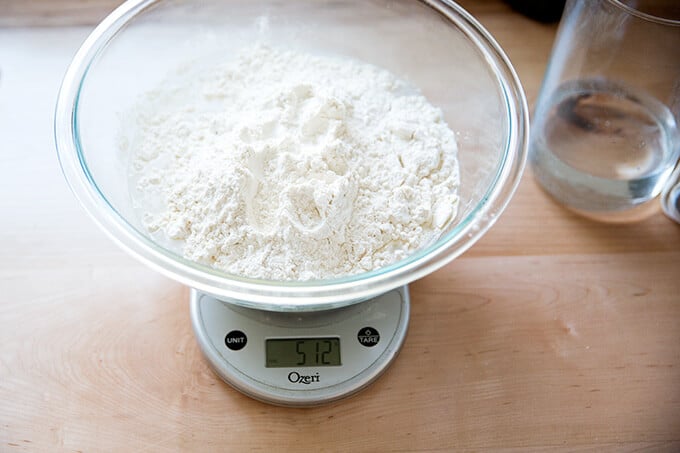
Add 512 g bread flour.
Stir to form a sticky dough ball.
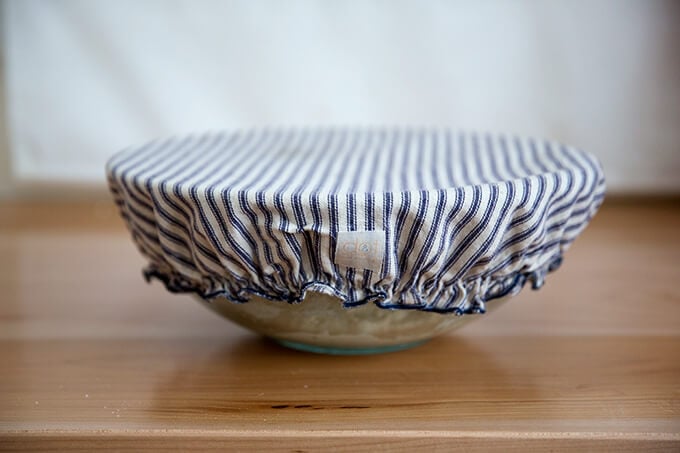
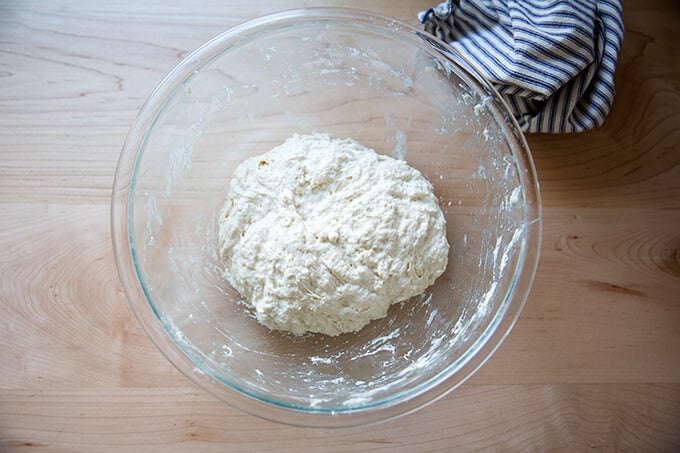
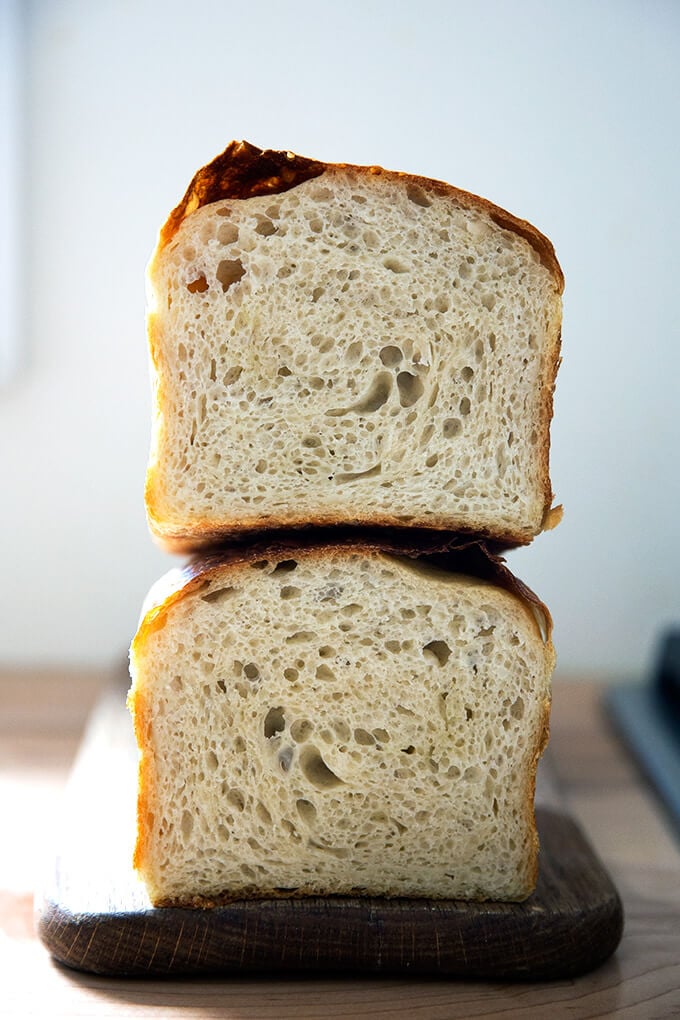
Cover with a towel or bowl cover, and let rest for 30 minutes. Then, perform a series of stretches and folds. See video for guidance. Repeat this 3 more times for a total of 4 sets of stretches and folds during the first two hours. Then, let rise for 6 to 18 hours* (see recipe notes) at room temperature:
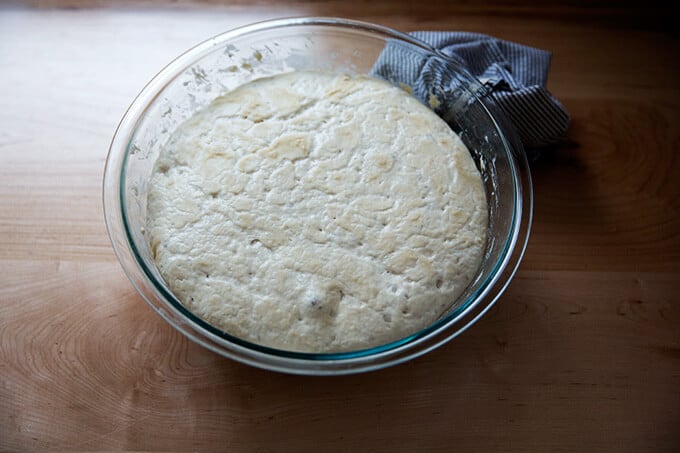
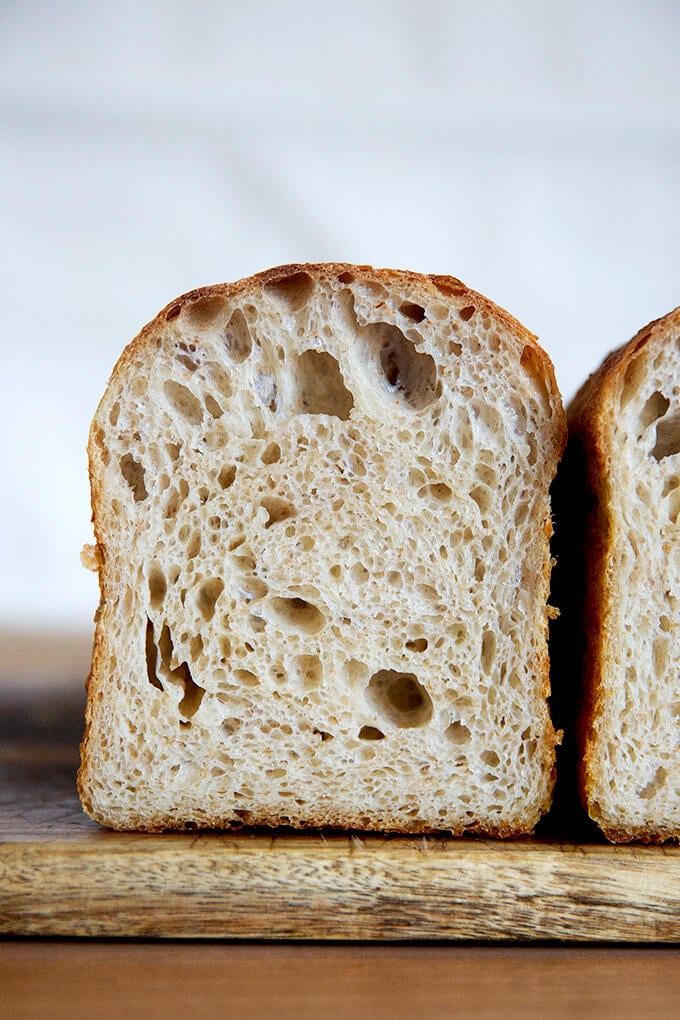
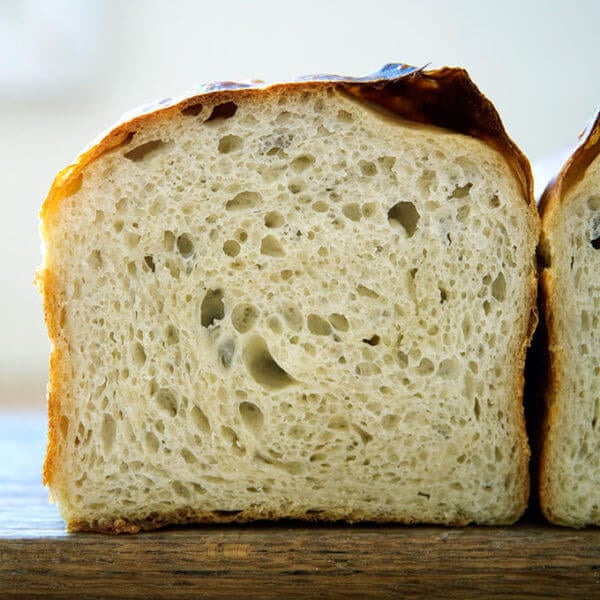
After 6 – 18 hours, it will look something like this:
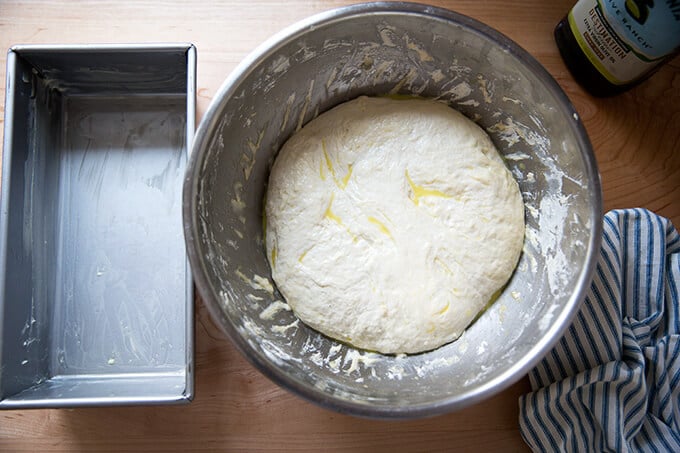
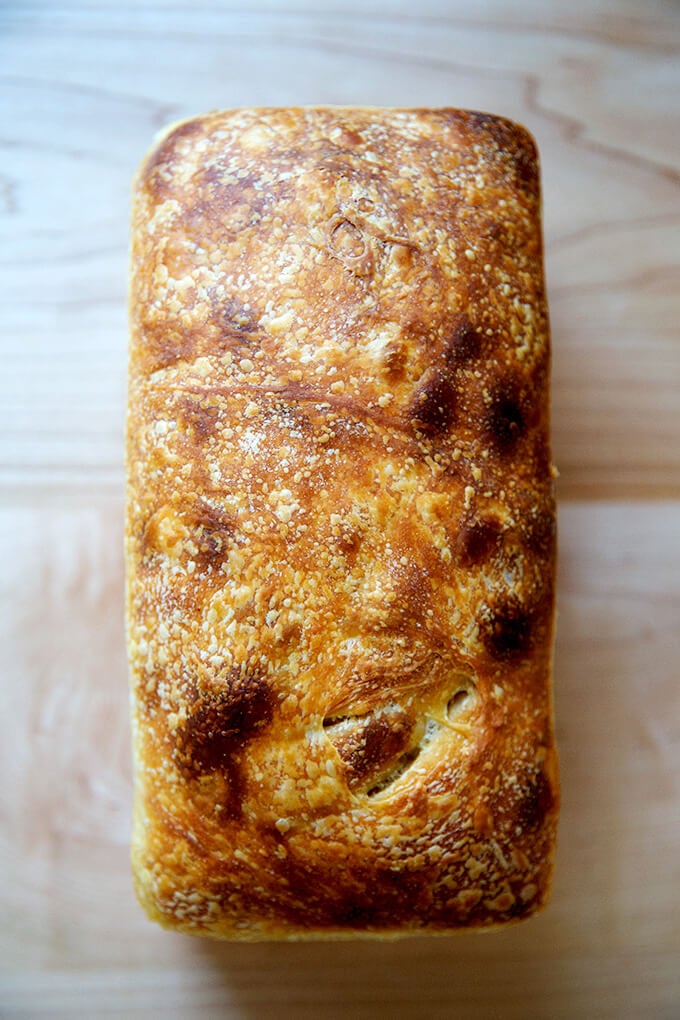
Drizzle the surface of the dough with a little bit of olive oil; then fold the dough inwards from the sides to deflate.
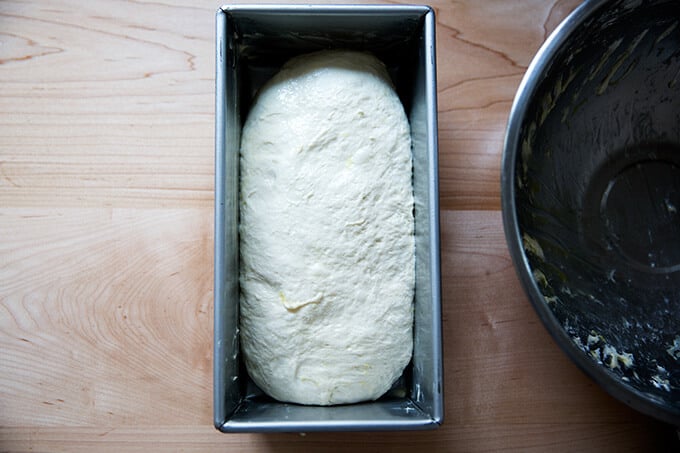
Transfer dough to loaf pan.
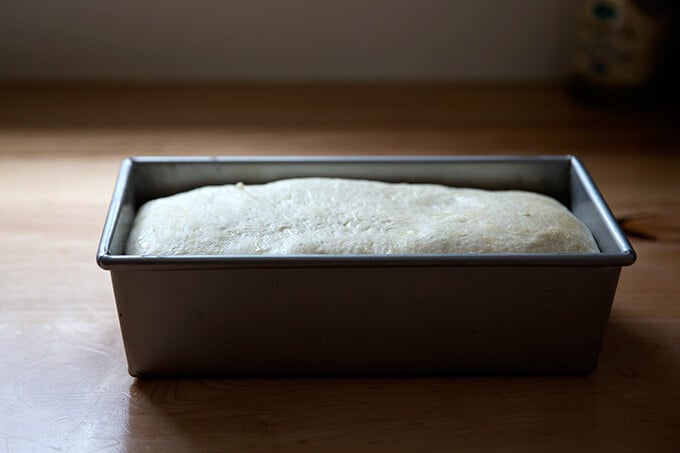
Let rise till dough just begins to crown the rim of the pan, about 6 hours.
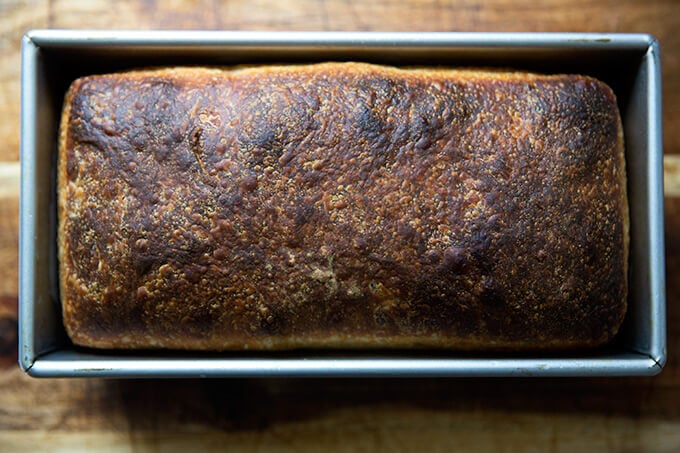
Bake for about 45 minutes.
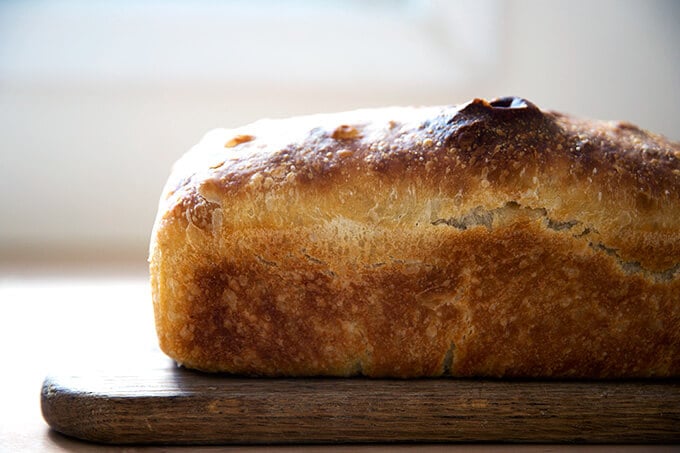

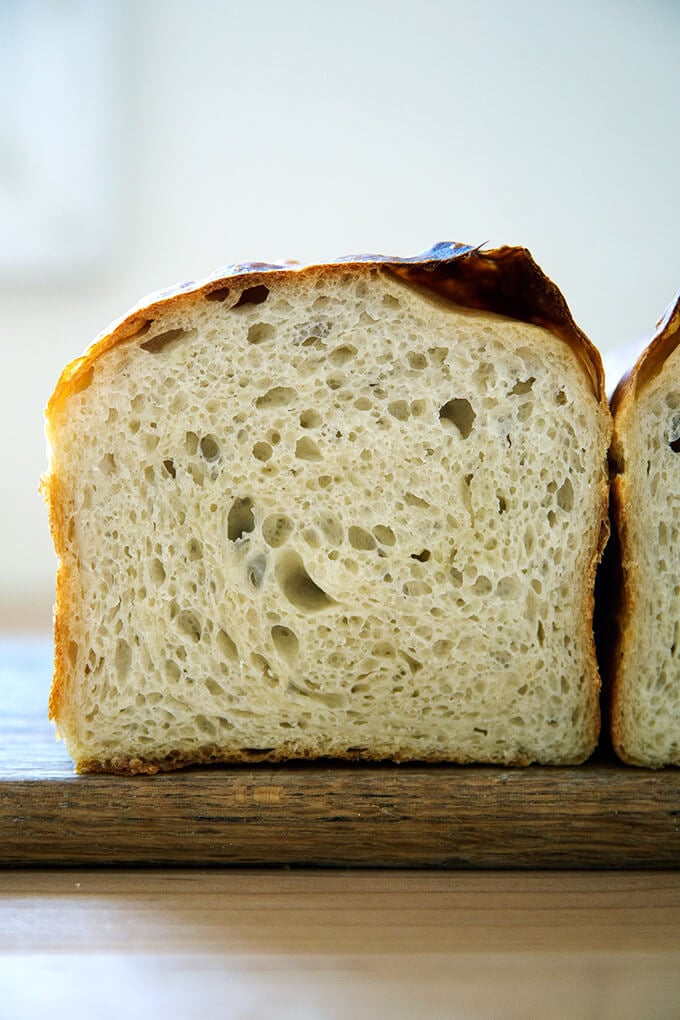
I baked this loaf in a tall-sided pullman loaf. Love the shape!
Easy Sourdough Sandwich Bread
- Total Time: 24 hours 40 minutes
- Yield: 1 loaf
Description
** UPDATE: VIDEO GUIDANCE IS HERE **
The makeup of this dough is the same as this sourdough focaccia. Here, the dough is baked in a loaf pan, and there is no sea salt on top.
This recipe yields one large loaf. You’ll need a 10 x 5-inch loaf pan, such as this one. If you only have two smaller loaf pans, such as 8.5 x 4.5-inch pans, you should probably split the dough in half after the first rise.
Plan ahead: This dough rises first for 6 to 18 hours (or less if it is super hot out or if you live in a humid area) or until the dough doubles in volume; then again for about 4 to 6 hour or until the dough crowns the rim of the baking vessel.
Troubleshooting: If you have issues with your dough being too sticky, please read this post: Why is my sourdough so sticky? The 4 common mistakes.
If you’re just getting started with sourdough, check out this post first. You’ll find tips there on procuring a starter as well as how to feed it and maintain it. If you’re up for making your starter from scratch, you can do so in just about 1 week.
Water: Chlorine in water can adversely affect sourdough. Leaving water at room temperature for 24 hours will allow most of the chlorine to escape. When I am in the habit of making sourdough bread, I fill a large pitcher with water and leave it out at room temperature. I use this for my sourdough breads and starter. Truth be told, I’ve used water straight from the tap and have not noticed a difference.
Water quantity: Also, depending on where you live and the time of year, you may need to cut the water back. If you live in a humid environment, for instance, I would suggest starting with 400 g or 420 g water. If you are not using bread flour, you also may need to cut the water back a bit. So much success with sourdough relies on getting the water quantity right.
Starter: I use a 100% hydration starter, meaning it is equal parts by weight flour and water. If you need guidance on how to maintain a starter, see this post.
Ingredients
- 100 g (about 1/2 cup) active starter, see notes above
- 10 g (about 2.5 teaspoons) kosher salt
- 430 g water, (or less, see notes above) room temperature
- 512 g (4 cups) bread flour, such as King Arthur Flour
- a few tablespoons extra-virgin olive oil
- room temperature butter, for greasing
Instructions
- Mix the dough: Place the starter, salt, and water in a large bowl. Stir with a spatula to combine — it doesn’t have to be uniformly mixed. Add the flour. Mix again until the flour is completely incorporated. If you have a straight-sided vessel, transfer the dough to it — it really helps monitor the rise and allows you to see the true growth in volume of the dough.
- Perform one (or more) “folds”: 30 minutes after you mix the dough, reach into the bowl and pull the dough up and into the center. Turn the bowl quarter turns and continue this pulling 8 to 10 times. See video for guidance. If time permits, repeat this “folding” step every 30 minutes for the first two hours. (Note: even if you perform just 1 fold, your dough will be in good shape.)
- Drizzle with a splash of olive oil and rub to coat. Cover bowl with a tea towel or bowl cover and set aside to rise at room temperature (70ºF/21ºC) for 4 to 18 hours — if it is super hot out or if you live in a humid environment, it may only take 4-6 hours. When the dough has nearly doubled in volume (or UPDATE: increased in volume by 50%, which is when I now end the bulk fermentation), it is ready. (Note: Do not use an oven with the light on for the bulk fermentation — it will be too warm. It is best to rely on visual cues (increasing in volume by 50% or doubling if you’ve had success with doubling) as opposed to time to determine when the bulk fermentation is done. A straight-sided vessel makes monitoring the bulk fermentation especially easy.)
- When the dough has nearly doubled, grease a 10 x 5-inch loaf pan with butter (or nonstick spray). Drizzle dough with a few tablespoons of olive oil. Rub your hands with a little bit of oil to coat. Use your hand to release the dough from the sides of the vessel, being careful not to completely deflate the dough. Video guidance here. Turn dough out onto a work surface. Quickly, shape the dough into a rectangle — I fold the dough envelope-style first; then I use a bench scraper to shape the dough into a rough rectangle. Transfer dough, seam-side down to prepared loaf pan and gently stretch into an oblong shape. (At this point, you can transfer the pan to the fridge if it makes sense with your schedule: rub the dough with oil and cover with a cloth bowl cover or plastic wrap. Transfer to the fridge will the next day. Then proceed with the recipe.)
- Leave alone for 5 to 6 hours or until dough begins reaching the rim of the pan — this may take less time when it is very warm out. Do be patient with this second rise: to get good height, the dough should be near the rim of the pan before you transfer it to the oven.
- Heat oven to 425ºF. Transfer pan to the oven and bake for about 20 minutes. Reduce heat to 375ºF. Bake for 20 to 25 minutes more or until golden all around. If you have an instant read thermometer, it should register 206-210ºF or so before removing. Remove pan from oven and turn bread out onto a cooling rack. Cool at least 30 minutes before slicing.
- Prep Time: 24 hours
- Cook Time: 40 minutes
- Category: Bread
- Method: Sourdough/Natural Leavening
- Cuisine: American
This post may contain affiliate links. Please read my disclosure policy.


893 Comments on “Easy Sourdough Sandwich Bread”
I’ve made this before and love it, thanks! My starter was a little sluggish coming out of the fridge but us ready to go. Was hoping to make this yesterday but wanted to give it a go today. Since I will be at work most of the day tomorrow will it be ok to do pan rise in the fridge so it doesn’t over proof the 10hrs I’m gone? Would I go right from fridge to oven? Thanks.
Yes, absolutely! Always use the fridge as needed in either the bulk or the proofing phase. Regarding when to bake, I would let the pan sit at room temperature for a bit to all the dough to rise a bit — you want the dough approaching the rim of the pan before you bake it.
HI! I’m loving this recipe thank you so much. I’ve done it two days in a row and everyone at home loves it. However, I have a question, since it’s really hot and humid when I’m at (Saudi), the dough doubles in about 5 hours but when I transfer it to the loaf pan, it reaches the rim in less than an hour, is that ok? and the holes inside are not really consistent, not sure what I could do to fix that. (does it need more steam in the oven for a more crusty surface, and can I put in the fridge after putting in in the loaf pan to slow the rise?)
Thanks again for a super easy and well instructed recipe!
Hi Darene! What size loaf pan are you using? Yes, you absolutely can slow down the rise by transferring the pan of dough to the fridge — I would slick the dough with some oil to prevent it from drying out and cover the pan with a dish towel. You can keep it there for as long as 24 hours.
Hi! Thanks for the reply. Im using the same size of loaf pan as yours
OK, great! And amazing: your starter must be happy happy 🎉🎉🎉
This recipe is amazing! Thank you so much for sharing. My loaf keeps sticking to my non-stick loaf tin though even after a thick layer of butter, would it be ok to line it with baking paper first?
So nice to hear this, Joyce! Yes, parchment will work beautifully!
I don’t know what I did wrong but the dough is so wet and sticky. The bulk rise was beautiful but the proofing didn’t do as well. Will bake and see how it tastes!
Hi Linda! It’s possible your dough over fermented if it is very wet and sticky. How many hours was the bulk fermentation?
Hi… I just made this recipe. I only had smaller loaf pans so I had to divide into 2. I put it in oven at 475 for 20 minutes and it totally burnt the top so I didn’t do the remaining 20 minutes. Any suggestions on what to do next time so I don’t burn the top? It was an easy recipe. My loaf pans were 8×4.5.
Hi Julie! Bummer to hear this. Question, why did you bake it at 475ºF? Did you just misread the instructions? This is what the instructions say: “Heat oven to 425ºF. Transfer pan to the oven and bake for about 20 minutes. Reduce heat to 375ºF. Bake for 20 to 25 minutes more or until golden all around.” I think you’ll have luck if you start at 425ºF. Sorry this happened.
This recipe is awesome. I subbed in some multigrain flour today and it rose better than it ever has. I can’t wait to eat it for dinner.
Wonderful to hear this! I love adding some freshly milled graham flour to this one, too.
Perfect and practical! I’m in ❤️
Thanks for a great recipe and excellent instructions. After perusing many sourdough recipes and videos, This seemed the best fit for the minimal supplies I had and the simplicity of the technique. This is my first “no commercial yeast”sourdough and made from my own starter! I only had an 8×4 loaf pan so I decreased Ingredients to 70%. Worked great with unbleached AP flour. The comments and your responses were very helpful. I mixed everything in late afternoon. S&F and a little rise time Til bed. I was too chicken to leave out overnight-good thing-so chilled it til morning. Took out for a couple hours in the morning and it was doubled-shaped loaf and fridged it again til after work. Out for a couple hours and ready to bake. Turned out amazing. I was so worried my starter was not ready but it worked! Such fun dough to work with. Focaccia is next!
So wonderful to hear this, Dana! Great work using the fridge as needed — I do this all the time. It’s not worth risking over fermentation. Thanks for writing!
Hi,
I’m not brand new to sourdough breads, but I have always wanted to devise a decent sandwich loaf. Now, I don’t have to; you’ve done it for me. I’ve used this recipe twice now with only small variations, and it has worked with excellent results both times. It could be the perfect sourdough toasting bread yet. My one big difference is refrigerating the dough overnight after the first rise and putting it in loaf pans. I find that ‘slow’ proofing sourdough overnight really adds to the tangyness (is tangyness a real word?). Anyway, thank you for this great recipe.
– Charles Brenner
Hi Charles! So nice to hear this. Thanks so much for writing. I actually love doing the same and have been meaning to update this post with some notes, because I couldn’t agree more about the slow, cold proof. Will update the post soon. Thanks again for writing!
I made this and everything was going fine until I actually baked the bread, It looked fine besides the fact that it was misshapen, I still had hope. But, I waited 35 minutes to cut then it turned out that it was gummy. I don’t know if it happened because I used a 9 x 5 loaf pan. My house is 80 F, so I don’t know if it was over proofed or because I did 4 folds over 2 hours then placed it in the fridge overnight. I also used half bread flour and half all purpose flour. I hope you can help.
Hi Flynn! Bummer to hear this. Please check out this troubleshooting page first: Why is my sourdough so sticky? The 4 Common Mistakes
How many hours was the bulk before you placed the pan in the fridge? And how many hours did the dough sit at room temperature after you shaped it and before you baked it?
It was in the fridge for 8 hours then I left it at room temperature for 4 hours after I shaped.
Add on to my reply, I placed it in the fridge for step 3.
Flynn, I’m a little stumped because it sounds as though you did everything right in terms of timing.
Are you confident in your starter? Have you baked other loaves of sourdough successfully with it? Does it double in volume within 4 to 6 hours of a feeding?
I let my bulk rise happen overnight (should have used the fridge) and it quadrupled in size. It’s no good, right?
Hi Andrea! Is it super super sticky? As in without strength and elasticity?
I stuck it in the fridge as soon as I woke up. It has some strength and elasticity, for sure.
OK, great, then it may be fine. You’ll know once you bake it — if it’s very dense and gummy, it likely overfermented. Let me know how it turns out!
Thank you for replying, I don’t think this was your recipe’s fault, I did some research and it turns out that I forgot to add salt. I’ll try this next week to see how it turns out. I can’t really tell if my starter has doubled because I use a wide container, I just go by the dome on the top and if it has enough bubbles.
OK, great, sounds good, Flynn! Keep me posted on your trials!
I started with sourdough a couple of months ago and was always scared as the process seemed extensive and complicated. until I saw your taosting loaf and focaccia recipe. They have been my go-to basic recipes. Once I perfected those I started experimenting with adding linseed meal, olives, roasted garlic and red onion and every time they turn out. Thanks heaps for making this an easy transition to baking my own sourdough.
So nice to hear this, Anja! Thanks so much for writing 🙂
Is there a ‘proof’ test for this dough? I know when I’m making a rustic sourdough loaf to look for bounce-back when you poke the dough, is in the same here? I’ve go my fingers crossed for this sandwich loaf as I had great success following your Easy Sourdough Bread recipe. Your instructions are clear and easy to follow and your recipe is now my go-to. I’m hoping this one will be the same. My family gobbles up this bread!
Wonderful to hear this, Jen! You can do a “poke” test here if you wish. I mostly look for the dough to get to a certain height (near the rim of the pan), but a poke test works, too. I talk about the poke test on this post, so check that out if you want more details, but otherwise, just perform the poke test as you have in the past.
Thank you! It turned out pretty well. My pan was a bit smaller than yours (9×5 at the top – slightly smaller at the base) so of course it reached the top of the pan a lot faster than 5 hours. I left it as long as I could without the dough spilling over the edge of the pan (about 4 hours?) did a poke test and baked it. It probably could have proofed a bit longer, but it turned out well!
Wonderful to hear this, Jen! Thanks so much for writing!
I have made recipe twice. Love the bread but my dough is so wet it is impossible to shape. I reduced the water to 420 grams with no change in dough. Any suggestions?
Hi Frances! Question: is it super wet from the start? or is it super wet after the bulk fermentation.
A few thoughts:
1. You could cut the water back even more.
2. It’s possible you are over-fermenting the dough. How many hours roughly is the bulk fermentation? And is the dough more than doubling in volume during this period?
3. Please check out this troubleshooting post: Why is my sourdough so sticky? 4 Common Mistakes.
My kitchen smells soooo good I cannot wait to slice into the loaf. Half bread flour/half all purpose flour. The bulk ferment went quickly. It’s prettt warm here still so after 7 hours I put it in the fridge to finish.
Wonderful to hear this, Wendy!
This bread is so delicious but for some reason, it keeps coming out without a crust on any part that touches the pan. What am I doing wrong? Do i have the wrong pan?
Hi Jeff! What material and size is your pan? It’s not a nonstick, is it?
Super easy and tasted AMAZING!!
Wonderful to hear this, Angela!
I used to run an artisan bakery, but I have always been totally intimidated by bread baking. Things have changed with this recipe! It is my go-to since we have been sheltering in place…I’ve gone through 50lb of flour so far. I have been experimenting with using a percentage of stone ground wheat or rye flour–20%-33%, and found that 20% still produces a really nice, chewy texture without being too dry or heavy.
I like to do a late mix, starting it 2 hours before going to bed to allow for the 4 rounds of folds. In the morning I transfer the dough to pans…fresh bread is then ready for lunch.
Thanks for such a great recipe! I have shared it with so many friends and am looking forward to branching out and trying more of your recipes. (BTW the sourdough pizza dough is also a favorite!!)
So nice to hear this, Emilia!! Thanks so much for writing and for sharing your timeline … that’s so helpful for others. Your mix of flours sounds lovely, too 🙂
I made this bread today, 10.05.2020, to use for sandwiches. The loaf is excellent in color and flavor. I added an egg wash half way through, which enhanced the beauty of the loaf. I have already recommended it to friends. Delicious! Thank you.
Wonderful to hear this, Allen!
This is an outstanding recipe!! Thanks!
Wonderful to hear this, Ann!
Hi!
Temperature here is 31 degree C . And i have only plain All purpose flour
So should it be same hydration and starter % ?
Hi Sonia! Sorry for the delay here … I would consider starting with 400 grams water. Same amount of starter.
Hi Ali,
Bread came out DELICIOUS!
I would like to incorporate some rye or whole wheat flour. Can you please recommend how much I can add without compromising too much on taste? Thanks!
Hi Angela, I would start with 50 grams. It seems like a tiny amount, but I think you’ll be surprised by the flavor that is lent by even just a small amount of rye or whole wheat flour. After you make it once with 50 grams, adjust the quantities with more or less. So glad you liked this one!
Love this recipe! Makes delicious sandwich bread And so easy!
Wonderful to hear this, Amy!
Just in the process of making the bread. Will be baking in the morning. I’m wondering if you add some water to the oven during the first 20 minutes for steam. Or is it not necessary due to the higher hydration. I didn’t see any reference to steam in the video. Thanks!
Hi Dave! I’m probably not getting to you in time, but I do no add any water to the oven during the first 20 minutes to create steam. You definitely can if you are up for it… it couldn’t hurt it. I’ve never found it necessary (also I’m a little lazy). Hope the bread turned out well!
No problem. I didn’t add steam and it was fine. I also baked my latest loaf in the 9x4x4 Pullman pan with the lid on and it worked perfectly. I was gong to add a photo but can’t see how to do it here.
Oh awesome, so great to hear this, Dave. And I love that you cooked one in your Pullman pan with the lid on … I have one of those pans. You’re inspiring me to give it a go. Thanks for writing.
In your photos, you say you baked the loaf in a tall-sided pullman loaf. Did you have to use two, or does this recipe work with one of the pullman loaf pans? I cannot wait to try this recipe. Thank you.
Hi Robin! I used just one pan: this one. Good luck!
This recipe has worked wonderfully with my starter, this is the highest bread height I’ve gotten since starting to experiment back in April! I use whole wheat for approximately half of the flour and it works great for me (I’m in a pretty humid environment so I haven’t had to change the amount of water or anything). This is my go to recipe each week now, thanks for posting this!
So wonderful to hear this, Karyn! Thanks so much for writing.
Amazing! I have been wanting to make sourdough sandwich bread for some time, but had been waiting until I purchased a 10″ by 5″ pan. While I let the 2nd rise go on a bit too long and the dough was over the top of the pan, the bread still turned out delicious. A crispy top and a soft and spongy inside with some of the best sour flavor I’ve had in my baking thus far. I’m not sure there is really any reason to ever by store bought bread again!
Oh Brian, yay! So nice to hear all of this, and I loved seeing your IG photo as well. And as we already messaged about, next time you can use your fridge as needed to make the proofing timeline work a little better with your schedule. Also I need to add a note to the recipe: When I proof my loaves now, I often tuck the whole pan into a produce bag and clip the end to seal — when sourdough proofs too long, sometimes it can develop a thin crust in the fridge, so I like to do this in case I don’t get around to baking the loaf as soon as I had originally planned.
This is REALLY delicious – I loved the consistency of the dough which was easy to work with. It has such a perfectly chewy texture and really wonderful flavor. Making another loaf today since the other that was supposed to last all week is already half way gone and it’s only Monday…
So nice to hear this, Alyssa! And I know, a loaf of bread never lasts more than a few days in our house.
I am unsure what I am doing wrong with this bread. It overproofs no matter what I do. I do the four stretches every 30 mins. I have a very active starter, but I find that the timing for the bulk fermentation is far too long. I have a cold apartment so it’s not overly warm. I have tried this three times and it has never risen sufficiently in my bread tin. And the colour on the crust seems too pale, which I can’t tell is a result of overproofing or the lower oven temperature. The final time I made this I did the stretch and folds and then almost immediately shaped and put it in a loaf tin to bulk ferment in the fridge. That didn’t seem to help much at all, so I’m not sure what to do.
Hi Catherine,
Are you using a straight-sided vessel to monitor the bulk fermentation? I always encourage people to rely on visual cues as opposed to timing to determine when to end the bulk fermentation. If you have a straight-sided vessel, you can accurately gauge how much the dough has grown. Most recently, I have been stopping the bulk fermentation when the dough increases in volume by 50% as opposed to 100% (doubling).
Other questions:
1. Have you had success making other sourdough breads with your starter?
2. What type of flour are you using?
This troubleshooting post may help you identify your issues, but my instinct is to to tell you to potentially cut back the water and shorten the bulk fermentation.
I don’t have a straight sided container. In my attempts of this bread I have just watched it in my bowl and did the poke test. I have attempted to shorten the bulk fermentation, that didn’t work. I initially cut back the water with the first time as I saw your note about it. My starter is very strong and I have done well with other bread although I find any recipe that proofs on the counter never works. The first time I did a bulk ferment on the counter for 4 hours and then another two in the tin and I had to bake it but I didn’t get any rise in the bread tin. The second time I reduced the initial bulk ferment as I thought perhaps it rose too much the first time and giving it more time to rise in the bread tin would help. But that did nothing. This time, I did the bulk ferment in the fridge this time overnight (about 12 hours) and it was overproofed still. So I think that it has too much time on the counter with the stretch and folds perhaps.
Hmmm, I’m a little stumped. It sounds as though you have a really good handle on sourdough, so I’m not sure why this isn’t working out for you. A few thoughts:
Do a short room temperature ferment on the counter (less than 4 hours). Transfer to greased loaf pan, turn to coat in oil, and tuck into a plastic bag (like a produce bag you can tie) and clip it closed or tie it. Let it cold proof for 12-24 hours. Bring it to room temperature and let it rise till it approaches or crowns the rim of the pan; then bake it.
Hi there, thanks for the advice although what you suggest is what I tried (except for the rise out of the fridge, because it was clearly overproofed at that stage. The total time on the counter after mixing was 2.5 hours.
This is my favorite sourdough sandwich bread recipe! Even better that it is dairy free, and I love that the crust is crunchy on the outside but soft on the inside!
Wonderful to hear this, Angie! Thanks so much for writing.