Description
** UPDATE: VIDEO GUIDANCE IS HERE **
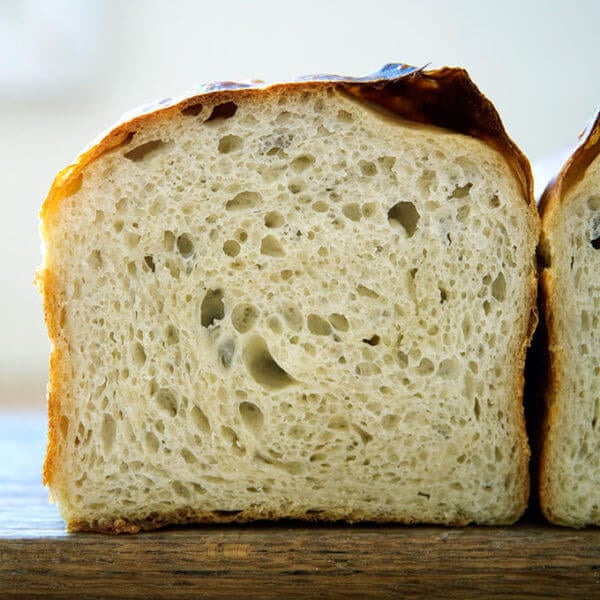
The makeup of this dough is the same as this sourdough focaccia. Here, the dough is baked in a loaf pan, and there is no sea salt on top.
This recipe yields one large loaf. You’ll need a 10 x 5-inch loaf pan, such as this one. If you only have two smaller loaf pans, such as 8.5 x 4.5-inch pans, you should probably split the dough in half after the first rise.
Plan ahead: This dough rises first for 6 to 18 hours (or less if it is super hot out or if you live in a humid area) or until the dough doubles in volume; then again for about 4 to 6 hour or until the dough crowns the rim of the baking vessel.
Troubleshooting: If you have issues with your dough being too sticky, please read this post: Why is my sourdough so sticky? The 4 common mistakes.
If you’re just getting started with sourdough, check out this post first. You’ll find tips there on procuring a starter as well as how to feed it and maintain it. If you’re up for making your starter from scratch, you can do so in just about 1 week.
Water: Chlorine in water can adversely affect sourdough. Leaving water at room temperature for 24 hours will allow most of the chlorine to escape. When I am in the habit of making sourdough bread, I fill a large pitcher with water and leave it out at room temperature. I use this for my sourdough breads and starter. Truth be told, I’ve used water straight from the tap and have not noticed a difference.
Water quantity: Also, depending on where you live and the time of year, you may need to cut the water back. If you live in a humid environment, for instance, I would suggest starting with 400 g or 420 g water. If you are not using bread flour, you also may need to cut the water back a bit. So much success with sourdough relies on getting the water quantity right.
Starter: I use a 100% hydration starter, meaning it is equal parts by weight flour and water. If you need guidance on how to maintain a starter, see this post.
Ingredients
- 100 g (about 1/2 cup) active starter, see notes above
- 10 g (about 2.5 teaspoons) kosher salt
- 430 g water, (or less, see notes above) room temperature
- 512 g (4 cups) bread flour, such as King Arthur Flour
- a few tablespoons extra-virgin olive oil
- room temperature butter, for greasing
Instructions
- Mix the dough: Place the starter, salt, and water in a large bowl. Stir with a spatula to combine — it doesn’t have to be uniformly mixed. Add the flour. Mix again until the flour is completely incorporated. If you have a straight-sided vessel, transfer the dough to it — it really helps monitor the rise and allows you to see the true growth in volume of the dough.
- Perform one (or more) “folds”: 30 minutes after you mix the dough, reach into the bowl and pull the dough up and into the center. Turn the bowl quarter turns and continue this pulling 8 to 10 times. See video for guidance. If time permits, repeat this “folding” step every 30 minutes for the first two hours. (Note: even if you perform just 1 fold, your dough will be in good shape.)
- Drizzle with a splash of olive oil and rub to coat. Cover bowl with a tea towel or bowl cover and set aside to rise at room temperature (70ºF/21ºC) for 4 to 18 hours — if it is super hot out or if you live in a humid environment, it may only take 4-6 hours. When the dough has nearly doubled in volume (or UPDATE: increased in volume by 50%, which is when I now end the bulk fermentation), it is ready. (Note: Do not use an oven with the light on for the bulk fermentation — it will be too warm. It is best to rely on visual cues (increasing in volume by 50% or doubling if you’ve had success with doubling) as opposed to time to determine when the bulk fermentation is done. A straight-sided vessel makes monitoring the bulk fermentation especially easy.)
- When the dough has nearly doubled, grease a 10 x 5-inch loaf pan with butter (or nonstick spray). Drizzle dough with a few tablespoons of olive oil. Rub your hands with a little bit of oil to coat. Use your hand to release the dough from the sides of the vessel, being careful not to completely deflate the dough. Video guidance here. Turn dough out onto a work surface. Quickly, shape the dough into a rectangle — I fold the dough envelope-style first; then I use a bench scraper to shape the dough into a rough rectangle. Transfer dough, seam-side down to prepared loaf pan and gently stretch into an oblong shape. (At this point, you can transfer the pan to the fridge if it makes sense with your schedule: rub the dough with oil and cover with a cloth bowl cover or plastic wrap. Transfer to the fridge will the next day. Then proceed with the recipe.)
- Leave alone for 5 to 6 hours or until dough begins reaching the rim of the pan — this may take less time when it is very warm out. Do be patient with this second rise: to get good height, the dough should be near the rim of the pan before you transfer it to the oven.
- Heat oven to 425ºF. Transfer pan to the oven and bake for about 20 minutes. Reduce heat to 375ºF. Bake for 20 to 25 minutes more or until golden all around. If you have an instant read thermometer, it should register 206-210ºF or so before removing. Remove pan from oven and turn bread out onto a cooling rack. Cool at least 30 minutes before slicing.
- Prep Time: 24 hours
- Cook Time: 40 minutes
- Category: Bread
- Method: Sourdough/Natural Leavening
- Cuisine: American