
Easy Sourdough Bread (Whole Wheat-ish)
This post may contain affiliate links. Please read my disclosure policy.
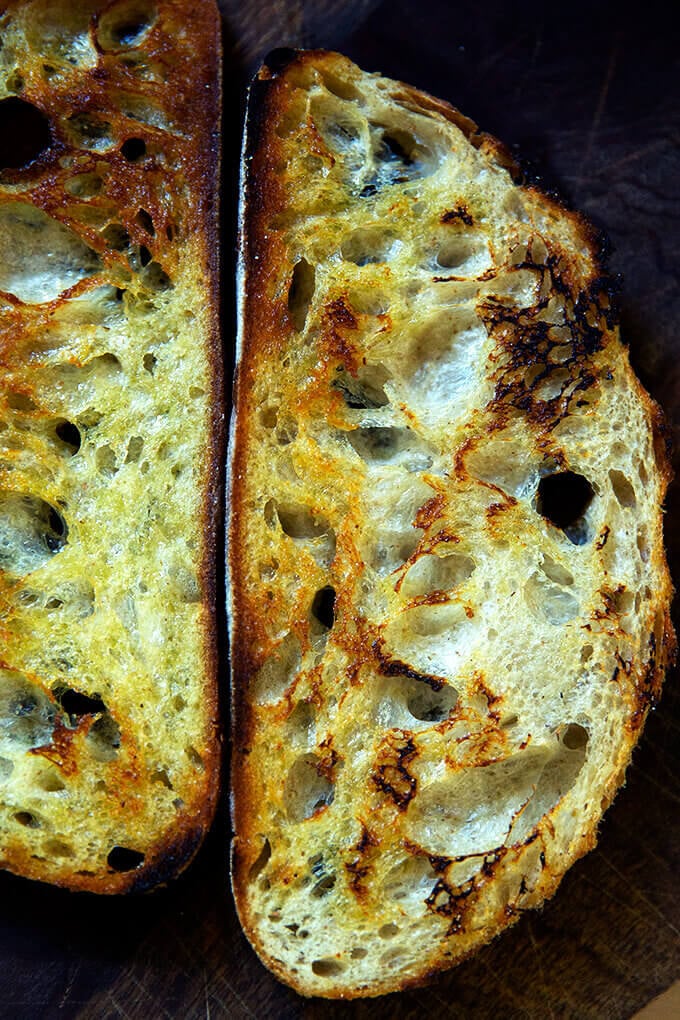
This is my favorite sourdough bread: It’s high hydration, whole wheat(ish), and just so darn tasty. As far as sourdough recipes go, this is about as simple as it gets. Below, you’ll find video guidance for every step of the process. Let’s do this! 🍞🍞🍞🍞
Sourdough is often described as a journey. The more I make it, the more this sentiment becomes a truth. For the past few years, I’ve been tinkering with various sourdough recipes, and though I can’t say I won’t stop tinkering, this is the current snapshot of my sourdough journey.
These are the characteristics I like in a sourdough boule:
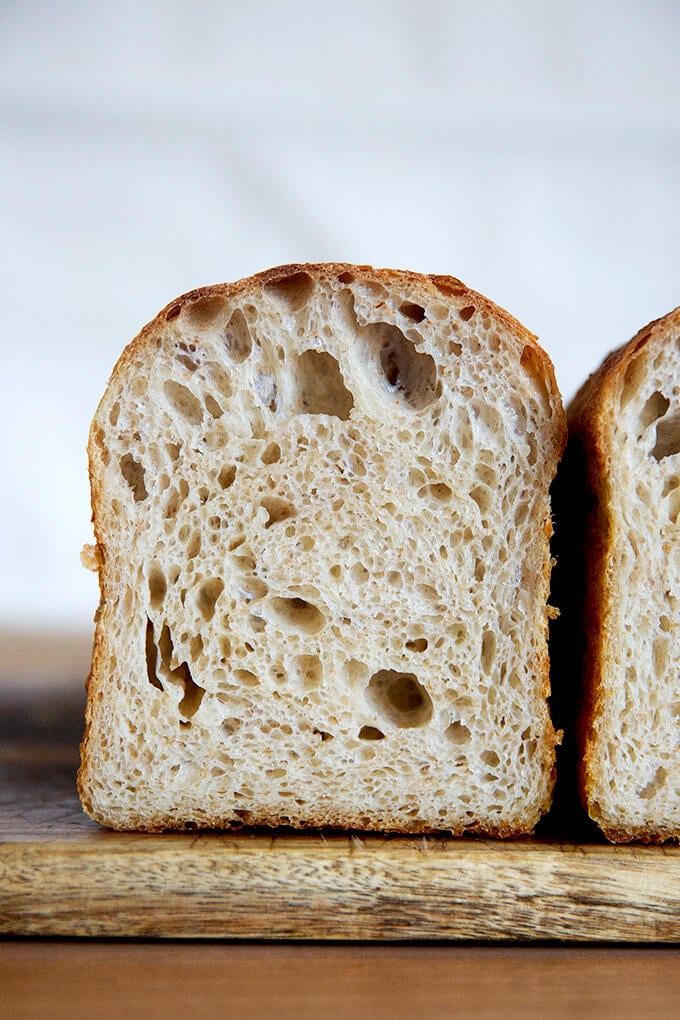
- high hydration (at least 75%)
- whole wheat-ish
- crusty but not super crusty
- nicely salted
- tangy though not super sour
I’ve outlined the process below to create this type of loaf, which as far as sourdough recipes go, is on the simple side — there’s no kneading, no autolyse-ing, no pre-fermenting, no levain-ing, no fancy scoring.
It’s a little bit smaller than most sourdough boules, too, reasons for which I explain below. And as with all sourdough baking (and bread baking in general), it does take time, though the time is mostly hands off.
This post is organized as follows:
- Two Sourdough Fermentation FAQs
- Two Tips for Assessing Fermentation
- Whole Wheat Flour
- Roller-Milled vs. Stone-Milled Flour
- 75% Hydration
- Mixing Sourdough Bread
- Bulk Fermentation
- Shaping + Bench Rest
- Proofing Sourdough
- Scoring and Baking Sourdough
- The Best Way to Store Bread
2 Sourdough Fermentation FAQs
Two of the most frequently asked questions I receive about sourdough bread baking are:
- How do I know when the dough has risen sufficiently and is therefore ready to be shaped?
- How do I know if it has proofed sufficiently and is therefore ready to be baked?
If you are unfamiliar with sourdough baking, these two questions relate to two distinct phases of fermentation:
- The first question relates to the bulk fermentation (the first rise), which takes place after the dough is mixed.
- The second question relates to proofing (the second rise), after the dough is shaped.
One thing I have learned through troubleshooting with various people is that it’s very hard to put a timeline on these two phases. Sourdough is much more sensitive than yeast-leavened breads to the environment in which it is being baked.
The bulk fermentation for me in my cold Upstate New York kitchen often takes 12 hours regardless of the time of year. For someone baking in humid Hawaii, it may take 6 hours (or less! or more!). Similarly, the proofing phase may vary by many hours depending on the environment. Additionally, there are countless variables that affect fermentation: type of flour, water, salt quantity, strength of the starter, to name a few.
Yes, there are textural/visual cues to help discern when each phase of fermentation is complete, but it still can be hard to judge.
If you struggle with these assessments, I have two tips for you:
2 Tips for Assessing Sourdough Fermentation
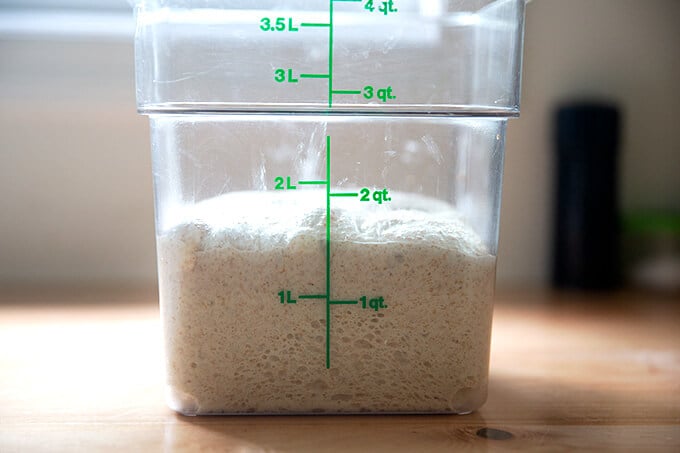
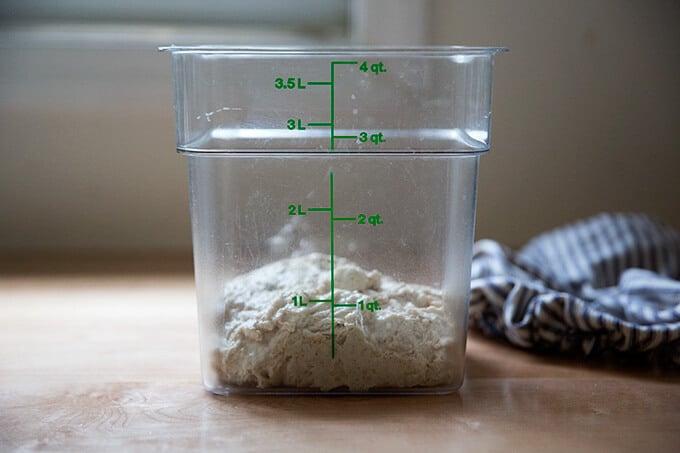
Tip #1: Buy a clear, straight-sided vessel.
After my digital scale, my clear, straight-sided 4-qt Cambro (**this one is BPA-free!**) has become my most important tool when it comes to sourdough bread baking. Why? For two reasons:
- Because it’s clear, it allows me to see when the dough is filled with bubbles and activity throughout — top, bottom, sides, etc.
- Because it’s straight sided, I know exactly when the dough has risen sufficiently (roughly 50% increase in volume) and is therefore ready to be shaped. When dough rises in a bowl, it’s very hard to gauge how much the dough has grown.
If I could single out the biggest lesson I’ve learned in my sourdough baking journey, it’s this: Do not allow sourdough rise beyond double during the bulk fermentation.
Why? When sourdoughs rise for too long, the dough weakens. A weak, fragile dough is hard to handle and difficult to shape into a tight round, which in turn makes for a dense loaf. Most recently I shoot to shape the dough when it has increased by 50% in volume.
Tip #2. Use Your Refrigerator & Be Flexible
Because judging bulk fermentation and proofing can be tricky, you can use your refrigerator during both phases.
Using your fridge for the bulk fermentation:
If, for instance, you see your dough rising nicely but all of a sudden it’s 10 pm and you’re ready for bed, and you know if you let the dough continue to rise, it will be way beyond double in the morning, stick the vessel in the fridge. The following morning, take it out and let the dough rise at room temperature until it has nearly doubled or, as I advise more and more, increased by 50% in volume.
With sourdough baking, you have to be patient, and you have to be flexible with the timing.
Using your fridge for proofing:
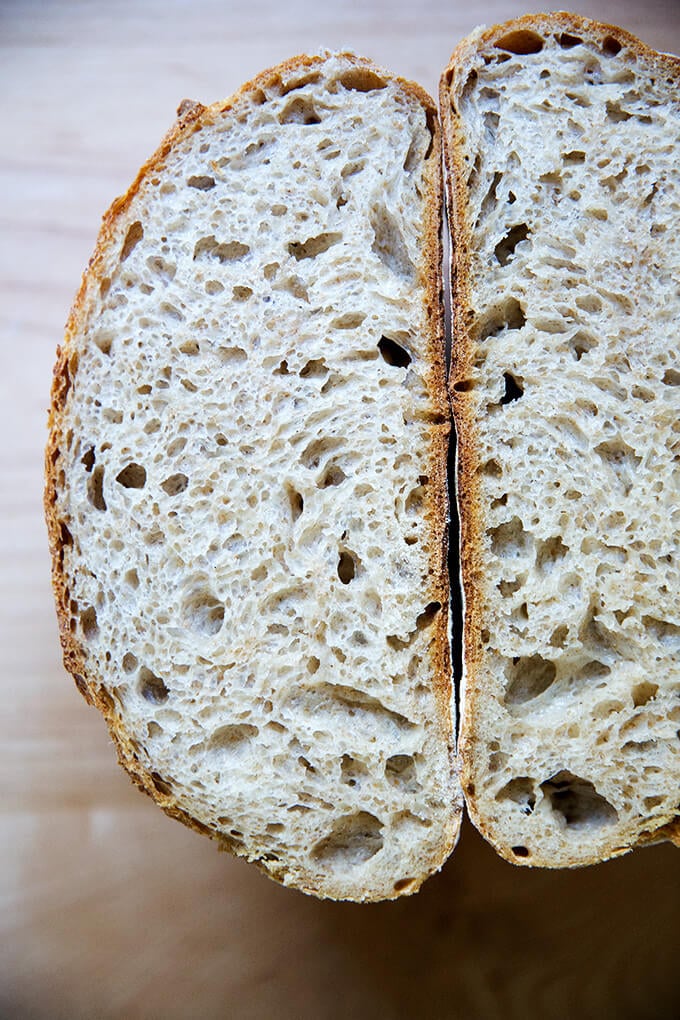
Using my fridge for the proofing phase has been the biggest change in my sourdough process of late. Previously, after shaping the boule and placing it in a towel-lined bowl, I would transfer the dough to the fridge for 1 hour, then bake it. These days, I like to stick the shaped boule in the fridge for at least 12 hours, but ideally 18-24 hours. Why?
- The extended cold proof creates a lighter, airier crumb.
- A cold round of dough is so much easier to handle from scoring it to transferring it to the Dutch oven.
Whole Wheat Flour FAQ

In my email course, Foolproof Bread Baking, I receive a lot of questions about how to incorporate more whole grain flours into bread.
This is a tricky one to answer for me for two reasons:
- I like white bread. A good loaf of bread for me has so much to do with texture. I love a pillowy, oily focaccia; a soft, squishy brioche bun; a ballooned, crisp-tender Neapolitan pizza. As soon as whole grain flour is entered into the mix, the texture changes, becoming heavier, denser.
- Commercial whole wheat flour isn’t necessarily healthier than commercial white flour. Wait, what? Read on.
Roller-milled Flour vs. Stone-milled Flour
Without getting too far into the weeds, most of the commercial flour on the market is made from wheat that has been roller milled, meaning a roller mill has separated the wheat kernel into three parts: the endosperm, germ, and bran. White flour is made from the endosperm.
Whole wheat flour, similarly, is made from rolled-milled wheat: again, first the kernel is separated into three parts: the endosperm, germ, and bran; BUT then the germ and the bran are added back in various proportions. Much research shows that as soon as the wheat kernel is separated into the various parts, much of the nutritional value is lost — even when the bran and germ are added in after the fact.
So what’s the solution?
Stone-Milled Flour
Stone-milled flour, contrary to roller-milled flour, is flour made from wheat that passes through a stone mill, the process of which keeps the endosperm, bran, and germ together. Much research shows that keeping the components together preserves the nutritional value.
The rub with stone-milled flour? Stone-milled flour is more perishable due to the presence of both the bran and the germ, but the germ in particular, which is packed with vitamins, minerals, and fats, which can go rancid quickly.
The boon? Because the bran and germ are present in the flour, it’s also more flavorful.
Anything else to consider? Baking with stone-milled flours requires a little more finesse. Even a small amount of bran and germ in the mix makes for a denser loaf. Many millers offer high-extraction stone-milled flours — meaning stone-milled flours that have been sifted to remove some of the bran and endosperm. But even when you bake with high-extraction, stone-milled flour, the finished loaf, when made from 100% of this type of flour, will be very dense.
For this reason, I use at the most 25% stone-milled flour (100 g for this recipe), but preferably in terms of texture, 12.5% stone-milled flour (50 g for this recipe). 12.5% may seem like a tiny amount, but I am constantly surprised by how much flavor, texture, and color this small proportion of stone-milled flour offers to a loaf of bread.
In fact, I now prefer a partially whole wheat loaf to an all white loaf. The freshly milled, stone-milled flours offer so much flavor.
Where to Buy Stone-Milled Flour?
In the past few years, it has become easier to find stone-milled flour, and if you are up for it, you should seek out locally, stone-milled flour. Why? Because if you’re buying locally milled flour, you likely can find out how recently it was milled. Because stone-milled flour perishes more quickly than roller-milled flour, it’s best if you can find a local source, which will ensure it will be fresh. Note: Store stone-milled flour in the freezer if you don’t bake regularly.
Final note: I no longer buy commercial whole wheat flours. I buy commercial white flours: King Arthur Flour’s all-purpose flour and bread flour are staples. I find locally milled stone-milled flours at a local co-op, Honest Weight Food Co-op, and I also order online from various sources. Here are a few I love:
Finally: Here’s a great resource if you’re interested in learning more about wheat and flour: The Bread Lab. Also, Dan Barber’s The Third Plate was eye opening.
75% Hydration
Standard sourdough recipes often call for 500g of flour per loaf. As noted above, the recipe below makes a loaf that’s a little bit smaller for two reasons:
- I’m often asked if the bread recipes here on the blog as well as in my book can be halved. The answer is yes, but in an effort to make a loaf that may not feel quite so overwhelming for people, I’ve reduced the flour to 400g.
- I wanted to include quantities that make hydration easier to understand. Hydration is something I don’t discuss too often because I find it can turn people off (me included). In short, hydration is: the ratio of water relative to flour in a bread dough. The proportions in this recipe — 300g water and 400g flour — make it a little easier to see it’s a 75% hydration dough: 300/400=0.75.* With this baseline, you can increase the amount of water to make it higher hydration or decrease the amount of water to make it lower hydration depending on your preference.
*Note: This is a crude calculation. If you want to be super accurate when calculating hydration, you include the weight of the starter in the equation, too, which will throw off the percentage slightly.
Salt
I love salt. The standard percentage of salt in a bread recipe is 2% by weight of the flour. For 400g flour, this means 8g salt. I use 10g. The amount of salt, fortunately, is a variable that can easily be tailored to your liking. If 10g of salt is too much for you or if you know from the start you are sensitive to salt, start with 8g, then adjust accordingly. Also, higher amounts of salt will slow down the rise a bit as well.
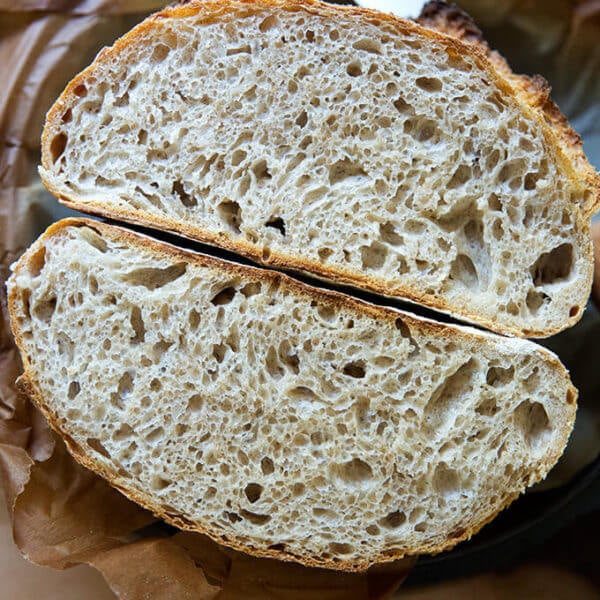
5 Phases: Simple Sourdough Bread
This videos and photos below shows how to make from start to finish the high-hydration, whole wheat(-ish) sourdough bread recipe included at the end of the post.
Phase 1: Mix the Dough
Step 1: Gather your ingredients — flour, salt, water, a sourdough starter — and equipment, namely a digital scale. I recommend buying a starter (reasons for which I explain here). But if you’re up for it, you can make a sourdough starter from scratch in just about a week. I only recommend doing so if it currently is summer (or a very warm fall) where you are.
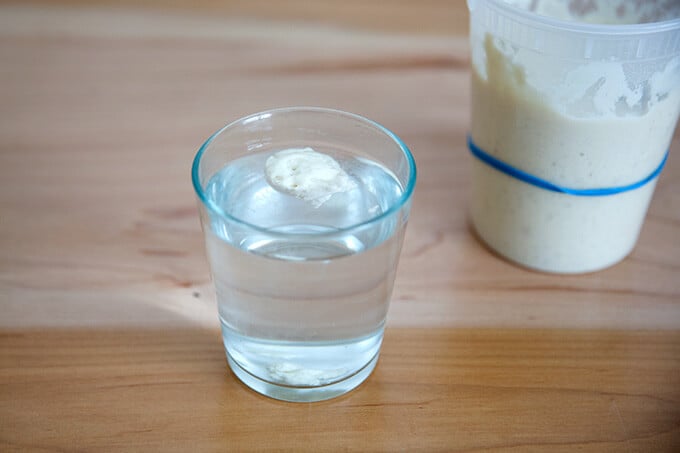
Most important, you need a fed, active starter.

To ensure it is ready, drop a spoonful of it in a glass of water. If it floats, it’s ready:
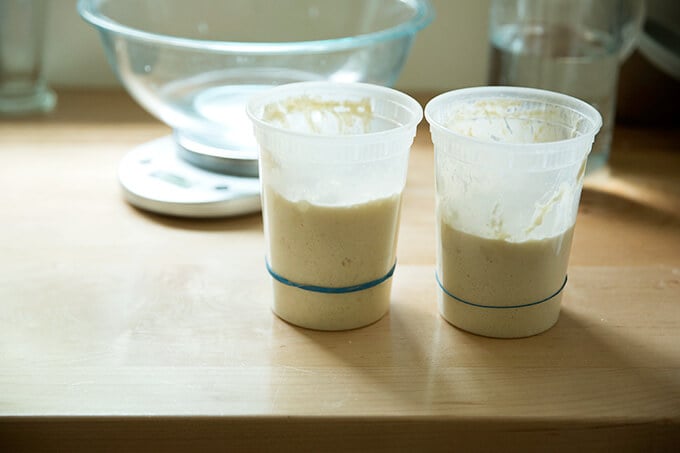
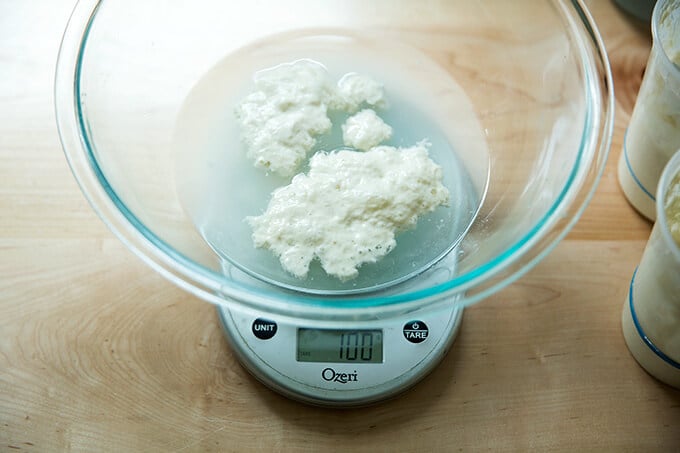
Start by weighing 300g water, 100g starter, and 10g salt.
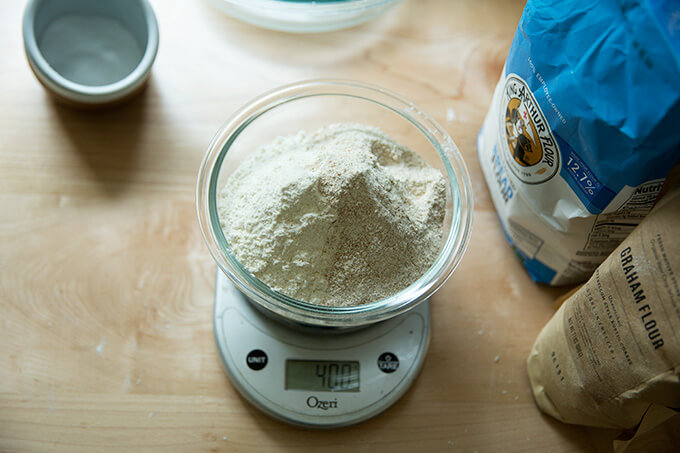
You’ll need 400g flour. You can use all bread flour of a mix of bread flour and whole wheat flour. My preferences is 350g bread flour (King Arthur Flour) and 50g stone-milled, freshly milled flour (I use a mix of Anson Mills rye and graham).
Mix to form a sticky dough ball.
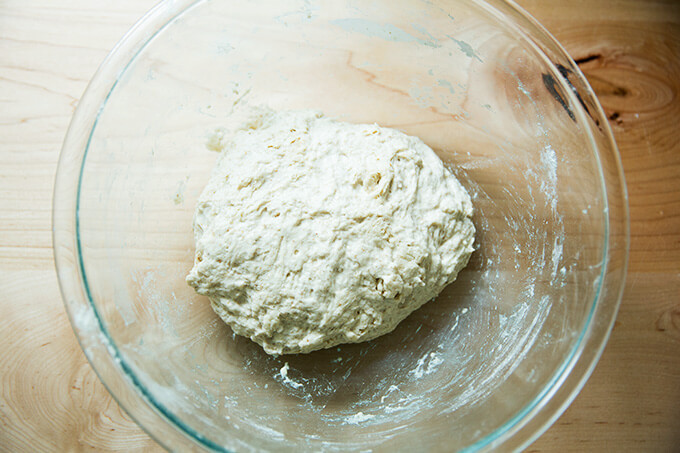
Then transfer to a straight-sided vessel for the bulk fermentation (the first rise).
Phase 2: Bulk Fermentation
After 30 minutes, stretch and fold the dough:
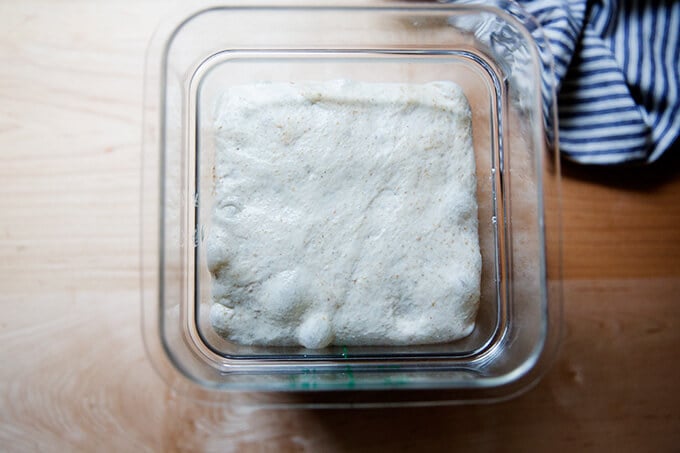
You’ll repeat this stretching and folding 3x at 30-minute intervals; then you’ll leave the dough to rise until it increases in volume by 50-75%.
Phase 3: Shape + Bench Rest
Transfer dough to a clean work surface. I prefer to use no flour and minimal handling to shape it into a ball.
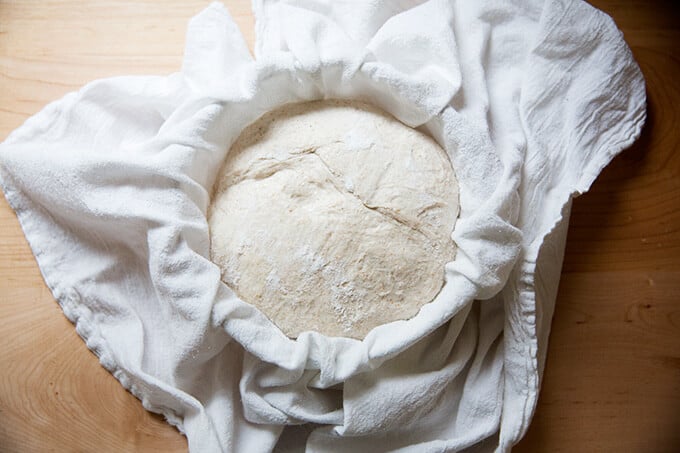
After the initial shape, let the dough rest for 20-40 minutes; then shape again and transfer to a flour sack-lined bowl.
Phase 4: Proof
Transfer bowl to fridge to proof (second rise) for 18 to 24 hours

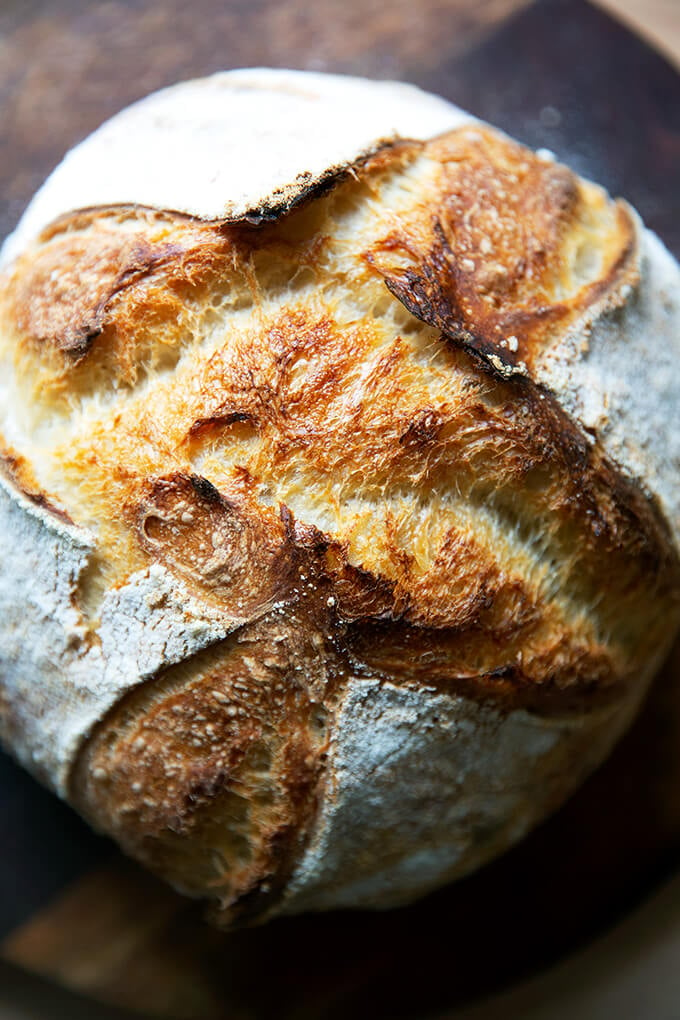
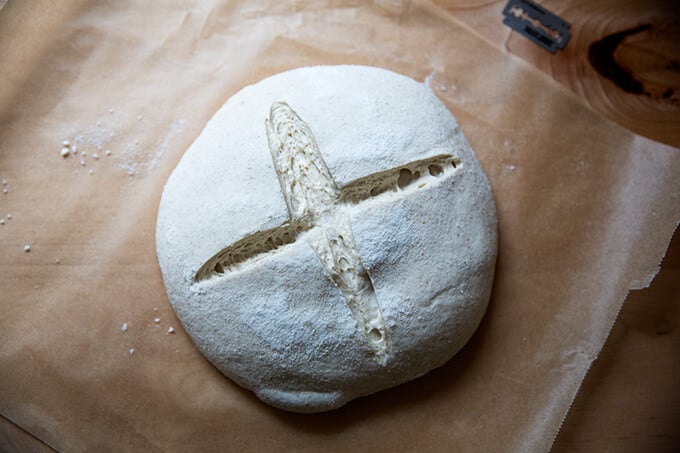
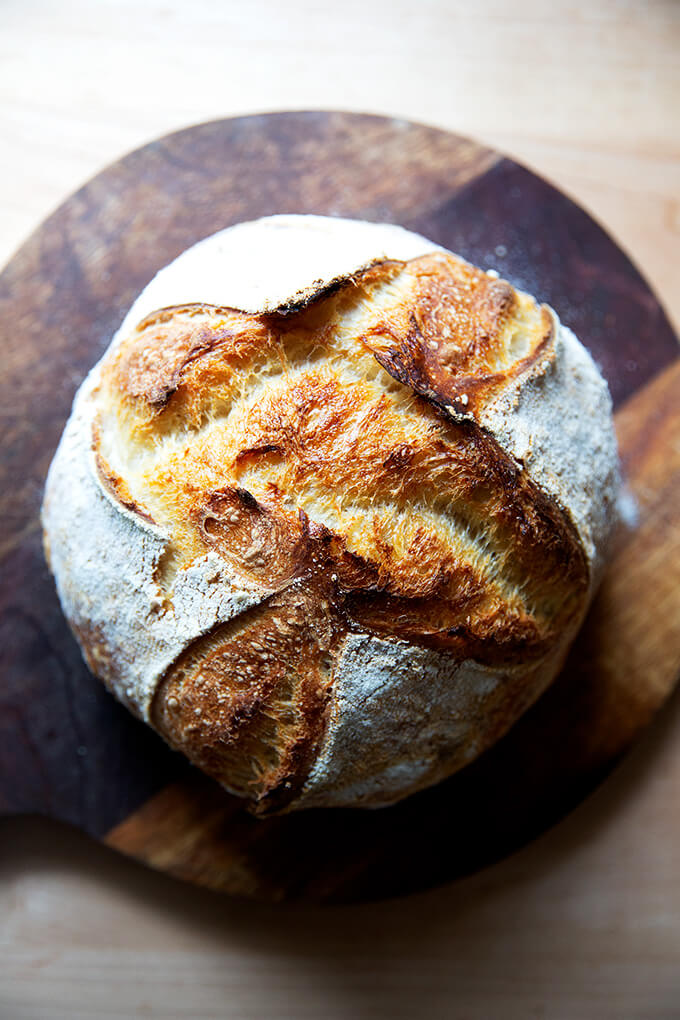
Phase 5: Score + Bake
After 18 to 24 hours, transfer dough to a sheet of parchment paper. This video shows how:
Score as you wish; simple is fine.
Transfer to a Dutch oven and bake at 450ºF covered for 30 minutes, then uncovered for 10 minutes at 400ºF.
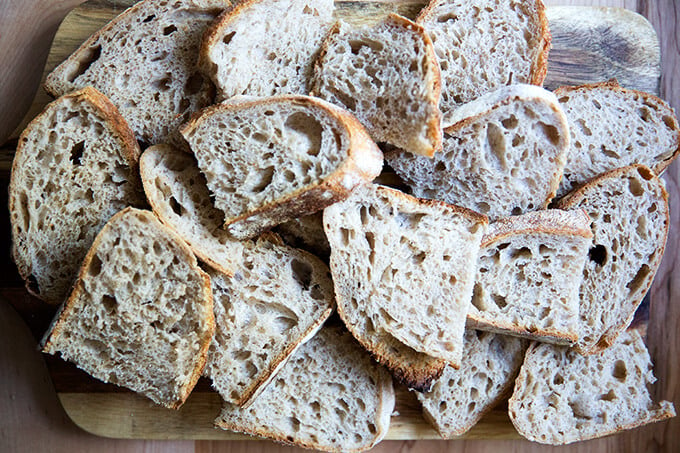
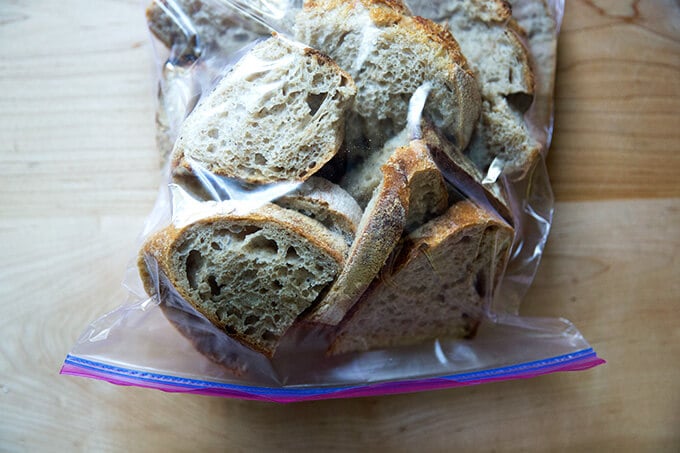
The Best Way to Store Bread
How do I store bread? is one of the most frequently asked questions I receive.
If you want to store the bread at room temperature for 3 to 4 days, I think the best method is in a ziplock bag. I’ve tried other reusable/environmentally friendly options, but nothing seems to keep bread freshest — the crumb the softest — better than a ziplock bag.
If you intend to keep the bread for longer, I would stick the ziplock bag in the freezer, and pull out slices or hunks as you wish. I often slice bread as soon as it cools completely, transfer the slices to a ziplock bag, then freeze. This way, I know the bread was frozen at its freshest.
A ziplock bag will not prevent the crust of bread from turning soft, which is why I suggest always reheating day-old bread. I use a toaster at breakfast for slices of bread, and I reheat half or quarter loaves in the oven at 350ºF for 15 to 20 minutes when serving for dinner.
Bread revives so beautifully in the oven or toaster.
I baked this loaf in a tall-sided pullman loaf. Love the shape! I proofed this in the fridge for about 12 hours; then let rise at room temperature for roughly 5-6 hours before baking at 400ºF for about 40 minutes.
Easy Sourdough Bread (Whole Wheat-ish)
- Total Time: 48 hours 45 minutes
- Yield: 1 loaf
Description
Special equipment: Straight-sided vessel for the bulk fermentation, Dutch oven, flour-sack towel
Here’s my list of essentials for sourdough bread baking.
Digital Scale: Do not attempt this recipe without a scale. This one costs $9. Troubleshooting what goes wrong with sourdough bread is impossible if you’ve measured with cups. They’re simply not accurate.
Troubleshooting: If you have issues with your dough being too sticky, please read this post: Why is my sourdough so sticky? The 4 common mistakes.
Flour:
- I prefer making this bread with 350g bread flour and 50g of freshly milled, stone-milled flour, which provides both flavor and color. (Read the post above for more details and why I suggest stone-milled flour as opposed to commercial whole wheat flour.) I’ve been using a mix of Anson Mills graham flour and rye flour, but there are many great stone-milled flours out there, and you may have a local source, which is even better.
- 50g may seem like a tiny amount of stone-milled flour for this recipe, but I am constantly amazed by how much flavor this small amount of freshly milled flour adds. If you are new to sourdough baking, I recommend starting with 100% bread flour (King Arthur Flour is my preference) because it’s so forgiving and easy to work with. Once you get the hang of it, start incorporating stone-milled flour a little bit at a time. I don’t like using more than 100g (25%) of stone-milled flour in this recipe.
- If you cannot find bread flour — I know supplies are limited at the moment — you can use all-purpose flour. If you live in a humid climate, consider reducing the water by 20 g. You can add the 20 g of water in slowly while you mix until the dough resembles that in the video/photos.
Salt:
I like breads to be a little bit saltier than standard. If you are sensitive to salt, start with 8g. Next time, adjust salt as you wish.
Ingredients
*Please read notes above before proceeding. Watching the video is helpful, too.*
- 400 g bread flour, see notes above
- 8g to 10g kosher salt or sea salt, see notes above
- 300 g water
- 100 g active sourdough starter
- rice flour, for dusting
Instructions
- Mix the dough. In a large bowl, combine the water, starter, and salt. Stir with a rubber spatula to loosely combine. Add the flour, and stir with a spatula to combine — it will be a wet, sticky dough ball. Transfer to a straight-sided vessel and cover with a tea towel or bowl cover for 30 minutes.
- Stretch and fold. After 30 minutes, grab a corner of the dough and pull it up and into the center. Repeat until you’ve performed this series of folds 4 to 5 times with the dough. Let dough rest for another 30 minutes and repeat the stretching and folding action. If you have the time: do this twice more for a total of 4 times in 2 hours. [Video guidance here.] Note: Even if you can only perform one series of stretches and folds, your dough will benefit. So don’t worry if you have to run off shortly after you mix the dough.
- Bulk fermentation: Cover the vessel with a tea towel or bowl cover and let rise at room temperature (70ºF/21ºC) for 4 to 18 hours (times will vary based on the time of year, the humidity, and the temperature of your kitchen). The bulk fermentation will end when the dough has nearly doubled in volume and you can see bubbles throughout the dough and on the surface. (Note: Do not use your oven with the light on for the bulk fermentation — it is too warm for the dough. To determine when the bulk fermentation is done, it is best to rely on visual cues (doubling in volume) as opposed to time. A straight-sided vessel makes monitoring the bulk fermentation especially easy because it allows you to see when your dough has truly doubled.)
- Shape: Gently transfer the dough to clean work surface. I prefer to use no flour and a bench scraper at this step, but if you find an un-floured work surface to be difficult, feel free to lightly flour it. [Video guidance is especially helpful for this step.] Fold the dough, envelope style: top third over to the center; bottom third up and over to the center. Then repeat from right to left. Turn the dough over and use your bench scraper to push the dough up, then back towards you to create a tight ball. Repeat this pushing and pulling till you feel you have some tension in your ball. Place the dough ball top side down and let rest 30 to 40 minutes. (FYI: This is called the bench rest.)
- Proof. Line a shallow 2-qt bowl (or something similar) with a tea towel or flour sack towel. Flour sack towels are amazing because the dough doesn’t stick to them, and therefore you need very little rice flour, but if you only have a tea towel, you will be fine. If you are using a tea towel, sprinkle it generously with rice flour. If you are using a flour sack towel, you can use a lighter hand with the rice flour. After the 30-to 40-minute bench rest, repeat the envelope-style folding and the bench scraper pushing and pulling till you have a tight ball. [Video guidance here.] Place the ball top side down in your prepared towel-lined bowl. Cover bowl with overhanging towel. Transfer bowl to the fridge for 12 to 24 hours. (Note: When you remove your dough from the fridge, visually it will likely look unchanged. This is OK. You do not need to let it then proof at room temperature before baking.)
- Bake. Heat oven to 500ºF. Remove your sourdough from the fridge. Open the towel. Place a sheet of parchment over the bowl. Place a plate over the parchment. With a hand firmly on the plate and one on the bowl, turn the dough out onto the parchment-paper lined plate. [Video guidance here.] Carefully remove the bowl and towel. Carefully remove the plate. Brush off any excess rice flour. Use a razor blade to score the dough as you wish. I always do a simple X. Grab the ends of the parchment paper and transfer to the Dutch oven. [Video guidance here.] Cover it. Lower oven temperature to 450ºF, bake covered for 30 minutes. Uncover. Lower temperature to 400ºF. Bake for 10 minutes more or until the loaf has darkened to your liking. Transfer loaf to a cooling rack.
- Cool. Let loaf cool for at least 30 minutes before cutting.
- Prep Time: 48 hours
- Cook Time: 45 minutes
- Category: Bread
- Method: Sourdough
- Cuisine: Global
This post may contain affiliate links. Please read my disclosure policy.


982 Comments on “Easy Sourdough Bread (Whole Wheat-ish)”
Wow. I feel like I’ve just attended a well-done, comprehensive class on making sourdough bread. I have avoided it because it just seemed too confusing. Now I “get” it. Thanks Ali!
So happy to hear this, Claire! It really is simple once you get the hang of it. I still find myself making yeasted breads more often because I know I can just throw them together without too much planning, but I love having sourdoughs rising/proofing in the background.
My very first sourdough loaf ever was a thrilling success thanks to your wonderful recipe and excellent video tutorial. I feel like a magician! 🙂
Sarah, I am so, so happy to hear this!! Thanks so much for writing 🙂 🙂 🙂
forgot to add the star rating — wonderful recipe and tutorial!
Thank you, Sarah!
I have been baking sourdough bread for a while. In my opinion this tutorial is great. One comment, for hydration I do it by weight, not volume.
I did the star rating and was not posted. I am doing it again. Any way I am giving you ***** stars
Thank you, Ramon! I am so happy to hear all of this. Thanks for writing/rating 🙂
This is the best sourdough bread attempt I’ve had yet! And I’ve tried quite a few times over the years. My loaf just came out of the oven and looks fantastic but it’s a tiny bit burnt on the bottom. Any thoughts on how to prevent this? I wanted to make sure it got enough color on top.
Thanks for a great and informative post!
Wonderful to hear this, Laura! Bummer about the bottom being burnt. Questions: Did you use a preheated or cold Dutch oven? What material is your Dutch oven made out of? Did you make any changes to times/temperature? What type of flour did you use (if any) for shaping or using as a barrier between the tea towel? We’ll get to the bottom of it!
Thanks for responding! I just made a second loaf and it was devoured quickly so maybe I’m just being nit picky. But since sourdough quickly leads you down a rabbit hole here goes: I used a cold Le Creuset Dutch oven, followed temperature directions exactly but did leave it in a bit longer at the end since it was still a little pale looking (probably ~10 additional minutes). I used rice flour for dusting but I should note that I used all white flour since that’s what I had. Maybe that’s my problem right there? Otherwise seriously delicious! Thanks in advance for any feedback!
It’s important to be nit picky! I’m wondering two things:
1. If you preheat the vessel, you may not need to leave it in for the additional 10 minutes to get the browning on the exterior you are looking for, which might prevent the bottom from getting too brown.
2. If you don’t want to preheat the vessel, you could remove the loaf entirely from pot after the 30 minutes or whenever you uncover the pot, which also might help the bottom from getting too brown.
Keep me posted on any experiments. I don’t think using all white flour in your bread would affect the bottom being too brown.
I’ll try both of those ideas! Mixing my next loaf now. I’ll let you know my results 🙂
perfect 🙂
I took the bread out of the Dutch oven after 30 minutes and baked in the oven for another 10 minutes and it is perfect! No burning on the bottom. Thank you so much for helping me troubleshoot. I’m going to mix another loaf now.
Wonderful to hear this, Laura!!
My sourdough starter is about 35 years old so I have been at it for a while. I have my go-to recipes but I am always willing to try another cook’s recipe/methods. This one is going to be a new favorite, nice crust but not too hard and, the flavor of the bread is wonderful. Bravo!
So happy to hear this, Roberta! Means a lot coming from such a seasoned sourdough baker. Thanks so much for writing.
I’ve been feeding and maintaining my starter for at least six months now, using my discard for various yummy things. Being unsure how to go forward with making actual sourdough bread, I have spent a lot of time reading posts mostly from large companies who profess to have all we need to be successful in this endeavor. It wasn’t until I came across this post that I finally understood and had the confidence to go for it! My bread is delicious. Thank you for the easy to understand explanations of all the steps along the way. I’ll be back for more!
I’m so happy to hear this, LJ! Thanks for writing.
The bread was amazing Ali and your step by step instructions so good!
My only -minor- problem was that my dough was a bit “wet” after proofing in the refrigerator for 18 hours. This is entirely my mistake however because I used only regular, AP King Arthur flour! The baked loaf spread a bit more as it baked, but, the taste was absolutely delicious!
Thank you for all your hard work in putting together such detailed instructions!
Oh Marilena, I am so happy to hear this! It is amazing how using bread flour vs ap flour makes a difference, and depending on the time of year, the difference is more pronounced. You might be able to get away with using more ap flour if you don’t feel like getting bread flour. Hope you are well! xo
Ali, I’ve been making sourdough bread for nearly a year now. Very happy to have Emilie Raffa’s book in my collection. But your recipe here takes the process to a new level. First of all, I bought the exact flours you use from Anson Mills. The flavor that these give to the bread is amazing. Overused word, I know! But it’s truly amazing. Thank you for explaining each step. I am always a student, no matter how much experience I have in the kitchen. And I have a lot … for many years.
Lu, I’m so happy to hear all of this, and I’m so happy you bought the flours — it’s always amazing (ha!) to me that such a small amount of these freshly milled/stone milled flours makes such a difference. Glad you approve 🙂 And I feel the same way regarding cooking and learning — I think that’s partly why it’s so much fun. There’s always something else to learn. xoxo
Thank you!!! Made my first sourdough ever with this recipe (and your video, which I watched several times). Best bread I’ve ever made! I’ve already started two more loaves. Quick question: can I leave it in the fridge for more than 24 hours?
Yay!! So happy to hear this, Faith! And yes: I definitely have left it in longer than 24 hours … don’t think I’ve left it in longer than 48 hours, but that doesn’t mean it wouldn’t work. How long are you hoping to leave the bread in the fridge for?
Followed this recipe exactly, but the bulk fermentation period (longer than in other recipes I’ve seen) was far too lengthy for my dough: after 6 hours my dough (which had a good shape during the stretch and folds) became sticky and fell apart. Completely unworkable and unshapable, and I lost about a quarter of it just because it clung to the bowl and every other surface. I had to add a bunch of flour just to be able to keep what was left of the dough together. Fortunately it turned out fine, but I would do a shorter bulk fermentation next time.
Interesting! Where do you live? Is it very warm/humid where you live? This is why I put a wide range on the timing of the bulk fermentation for sourdoughs, and why I prefer to rely on use visual cues — i.e. not letting the dough get beyond double — over time cues because dough behaves differently for everyone for so many various reasons. Sorry you had trouble with this one!
Question. What can I use if I don’t have rice flour? And I agree on dtone ground flour! My starter did zip before feeding it with sg rye our just once.
Hi Mary! You can use all-purpose or bread flour — I just love rice flour because it doesn’t burn or leave that raw-flour taste in your mouth. But don’t run out to get it just yet … try the ap flour and see how you like it.
I just tried your recipe Word for Word. It turned out wonderful definitely the sour flavor I was looking for. I think that whole wheat flour makes all the difference. It’s so easy and the bread is so yummy!
So happy to hear this Bridgette! I’m a believer in the small amount of whole wheat flour too 😍
hi.. I love your other sourdough recipe. Are longer proofs required because of the wheat flour?
Hi! Nope! I actually find the longer plus cold proof creates a ligher, airier crumb.
HI! I am VERY new to to trying sourdough. I have a very healthy, active starter and everything went exactly according to your directions until….the proofing period in the fridge. My dough did not rise in the slightest and remind a firm little ball of dough when I took it out at the end. suggestions?
Lesli, hi! Question: how long was the bulk fermentation before you shaped and stuck the round in the fridge? My dough ball rarely looks much different after the proof in the fridge, but it transforms once baked.
Hi I’ve made your re iOS for white sourdough and it was the first time the whole family enjoyed my sourdough efforts (I’ve been at it for a while!). I tried this one and everything was going well but the bread did not rise in the oven. It’s still soft and springy so not a slab (as in my past endeavours…) but thin. I used a mixture of stoneground white spelt and stoneground wholewheat though. I am in Wales, UK so very damp…. any insight would be greatly appreciated!
Hi Theodora! Questions: with the loaf that turned out well, what kind of flour did you use? My first thought about why this one didn’t turn out is maybe because you used all stoneground flours, and in particular spelt and wholewheat. To get a nice loft in my loaves, I find I can’t use more than 25% stone-milled flours. So I shoot for 25% stone-milled and 75% all-purpose or bread flour (roller milled).
Hi and thanks for your reply. The “good” loaf was all white so I’ll take your suggestion and include a lot of heavy flours. One more clarification, in your white loaf recipe the fermentation and proofing process is slightly different and shorter than the whole meal recipe. Is there a reason or is it just another way of doing it?
Hi Theodora! Yes, the bulk fermenation and proofing process is different here. I explain in a lot more detail above, but in short I’ve learned:
1. Do not let dough more than double during the bulk fermenation. So keep an eye on it, and shape it before it doubles.
2. Let the dough perform its proof in the fridge for a much longer period of time — this makes for an airier/lighter crumb.
3. Stone-milled flour in small quantities (12.5% to 25% of the total amount of flour at most) adds tremendous flavor. It’s much better to use a small amount of freshly milled stone milled flour than to use a lot (or even a little bit) of commercial whole wheat flour, which doesn’t have much nutritional value or flavor.
Thank you! That makes sense now!
Thank you. Thank you!!!
I got a starter from a friend and have been so nervous and confused about the process. I put off baking a bread but your guide gave me a lot more confidence and it turns out it’s pretty easy! You just need some planning and otherwise so much of the work is letting the dough get happy. This is also good for beginners…. my husband had to feed my starter one day and drowned it a little with incorrect ratios and even then this got nice and bubbly even with a struggling starter.
I can report from hot, humid Hawaii that it took about 8/9 hours after the turn and folds for bulk fermentation (good sunny day, but we do have winter here… it’s low 70s. It’s more hot and humid in summer.)
On the taste…. it’s the perfect amount of tangy and sour. I let it rest in the fridge for almost a 24 full hours. It also has a beautiful texture and good crunch. It’s everything I wanted in a loaf and I’m so grateful! Planning my next loaf already!
Oh Paige, yay! So happy to hear this. Thanks so much for writing and sharing the details, especially coming from Hawaii. I try my best to troubleshoot with people from all over the world, but it can be tricky when environments are so, so different. Glad this one worked out. Happy baking!
I never thought I could make such a perfect sourdough loaf until I tried this recipe! I’m so happy and proud! Thanks so much for laying out all the steps in such a straight forward way. I know this will my my go-to recipe for the rest of my life, it’s perfect! 🙂
Hi, just stumbled upon your website after failing to make the sour dough with another website. Your tips and information was very helpful and the youtube videos are fantastic. Was a bit down in the dumps so watching your video inspired me to try and nail this! Have just pulled the loaf out of the oven, it looks nice and crusty but it didn’t rise as much as yours? I did the drop test with the starter and the dough itself felt texturally “correct” when I was doing the stretching. Th bulk rise was just under double the volume, and was in the fridge for 24 hours. The oven temps mentioned, is this for fan forced? I adjusted it because mine is fan forced and also working with degrees C (in Oz:) Could this be the reason why it didn’t rise as much? What time/temps do you recommend for degrees C and fan forced? Love your website!
Hi Tarn! And welcome. Thank you for the kind words 🙂 It sounds as though you are doing everything correct. The oven temp is not for fan forced. For Celsius, I would preheat at 287, but as soon as you transfer the bread to the heated Dutch oven, I would lower the temp to 232. Cover the pan, cook 30 minutes, then uncover and cook for 10-15 minutes more at 204. How specific can you get with the degrees of Celsius with your oven?
Regarding rise or oven spring, questions for you: what kind of flour did you use? do you live in a humid environment?
Hi Ali, thanks for replying. Unfortunately my oven only goes up to 250C and temps are not very specific (the dial goes up in 25 degree increments)
I did use white bread flour 300g and 100g of wholemeal bread flour. Not sure if we can get the brands you mention here in Australia. Yes, its been very humid here. – Maybe too much wholemeal, and humidity affecting the oven spring?
You suggested 18-24hrs in the fridge for the proofing. Would it be detrimental to have it in there for longer?
I have a boule waiting in the fridge at the moment, I used 100% white this time. Will try you temps suggested above.
Thanks
Hi Again! OK, one thing you could do is make sure you preheat your Dutch oven for longer, at least 45 minutes to an hour … maybe you have been doing this already. Glad to hear you are trying with 100% white … that will give you a good baseline. Definitely not detrimental to have in the fridge for longer. I think I’ve gone as long as 48 hours, maybe longer. Given that it is humid, do you find the dough to be too wet? Or unmanageable? It didn’t sound so from your first comment, but if it is, you could cut back on some of the water.
Hi! It was the oven temp! My oven is not as accurate as I thought it was. For my 3rd loaf, I set it to 250C for 30 mins and then 10 mins at 225C, and the loaf rose like yours! Thrilled that it worked. I was wondering if you had a recipe or method to incorporate seeds into this loaf? What % would you be looking at?
Thanks again. Have made so many loaves now that I found out what the problem was. So satisfying!
Oh wonderful! So happy to hear this, Tarn. And funny you ask about seeds, because I’m dying to make a 3-seed sourdough loaf … stay tuned, or go ahead and try adding as much as 3/4 of a cup of seeds …. sorry I don’t have the weights at the moment, but I don’t think you have to be very precise with seeds. I love a mix of sesame, pepitas, and sunflower seeds. I don’t bother toasting them before use.
Hi! Thanks as always for your recipes! You’ve inspired me to start making sourdough loaves. So far, I have had success, and I really enjoy the flavor of this loaf, but the texture is a little sticky/moist. Any idea what that means/how I could adjust to make the crumb a little drier? Longer baking time?
Hi Erika! Do you live in a humid environment? You could either cut back some of the water (50-70 g) or you could bake it longer.
OK. I live in the northeast, so things are pretty try this time of year. I will try extending the bake by a few minutes. Thanks!
perfect! Keep me posted.
I have tried a few things, but what has worked the best is after the initial 30 minutes at 450 with the top on, I remove the lid and keep the temp up at 450 for 10 minutes, then lower to 400 for just the last 5 minutes. Thanks!
OK, great! The more I think about it, too, if you really do prefer a dryer crumb, probably cutting back the water is a good idea.
I tried a rye sourdough this week – my third sourdough loaf now! It’s such a satisfying process when you achieve this yumminess. In my rye bread, I used around about 2/3 bread flour to 1/3 stone ground rye. It was beautiful! Crusty, with a lovely soft centre. I have just had it for toast this morning and it was amazing – so crunchy. Starting more this morning, as it’s been requested 😉
It is such a long process though – is that because it has whole grain in it? Does rye require longer to prove?
Hi Cheryl! It’s possible that using 1/3 stone-ground rye could have slowed down the process. Compared to previous attempts, how long was the first proof with the rye? In the past did you use rye or a different stone-ground flour?
It is fun, isn’t it? 🙂 🙂 🙂
The others I have were white sourdoughs, Alexandra. The fridge prove was quite short for them, in comparison to the rye. Second loaf is going into the oven later today, so I’ll see if the first was beginner’s luck! Haha
Loving your site and the straightforward advice it gives. I think I’m going to be brave and make one with softened grains next week. I have access to lots of different stoneground flours and whole grains, so I think it’s time!
Hi Ali – I’ve just started making my own sourdough bread, and have found your content to be pretty great. The detailed descriptions and videos are super helpful, and take some of the stress out of the whole process for a beginner like me.
I’ve made this 4 or 5 times, and with exception of one massive failure, the rest have been quite good. I do struggle each time, however, with the stickiness / wetness of the dough. I find it really difficult to manage and end up adding some dough, but it always remains wet and sticky.
I find it challenging after bulk fermentation (where I do get great rise) to shape it so that it has some give and stays somewhat closer to a ball – mine always flatten out, and my final product, while texturally fine, are much flatter than what I’m shooting for.
I see you ask about humidity in many of the posts – it’s typically humid in my area, but this time of year is definitely not. I use the King Arthur bread flour you recommend. Any thoughts on how to overcome this? Many thanks in advance!
Hi Justin,
So glad you are liking the videos, and I’m glad you are having some success with the recipe. It does sound as though you could try reducing the amount of water a bit. Questions: are you using a straight-sided vessel for the bulk fermentation? And how long typically is the bulk fermentation going?
My initial thoughts are to maybe reduce the water slightly and shorten the bulk fermentation.
Are you using a bench scraper to shape the dough?
It sounds as though you are doing everything right, and I think a few minor changes will make a difference.
Can I use a mixer to shorten the bulk fermentation time?
Do you use specific white flour with a certain amount of protein?
Hi Luella,
I don’t think using a mixer will shorten the bulk fermentation time. You can use a mixer, but the bulk fermentation will likely take the same amount of time as when you mix by hand. I use King Arthur Flour (bread or ap) and the protein levels are: Bread flour: 12.7%, All-Purpose: 11.7%
I have tried a few things, but what has worked the best is after the initial 30 minutes at 450 with the top on, I remove the lid and keep the temp up at 450 for 10 minutes, then lower to 400 for just the last 5 minutes. Thanks!
Hi! I’m still pretty new to sour dough bread but am improving. My bread was a little burnt on the bottom and a little doughy. Recently my husband had heart attack so am using King Arthur whole wheat only. Could that make a difference in the texture of my bread? Next time I’ll bake the bread higher in my oven and try taking it out of my Dutch oven after 30 minutes. Any other suggestions?
Hi Lynn,
I think the issue is the whole wheat flour. I don’t recommend using more than 12.5% to 25% (1/2 cup to 1 cup) whole wheat flour in this recipe because if you do, the dough will be very dense.
Are you using a scale to measure the flour? With whole wheat flour, you’ll want to add a little more water. What kind of flour are you using to line the towel with during the proofing phase?
No need to bring to room temp. Just transfer straight from fridge to oven … score it first 🙂
With all the panic buying, I haven’t been able to get ahold of whole wheat flour or bread flour. I just have ap. Should I use less water to make for an easier to handle dough? Also I live in the south and it can be close to 70% humidity in my apartment. How much water would you recommend starting with?
Yes, just use ap flour. Is it unbleached?
Given that you are in a humid climate, I would definitely cut the water back. Start by cutting it back by 70 g … you can always drizzle in more water if it looks too stiff after you mix it up.
Yes unbleached ap! Looking forward to trying this recipe. I’m just starting out with sourdough, and your website has been so helpful!
Wonderful! So happy to hear this, Amy!
Hello from Ottawa, Ontario! 🙂
Looking forward to trying your recipe. I don’t currently have rice flour and can’t go buy it right now (under self-isolation!) will any other flour work well for dusting? I currently only have red fife and AP. Thanks! 🙂
Yes! I would use AP flour. When you flip the bread over onto the parchment paper, I would brush off any excess flour you are able … just to prevent burning. Happy Baking!
I can’t seem to develop a crust on my bread? I am using a Le Creuset dutch oven and putting it in right from the fridge. The bread bakes and rises but the top never changes colour from how it looks when I put it in. I took it out of the dutch oven for an additional 10min and put it directly on my baking stone but it still stayed pale. Any ideas? I am cooking on the regular setting and not convection. Would convection be better?
Hi Delilah! Questions: are you using bleached flour? are you preheating the Dutch oven or putting it in cold? do you have an oven thermometer? I’m curious how hot your oven is really getting. I never use convection so I don’t think that’s it. You could bake the bread covered for 30 minutes in the pot, then take it out of the pot completely and let it bake 15-20 minutes directly on the oven racks.
As a follow-up for anyone who was having the same problem. For me preheating the dutch oven made all the difference in achieving a nice crispy chewy dark crust. I also spritzed the bread with a little water before putting it in the oven initially. Result: amazing
Oh wonderful! So happy to hear this.
Hi! I was wondering about what you could do if you don’t have a dutch oven. Thanks!
Hi! Do you have a large loaf pan? Like a 10×5-inch?