
Simple Sourdough Pizza Crust: A Step-by-Step Guide
This post may contain affiliate links. Please read my disclosure policy.
Here is my guide for making sourdough pizza crust at home. As far as sourdough pizza recipes are concerned, this one is as simple as it gets — it’s made with all-purpose flour and there is no autolyse or preferment. Everything gets mixed together at once and you are on your way! Ready? Wake up your starter! Let’s do this 🍕🍕🍕
One of the most frequently asked questions I’ve received these past few weeks is: “Have you ever replaced the yeast in “X” bread recipe with sourdough starter?”
And specifically: “Could I use sourdough starter in your pizza dough recipe?”
Yes! And today, I’m going to show you how. The process is very similar to how I make yeast-leavened pizza, and the resulting pies are similar: ballooned and blistered edges with crisp but pliable crusts. In the recipe below, there are instructions for making three favorite pizzas 🍕🍕🍕:
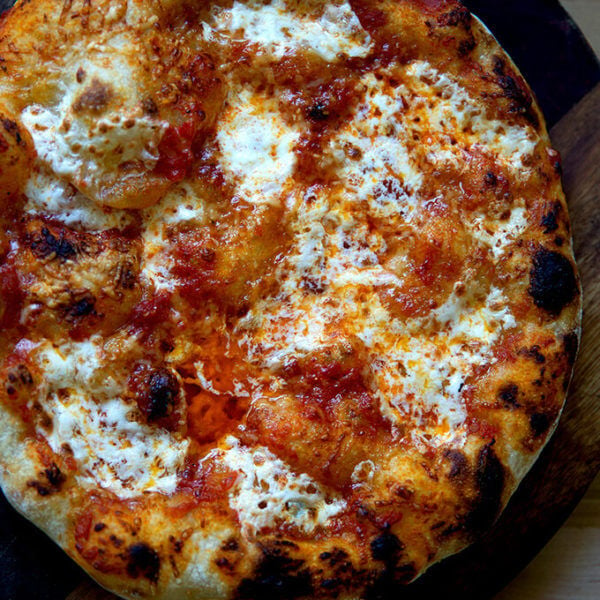
- Classic Margherita
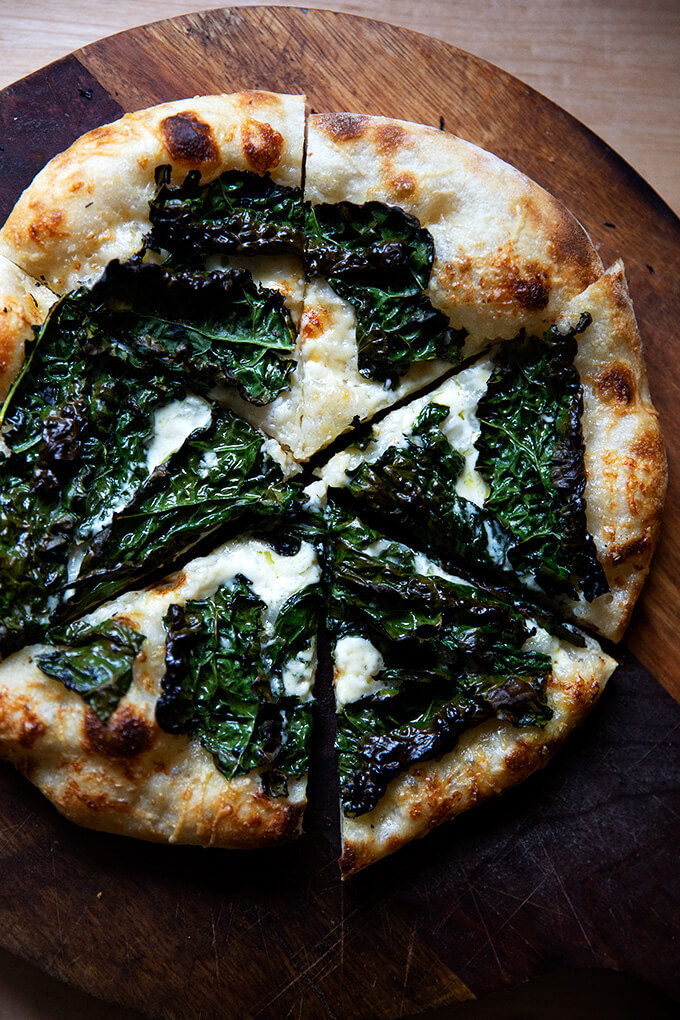
- Kale and Crème Fraîche
- Naked Pizza with Spicy Scallion (or Ramp!) Oil … made this on Instagram over the weekend
Simple Sourdough Pizza Crust: The details
This sourdough pizza crust is …
- Basic! Given supply constraints, I didn’t get creative with the flour mix here. This dough is made with 100% all-purpose flour. You absolutely can use bread flour or tipo 00 flour (read more about tipo 00 flour here) if you can get your hands on either. If you have been having a hard time finding flour, Baker’s Authority is a great option — great prices, too, even with shipping tacked on.
- 75% hydration. This is a classic sourdough formula: 375 g water, 500 g flour. (Note: This calculation is not quite accurate, because I am not including the weight of the water and flour of the sourdough starter in the calculation.)
- Simple! As with all of the sourdough recipes on this site, there is no autolyse or preferment or levain. I do call for some stretches and folds, which build strength in the dough. I like to do 4 stretch and folds, but even if you can only perform one stretch and fold, your dough will benefit.
Can you Freeze Sourdough Pizza Dough?
Yes. In my experience, the pizzas made from frozen dough do not spring as high upon being baked, but they still taste delicious.
Also, in my experience, the more time dough spends in the freezer, the more air bubbles the dough seems to lose. After 1 week in the freezer, my dough will bake up beautifully. After 3 weeks in the freezer, my dough will be less bubbly and will bake into a thinner and crisper crust.
To freeze sourdough pizza dough: make it through step 4 in the recipe below or until after you transfer the portioned rounds to quart containers. At this point, transfer the quart containers to the freezer. To thaw, remove a container (or more) and let thaw in the refrigerator for 1 day or thaw at room temperature for 8 hours. Then, proceed with the recipe.
5 Keys to Excellent Pizza Every Time
Regardless if you are using yeast or sourdough, these (for me) are the keys to making excellent pizza at home every time.
- High-hydration Dough: When handled properly, doughs with a high proportion of water relative to the flour bake into beautiful, ballooned-pocketed crusts.
- Refrigerator time: After the first rise, time (at least 6 hours, but up to 3 days) in the fridge further develops flavor and improves the texture of the pizza dough.
- 1 hour at room temperature: If time permits, letting the dough come to room temperature an hour before baking, allows for easier shaping — room temperature dough will more easily stretch into a round than cold dough.
- Minimal handling of dough: Using a delicate hand to shape the dough, preserves the air pockets created during the fermentation process. I learned this from Jim Lahey:
“As soon as I began really paying attention to how I shaped my pizza rounds by taking care to use a gentle hand, I noticed a difference in the finished product. The air pockets pervading the unbaked round really affect the texture of the baked pizza.”
- Baking Steel: As you might know, I am a huge fan of the Baking Steel. In sum: steel is a better conductor of heat than stone — i.e. it transfers heat to the dough faster — which promotes great oven spring which translates to glorious bubbles throughout the dough. (Read more about the Baking Steel here.)
To be clear, I do not think you need to use a sourdough starter to make excellent pizza at home. A high hydration dough + leavening of choice + proper handling will give you excellent pizza every time, including that baked in a skillet: How to Make Excellent Skillet Pizza.
Here’s my guide to making yeast-leavened pizza dough at home: How to Make Pizza

Pizza Night
My cookbook, Pizza Night, which includes 52 pizza and 52 salad recipes, one pair for every week of the year, as well as five simple desserts is now available for preorder 🍕🍕🍕
It’s organized seasonally and includes recipes for the home oven, outdoor oven, the grill, Sicilian-style, Detroit-style, grandma-style, skillet pizzas, gluten-free, and more. There are both yeast and sourdough recipes for every style of pizza in the book.
Get your copy here: Pizza Night.
New to Sourdough?
If you are intimidated by sourdough bread baking, I have a free email course that covers the basics: Sourdough: Demystified.
And if you are looking for other easy sourdough bread recipes, this simple sourdough focaccia recipe, as well as this simple sourdough bread recipe, are the recipes I suggest attempting first, both for their simplicity and flavor. Another great beginner’s bread recipe to try is this overnight, refrigerator focaccia, which requires minimal effort but yields spectacular results.
PS: Easy, Homemade Pita Bread Recipe
PPS: My Mother’s Peasant Bread: The Best Easiest Bread You Will Every Make
Here’s the simple sourdough pizza crust play-by-play: As always, a scale is essential for best results. You need water, flour, salt, and a sourdough starter. I am a proponent of buying a starter (see recipe box for sources), but if you are up for it, you can build a starter from scratch in just about 1 week.
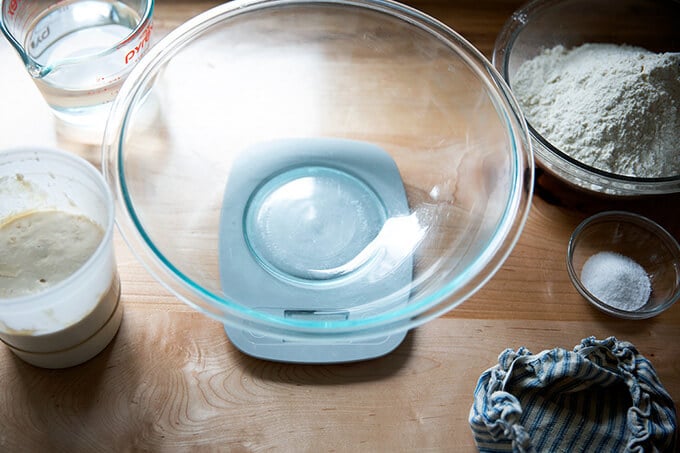
Combine 375 g water, 100 g sourdough starter, and 10 g salt in a bowl. (See notes in recipe box about using less water if you live in a humid environment.)
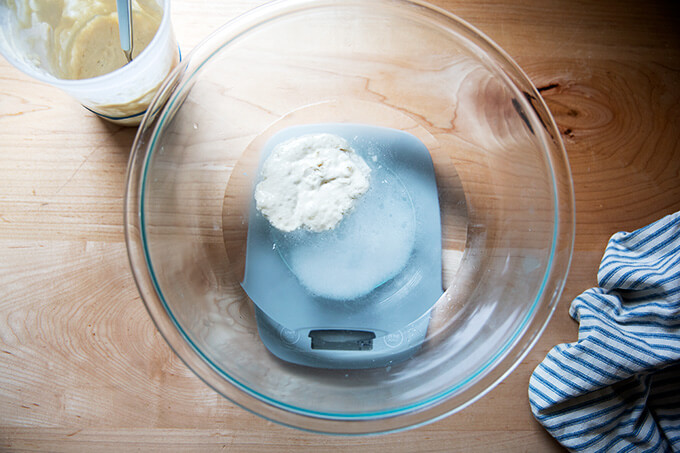
Stir to combine; then add …
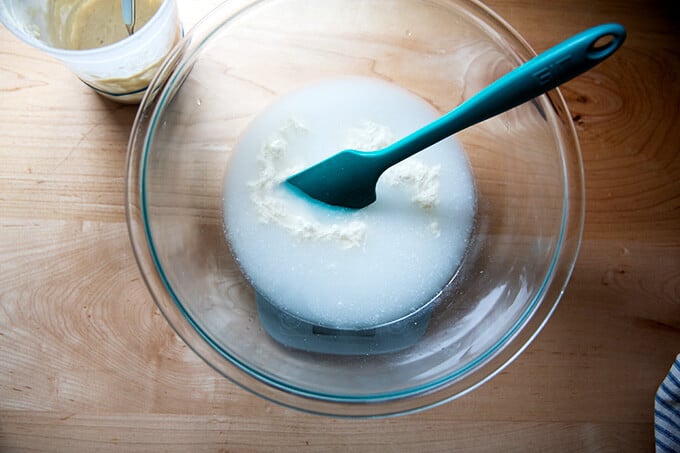
… 500 g all-purpose flour.
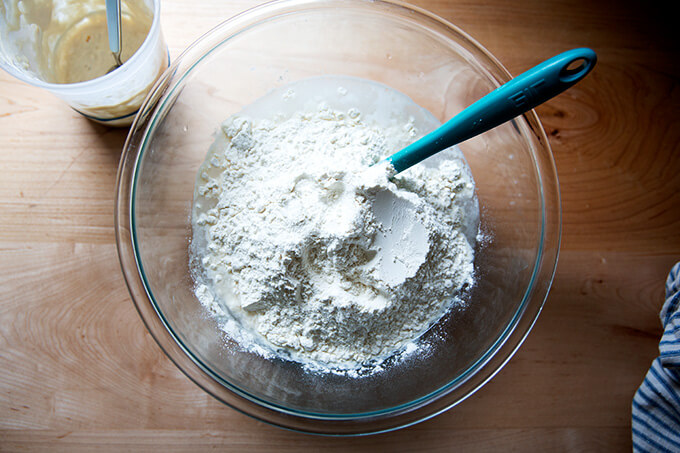
Stir until you have a sticky dough ball.
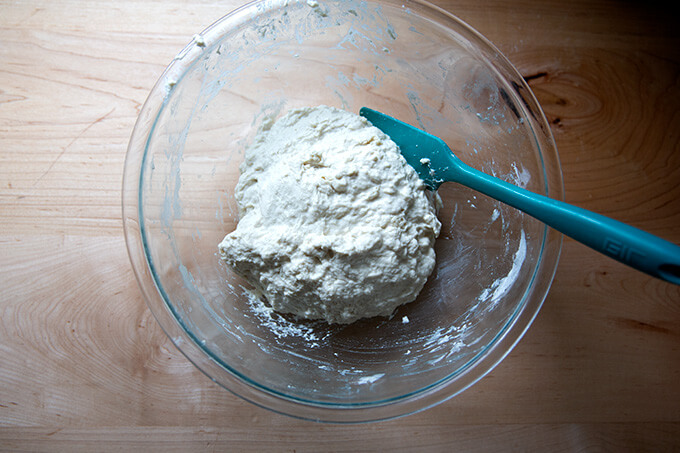
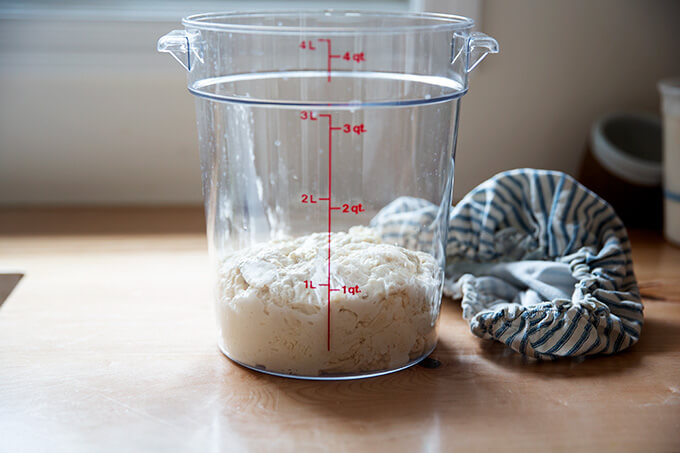
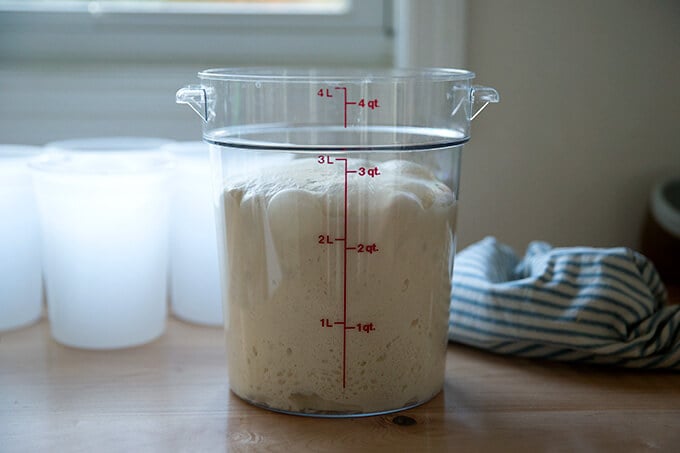
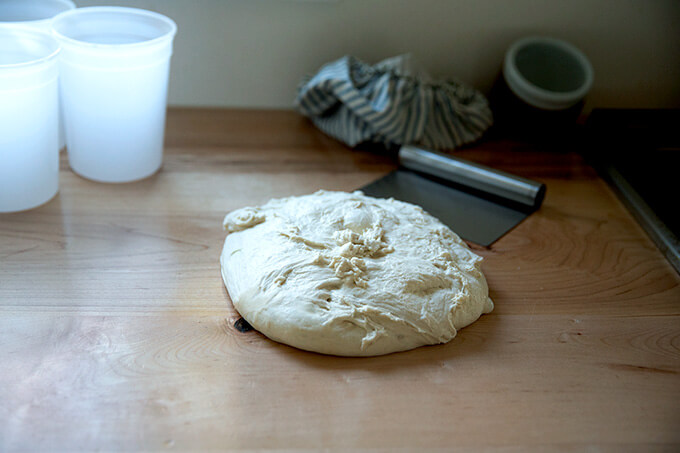
Transfer to a straight-sided vessel (if possible) and let rest for 30 minutes. Then, “stretch and fold” the dough (see video for guidance) 4 times at 30 minute intervals. Cover the vessel. Let it rest for 6 to 12 hours (see recipe notes for timing) or until the dough…
… has about doubled in volume. (Note: This is a little bit more than double. Ideally you don’t want your dough to rise much beyond double. More recently, in fact, I stop the bulk fermentation when the dough has increased in volume by 50%.)
Turn dough out onto a work surface. Use flour here as needed.
Portion into 4 equal pieces, again using flour as needed.
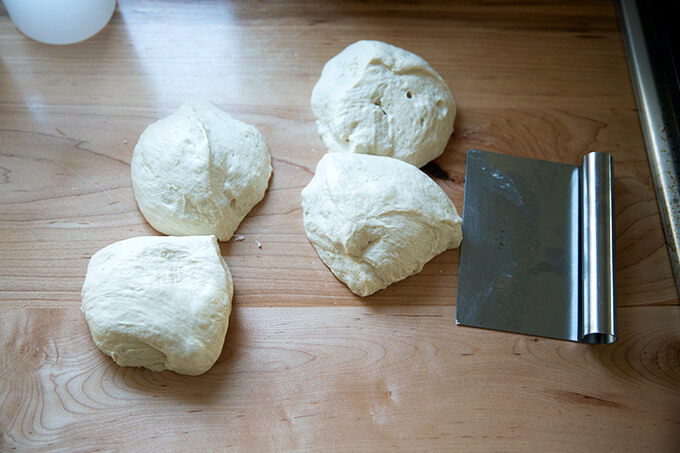
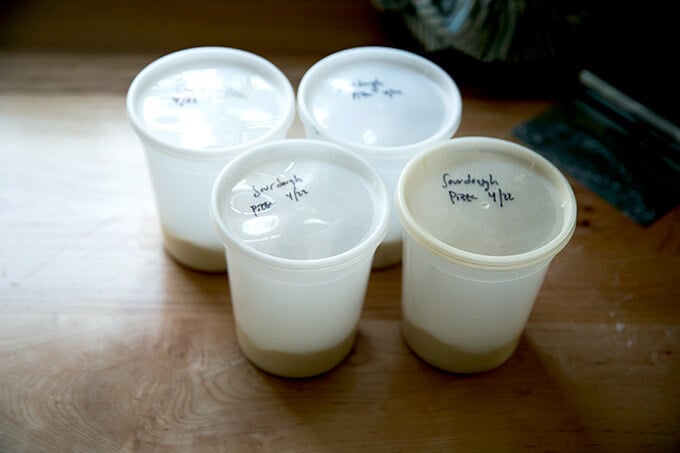
Ball up and transfer to quart (or other similar-sized) containers (I love these deli quart containers). Transfer to the fridge, ideally for at least 6 hours and up to 3 days.
An hour prior to baking, remove a round (or more) of pizza dough, and place it on a floured work surface. If you have a Baking Steel, place it in the upper third of your oven, and heat the oven to 550ºF. (See recipe for other options.)
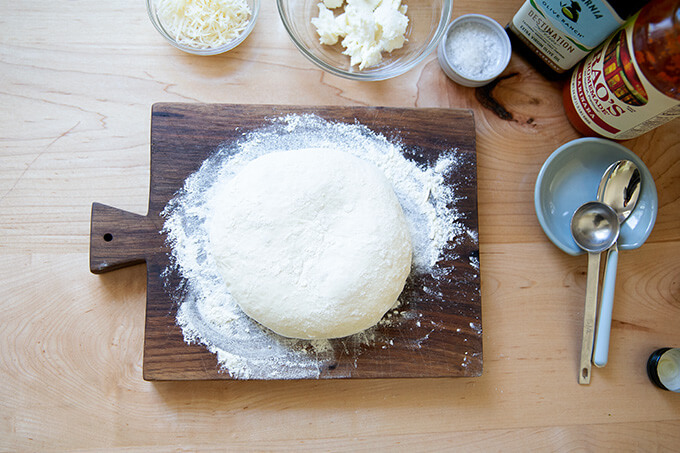
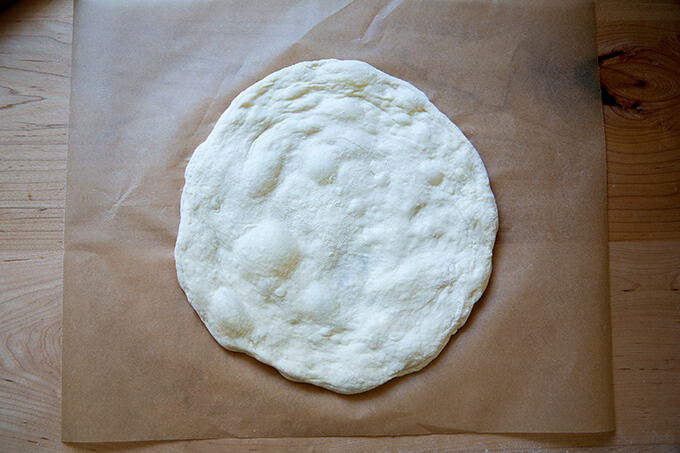
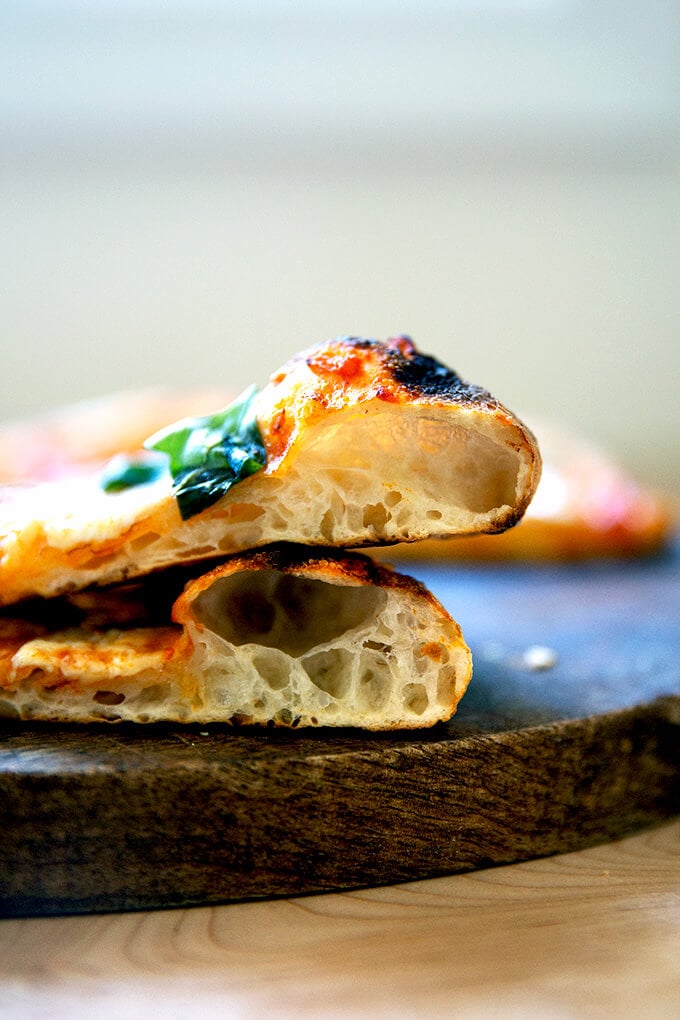
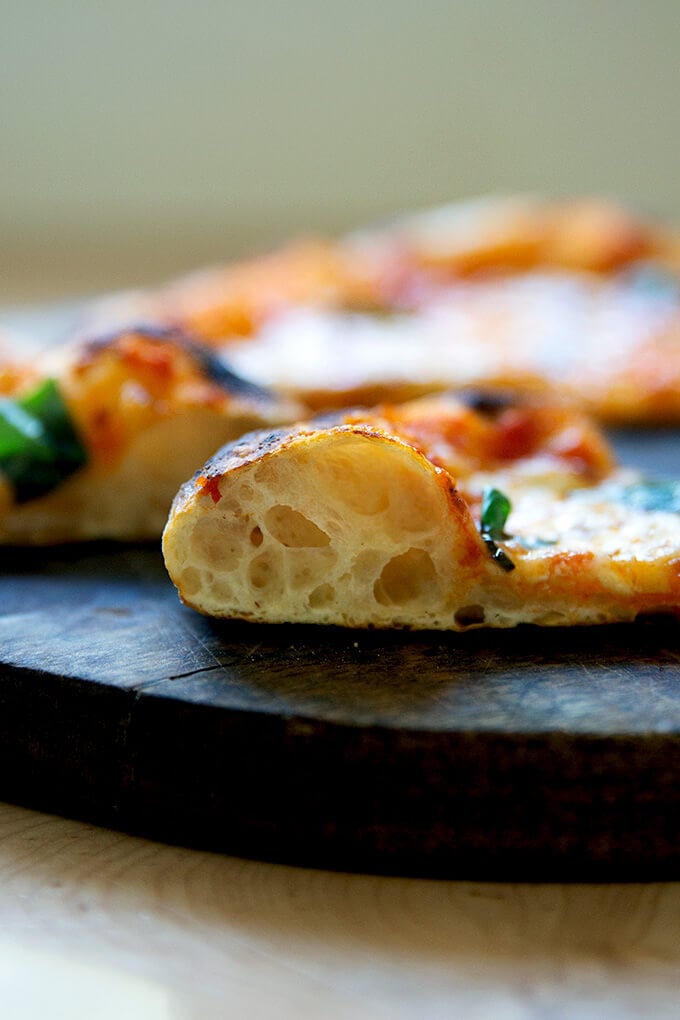
Delicately stretch the dough into a round, trying as best you can to preserve those air pockets.
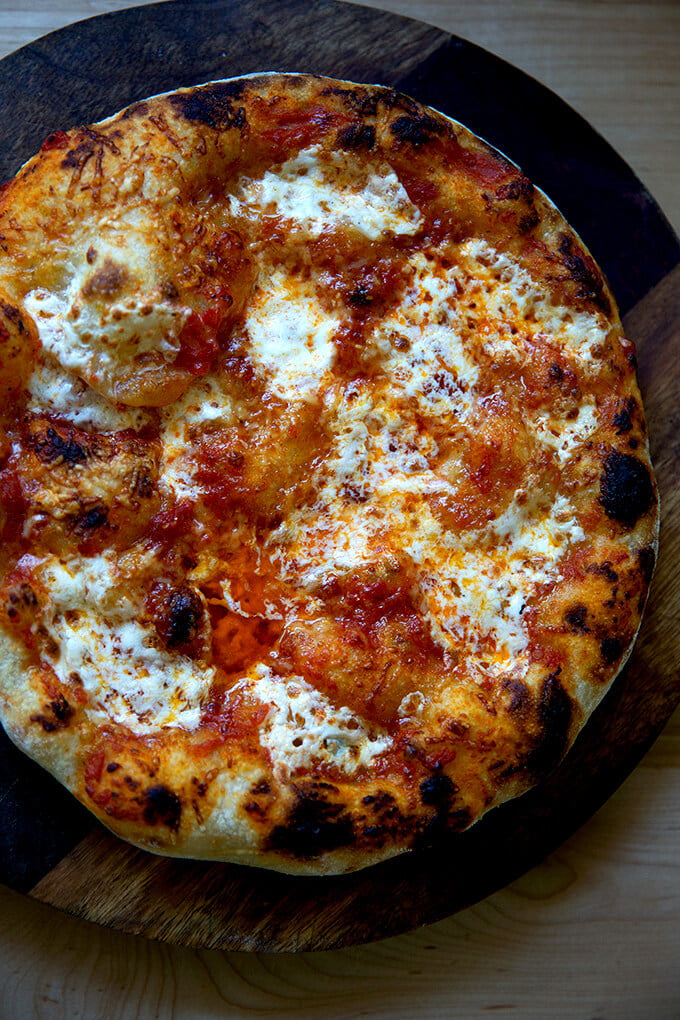
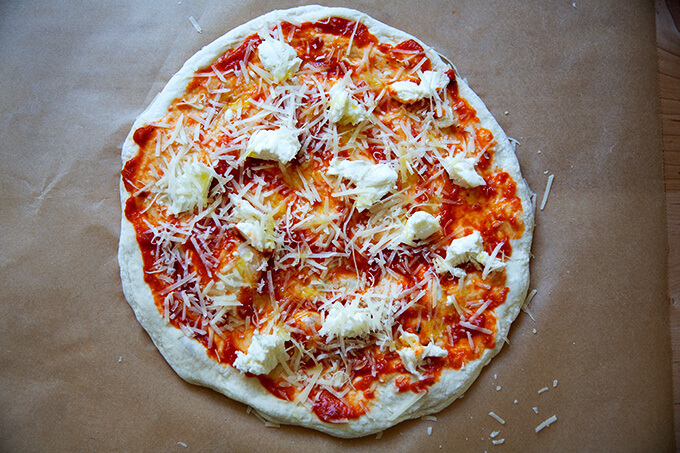
Top as you wish. This one is spread with tomato sauce and topped with fresh mozzarella, parmesan, olive oil, and sea salt.
Transfer pizza, parchment paper and all to a preheated Baking Steel or stone in a 550ºF oven. Bake 5 to 6 minutes or until cooked to your liking.
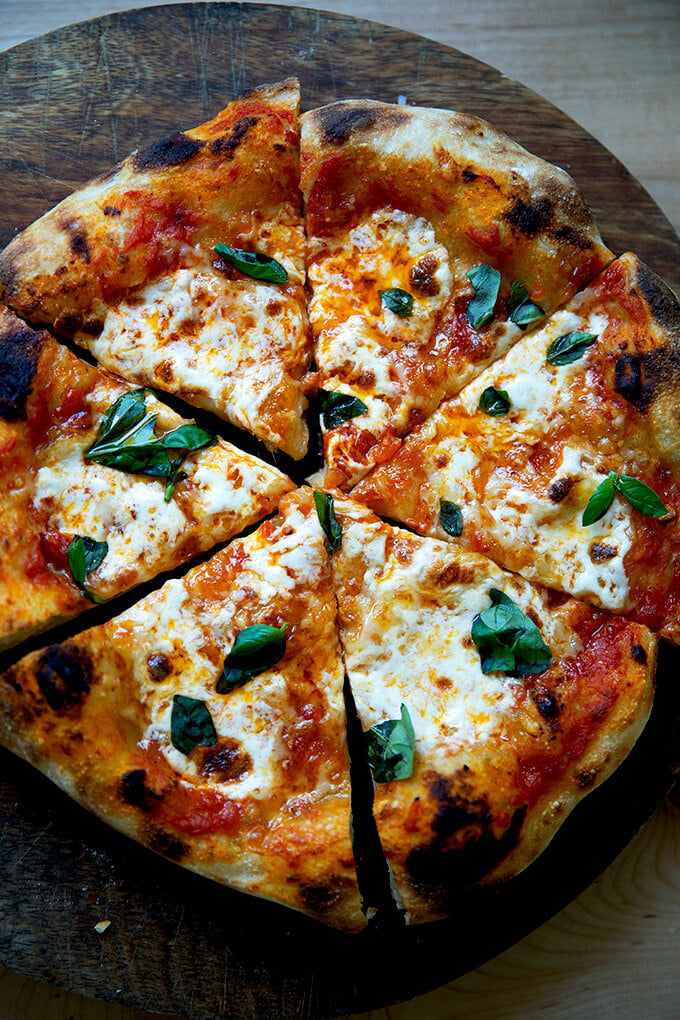
Slice and serve.

A little fresh basil is always nice.
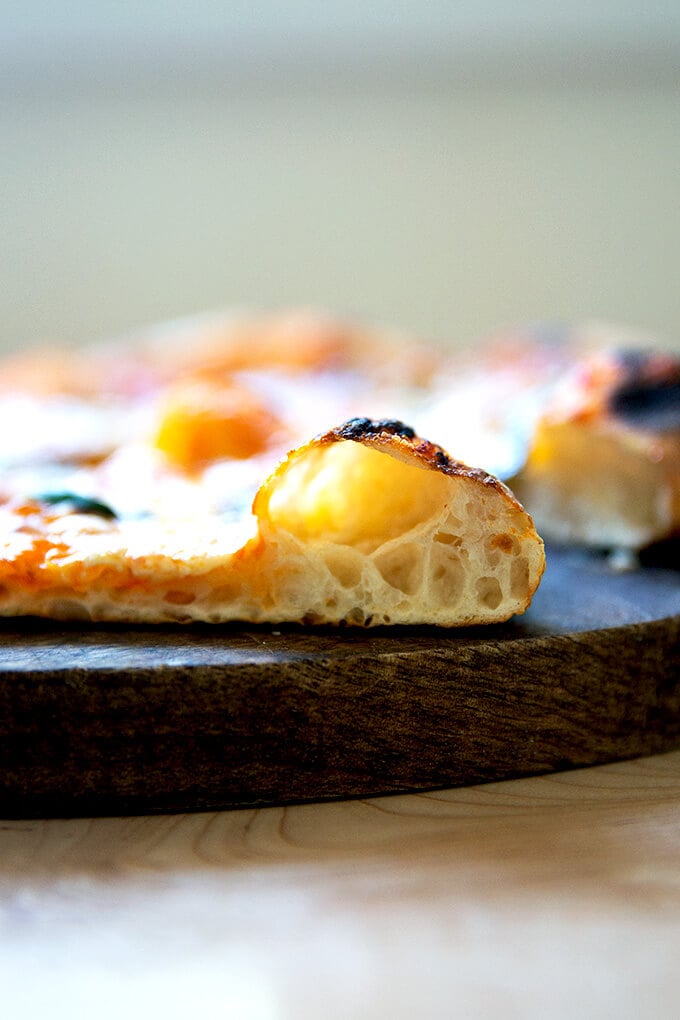
This is the beauty of the Baking Steel: oven spring!
Another favorite: kale + crème fraîche:
Another favorite: “naked” + spicy scallion (or ramp) oil:

Simple Sourdough Pizza Crust
- Total Time: 1 day + 1 hour
- Yield: 4 pizzas
Description
**Attention Pizza Fans**: My pizza cookbook, Pizza Night, is now available for pre-order. Get your copy here: Pizza Night
What you need to make this recipe…:
- …a sourdough starter. Ideally, you want to use your starter 4 to 6 hours after you feed it, when it has doubled in volume and is very bubbly and active. You can build a starter from scratch in just about 1 week. Or you can buy one. Here are three sources:
- …time. Once your starter is ready to go, this recipe requires an initial 6 – 18 hour rise, followed by at least 6 hours in the fridge or up to 3 days.
Timing/Schedule:
The more I make sourdough, the more I realize that the timing of each bake depends so much on the time of year and the temperature of my kitchen. In the summer, because it is warm and humid, the first rise (bulk fermentation) of all my sourdoughs takes between 6 – 8 hours; in the winter it will take longer, 10 to 12 hours.
It is best to rely on visual cues. For the bulk fermentation, you want the dough to double or less than double: I now end my bulk fermentation when the dough has risen by 50% to 75% in volume. This is why I cannot recommend using a straight-sided vessel (as opposed to a bowl) enough. It makes gauging the first rise easier.
If at any point you are worried the dough will over-ferment — say, for example, the bulk fermentation is nearly complete but you are tired and want to go to bed — stick the vessel in the fridge and pick up the process in the morning. (Note: If your dough rises above double, don’t despair … my dough has tripled in volume during an overnight rise, and the resulting dough still had plenty of strength and spring.)
Schedule: I like mixing this dough in the evening, performing 4 stretch and folds before I go to bed (if time permits), then letting the dough complete its bulk fermentation at room temperature (68ºF) overnight or in the refrigerator (especially in the summer, when my kitchen is much warmer). In the morning, it’s typically ready to be portioned (if it rose at room temperature), transferred to quart containers, and stashed in the fridge. If I had let my dough spend time in the fridge for the bulk fermentation, I remove it in the morning, and let it complete its bulk fermentation at room temperature. Once complete, I portion the dough and stash it in the fridge. Sometimes I’ll use the dough that same evening; sometimes I’ll use it the following day or the next. I encourage using the dough within 3 days.
In short: If you want pizza for the weekend, mix your dough on either Wednesday or Thursday.
Troubleshooting: If you have issues with your dough being too sticky, please read this post: Why is my sourdough so sticky? The 4 common mistakes.
Water: If you live in a humid environment or if you are making this on a particularly humid day, consider starting with less water, such as 335 grams of water, which will bring the hydration down to 70%. This amount of water will still produce a light airy crust but the dough will be more manageable.
Flour choice:
- Due to supply issues, I’ve been making this recipe with all-purpose flour, and it works beautifully. You absolutely can use bread flour or tipo 00 flour if you can get your hands on either. If you can’t, know that all-purpose (unbleached) flour works great here. If you use 00 flour, you’ll likely need to reduce the amount of water. I would start with 350 g, and adjust moving forward based on your results.
Favorite Pizza-Making Tools:
- Baking Steel
- Pizza Peel
- Parchment Paper: I bake my pizzas on parchment paper on my Baking Steel. Parchment allows for easy transfer from peel to steel.
- Cast Iron Skillet: If you do not have a Steel or stone, you can use a cast iron skillet. Rub a half teaspoon of oil over its surface, transfer a stretched dough round to the skillet. Top as desired. Bake at 450ºF for about 15 minutes.
- Quart Containers for storing dough
Ingredients
For the dough:
- 375 g water (or less, see notes above)
- 100 g sourdough starter, active and bubbly, see notes above
- 10 g salt
- 500 g all-purpose or bread flour
For each Margherita pizza:
- 2 tablespoons tomato sauce
- 1 to 2 oz mozzarella
- handful of grated Parmigiano Reggiano (less than an ounce)
- drizzle olive oil
- pinch sea salt
For each kale and crème fraiche pizza:
- extra-virgin olive oil
- a couple handfuls of baby or Tuscan kale
- 1 to 2 cloves garlic
- Sea salt, such as Maldon
- 2 tablespoons crème fraîche
- grated Parmigiano Reggiano, about 1/4 to 1/3 cup
For each naked pizza with ramp or scallion oil:
- 1/4 cup olive oil
- 1/4 cup minced scallions or ramps
- 1 teaspoon crushed red pepper flakes
- 1 to 2 tablespoons crème fraîche
- handful grated Parmigiano Reggiano
- sea salt
Instructions
- Mix the dough. Place the starter, salt, and water in a large bowl. Stir with a spatula to combine — it doesn’t have to be uniformly mixed. Add the flour. Mix again until the flour is completely incorporated. Transfer to a straight-sided vessel (if you have one.) Cover vessel with tea towel or cloth bowl cover and let stand 30 minutes.
- Stretch and fold: after 30 minutes have passed, reach into the vessel and pull the dough up and into the center. Turn the vessel quarter turns and continue this pulling 8 to 10 times. See video for guidance. Let the dough rest for another 30 minutes; then repeat the stretching and folding. If possible, repeat this cycle twice more for a total of 4 stretch and folds. By the 4th cycle, you will notice a huge difference in the texture of the dough: it will be smoother, stronger, and more elastic.
- Bulk fermentation: Cover vessel with a tea towel or bowl cover and set aside to rise at room temperature (70ºF/21ºC) for 4 to 18 hours (the time will vary depending on the time of year, the strength of your starter, and the temperature of your kitchen; see notes above) or until the dough has roughly doubled in volume. (UPDATE: In the past I have recommended letting the dough rise until it doubles in volume. If you’ve had success with this, continue to let the dough double. Recently, I have been stopping the bulk fermentation when the dough increases by 50% in volume, and I feel my dough is even stronger in the end.) Note: Do not use your oven with the light on for the bulk fermentation — it is too warm for the dough. When determining when the bulk fermentation is done, it is best to rely on visual cues (doubling in volume) as opposed to time. A straight-sided vessel makes monitoring the bulk fermentation especially easy because it allows you to see when your dough has truly doubled.
- Portion and shape: Turn the dough out onto a work surface and shape into a rough ball, using as much flour as needed — the dough will be sticky. Using a bench scraper, divide the dough into 4 equal portions. Sprinkle portions with flour. With floured hands, roll each portion into a ball, using the pinkie-edges of your hands to pinch the dough underneath each ball. Transfer each round of dough to a plastic quart container, cover, and store in fridge for at least 6 hours or up to 3 days or transfer to the freezer (see notes in post about thawing).
- Make the pizzas: Pull out a round (or more) of dough from the fridge one hour before you plan on baking. Dust dough with flour and place on a floured work surface. Let sit untouched for about an hour (a little longer or shorter is fine). Place a Baking Steel or pizza stone in the top third of your oven. Set oven to 550ºF. Heat oven for at least 45 minutes but ideally 1 hour prior to baking.
- Shape the dough: Gently shape dough into a 10-inch (roughly) round handling it as minimally as possible. (See video for guidance.) Lay a sheet of parchment paper on top of a pizza peel. Transfer the dough round to the parchment-lined peel.
Top and Bake
- To make a classic Margherita-style pizza: Spread 2 tablespoons of tomato sauce over the surface of the dough. Top with mozzarella to taste. Sprinkle with parmesan to taste. Drizzle with olive oil. Sprinkle lightly with sea salt. Shimmy the pizza, parchment paper and all into the oven. Bake pizza until top is blistered, about 5-6 minutes. Transfer to cutting board. Sprinkle with basil, if you have it. Cut and serve. Discard parchment paper.
- To make a kale and crème fraîche pizza: Place the kale in a small bowl, drizzle with olive oil, season with sea salt, and toss. Spoon crème fraîche over the dough leaving a 1/2-inch border or so—I use about a tablespoon per pizza. Sprinkle with minced garlic and a handful of grated Parmigiano Reggiano. Top with the kale. Shimmy the pizza, parchment paper and all into the oven. Bake pizza until top is blistered, about 5 – 6 minutes. Transfer to cutting board. Cut and serve. Discard parchment paper.
- To make a naked pizza with scallion oil: Heat 1/4 cup olive oil in a skillet with 1/4 cup of minced scallions (or ramps!) and 1 teaspoon crushed red pepper flakes. Keep it over low heat while you make the pizza. Spoon crème fraîche over the dough leaving a 1/2-inch border or so—I use about a tablespoon per pizza. Sprinkle with a handful of grated parmesan. Shimmy the pizza, parchment paper and all into the oven. Bake pizza until top is blistered, about 5 – 6 minutes. Transfer to cutting board. At this point, the scallions should be starting to “frizzle”. If they aren’t, crank up the heat until the oil is sizzling. Spoon a few tablespoons of the hot oil over the pizza (you’ll have extra oil). Sprinkle with a pinch of sea salt. Cut and serve.
- Prep Time: 24 hours
- Cook Time: 5 to 6 minutes
- Category: Pizza
- Method: Oven
- Cuisine: American, Italian
This post may contain affiliate links. Please read my disclosure policy.


1,108 Comments on “Simple Sourdough Pizza Crust: A Step-by-Step Guide”
Easy and delicious. My “go to” pizza crust recipe.
Great to hear this, Debbie!
Quick question, your pies look a little small, could I safely use this recipe and turn out just 3 pies? Thanks
Absolutely! Go for it.
I have a question
Instead of the sourdough starter I’ve been using in this recipe a biga starter.
Its turned out great every time
But i was wondering, should i use more water?
The biga recipe is 210 g flour ,140 g water and 1/4 teaspoon instead dry yeast.
And one more quick question,
What is the minimum time that the dough need to rest befor shaping and baking? I live in a warm country and i think that one hour its a lot.
Thank you so much 🙂
Hi! Great to hear. I think if you used more of a poolish (equal parts by weight flour and water + the yeast), you would come closer to what the ratios are in this recipe because the sourdough starter I use is equal parts by weight flour and water.
And definitely cut the room temperature rest time if you are in a warm country. I think you could probably get away with 20-30 minutes, but experiment and see how it goes!
Thanks for the quick response!
I did everything the recipe suggested and just left the dough out overnight to bulk ferment but it’s barely risen. Any advice? Do I just go on with the rest of the recipe or do something specific to help?
Hi Hannah,
Sorry to hear this! Question for you: Are you confident in the strength of your starter? Did it double in volume within 6 hours or so of feeding it? Did it float?
Have you used your starter successfully with other bread recipes?
Thank you for responding!
The issue could be my starter . It did double but did not float. I’m hoping the pizza bases turn out ok cause we’re using them to make pizza for my moms birthday tomorrow.
Great recipe!
Wonderful to hear, Annette!
Hi there!
I have a question regarding baking this in a cast iron skillet. Do you want us to preheat the skillet too for an hour and then drop the pizza in and cook for 15 minutes or to not preheat the skillet and place the pizza in the skillet and then put it in the oven? Additionally, with the skillet, do we put olive oil directly in the pan and then the pizza directly in that or put olive oil on parchment paper and then put the pizza on parchment paper into the skillet? Thank you so much!
Hi Grace! I do not have you preheat the skillet only because I find placing dough in a hot skillet and then topping it to be kind of tricky, but if you want to do that and feel safe doing it, you absolutely can.
My method does have you put olive oil in the skillet and to turn the ball to coat in the oil. The dough ball will sit in the skillet for about 45 minutes before you press out the dough and bake it. No parchment for the skillet method. Here’s my full skillet-method pizza post.
Thank you so much! I have one more question. I mixed the dough and performed the stretch and folds last night and finished the fourth at 10:30. I then went to bed and at 9:15 looked and there hasn’t been a ton of growth. There are visible air bubbles in the surface – but it has not gotten close to doubling in volume. I started my starter 2 weeks ago and it’s been pretty strong, I kept my dough out in room temperature too. How long do you think I should wait before cutting and rolling the balls? Additionally – how long is too long before it over-proofs? What if it doesn’t double?
I can’t wait to make this! I just got an Ooni pizza oven!
Do you have to store the dough in the fridge after dividing it into 4 pieces or can you just make pizza with it right away?
Thanks!
Hi Sarah! You will have better results with some time in the fridge, but you don’t have to. After you shape them, coat them liberally in flour and let them rest on a board at room temperature, I would say for at least an hour.
Enjoy your Ooni! I bought one, too, but I haven’t used it yet!
I just finished the folds and I am currently letting the dough sit overnight (bulk fermentation). I fed and discarded my starter and then fed it again (not sure if this matters) and used that as my active100g for this recipe ( I find that the second rise session is so much more flavorful and bubbly when baked) so far I’m very exited for this dough!
My question is that my stupid oven (convection) only goes to 446 (yes I know this is a ridiculous number and I did not choose this oven) how should I adjust the cooking time or anything else for this recipe??
Great to hear all of this Brianna!
I think you may just have to cook the pizzas a little bit longer. And don’t worry if you don’t get the char and blisters — your pizzas might not get as browned, but they’ll still be done. Good luck!
Délicieux! Merci!
Yay 🍕🍕🍕🍕🍕🍕
Can you tell me what is the water temperature used?
Hi Caroline! I never test the temperature. I either use water from the tap (cold) or water I’ve left out at room temperature (slightly warmer than tap water).
Perfect, made pizza last night definitely a pizza dough keeper. Just a beautiful dough!
Great to hear this, Caroline! Thanks for writing 🙂
Thank you for a great recipe ❤️!
Of course, Anh!
Now my go to pizza dough recipe! So delicious. Crisp, bit of chew, airy, light and quick to make and bake. I also highly recommend trying her sourdough focaccia recipe!!
Wonderful to hear this, Amber!! Thanks so much for writing. And thanks for encouraging others to try the sourdough focaccia, too 🙂
I’m so thrilled to try this recipe out! However I need help! I apparently am terrible at reading directions and messed up the first bulk fermentation. I waited only 1 hour (it didn’t budge at all and didn’t increase to even 50% at all), split it into 4 portions, rolled them and put them in containers in the fridge.
Should I let the second fermentation go longer? Or is it unrecoverable now…haha. Help!
I am about to bake the pizza, but so far the dough looks beautiful and was easy to work with..
Can the pizzas be partially baked and then frozen? If so, how do I reheat them?
Thanks,
Debbie
Great to hear this Debbie! And yes, parbaking and freezing works beautifully. I would thaw overnight at room temperature. When ready to bake, simply top the dough as you wish; then transfer to a 550ºF oven (or as hot as your oven goes). If you have a Baking Steel or pizza stone, I would bake it directly on it, ideally preheated for at least 30 minutes beforehand.
How long would you partake for?
I would do 3 to 4 minutes.
Thanks. The crust was delicious. It didn’t have the spring that yours has because I baked it on an aluminum pizza pan, but the taste and texture were wonderful. Chewy, but in the best way possible. Unanimous vote as a keeper recipe from 4 kids and the hubby.
I baked the crust directly on the pan and ended up with flour that stayed on the pan after I removed the crust with a peel. I had to take the pan out and wipe off residual flour between baking crusts so that I didn’t have burnt flour on the, following crusts.
So great to hear this, Debbie! Nothing better than having the whole family approve.
One thought for you: parchment paper! I know it feels a bit wasteful but sometimes you can get away with re-using sheets. When you use parchment you don’t have to worry about that residual flour on a pan burning.
Yeah, I really hate throwing things away. I’ll just brush off the flour with a towel between crusts. Thanks for the suggestion though.
Got it! You’re good, I totally understand 🙂
I jumped on the sourdough bandwagon over the Christmas holidays and I’ve been doing LOTS of baking since then. After trying many “formulas” for pizza dough I can say this one is the best. The crust is delicious, bakes up nice and crisp on the bottom and freezes like a dream. I have been making a pie almost weekly. Smiles all around.
Wonderful to hear this, Deb! Thanks so much for writing and sharing your notes. Love that you freeze the baked pizzas — so smart!
Tried more sourdough pizza recipes than I can count. This is best by far. I should note, I need to let the pizza stone heat up for a couple minutes after each pizza, in order to get the same quality oven spring on the last pizza that I got on the first. But awesome and easy recipe.
So nice to hear this, Jack! And great tip re letting stone heat up in between uses. Thanks for writing!
I am looking to make this soon, but my oven only goes to 500F. Any recommendations on how to adjust the baking time?
Hi James! 500 should be fine. You. may just need to cook it a little bit longer. 1-2 minutes at the most, likely.
Hi!
Question when using pizza stone and parchment paper. Do you prepare the pizza on the parchment paper and then put this on top of the pizza stone? Paper goes in the oven too?
Just wondering if that would take away from the crispiness on the bottom!
Hi Christine! Yes, exactly. The pizza goes on the stone parchment paper and all. It does not take away any crispiness and it makes the transfer so easy. Hope it works out for you!
I’m not seeing the tips for defrosting frozen dough . . .
Sorry – I just now saw the freezer tips, so no need to answer. Thank you!
Kelly
Glad you found it!
This was really excellent pizza dough and easy to follow for a new baker. I made one pizza with half of the dough. Now I have a question. Can I take the other half of this dough that I have in the quart jars in the refrigerator and make your focaccia recipe with it? Could I take it and let it get room temperature and then put in the pan with oil and fold, etc at that point in the focaccia recipe to make it work?
thanks!
Great to hear this, Carolanne! And yes, I think you could. Keep in mind: the focaccia dough is a little wetter/higher hydration, so you’ll get more of that pillowy texture when you use that type of a dough. But this pizza dough absolutely will work. I would transfer it straight from the fridge to your oiled pan (be sure to butter your pan first if you are not sure of its nonstick capabilities… see notes). Get it into a ball/rectangle; then let it sit undisturbed for 4-5 hours or until it puffs and is ready to be dimpled/baked.
My new “go to” pizza dough. This is so good! The texture is so unbelievable. thank you!
Wonderful to hear this, Susan!
Your sourdough and Neapolitan pizza recipes are my go to. Giving this one a go for the first time today and I already know it’s going to be a new favorite! Thanks for your detailed explanations and mouthwatering pictures!!
So nice to hear this, Anto! Thanks so much for writing 🙂 🙂 🙂 Hope the pizza turned out well 🍕🍕🍕🍕🍕
Made this today, but started it yesterday of course and cooked it in my woodfired pizza oven. Really, really good and I also had some with your scullion topping, and once again really good. It’s such a shame there’s nowhere to post photos when we make someone’s recipe
And the reason that I gave it four stars is not that it wasn’t good. it’s just that I eat sourdough because I suffer from IBS, and because it is sourdough it tends to be a more chewy texture, but in reality I do prefer traditional Italian pizza dough. It just doesn’t prefer me..
Thank you so much for sharing this recipe
So, you gave 4 stars on a recipe for sourdough pizza crust because it’s a recipe for sourdough pizza crust… If I could put that gif of John Travolta from Pulp Fiction looking around in confusion, I totally would.
😂😂😂😂😂😂
This pizza dough came out amazingly! It was absolutely delicious it!
We used it for grilling pizza and it held up perfectly and got rave reviews from everyone!
Will be my definite go to from now on.
So great to hear this, Rachael! I am so eager to try this on the grill… will definitely happen this summer. Thanks for the encouragement.
This was fantastic. Seriously perfect crust.
Wonderful to hear this, Kristi! Thanks so much for writing 🙂 🙂 🙂
Love all your recipes!!! Can I use rye sourdough starter in this recipe?
Hi Sara! Yes, you can. You may need to adjust the water a little bit — I might consider holding back 50 grams or so — or you could make the recipe as is; then adjust next time around based on your results.
Great recipe! Just wondering what the reason behind refrigerating the dough after the bulk fermentation. I needed to make the pizza same day so I skipped this step and it was still yum! Just wondering what difference I would see if I followed the recipe to the letter.
Great to hear you got great results without the fridge step! Putting the dough in the fridge serves two purposes: one, it slows down the fermentation, which allows you to then use the dough over the course of a few days; two, especially after a day in the fridge, the dough might have even more gas bubbles accumulated in it, so you’ll get more of those glorious bubbles throughout the dough. There also are some enzymatic reactions that happen during a cold proof that involve the sugars breaking down which can result in slightly better flavor and browning.
Excellent, excellent recipe. I’ve used many, and this is one of the best. Strangely, my dough really went crazy this time and slightly over-proved, but the end result was still delicious if not quite as fluffy. I quadrupled the recipe for a pizza party, and it was a total success. I topped the first round of pizzas with pepperoni, sautéed mushrooms, roasted peppers, and caramelized onions. Then I did a hybrid of your kale and naked pizzas. I put crème fraîche, then garlic ramp oil (it’s the season), pecorino Romano, garlic powder, the kale, and a sprinkle of my version of Everything But the Bagel. One of the best pizzas I’ve ever had. Wow.
Oh, and I substituted 25% 00 flour and another 25% bread flour, which may account for the growth of the sourdough. Hahahahaaaaaa!
Interesting! Great to know!
Wonderful to hear all of this, Michael! I’m very impressed by your ability to quadruple this recipe — I may need to do this soon for a party, and I’m happy to hear you had success with it. Your toppings sound out of this world! Love ramps so much.
Do you think this would work well using 100% hydration starter rather than 75%?
Hi Colleen! I do use a 100% hydration starter, so yes, definitely 🙂 Let me know if you need anything else.
I’m making this for the first time this weekend. Can the dough recipe be doubled or should I make two different batches?
Thanks – Susan
Definitely! Go for it!
I have used this recipe 3 times! it is perfect. It even freezes well.
Thanks for posting Ali.
Wonderful to hear this, Mary! Thanks so much for writing!
Hi Ali,
I’ve just been making your pizza dough for the first time. I used 00 flour but hadn’t realised I would need to reduce the amount of water.
As a result my dough is very sticky, I have completed stretching and folding the dough but wondering if it will still be ok or if I need to add more flour to it?
Hi Tara! You could try adding a bit more flour, but I don’t generally advise adding flour so late in the process. Did the dough have any strength and elasticity? It’s definitely a sticky dough, and I think it might be fine if you pushed on.