
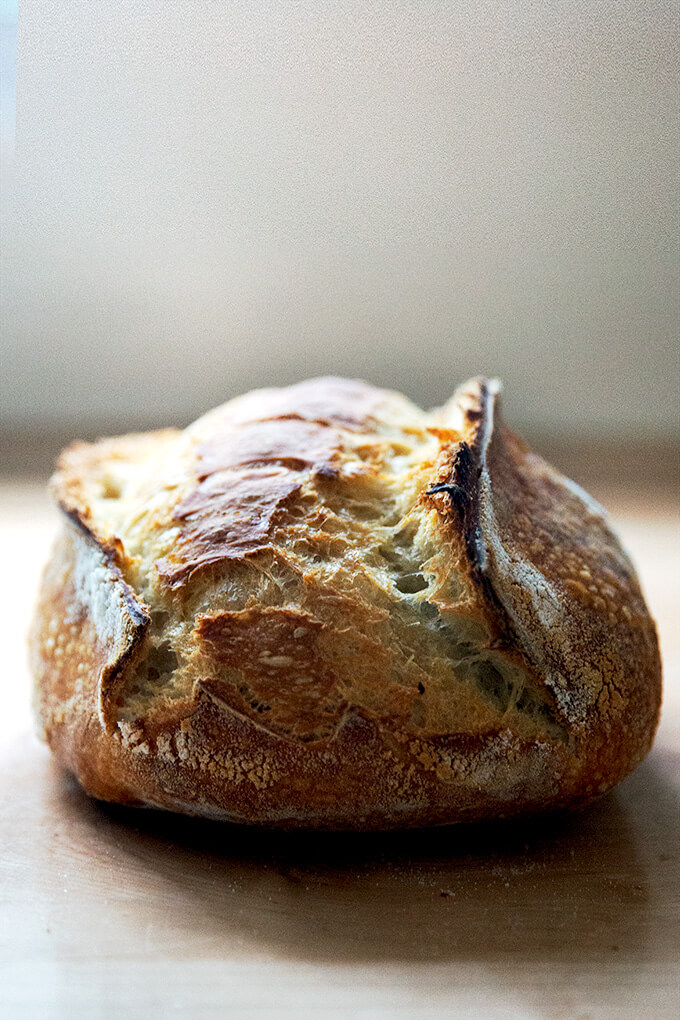
Why is my sourdough so sticky? 4 Common Sourdough Mistakes + Answers to FAQ’s
This post may contain affiliate links. Please read my disclosure policy.
We all face failure, at some point, when making sourdough bread.
Common troubles include:
- an impossibly sticky dough
- a just-baked loaf looking more like a pancake than a lofty boule
- a crust so tough it might rip your teeth out
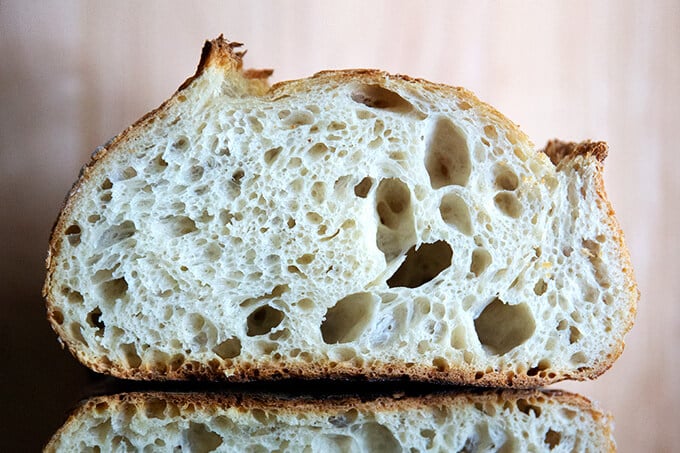
- a dense, gummy crumb
Sourdough is a journey. Failures are a rite of passage.
If you can embrace the failures, learn from your mistakes, and make changes based on your results, you will find success.
Earlier this year, when the interest in sourdough surged among the many people housebound, I received more questions about sourdough bread baking than anything else. Often: Why is my dough so wet and sticky? But also: How can I get better oven spring? And frequently: How can I make sourdough without being up till midnight?
In responding to the various inquiries, I noticed some trends and can trace most sourdough troubles to just a handful of issues.
This post is organized as follows:
If I haven’t addressed one of your questions, please leave a comment below. Or if you still need clarification on something, leave a comment. I intend to update this post regularly.
Finally: I collected much of the information below while engaging with people who signed up for my free Sourdough: Demystified! email course. If you’d like to learn the basics of sourdough bread baking, sign up here: Sourdough: Demystified!
Where Sourdough Goes Wrong: The 4 Common Mistakes
I am assuming everyone reading this is baking with a scale. If you are not measuring your flour, salt, water, and sourdough starter with a digital scale, that is the first change you need to make.
The 4 Common Mistakes:
- Using a weak starter or not using starter at its peak.
- Using too much water relative to the flour.
- Over fermentation: letting the bulk fermentation (first rise) go too long.
- Using too much whole wheat flour, rye flour, or freshly milled flour.
1. Using a weak starter or not using starter at its peak.
When you set out to make a loaf of sourdough bread, you first need to make sure your starter is ready — it has to be strong enough to transform a mass of dough into a lofty boule.
How do you know if your starter is ready? When it …
- … doubles in volume within 4 to 6 hours (roughly) of feeding it.
- … floats when you drop a spoonful of it in water.
Both of these are good signs your starter is ready, but in my experience, #1 is a more reliable test than #2. If your starter is not doubling in volume within 4 to 6 hours of a feeding you should spend a few days strengthening it. This is what I always recommend:
- Be aggressive with how much of it you are discarding: throw away most of it, leaving behind just 2 tablespoons or so. Feed it with equal parts by weight flour and water. Start with 40 g of each or so.
- Use water that you’ve left out overnight to ensure any chlorine has evaporated. (This isn’t always necessary, but it might make a difference.)
- Buy spring water. In some places, letting water sit out overnight will not be effective, and your tap water may kill your starter.
- Feed your starter with organic flour or a small amount of rye flour or stone-milled flour (fresh or locally milled if possible). My store sells 2-lb. bags of King Arthur Flour organic all-purpose flour for $3.49 — I use it exclusively for feeding my starter.
- Once you feed your starter, cover the vessel with a breathable lid, and leave it alone at room temperature. After 6 hours (more or less), repeat the process: discard most of it and feed it with 40 g each flour and water.
Once you have a strong starter on hand — one that is doubling in volume within 4 to 6 hours — you can bake with it (using it at its peak doubling point) or stash it in the fridge. When you feed your starter, place a rubber band around the vessel to mark the starter’s height, which helps gauge when it has doubled.
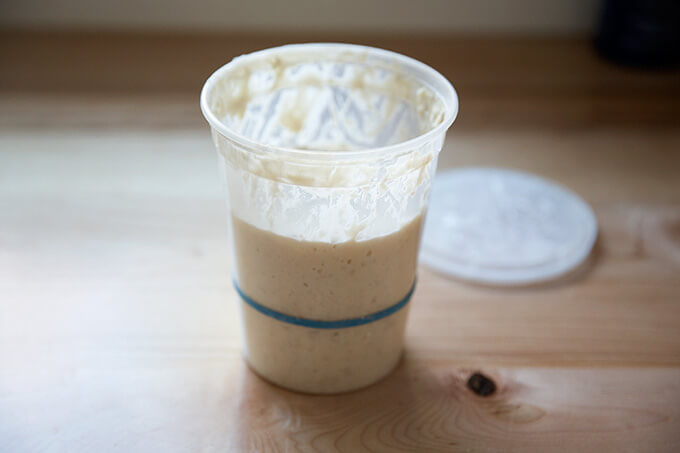
My preferred storage vessel is a deli quart container. When I store my starter in the fridge, I use the lid that comes with the quart container. When I feed my starter and let it sit at room temperature, I use a breathable lid.
Moving forward, you should remove your starter from the fridge a day before baking, discarding most of it and feeding it at least once but ideally twice (if you have time) before using it.
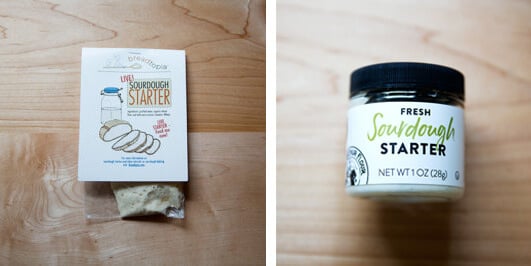
Finally: There is no shame in purchasing a starter. I am a huge proponent of purchasing a starter, which is guaranteed to be vigorous nearly from the get go. Building a starter from scratch is a great exercise, but the reality is that your starter, in the end, might not be as strong as you need it to be to bake a lofty loaf of bread.
Two sources for sourdough starter: Breadtopia and King Arthur Flour.
2. Using too much water relative to the flour.
All flours absorb water differently. Bread flour, all-purpose flour, whole wheat flour vary from brand to brand in their protein content and overall makeup. Environment (humidity in particular) plays a role in water absorption, too.
If, for example, I mix a dough made with 100 g starter, 300 g water, and 400 g bread flour in Upstate New York and you do the same wherever you are, even if we’re using the same brand of flour, the texture of the dough may look and feel very different. If you live in a humid environment, your dough may look soupier. If you live in a dry environment, your dough may look stiffer.
The solution? Experiment! Use a recipe as a guide. If you are using a recipe with a hydration of 75% or higher (300 g water to 400 g flour, for example) and you live in a humid environment, consider holding back some (50 g or so) of the water. You can always add some of it back in slowly if the dough feels too stiff. Always measure by weight, and take notes.
A general rule of thumb to consider is that the higher the protein content of a flour, the more water will be absorbed. Same for whole grain flours — whole grain flours absorb more water, so when you use whole grain flours or bread flours (which are generally high in protein), the dough may require a little more water. All-purpose flours may need less water.
Once people fiddle with the water level of a recipe — usually by cutting it back by 50 g or so — their troubles are mostly solved.
3. Over fermentation: letting the bulk fermentation go too long.
The bulk fermentation is the dough’s first rise: it’s the time period that begins when the dough is mixed and ends when it is shaped.
Unlike yeast-leavened doughs, which often call for letting the dough rise till it doubles (or more) in volume, with sourdoughs, you don’t want it to rise so high.
Opinions vary on what percentage increase is optimal. Some bakers suggest a 30-50% increase. Others suggest a 50-75% increase. Others suggest more.
As with determining the ideal hydration of your dough given your environment (as discussed above), determining the ideal increase in volume may take some trial and error.
The more sourdough I bake, the more I find it beneficial to stop the bulk fermentation when the dough has increased by roughly 50% in volume. Keep in mind, with the exception of focaccia, I almost always follow the bulk fermentation with a long, cold, refrigerated proof.
Why is this important? Here’s a general rule of thumb: if you’re going to do a short (4 to 6 hours), room temperature proof before baking, you can allow the dough during the bulk fermentation to increase by more. If you’re going to do a long, cold proof, stop the bulk fermentation when the dough has increased by 50% or less in volume.
The length of time it takes for your dough to increase by 50% in volume depends on a number of variables, including the strength of your starter, how much starter you use, the hydration of your dough, the type of flour you are using, the humidity, and the temperature of your kitchen.
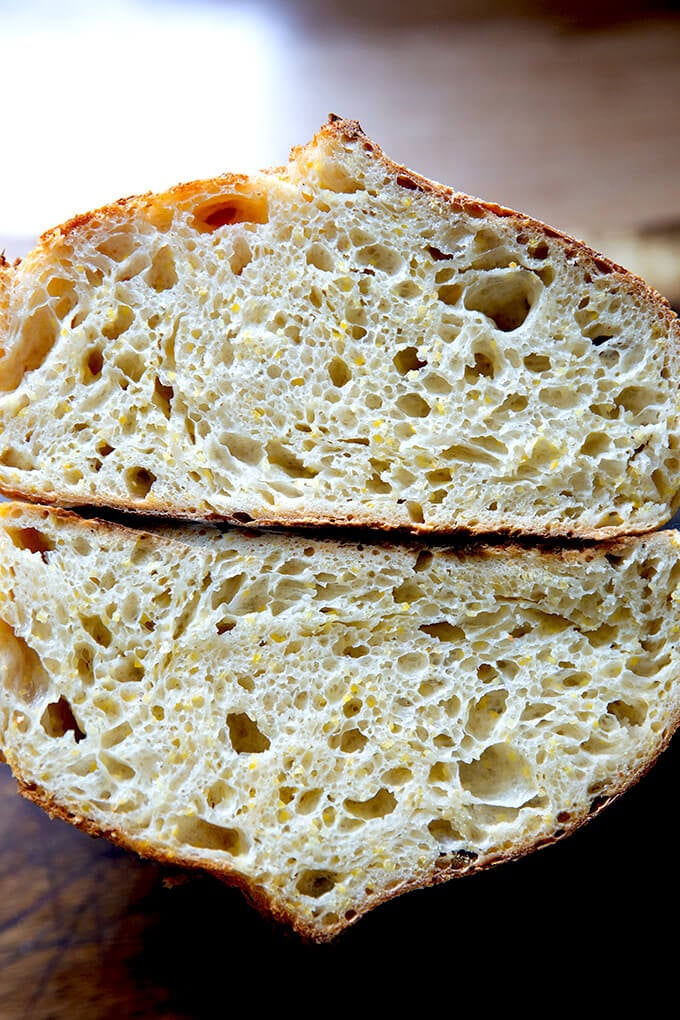
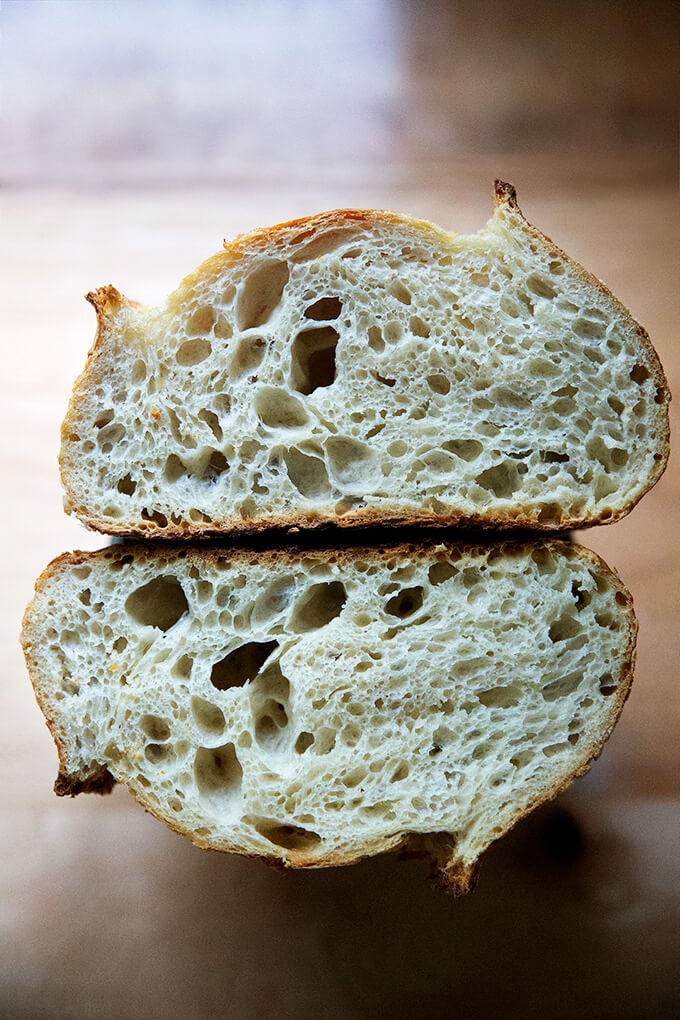
When the dough has visible bubbles throughout and has roughly increased by 50% in volume, it’s ready to be shaped.
When the bulk fermentation goes too long — often when the dough more than doubles or triples in volume — the dough can over ferment. You know the dough has over fermented if, when you turn it out to shape it, it is very slack — if it’s like a wet puddle — and very sticky and lacking any strength and elasticity. It might smell a bit like alcohol as well.
At this point, the dough unfortunately is unsalvageable.
To prevent dough from over-fermenting:
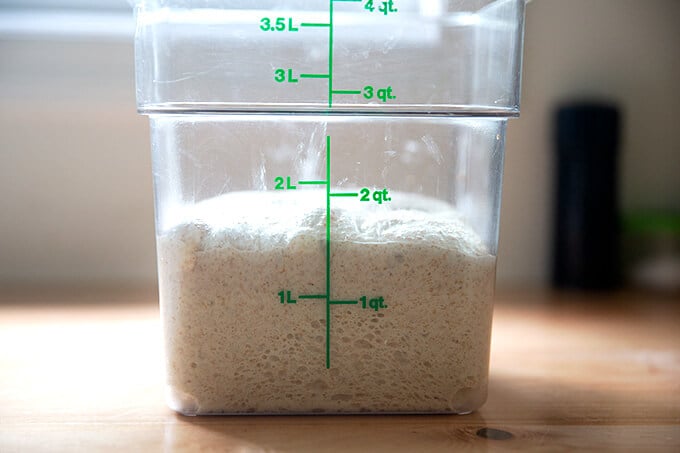
- Let the dough rise in a clear, straight-sided vessel (such as this one). Unlike a bowl, a clear straight-sided vessel allows you to see the bubble activity throughout the dough, but also lets you accurately see how much the dough has grown in volume. In the photo above, the dough has increased in volume by 50%. A straight-sided vessel allows you to accurately gauge the increase in volume.
- Use the refrigerator as needed. At any point during the bulk fermentation you can stick your vat of dough in the fridge to slow the fermentation. If, say, your dough is rising but you are tired and need to go bed, stick the vessel of dough in the fridge, and pick up where you left off in the morning.
A warning: I do not recommend letting your dough do the bulk fermentation in your oven with the light on. Many people try this, especially in the winter, and while some have success, others do not — the environment is just too warm and, as a result, the risk of over fermentation is too high.
4. Using too much whole wheat flour or rye flour or freshly milled flours.
People love incorporating rye and whole wheat flours into their breads mostly for health reasons but also for flavor.
When anyone asks me how to incorporate more whole wheat flour into a loaf of bread, the first thing I ask is: “What type of whole wheat flour are you using?”
And the reason I ask this is that commercial whole wheat flours aren’t necessarily healthier than commercial all-purpose flours or bread flours.
I go into more depth on this subject in this post, Favorite, Easy Whole Wheat-ish Sourdough Bread, so I’ll summarize: if you want to truly introduce healthy flours into your breads, you are better off using freshly milled, stone-milled flours — the milling process of these flours keeps the bran, the germ, and the endosperm together, which in turn preserves the nutrients. (Read more about this here.)
You can order these flours online or search for them at a farmer’s market or local co-op. These types of flours add tremendous flavor and aroma to breads. That said, these flours can be difficult to work with for two reasons:
- Because whole grain flours absorb more liquid (due to the presence of fiber particles), they require more liquid, which makes the dough wetter. Wet doughs are tricky to work with, and if you are new to sourdough, shaping a very wet dough or trying to create tension can be frustrating and discouraging.
- Whole grain flours tend to make for a denser crumb. Due to the presence of the bran, which often is likened to a razor blade that cuts the gluten bonds and impedes gluten development, breads made with a high proportion of whole grain flour won’t have a light, airy crumb. There is nothing wrong with this, but you should manage your expectations as soon as you introduce whole grain flours into your doughs.
I always encourage people to start by using 100% bread flour or all-purpose flour. Once you get the hang of the sourdough process and the various phases, then start introducing whole grain flours into the mix. Start by swapping out 12-15% of the white flour for whole grain flours; then increase to 25% (and so on) if you are happy with the results.
I love adding cornmeal, both for flavor and texture, into my bread doughs:
How to Keep a Lean Starter
A common question I get is: What do you do with all of the discard? I have one suggestion below, but the truth is that I don’t bake with a lot of discard because I don’t have a lot of discard on hand.
I keep a very lean starter.
This is my starter maintenance routine: I have one vessel (a deli quart container) for my starter, and I only keep about 100 g of it on hand at one time. I store it in the fridge, covering it with the lid that comes with the quart container.
When I am ready to feed it, I remove it from the fridge, discard most of it, leaving behind just 2 tablespoons or so; then I feed it with 60 g each flour and water, cover it with a breathable lid, and let it sit at room temperature for 4 to 6 hours or until it doubles.
When it doubles, it’s ready to be used in a recipe, and I scoop out the amount required. After I use it, I replenish it with a small amount of flour and water (40 g each water and flour); then I stash it in the fridge.
When I am ready to bake again, I repeat the process: discard most of it, feed it, let it double, use it.
FAQ’s
When do I use my starter?
Use your starter when it doubles in volume, usually 4 to 6 hours after a feeding.
If your starter is not doubling in 4 to 6 hours, you should spend some time strengthening it. See #1 above: Using a weak starter or not using a starter at its peak.
How do I keep my starter alive?
Many people don’t get into sourdough bread baking because of the perceived demands of a sourdough starter. They worry: It’s like having a pet!
The truth is that starters are not as needy as people think. I have left my starter for 3 to 4 weeks at a time in the fridge without feeding it, and it always revives beautifully.
When I neglect it for this many weeks, I’ll spend a day or two getting it back to strength. See my starter maintenance routine above in the How to Keep A Lean Starter section.
What’s a good baking schedule to follow?
People often ask: What is a good schedule to follow? How do I avoid baking bread at midnight?
There are various schedules you can follow, but my biggest tip in regard to making sourdough work with your schedule is to use your refrigerator.
For whatever reason, I often find myself mixing bread doughs in the evening. Because of this, I find myself wanting to go to be in the middle of the bulk fermentation (first rise). In the winter, I can get away with letting the dough rise over night on the counter, but in the summer, it’s a gamble — when the bulk fermentation goes for too many hours, the risk of over fermentation is high.
So this is what I do: after I do at least two to four sets of stretches and folds (see this post if you are unfamiliar with stretches and folds), I cover the vessel, and stash it in the fridge. In the morning, I remove the vessel from the fridge, set it on the counter, and pick up where I left off, letting the bulk fermentation continue until the dough increase in volume by 50% (roughly).
Then I’ll turn the dough out, shape it, and refrigerate it for another 12 to 48 hours before baking. So, the next tip: plan ahead. If I first mix the dough Wednesday evening, I likely won’t bake it till Friday.
Here’s a sample schedule:
Wednesday: Get my starter ready. If I am baking frequently, I can remove my starter from the fridge, feed it once, let it rise till it doubles, then use it. Sometimes I’ll feed it twice. Often, as noted above, I mix my dough in the evening, let it rise for a couple of hours, then stick it in the fridge to prevent it from over fermenting over night.
Thursday morning: Remove dough from fridge, let it rise at room temperature until the bulk fermentation is complete (when the dough has increased by 50% in volume). Shape it, transfer it to a flour sack-lined bowl, and refrigerate for 12 to 48 hours. (Note: If Thursday morning you have to go to work, rather than take the dough out of the fridge in the morning, take it out when you get home from work. Let it rise at room temperature till it increases in volume by 50%; then shape it and return it to the fridge.)
Friday: Bake it at my convenience.
Here are two easy sourdough boule recipes to test out this schedule:
How do I get better oven spring? In other words, how can I create a loftier boule?
Good oven spring is based on a number of factors. As noted above, if your starter is weak, if your dough is overly hydrated, if the dough over ferments, if you use too much whole grain flour, you may end up with a squat, dense loaf.
If, however, you feel confident in all of the above — strong starter, proper hydration, optimal bulk fermentation, good mix of flour — then oven spring can be affected by:
- Creating good tension during shaping.
- Cold proofing.
- Proper scoring.
- Using a good baking vessel.
Creating tension: This takes practice. When I shape, I like to use an un-floured work surface, and I like to use a bench scraper. Here is a video of me shaping a high-hydration dough, but I highly recommend poking around YouTube for other videos from more skilled shapers.
Cold proofing: Because a cold environment slows down fermentation, a shaped loaf of sourdough needs to proof for a longer period of time than a loaf proofing at room temperature. And because cold gasses contract in volume, a loaf of refrigerated sourdough needs more time — needs to accumulate more gas — to become fully proofed. In his book Open Crumb Mastery, Trevor Wilson says: “More gas equals more oven spring.”
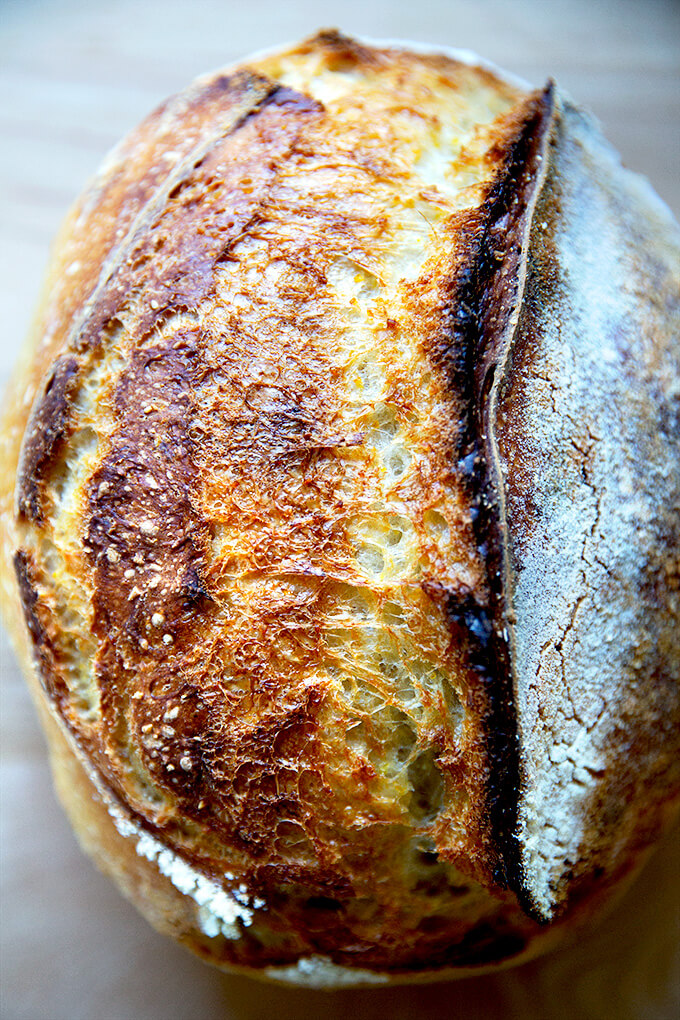
Proper scoring: Scoring a loaf helps it fully expand in the oven — an unscored loaf might burst in unexpected (weak) spots of the dough and will not rise to its full potential. (See image above.)
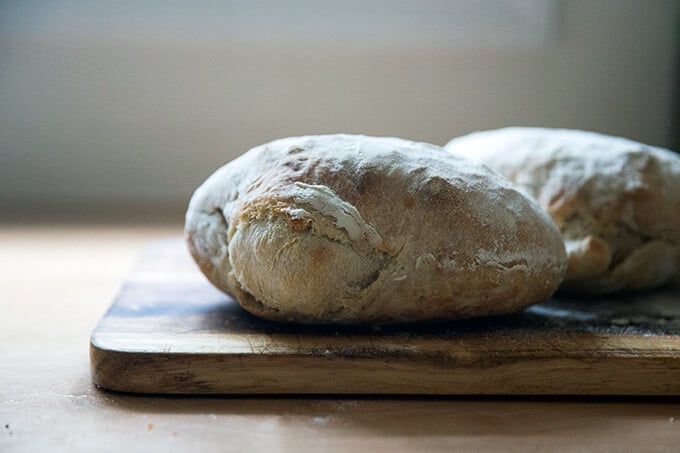
Like shaping, this takes practice. You want to score the dough swiftly and confidently. A sharp blade helps. Start with a simple slash down the middle for oblong loaves. Start with a simple “X” for round loaves.
I find scoring a cold dough much easier than scoring a room temperature dough, which is another reason why I’m a fan of the cold, refrigerator proof. Regardless if the dough is cold, however, you want to make a 1/2-inch deep (roughly) score into the dough.
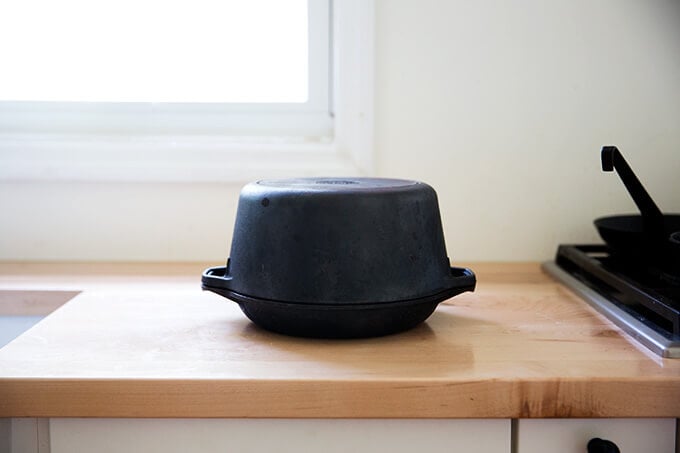
A good baking vessel: The reason many sourdough bread recipes call for baking in a preheated Dutch oven is that the sealed environment creates a hot steamy place for the bread to rise. In Tartine Bread, Chad Robertson writes:
“Baking your bread in a cast-iron combo cooker gives you the same results you’d get with a professional deck oven by creating a completely sealed, radiant-heat environment. The loaf itself generates the perfect amount of steam until you remove the cooker lid to allow the formation of the crust to finish the bake. The cooker’s sealed steam-saturated chamber gives considerably better results in oven spring and score development than baking a loaf on a baking stone placed in a home oven.”
I can recommend two great baking vessels.
- This is the 5-Qt Lodge Double Dutch oven I used exclusively for sourdough bread for years. As far as Dutch ovens go, this one is on the more reasonably priced side ($50). Yes, it is an investment, but if you are after that crackling crusted lofty boule, it will be worth every penny.
- This was a recent splurge: The Challenger Bread Pan. If you are more interested in baking batards or other oblong-shaped loaves (in addition to round boules), this is a great pan. The handles on the lid make it an especially nice user experience. Yes, it is expensive ($295). If you are committed to sourdough and bread baking in general, I don’t think you will be disappointed in this investment.
This is the 5-Qt Lodge Double Dutch oven:
What if I don’t have a Dutch oven?
If you don’t have a Dutch oven, you can do several things. Know, however, these alternative methods will not give you the same results as a Dutch oven. I can’t encourage you enough to invest in one of the two pots mentioned above.
Options:
- Preheat any oven safe pot with a lid.
- Preheat oven safe pot with a sheet pan placed over top or vice versa: a sheet pan with a pot inverted over top.
- Preheat a Baking Steel or baking stone with a pot inverted over top.
- With any of these methods you may want to also preheat another smaller vessel (such as a cast iron skillet), into which you could throw some ice once the bread has been placed in its baking vessel. As the ice melts, it will release steam, which as discussed above is good for oven spring.
What to do with the discard?
As discussed above, I don’t do much baking with discard because I keep a very lean starter. And while I have been been very pleased with using discard in these sourdough flour tortillas, in this Irish soda bread recipe, and in my favorite pancake recipe, my favorite thing to do with discard is to: make more bread!
I use my mother’s peasant bread recipe but you can use any bread recipe you like, so long as you have the weight measurements. So, if I want to use 100 g of discard (assuming this is made with equal parts by weight flour and water) in a bread recipe, I’ll simply subtract half of the starter weight (50 g) from the flour and half from the water.
For my mother’s peasant bread recipe, these are the proportions:
- 462 g flour (512 g minus 50 g)
- 404 g water (454 g minus 50 g)
- 10 g salt (same amount)
- 8 g instant yeast (same amount)
- 8 g sugar (same amount)
You can use any amount of starter you have on hand — just adapt the recipe accordingly. As I said above, do this with any yeast-leavened bread recipe you like.
I love making bread with discard, because while my sourdough slowly materializes over the course of a few days, I can enjoy delicious, freshly baked bread in three hours.
My bread is burnt on the bottom. How can I prevent this?
If you are using a preheated Dutch oven, consider lowering the temperature.
Before you make changes to the temperature, however, next time you bake, check the dough after 30 minutes. If the dough is browning too much on the bottom, you know that it’s happening during these first 30 minutes, in which case, you should lower the temperature from the start. Decrease it by 25ºF.
If the dough is not browning, then you know the burning is happening during the last 15-20 minutes of baking, in which case you could remove the loaf from the pot after 30 minutes and bake it on a sheet pan.
Another option: place your Dutch oven on two sheet pans. I do this with challah to prevent the bottom from burning. The extra layer of sheet pans will prevent the bottom of your sourdough from burning, too.
Another option: place your Dutch oven on a broiling pan.
Finally: Use rice flour for dusting — it makes all the difference. It does not burn the way wheat flour does. It also doesn’t coat the loaves with an unpleasant raw flour taste. One bag will last you a long time.
How do I know if my dough has proofed sufficiently?
Just to clarify: the bulk fermentation in essence is the first rise. I discuss assessing the bulk fermentation above. Proofing in essence is the second rise — the phase after the dough is shaped.
Confession: I never do any test to see if my dough has sufficiently proofed. This is because I know if the dough has properly fermented during the bulk fermentation (i.e. not over fermented), and if I know the dough has spent enough time in the fridge (at least 12 hours but up to 48 hours); then I know it has sufficiently proofed.
If, however, you want to do a test, a common one is the “finger poke” test.
In his book Open Crumb Mastery, Trevor Wilson writes:
“As its name implies, the finger poke test is just that — a finger poke. As commonly prescribed, the baker should poke a finger into the proofing loaf about a half-inch deep or so. If the dough springs back completely and quickly, then that means the dough is not ready to bake. It’s still underproofed. If the dough barely springs back — or doesn’t spring back at all — then that means the dough is past its peak. It has overproofed. If, however, the dough slowly springs back completely or almost completely, then that means it’s just right.”
To be clear, Trevor finds this test to be problematic for a number of reasons, and if you want a more in depth explanation, download his book.
In short, in my opinion, if you take care in making sure your bulk fermentation is the proper length, and if you do a cold, refrigerator proof, you don’t have to worry if your dough has over or under proofed.
How to convert the Fahrenheit temperatures to Celsius, gas, and fan forced?
Use this handy table.
What is the difference between a levain and a starter?
There are a number of definitions out there for levain or leaven, but think of a levain simply as your sourdough starter’s offspring.
The Tartine Bread method of making naturally leavened bread uses this method. In short, it calls for using just a tablespoon of starter, which you mix with 200 g each flour and water and set aside to rise overnight. The following morning, you use this leaven in your dough.
How do I incorporate olives or other ingredients into my loaves?
Incorporate ingredients such as olives, nuts, sun-dried tomatoes, etc. in the early part of the bulk fermentation after you’ve done at least one set of stretches and folds. Before the second set, sprinkle the ingredients over top of the dough. As you do the stretches and folds, the ingredients will incorporate into the dough.
How do I get a more open crumb?
Achieving an open crumb is something I have not yet mastered.
As with many of the issues discussed above, it’s something, I’m hoping, that comes with practice — as I get better assessing the bulk fermentation, as I get better shaping and creating tension, as I get better using a delicate but confident touch while scoring, I am hoping I will see more of that beautiful, honeycomb open crumb in the boules I bake.
That said, there is only so much I am willing to do for a loaf of bread. This may come as a surprise to those of you who know how much I love bread, but it’s the truth. If you’ve made any of the sourdough bread recipes on this blog, you know I like to keep thing relatively simple, and I am unwilling to to do an autolyse, which always feels like too much work. (Autolyse, if you are unfamiliar, is the process of mixing the flour and water together and letting it sit for a period of time before adding the salt and the starter, a technique many sourdough bread bakers believe is beneficial for a number of reasons including dough extensibility/gluten development, crust color, and flavor.)
If you are after that open crumb, I highly recommend you download Trevor Wilson’s Open Crumb Mastery. I am currently making my way through it, and I am learning a lot, though I find it to be a bit overwhelming. With that in mind, it is not a book for beginners. It is intended for the intermediate sourdough bread baker.
For me, I think, it’s going to be a bit like Tartine Bread: a book I find myself returning to year after year, devouring it for stretches of time, then tucking it away for months till I feel moved again.
Open Crumb Mastery is packed with information, and if achieving an open crumb is a goal of yours, it’s definitely worth adding to your library. I have never read a sourdough bread baking book packed with so much information.
How do I make my loaves taste more sour?
There are a number of ways to make your loaves taste more sour, but my biggest tip is to do a long, cold, refrigerated proof. The longer time the shaped loaf spends proofing in the fridge, the more sour the flavor. Try for at least 24 hours but for as long as 48 hours.
Another tip: use less starter. It’s counterintuitive, but using less starter usually means your bulk fermentation will be longer, which means your starter will go through its food source at a slower rate and therefore produce more acetic acid along the way.
In my experience, I see little difference in both the length of the bulk fermentation and the resulting sourness in a loaf whether I use 50 g or 100 g of starter in a recipe. But if you are after more sour flavor, using less starter may be something to try.
How do I make my loaves taste less sour?
1. Room temperature proof. After the bulk fermentation and after you shape the dough and get it in its proofing bowl or basket, you can simply let the dough proof at room temperature for 4 to 5 hours or until it has proofed sufficiently and is ready to be baked. (See the reference to the (imperfect) poke test in the “How do I know if my dough has proofed sufficiently” section above).
2. Shorter colder proof. I prefer to do at least a 24 hour refrigerator proof because I find it make a big difference in my crumb structure. That said, the longer the dough spends in the fridge, the more tangy/sour the flavor gets. You can get away with a much shorter proof — 12 hours or so — keeping in mind your crumb might not be as light/open.
3. Use the levain method: At night before you go to bed, stir 20 g of sourdough starter (fed and at its peak) into 50 g water and 50 g flour. Let it sit overnight. In the morning, stir this levain into 300 g water, 10 g salt, and 400 g flour. Then proceed with the recipe through the shaping step. At this point, you can either do a room temperature proof or a shorter refrigerator proof. The levain method is what is employed in Tartine Bread, and it produces a less sour flavor.
4. Using starter at its peak. Be sure to use your sourdough starter at its peak or just before it reaches its peak after a feeding. Sometimes I don’t catch the starter at its doubling point, and I use it when it is a little “riper”, which makes for a more sour flavor. I prefer using it when it is not so ripe to ensure the flavor is not super sour.
5. Use more starter. As noted above in the “How do I make my loaves taste more sour?” section, using more starter will actually make the loaf taste less sour.
That said, this is true up to a point: if you make a loaf with 400-500 g flour and use 200 g sourdough starter, it is going to taste sour due to the high percentage of sourdough starter in the mix, which will lend a lot of sour flavor. To prevent a loaf of bread from tasting too sour, I wouldn’t use much more than 100 grams of starter for a 400- to 500-gram loaf of bread.
My crust is so tough. What can I do to prevent this?
A few thoughts. First, a sharp bread knife makes all the difference. Here are two I like:
- This one is attractive and reasonably priced.
- This one is a little more expensive, but also nicely designed and sharp.
Second, you try a different recipe, such as sourdough focaccia or sourdough sandwich bread.
If you are after a crusty boule, however, but you just want it a little less crusty, there are a few things you can do:
- Use rice flour as opposed to bread flour for dusting.
- Be sure you are using a good Dutch oven, which will create a good steamy environment during the first 25-30 minutes of baking. These are two I like: 5-Qt Lodge Double Dutch oven and The Challenger Bread Pan.
- Spray your dough with water before covering the Dutch oven.
- Lower the baking temperature. Continue to preheat your Dutch oven at a hot setting (500ºF or above) but lower the oven temperature to 425ºF when you place your dough in it. Bake it for 30 minutes covered. Uncover the pan and transfer the loaf to a sheet pan. Bake for 15 minutes more or so. If you have an instant read thermometer, it should register 207ºF or above to ensure the bread is cooked.
This post may contain affiliate links. Please read my disclosure policy.


164 Comments on “Why is my sourdough so sticky? 4 Common Sourdough Mistakes + Answers to FAQ’s”
Thanks so much for all the detailed information you put out and the work that goes into these posts!
One thing that’s stumping me a bit: I see a lot of mentions of both “increasing in volume by 50%” and “doubling in volume” here when talking about the bulk fermentation phase. They seem to be used interchangeably, but doubling is an increase of 100%, not 50%.
If the target increase is actually 50%, then maybe my loaves are always overproofed, which would explain a thing or two.
Could you clarify which one you mean here?
Thanks again!
Hi Josh! Thank you 🙂
More and more, I find that stopping the bulk fermentation at 50% to be ideal. I can get away with letting the dough double (increase by 100% in volume), but I find that when I do that, the dough isn’t quite as strong.
So, I’ll have to re-read my post, but I was not trying to use the two phrases interchangeably. If you have been letting your dough double in volume and you are not happy with the results, try stopping the bulk fermentation at 50% and see if you get better results.
Also, Josh, I thought of one more thing:
You definitely want your starter to double in volume before using it, but for your bulk fermentation, you want your dough to rise about 50% in volume.
All of this said, I have let my dough rise to double, and it has turned out fine, but more and more, I find my loaves turn out better when the initial rise allows the dough to grow roughly 50% in volume.
Hope that makes sense.
How can I get my sourdough to have more tang/sourdough taste?
Ahhh good question. I’ll add this above.
My biggest tip: do a cold, refrigerated proof. The longer time spent in the fridge, the more sour the flavor. Try for at least 24 hours but for as long as 48 hours.
Some bakers say if you want more sour flavor, use less starter. It’s counterintuitive but using less starter usually means your bulk fermentation will be longer, which means your starter will go through its food source at a slower rate and produce more acetic acid along the way.
In my experience, whether I use 50 g or 100 g of starter in a recipe, makes little difference in both the time of the bulk fermentation and the resulting sourness in a loaf. But, using less starter may be something you want to experiment with if you are after more sour flavor.
My otherwise wonderful sourdough has crust that is so thick, dense, tough. Difficult to cut, difficult to chew. Any thoughts or suggestions.
Hi Karin! Thank you for this! I added this question in the FAQ part of the article and added some notes. Thanks for asking this … I meant to include it originally.
Thank you for such an informative article! I just wanted to point out that instead of throwing out overproofed dough, one can roll it out, sprinkle w/ seeds, rough salt, etc, and bake off some very delicious crackers!
Oh Rebz, thank you! This is brilliant. I will try this. Thanks so much for writing.
This is my first time reading your blog, lots of info. Thanks. Can you suggest why my bread’s crust is tough? It’s crispy but the bottom is particularly chewy.
Hi Liam! I added this question in the FAQ part of the article and added some notes. Thanks for asking this … I meant to include it originally.
Terrific!! Well written, very clear; impressive and helpful! One thought- you mentioned loaves “too moist”, and I didn’t recall your addressing that – perhaps in your discussions of “how much water”? Your comments about over doing batch fermentation were bang on for me. (I got tired and went to bed). And your comments re: “lean starter” and “scheduled”, ALL very helpful!!! I will also find a way to make space in the frig. when needed. Onward! Oh.. I just baked it anyway.. flattish, but very tasty..(That’s one of my rules- whatever happens- bake it anyway!)
Hi Chris! So nice to hear all of this. Really like your philosophy, too: “Whatever happens- bake it anyway!” I feel like Julia Child would approve of that, too 🙂
Regarding loaves being too moist, I think it is simply a matter of reducing the amount of water. I would start by holding 50 g and see how you you like the results; then adjust the amount moving forward accordingly.
Such a helpful post!! Thank you!
Sure thing, Blair!
Thank you for this post and for answering our questions. It is so very helpful! You are so patient! I continue to learn with each loaf of bread and I am enjoying my sourdough journey. I really enjoyed your sourdough email course.
Oh wonderful! So nice to hear this, Ruth. Thanks for writing.
Thank-you for a VERY helpful thorough article!
I got my starter from “Homestead and Chill” with great results.
My oven has a bottom burner so I prevent a burnt bottom crust by placing my dutch oven on a double layer of sheet pans.
Smart! I love this idea. Will add this suggestion to the notes above. Thank you.
Great article! I’ve been at this sourdough adventure for 2 1/2 years now and I’m still learning new things. Right now I’m building another starter just for sh*ts and giggles…but it’s an outside starter! As long as it’s warm enough,I figured I can try and capture a different variety of yeasts & bacteria. If he survives, I’ll call him “Garden Gnome”.
Oh I love this, Sabine! So fun. Keep me posted on Garden Gnome 🙂 🙂 🙂
Hi, the intro discusses gummy interior but I missed where you discussed causes and solutions. I wait 2 + hours before cutting and I always bake to 205-210 degrees but I always have gummy dense interiors.
Thanks
Hi Janet! Sorry this wasn’t made clear. The gumminess can be a result of all of the factors or a combination of the factors: not using starter at its peak or using a weak starter; letting the dough over ferment; using too much water relative to the flour; using too much whole wheat flour.
Do you feel confident in your starter? Does it double in volume within 4-6 hours? When you shape your dough after the bulk fermentation, does it feel strong and elastic?
One thing I’ve discovered, which helped my bread have a more open crumb, better oven spring, better taste, etc., etc., etc., has to do with the water I use. Letting some water sit in the counter overnight doesn’t work anymore in most places. I’m in L.A., and our tap water doesn’t use chlorine, but instead uses chloramine (a chlorine/ammonia water detergent.). While it is safe to drink, it will KILL your starter, leaving all the problems listed in this article. Chloramine doesn’t evaporate. Therefore, I get a gallon jug of distilled water at the grocery for, like, $1.00. It lasts through many loaves and feedings. The difference is absolutely unmistakeable!
Wow, Jonathan, this is so interesting. I’m going to edit the post above to reflect this info. Thanks so much for writing!
Hi, first time visitor, reading comments and I had to reply to this one. Using distilled water is a huge mistake because it lacks the minerals and bacteria that the starter needs. Instead use spring water, or most fridges have filters on them which have charcoal. That should remove the chloramine, or if someone has chlorine like I do, it removes it. I’ve had it tested for the presence of chlorine, there was no trace. Hope this helps.
Thanks for writing. In the post above, I do recommend using spring water as opposed to distilled for the reasons you mention.
Thanks! And I’m so sorry, I can’t type my own name! It’s Terry! My phone always corrects when I hit the wrong letter…oops!
I am trying your mother’s Peasant Bread and have a question. If I use sourdough discard do I still need to add the yeast? Unfortunately, I made the recipe without the yeast and it is not rising very much. Should a I treat it as a sourdough and give it more time?
Thanks, Sandra
Hi Sandra, I do use yeast when I make the bread with discard. Since you made it without the yeast, I would treat it like sourdough and let it rise slowly. If you have a stand mixer, you could try dissolving the yeast in water (maybe a 1/4 cup) and mixing it into the dough using a stand mixer. You may have to add a bit more flour to account for the additional moisture.
Thanks, I’ll try to add the yeast and let you know if it works.
OK, let me know!
With regards to the section of being more sour, if I want my bread to be less sour, could I put more starter? Then place it somewhere warmer to make it rise faster?
Hi JT! Great question. I will add all of the below info up above in the post for future reference.
Yes, you can use more sourdough starter to make your bread taste less sour, but to a point: if you make a loaf with 400-500 g flour and use 200 g sourdough starter, it is going to taste sour due to the high percentage of sourdough starter in the mix, which will lend a sour flavor. I wouldn’t use much more than 100 g starter for that size loaf. And I do not recommend letting sourdough rise in a warm place — even the warm light of an oven can be too warm sometimes. Unfortunately, sourdough is just a little less forgiving than yeast-leavened bread, and when you create warm environments, you risk over fermenting your dough.
But there are other options:
1. Room temperature proof. After the bulk fermentation and after your shape the dough and get it in its proofing bowl or basket, you can simply let the dough proof at room temperature for 4 to 5 hours or until it’s ready to be baked. (See the reference to the (imperfect) poke test in the “How do I know if my dough has proofed” section above).
2. Shorter colder proof. I prefer to do at least a 24 hour refrigerator proof because I find it make a big difference in my crumb structure. That said, the longer the dough spends in the fridge, the more tangy/sour the flavor gets. You can get away with a much shorter proof — 12 hours or so — keeping in mind your crumb might not be as light/open.
3. Use the levain method: At night before you go to bed, stir 20 g of sourdough starter (fed and at its peak) into 50 g water and 50 g flour. Let it sit overnight. In the morning, stir this levain into 300 g water, 10 g salt, and 400 g flour. Then proceed with the recipe through shaping. At this point, you can either do a room temperature proof or a shorter refrigerator proof. The levain method is what is employed in Tartine Bread, and it produces a less sour flavor.
4. Using starter at its peak. Be sure to use your sourdough starter at its peak or just before it reaches its peak after a feeding. Sometimes I don’t catch the starter at its doubling point, and I use it when it is a little “riper”, which makes for a more sour flavor. I prefer using it when it is not so ripe to ensure the flavor is not super sour.
Hope this helps!
HI Alexandra! This is so helpful! Question for you – do you feed your starter exclusively with organic or rye flour? With a few cool days now in the mid atlantic, it’s time to awaken my starter for a Fall round of baking. Many thanks!
Hi Leslie!
I often feed my starter with organic King Arthur Flour all-purpose flour, but not always. When I ran out of my last bag, I didn’t replace it, so I’ve been using KAF bread flour, and it’s been working just fine. I recommend using organic or a little bit of rye when people are trying to strengthen/build their starters.
Thank you for the great article. I have a question regarding my starter. I have been struggling to get a strong starter. It will double in volume, however it will not pass a float test. Currently using KA Organic White Wheat Flour at 1:1:1. I live in a small town and finding flour is an issue normally, but with Covid very difficult. I have a very good filter on my water and for extra measure boil it and let it sit overnight on the counter for my starter feeding. Any advice would be appreciated.
Hi Jan! Are you being aggressive with how much starter you are discarding before feeding it?
One thought is to try using filtered water. I know it’s a bummer to have to buy water, but while you are in the building/strengthening phase, it might help.
I am sticking to your suggested 40 grams of starter with 40 grams of flour and water. Will try purchasing water, however I have a reverse osmosis with a very good filter of removing 99% of contaminants. But before I give up I will try your idea. Thank you so much for replying.
OK, keep me posted! You can also always go the purchased starter route … I hate to have suggested two things that cost money but if you are frustrated, a purchased starter might remove some of the frustrations. But let me know how being aggressive with how much starter you are discarding goes as well as using filtered water.
As an update to my questions of Sept. 18….I switched to distilled water and stuck with it….now have a good and active starter. Thank you for your encouragement to keep at it and the suggestions. Great site!
Wow, Jan, amazing! Thanks so much for reporting back. So wonderful to hear this!
Great blog Alexandra. My dutch oven is a stainless pot and cover. My first loaf (so far) was over hydrated I think,so somewhat flattened, but was nicely aerated and springy.The crust on the sides and top was great but the bottom crust was so hard you would have to use a skill saw to cut it.I assume due to too much heat through the bottom of the pan. Any simple suggestion to try to eliminate this bottom crust problem ? Thanks for any suggestion. Fred
Hi Fred! I have not tried this, but one commenter suggested placing a sheet pan (or two) underneath the pot, which should provide a bit of insulation. That would be my first suggestion. Next step might be to lower the temperature a bit.
Let me know if baking on a sheet pan or two helps!
Your advice NOT to use the oven with light on for bulk fermentation was a revelation. I thought I was helping the dough along but apparently that little bit of heat was too much, and my boules were coming out like large hockey pucks. Thanks for all this excellent advice.
Wonderful to hear this, Jeanne! Thanks so much for writing.
My last two attempts made a very sticky dough, particularly my last one. I have been using only 65% hydration to avoid a overly sticky dough while I am learning this sourdough discipline. One thing in common with the last two loaves is the use of 400g white bread flour and 100g of whole wheat flour with a pinch of rye flour. The fermentation phase was good but the dough was nearly impossible to work with. I’m sure 10% of the dough ended up stuck to my fingers. Of the two the first one worked out in the end although the loaf was on the tough side. The second one was impossible to get out of the banneton despite it being well floured, in my opinion.
Hi Dave! The stickiness is likely either because of the whole wheat flour or that the dough over fermented during the bulk fermentation. When you were doing the stretches and folds, did the dough feel strong and elastic? How many hours was the bulk fermentation?
Thank you for an extremely helpful and detailed post! One of the best I’ve read for a newbie sourdough baker. Appreciate all the time and effort you’ve put in! 🙏🏼 😊
My pleasure, Lisa! Great to hear this 🙂
Hello Ali
I happened upon your website when looking for an oatmeal bread recipe and as a result fell deep into a rabbit hole 😉 This was sometime in March, and we have not bought bread in a shop since… I had to adapt some of the recipes, especially the sourdough ones, since I live in Switzerland and am lucky to get my hands on a variety of locally milled flours.
I wanted to thank you for all the effort you put in making things simple. I love your little videos and also enjoy all the non-bread recipes you share. I don’t remeber how many times I made a version of your oven ratatouille this summer, in fact having it just now with some capers, olives and sharp watercress on pasta.
I remeber you sharing in a post that you would gradually add sourdough versions of most of your bread recipes and cannot wait for the oatmeal sandwich bread to turn into a sourdough oatmeal loaf.
Thank you
Emine
Hi Emine,
Thank you so much for the kind words. This truly means so much to read. And I’m so happy to hear you love the roasted ratatouille recipe … that has to be one of the recipes I make most often late summer every year.
And thank you for the nudge regarding converting the recipes to sourdough. I think I need to create a guide on how to “convert any bread recipe to sourdough” … but I’ll get working on the oatmeal sandwich bread recipe, too.
Thanks again for your kind words!
Hi Ali,
Thank you for this incredibly well thought out post! I’ve been using your sourdough recipe since March and I feel you covered EVERY issue I’ve encountered since I started my bread making journey.
First, I feel like you changed my life with the suggestion of pausing the bulk fermentation process overnight with refrigeration. 😉 Gah, I can’t tell you how many loaves I’ve overproofed by letting them sit out all night!
Second, I’m glad you said that the float test for an active starter is not always accurate. I’ve tested starter that doubled in volume after 4 hours and it still didn’t float, so it made me really confused. I’ll feel more confident now just really paying attention to how quickly my starter is doubling.
I’m going to try out that sheet pan suggestion or lowering the temperature to help keep the bottom of my loaf from burning. When I use my Dutch over for bread baking I notice the bottom gets really dark and hard to cut through, but when I use my Emile Henry clay pan I don’t have this issue.
I’m going to try your method of discarding most of the starter during the feeding process. My starter is usually pretty strong but I’d like to test out your suggestion. You leave all but 40 grams of starter and then feed with 40 grams of both water and flour, correct?
Lastly, I have Tapioca Starch – do you think that will work similar to rice flour? If you haven’t tried it yet, I’ll test it out on my next loaf and report back. 😉
Again, thank you so much for these great posts and I just want to say I love your cookbook as well.
Best,
Lindsey
Hi Lindsey! So nice to hear all of this … sourdough truly is a journey 🙂
Regarding your questions:
You leave all but 40 grams of starter and then feed with 40 grams of both water and flour, correct?
Yes! Sometimes I leave even less starter, around 25 g, and I feed it with more flour and water, around 50 g each … there’s no magic formula, but what I do find myself coming back to is that the more aggressive I am with discarding, I find my starter is happy. And if you are always feeding your starter with equal parts by weight flour and water, no matter what amount of starter you feed (20 g or 40 g or 60 g), if you feed it with equal parts by weight flour and water, you’ll always have a 100% hydration starter. Does that make sense?
Lastly, I have Tapioca Starch – do you think that will work similar to rice flour?
I don’t know! Worth a shot! Do you have the flour sack towels? I recently ran out of rice flour and keep forgetting to replace it, so I haven’t been dusting my flour sack towels with anything, and the dough is not sticking at all.
But please do report back on the success of tapioca starch.
Hi, I use my clay pot to bake the bread in it but I found it’s make the bottom of loaf a bit too damp, maybe I shouldn’t soak the dish before that? What is your recommendation? Do you think the iron cost dish is better the clay one? Thank you….. anyway your post is really good 😉
Hi Marta! I don’t know how to advise, because isn’t it always recommended to soak a clay pot before using? If it is safe to bake without soaking, then go for it, but I would hate for you to crack your clay pot if that is a risk … I’m not too familiar with clay pot baking. I love my cast iron for baking sourdough boules and batards. If you have a cast iron pan with a lid, I’d say try that out before trying your clay pot without soaking.
I am in the midst of using your recipe, so I am already worrying about my poor experience with using parchment paper. Twice it has failed me (though I suspect it the result of a wet/sticky dough) by fusing to the bottom of the bread! It happened with both a preheated DO and a cold DO. I have had better luck without it. Your thoughts?
Such a bummer! In my experience, not all parchment is created equally … I once bought a box of some brand I cannot remember, and I had terrible issues with sticking. Do you know the brand you are using? Have you had success using it with other baked items? If you would rather not use parchment you could dust a pizza peel with cornmeal or rice flour and use it to carefully transfer your dough to the heated Dutch Oven. I love using parchment paper for its ease in regard to the transfer, but I also know the brands of parchment I use won’t stick … If You Care is great, so is King Arthur Flour.
I appreciate your advice!
Thank you. Amy
Hi Ali! This post is incredibly helpful. I ALWAYS turn to your site when looking for recipes or help so thank you for helping me become a better cook! I have tried my hand at sourdough (even taking a class here locally in Seattle) and have had really no success 🙁 I don’t bake often enough to get the hang of it and my starter lags from lack of feeding. I tried again this week feeding my starter a few times and it seemed to come back. It doubled in size, had nice bubbles, and passed the float test. I mixed up the dough last night and did a series of folds. I then let it sit out for 45 minutes and saw no movement. I kept the dough out overnight and this morning see that there is not much if any rise and no bubbles on the surface. I don’t know what to do now–try to incorporate some yeast? Dump the whole thing and start again? Maybe my starter wasn’t really ready? Any thoughts you have would be appreciated and thank you for keeping us all well fed and happy during these trying times. Ps–loved seeing the kitchen reno and your children’s “helpful” hands 🙂
Hi Laura! Thank you for the kind words… means a lot!
Sorry to hear about your sourdough troubles. Question: are you using a purchased starter or one you’ve built yourself? It does sound as though you need to strengthen it. As I note above someplace, I don’t find the float test as reliable as the how-quickly-your-starter-doubles test.
Do you have a stand mixer? Part of me thinks you could dissolve 2 teaspoons of instant or active dry yeast into a quarter cup of lukewarm water; then incorporate it into the dough using the dough hook of a stand mixer. You may need to compensate with more flour. Then let the dough rise in a warm spot for 2 hours or until doubled and proceed with your recipe.
Also: I am teaching a Sourdough Demystified virtual cooking class on Sunday February 7th that will cover the basics of baking a sourdough boule.
Thank you for your response. My starter came from a friend but was pretty dormant in my fridge from lack of use. Might be time for a new starter! I do have a stand mixture and will attempt adding some yeast/water as you suggest to try to save my dough 🙂 I look forward to taking your classes!
OK, great to hear, Laura! I would try discarding most of your starter, leaving behind just 2 tablespoons or so, and then feeding it with 60 grams each flour and water… if you can get organic flour, try that, and if you feel like buying a gallon of spring water, that might help, too. Good luck!
“You know the dough has over fermented if, when you turn it out to shape it, it is very slack — if it’s like a wet puddle — and very sticky and lacking any strength and elasticity.”
Well, of that doesn’t describe exactly the problem I was running into then I don’t know what would. Now to figure out how to fix it!
Hi Jeff! I would start in two places: shorten the bulk fermentation and/or reduce the amount of water. Do you feel confident in the strength of your starter?
Ali, I have a question….how do you store your bread? Currently I am using plastic bags and the bread gets soft and doesn’t maintain the crust. I do not have room for a bread box. Wondering what your suggestion is?
And thank you for your time!
Grateful for your blog to help me with making sourdough!
Hi Amy! I actually think airtight bags (like Ziplock) or storage containers work best. The crust definitely will get soft but when you reheat it, which I always recommend doing for day-old bread, it revives. I find my crust firms right up in the oven or toaster. If you don’t use an airtight container, the bread dries out and stales much faster. I use a bread box, but inside that box, my bread is in bags or containers.
Hope that helps! Thank you for the kind words 🙂 🙂 🙂
Hi love these pages thank you. Have loads of questions but am trying different techniques to work out what is working for me. The first question though that I am not sure anyone else has asked is how important is it to have a breathable lid on your starter. I have mine in a Kilmer jar so have just been replacing the lid each day. I don’t have a need to put my starter in the fridge yet as seem to be baking every day for my family with varied results!!!!! Hence my experimenting!!!! X x
Hi Sarah! This is a great question. And honestly, I don’t think a breathable lid is super important, but I think it’s important that it not be airtight, because you do want some of the carbon dioxide to be able to get out. If your Kilmer jar is working, keep using it. I have heard that glass jars with lids with the gaskets removed are great, because it allows for some airflow. My understanding is that the yeasts and bacteria that help a starter grow mostly come from the flour and water, but some come from the air as well, which is why a breathable lid might also be beneficial. Hope this helps!
I’ve been baking bread for months and could not figure out why I wasn’t getting a good rise. This article completely changed the way I was approaching my bread. I didn’t realize that, because I live in a humid climate, I could cut back on the water. My bread is finally turning out the way that I want. I cannot thank you enough for sharing these tips!
Oh Yay! Eliza, so nice to hear this 🙂 🙂 🙂
Hi Ali,
I have now baked three sourdough loaves. The first was unrecognisable as food. The second dough was so sticky and weak that I had no expectation of success yet the baked loaf was quite good. A Google search ‘Why is my dough so sticky?’ led me to your posts. I followed the Bulk fermentation in the refrigerator technique you advise. Well, I honestly don’t think the outcome can be improved upon. Thank you so much for the detail you included. Perfect in all respects.
Stephen
So nice to hear this, Stephen. Thanks so much for writing. The refrigerator is the best tool when it comes to sourdough. So great to hear your third loaf was a success!