
Simple Sourdough Ciabatta Bread
This post may contain affiliate links. Please read my disclosure policy.
Last month, while posting a photo of this brioche loaf on Instagram, I posed a question: If 2020 was the year of banana bread and focaccia, what will be THE bread of 2021?
Which bread, I asked, did everyone want to learn how to make most?
Of all the responses, which included everything from fougasse to hoagie rolls, a crusty baguette was the most frequently cited, ciabatta following closely behind.
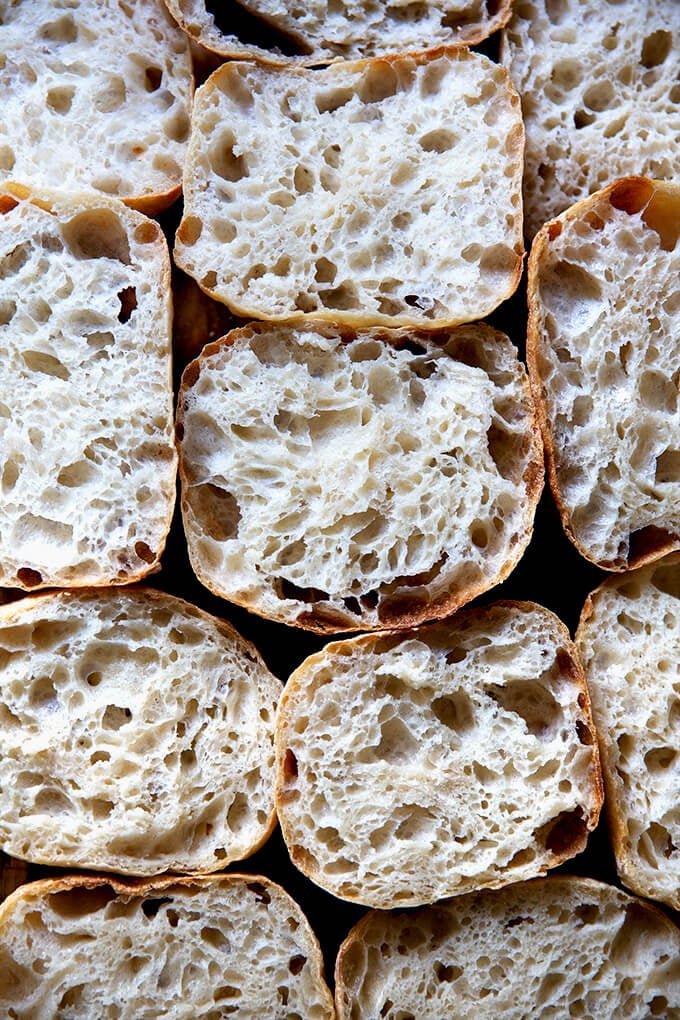
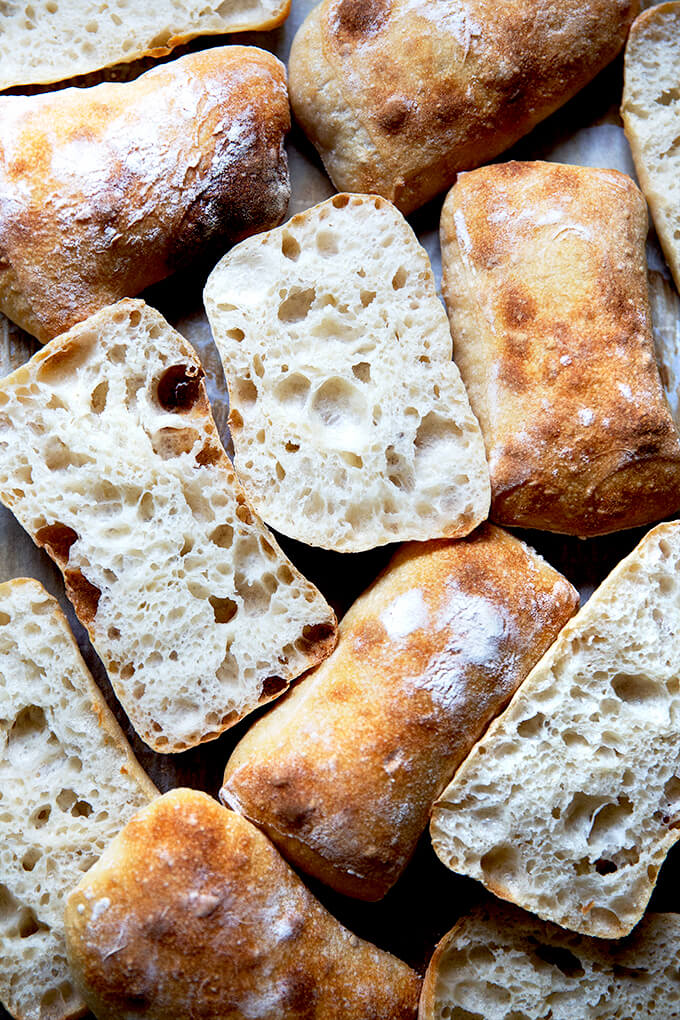
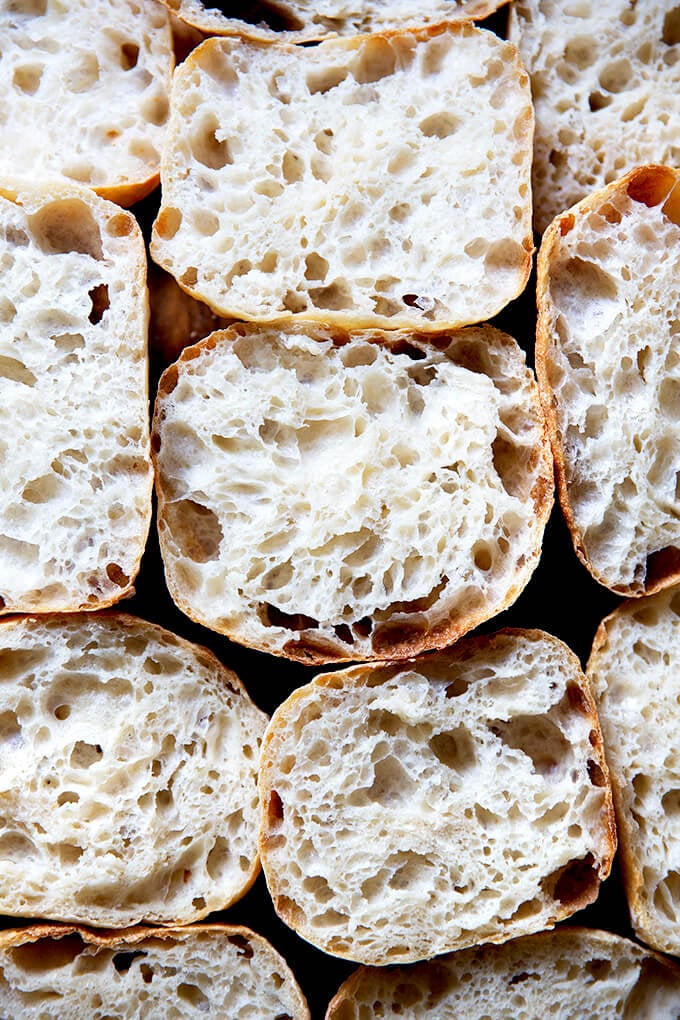
I’m excited to say today, after a few weeks of experiments, I have a wonderful sourdough ciabatta recipe to share. It has a thin, but crisp crust, a beautiful honeycomb crumb, and a lovely lightness and chew. It’s perfect for sandwiches.
And best of all: it’s truly simple. Made with four ingredients, this recipe requires neither an autolyse nor preferment, neither a preheated Dutch oven nor baking stone. If you have a sheet pan, you’re good to go.
What’s more, there’s no shaping or scoring, no balling up dough or creating tension. Truly, after the bulk fermentation, which includes some fridge time, you turn the dough out onto a floured work surface, pat it into a rectangle, and divide it into 8 roughly equal pieces. You then transfer those pieces, irregularly shaped and all, to a sheet pan, and bake them one hour later.
But can I tell you the most exciting part? This dough makes a decent — a more than decent — baguette! It’s not super crusty, but it’s a nice baguette nonetheless, flour-dusted and unscored, with a crumb and flavor better than any other I’ve attempted previously.
Friends, I hope you love this recipe. It’s on par with this sourdough focaccia recipe in terms of simplicity and effort, but it’s a totally different animal. I can’t wait for you to give it a try.
PS: If sourdough isn’t your thing, please try this yeast-leavened ciabatta bread recipe.
This post is organized as follows:
- 3 Tips for Sourdough Success
- What is Ciabatta?
- Sourdough Ciabatta, Step by Step
- Ciabatta Sandwich
- Sourdough Ciabatta “Baguettes” 🥖🥖🥖
3 Tips for Sourdough Success
Before you get started with this recipe, here are my three tips for sourdough bread baking.
- It starts with your starter.
- This will sound obvious, but: it starts with your starter. Before you mix a loaf of sourdough bread, you must ensure your starter is bubbly and active. I like to feed my starter at night before bed, let it rise and fall overnight; then feed it again in the morning. By midday, it’s ready.
- Use a digital scale.
- I say this all the time, but using a scale to measure the ingredients for a loaf of sourdough bread makes all the difference. So much of sourdough bread baking is simply a matter of using the precise amount of water given your environment and given the flour you are using. If you use cups to measure you are simply not being precise, and as a result, you will not be able to make meaningful adjustments should the recipe as written not work out perfectly.
- Use a straight-sided vessel for the bulk fermentation.
- With sourdough bread baking, one frequent problem bakers run into is over-fermentation. If you let the first rise go too long, the dough will over-ferment and become a sticky, unsalvageable mess. A straight-sided vessel allows you to see when your dough has truly increased in volume by 50%, 75%, 100% or whatever volume increase you are after.
- The vessel I use in this recipe, similar to this one, is 8 cups. Most grocery stores carry storage vessels similarly sized.
What is Ciabatta?
- Originating from the Lake Como region of northern Italy, ciabatta means “slipper” in Italian. Traditional ciabatta is characterized by this slipper shape as well as an extremely porous and chewy texture.
- Traditionally, ciabatta dough is very wet, calls for very little yeast, and requires a long, slow rise.
- Traditional recipes, too, often call for making a biga (a preferment), which helps produce that light, porous texture.
Sourdough Ciabatta, Step by Step:
Gather your ingredients: bread flour, water, salt, and a sourdough starter. I am a proponent of buying a starter (see recipe box for sources), but if you are up for it, you can build a starter from scratch in just about 1 week.
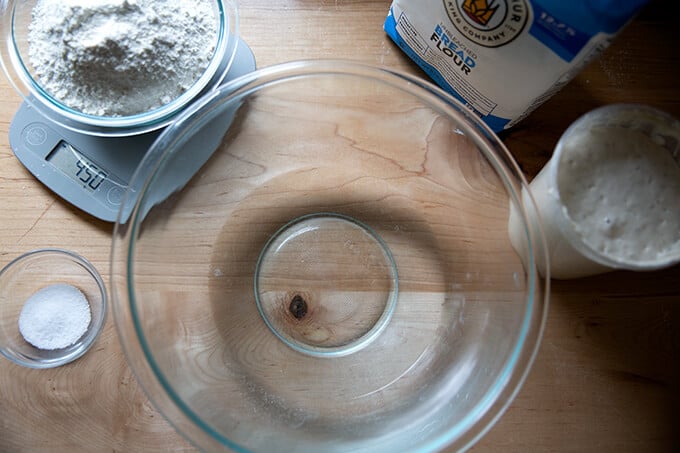
For this recipe, you’ll need: 100 grams sourdough starter, 360 grams water, 450 grams flour, and 12 grams salt. It’s 80% hydration.
Mix together the water, sourdough starter, and salt.
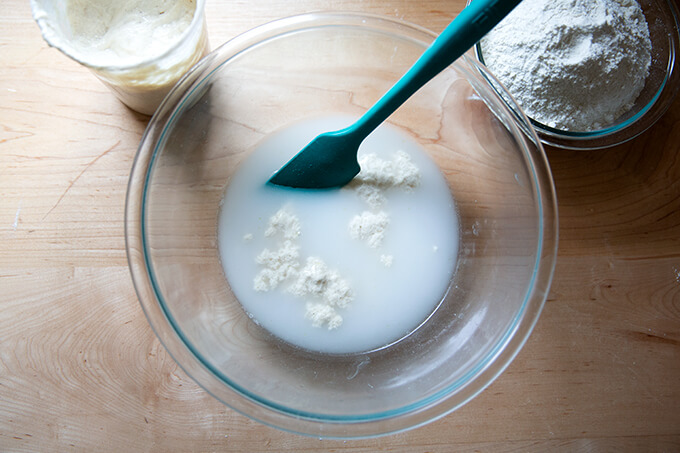
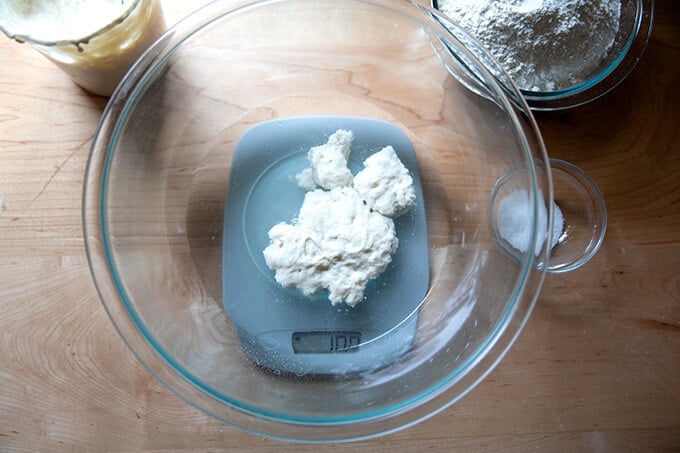
Add the flour and mix to form a sticky dough ball.
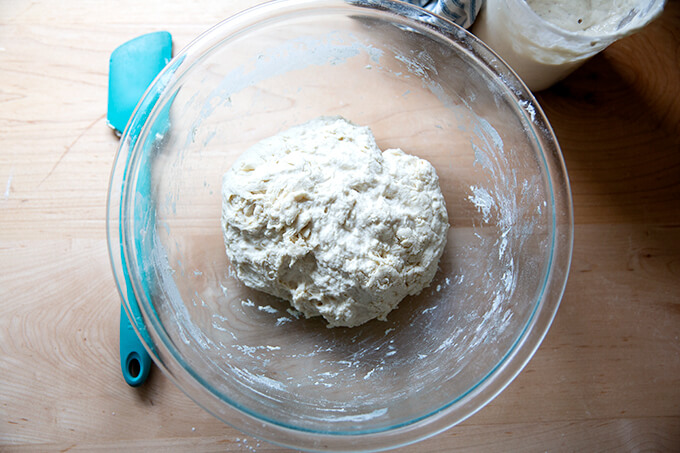
Cover the bowl and let rest for 30 minutes. Then perform a set of stretches and folds. See the video above or in the recipe box for guidance. This is what the dough will look like after one set of stretches and folds.
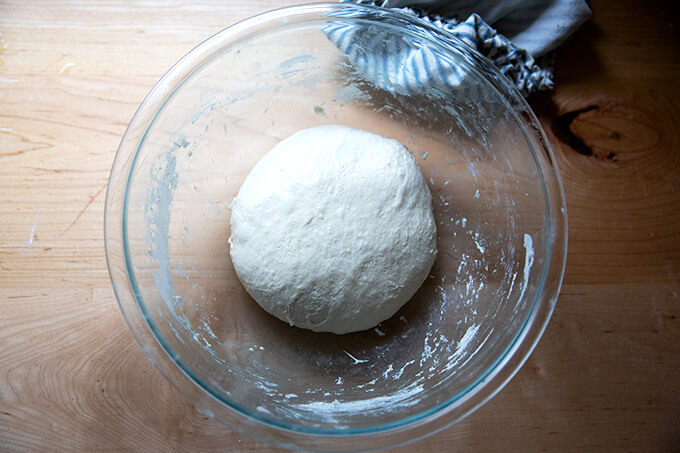
This is what the dough will look like after 4 sets of stretches and folds.
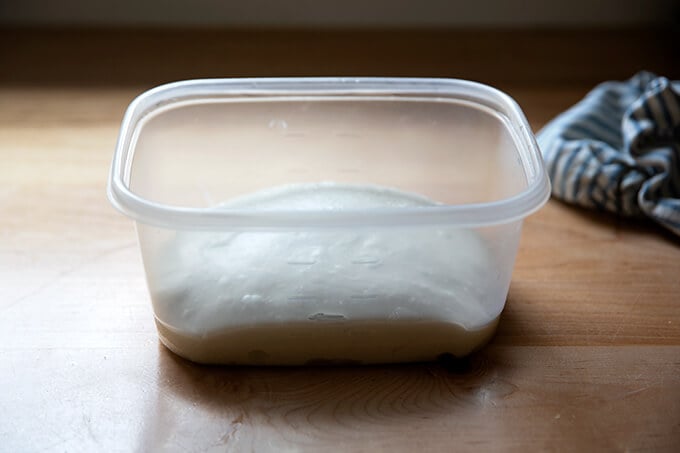
Transfer dough to a straight-sided vessel (this one is 8 cups, but anything similarly sized will do) for the bulk fermentation (the first rise):
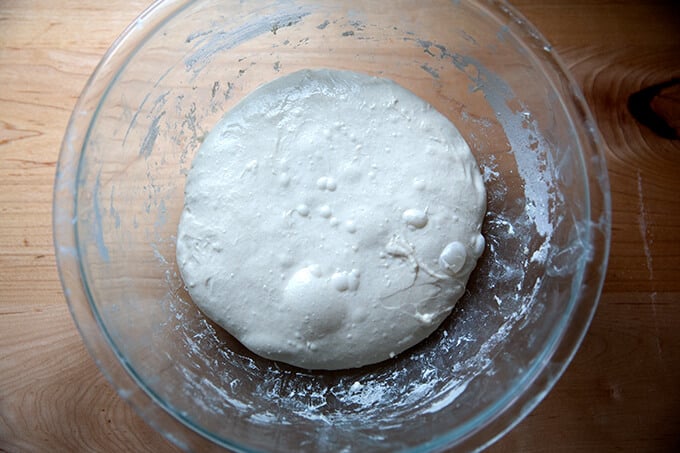
Mark the height of the dough on the vessel, cover the vessel, and let the dough rise until it increases in volume by roughly 75%.
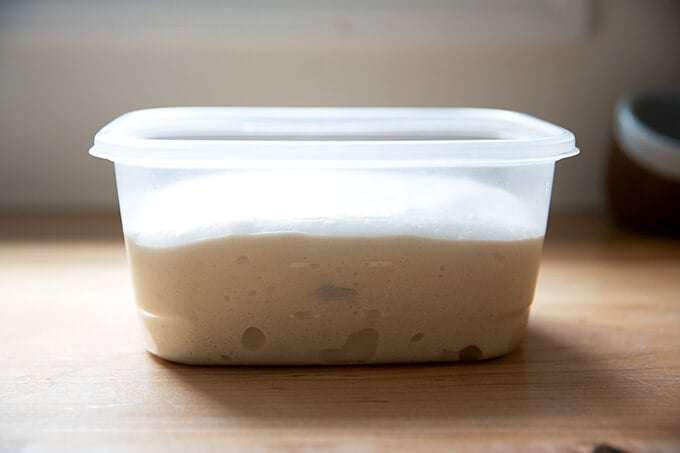
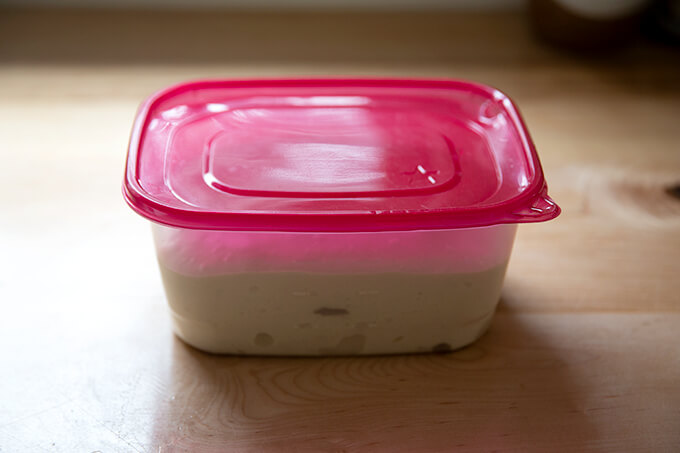
When the dough has increased by 75% (roughly), place a lid on the vessel, and transfer it to the fridge for 12-24 hours.
When ready to bake, remove the vessel from the fridge.
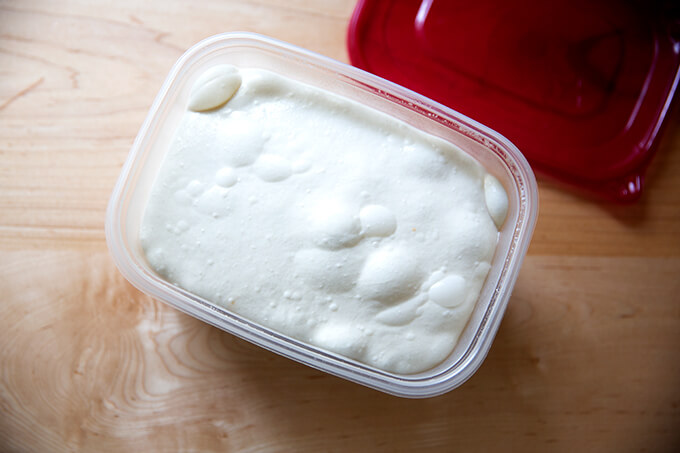
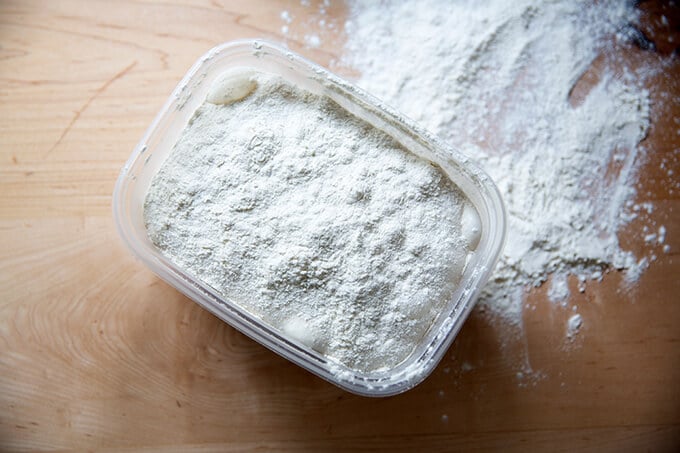
Dust the top of the dough liberally with flour. Dust a work surface liberally with flour, too.
Turn the dough out onto the prepared work surface.
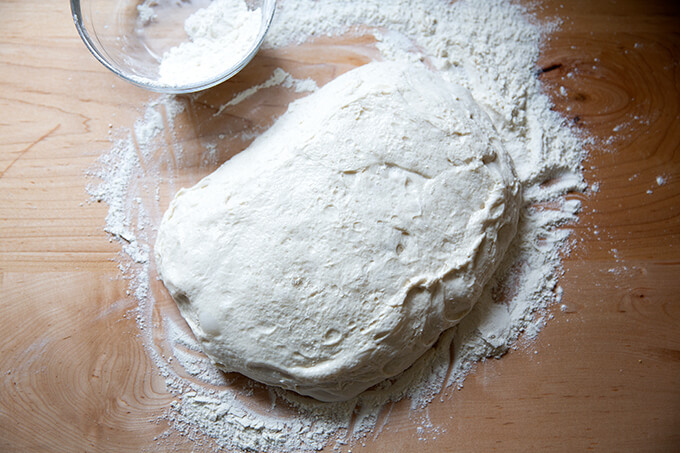
Pat the dough into a rectangle.

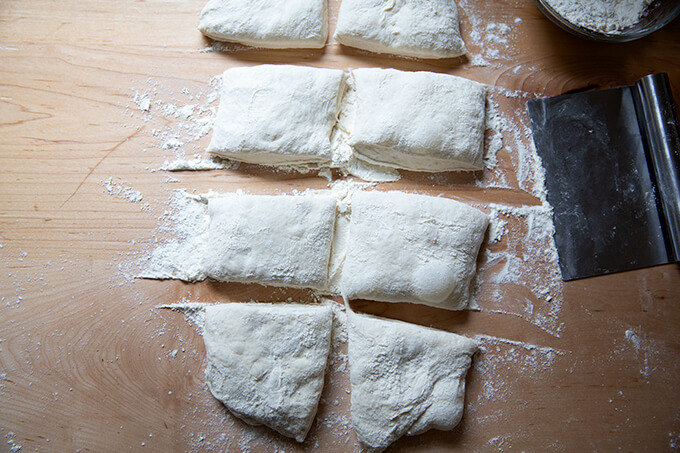
Cut the rectangle into 8 roughly equal portions.
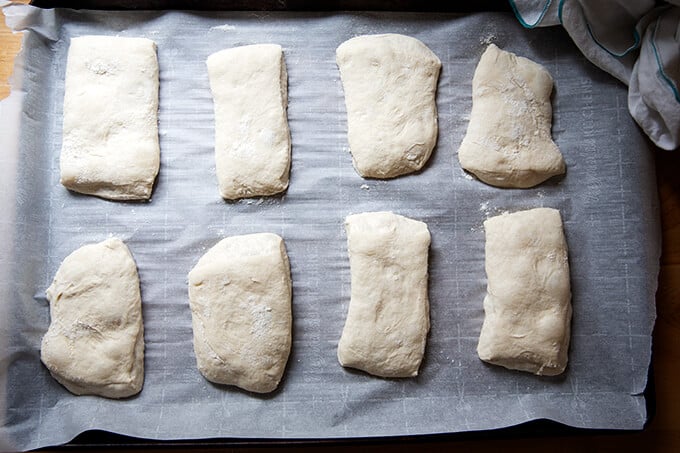
Transfer the portions to a parchment-lined sheet pan. Let rest for 1 hour. Then transfer to a 475ºF oven for 10 minutes. Lower the heat to 450ºF and bake for 10 minutes more.
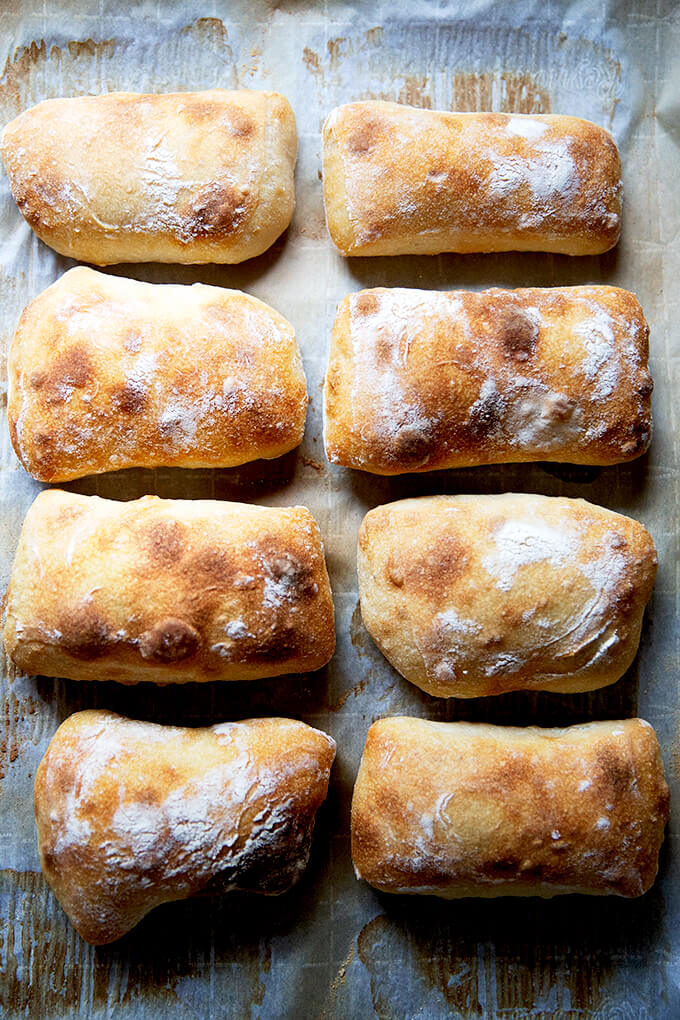
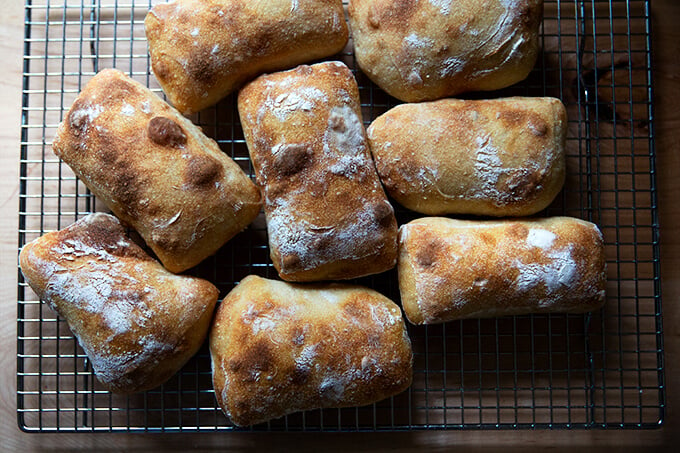
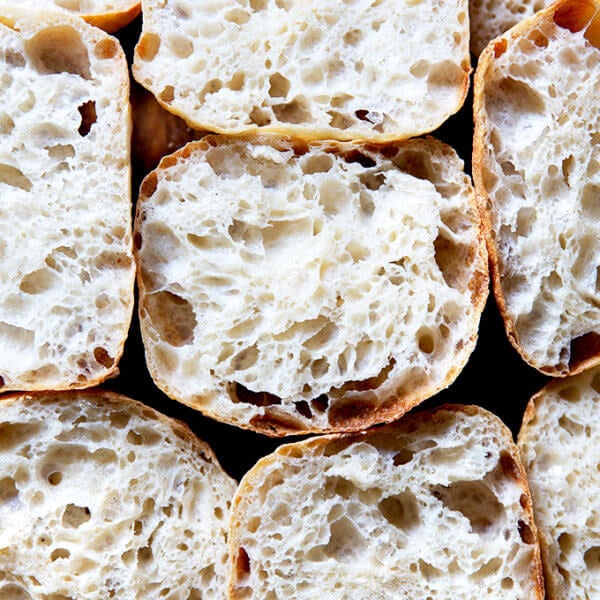
Transfer the rolls immediately to a cooling rack, and let cool for at least 20 minutes before cutting.
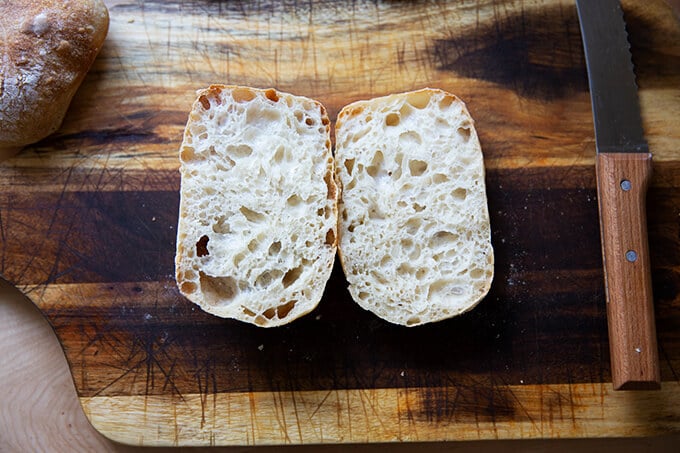
How pretty is that crumb?
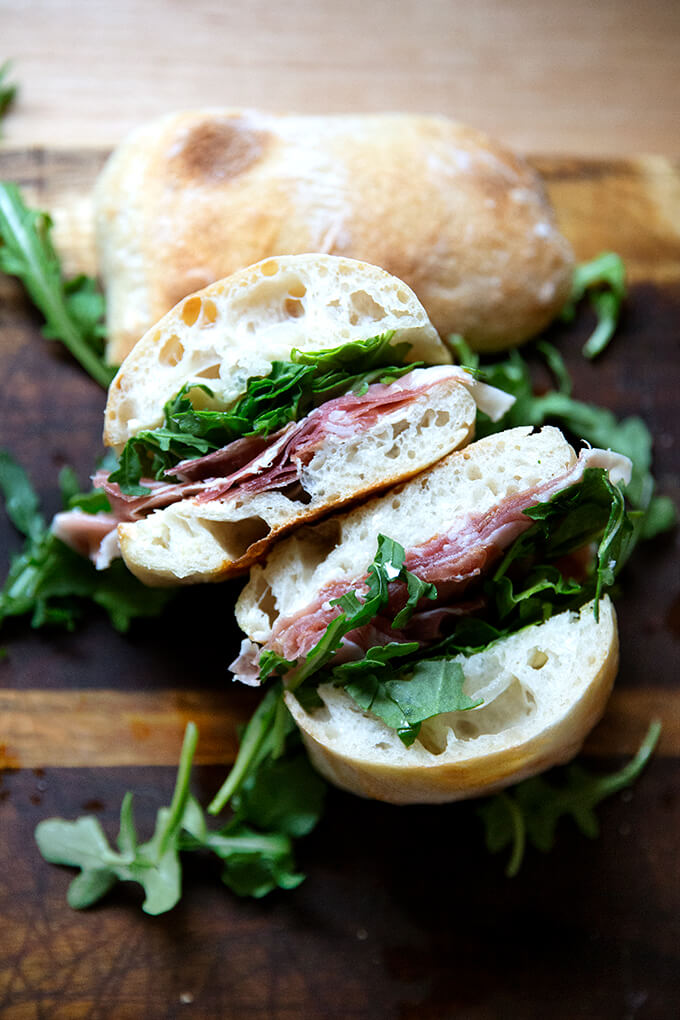
Ciabatta Sandwich
I have written about this favorite sandwich before, so forgive me if you know the story. It comes from Gabrielle Hamilton’s Blood, Bones, and Butter, a favorite book, and it’s something Gabrielle’s ex-husband, Michele, made for her during their courtship. If you have the book, the story is on page 163.
In short, the success of the sandwich relies on a delicate balance: “the perfection of three fats together — butter, olive oil, and the white fat from prosciutto or lardo.” To make it, spread good bread with “cool waxy butter,” top with prosciutto (more than you think), and arugula. Drizzle it all with good olive oil.
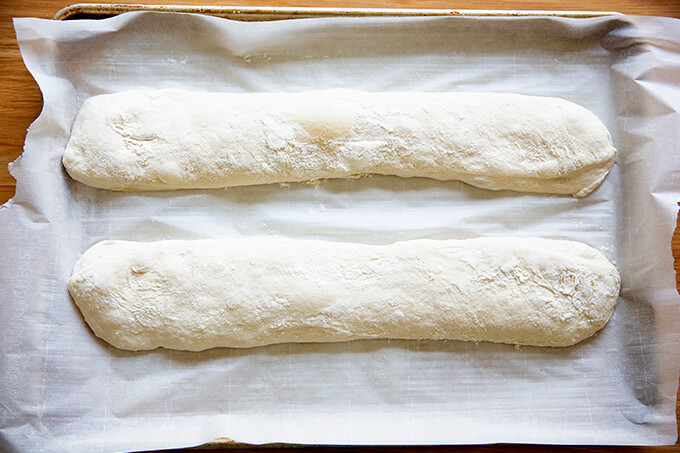
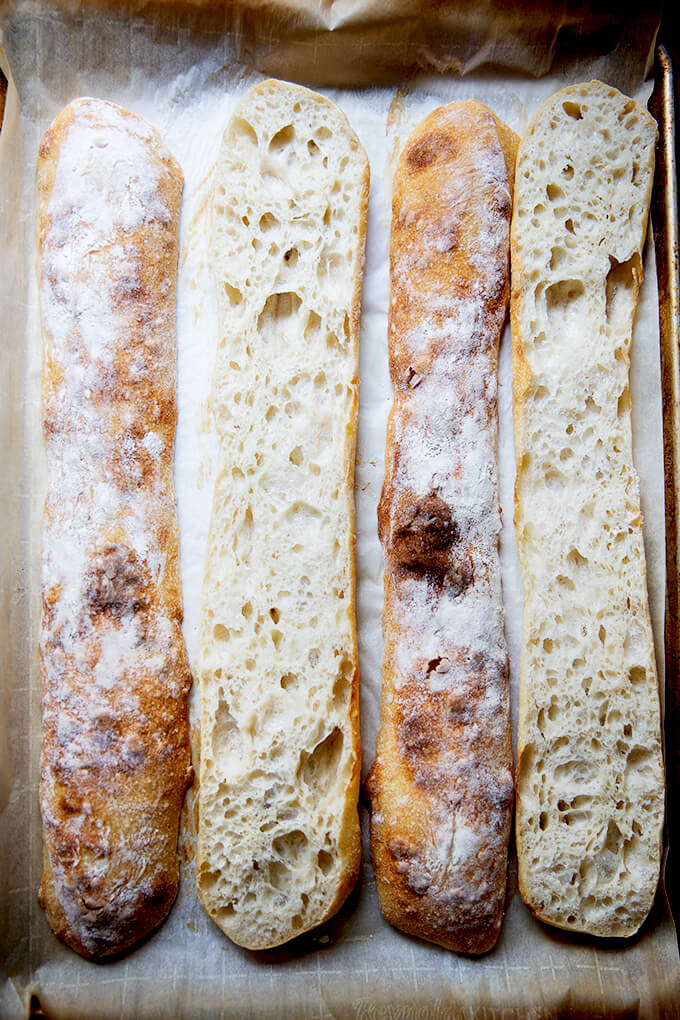
Sourdough Ciabatta “Baguettes” 🥖🥖🥖
To make baguettes, follow the same process, but instead of dividing the rectangle of dough into 8 portions, divide it into two. I find an extra-large sheet pan to be necessary to bake both baguettes at the same time. If you don’t have an extra-large sheet pan, I would bake one baguette at a time, and orient it at a diagonal angle from one corner to another.
Bake the baguettes at the same temperature and for the same amount of time as the rolls.
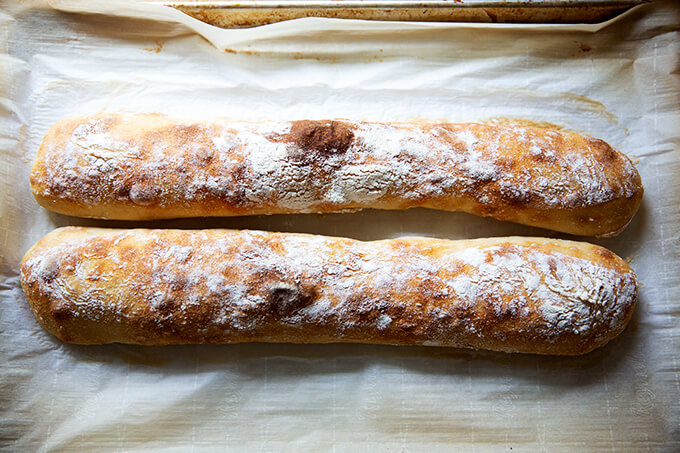
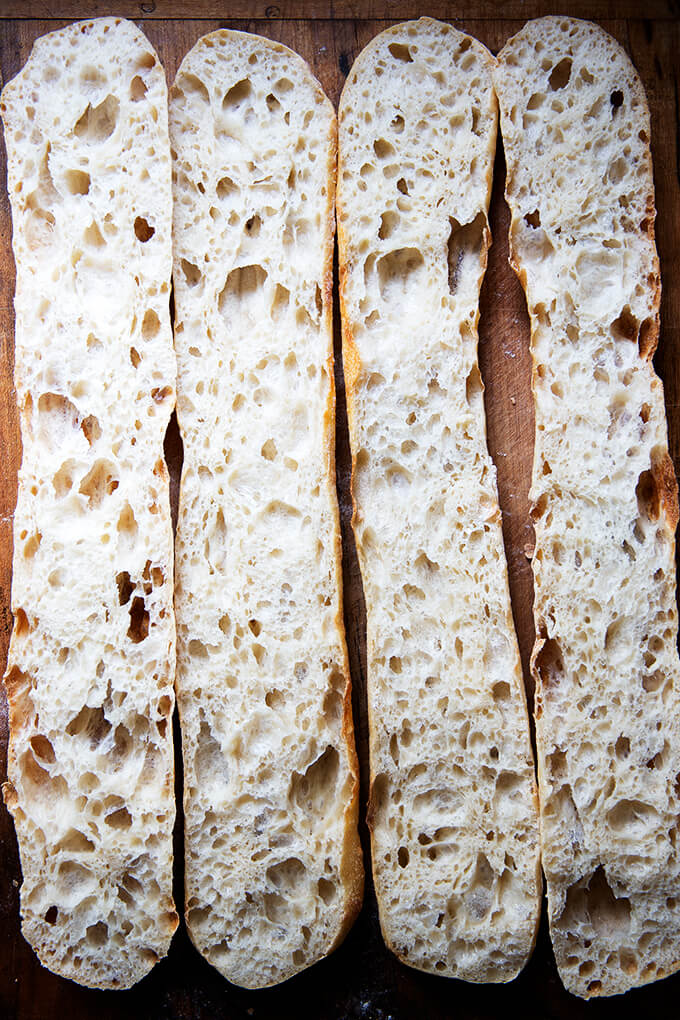
Not bad for the effort, right?
These ciabatta “baguettes” would be great vessels for giant sandwiches. I’ve been craving Bahn mi since
Simple Sourdough Ciabatta Bread
- Total Time: 24 hours 20 minutes
- Yield: 8 Rolls
- Diet: Vegan
Description
Notes:
- You need an active sourdough starter. You can build a starter from scratch in just about 1 week. But I am a huge proponent of buying a starter. Here are two sources:
- As always, I highly recommend investing in a digital scale before beginning any bread baking adventure.
Flour: I have had success using all-purpose flour, but if you can get your hands on bread flour, that is ideal, especially if you live in Canada or abroad. Moreover, if you live in Canada or abroad, you may need to reduce the water amount. Consider holding back some of the water during the mixing process to ensure you don’t end up with a soupy mess.
Straight-Sided Vessel:
- The vessel I use in this recipe, similar to this one, is 8 cups. Most grocery stores carry storage vessels similarly sized.
- Using a straight-sided vessel for the bulk fermentation will help prevent over-fermentation because it allows you to see when the dough has truly increased by 75% (or slightly more or less) in volume.
Ingredients
- 360 grams (about 1.5 cups) water
- 12 grams (about 2 teaspoons) salt
- 100 grams (about 1/2 cup) active sourdough starter, see notes above
- 450 grams (about 3.5 cups) bread flour, see notes above
Instructions
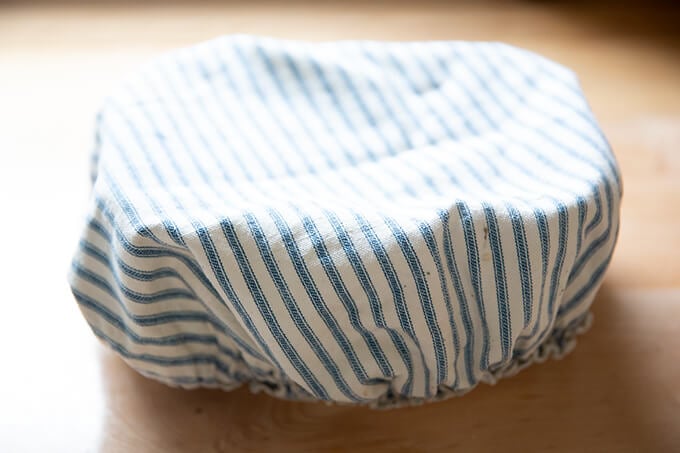
- Mix the dough: Place the water in a large bowl. Add the salt and stir briefly. Add the starter and stir briefly to incorporate. Add the flour, and stir until you have a wet, sticky dough ball. Knead briefly with your hands if necessary to incorporate the flour. Cover with a tea towel or cloth bowl cover and let sit for 30 minutes.
- Stretches and folds: With wet hands, grab one side of the dough, and pull up and to the center. Rotate the bowl a quarter turn, and repeat the grabbing and pulling. Do this until you’ve made a full circle. (Watch the video for more guidance. I do a few more pulls and turns in the video.) Cover the bowl. Repeat this process three more times at 30-minute intervals for a total of 4 sets of stretches and folds over the course of two hours. (In the video, I switch to coil folds for the last two sets of stretches and folds.)
- Bulk fermentation: Transfer the dough to a straight-sided vessel. Cover the vessel with a towel. Let rise at room temperature until the dough nearly doubles in volume (shoot for a 75% increase in volume). Times will vary depending on your environment and the strength of your starter. Recently, this has taken about 4 hours for me, but don’t worry if it takes longer for you. Cover vessel with a lid (ideally) or a towel (if you are using a towel, slick the top of the dough with oil to prevent it from drying out.) Transfer to fridge for 12-24 hours.
- Shape: Remove vessel from fridge. Remove lid. Sprinkle top of dough liberally with flour. Turn dough out onto a floured work surface. Pat dough into a rectangle. Sprinkle top with flour. Use a bench scraper to cut the dough in half vertically. Then make three cuts equally spaced in each half to create 8 small rectangles.
- Line a sheet pan with parchment paper. With floured hands, transfer each rectangle to the prepared pan, gently pulling outward. Cover the pan with a towel. Let stand for one hour.
- Bake: Heat oven to 475ºF. Transfer pan to oven and bake for 10 minutes. Lower heat to 450ºF, rotate pan, and bake for 10 minutes more. Remove pan from oven. Transfer ciabatta rolls to a cooling rack. Let cool for 20 to 30 minutes before slicing.
- Prep Time: 24 hours
- Cook Time: 20 minutes
- Category: Bread
- Method: Oven
- Cuisine: American, Italian
This post may contain affiliate links. Please read my disclosure policy.


502 Comments on “Simple Sourdough Ciabatta Bread”
Hi, my dough has been sitting on my counter for bulk fermentation for two hours and hasn’t even started to rise. As it’s 11p.m would it work to place it in the fridge even though it hasn’t doubled in size yet or is it bette4 to leave it on the counter until morning?
Thanks
Hi Rachel! Yes, place the vessel in the fridge. Tomorrow, you can take the dough out and let it rise at room temperature in the vessel until it increases in volume by roughly 75%. You can continue with the recipe from there.
I am super excited about this recipe and about to try. For the Baguettes are the cookie sheets what size should I look for? Is it a half sheet?
Thanks!
Hi Becca! A standard 1/2 sheet pan will work for 1 baguette placed on an angle. If you can get your hands on a larger sheet pan (something like this one, which is 21 x 15), you can fit both baguettes on the pan at once. Hope that makes sense!
Hello! I used an active starter consisting of 40% white flour, 40% whole wheat flour and 20% rye flour. I have just completed my first set of stretches and I have the impression that my dough looks more wet and sticky than yours. Maybe I should not have used this starter? Should I wait and see hoe it goes or add more flour? What do you recommend?
Thanks!
Hello! I have completed my first set of stretches and I have the impression that my dough looks more wet and sticky compared to yours on the video. Should I wait an see how it goes or add a bit of flour? (P.S I used an active starter consisting of 40% white flour, 40% whole wheat flour and 20% rye flour. would that be the reason it is that wet?) Thanks!
H! I have a feeling your starter is the reason the dough is a bit more wet. If you are able to email me a video of one of your stretches and folds, I might be able to assess better: alexandra@alexandracooks.com … or DM me on IG. Part of me feels you should just continue on as is; then make adjustments next time around by using less water. If it is impossibly wet (like soupy) you may want to add more flour.
So good! So simple! Your instructions, as always, are very easy to follow. The rolls turned out perfectly. Thank you.
Oh yay! So nice to hear this, Erika! Thanks so much for writing. It’s always a little scary putting a new bread recipe out into the world, so it’s wonderful to hear this worked out for you.
OMG! Sooo good. Easy peasy….love it. This will definitely go into my sourdough rotation.
Wonderful to hear this, Christine! Thanks so much for writing 🙂 🙂 🙂
I made this tonight and it was so good!!! It looked exactly like your pictures and it was so easy. Thank you! I really enjoy your blog.
Wonderful to hear this, Catherine! Thanks so much for writing and thanks for the kind words 🙂
HI Ali, I have wanted to attempt sourdough but now I have decided to with the posting of this recipe. I am getting ready to purchase the starter and then go for it. I also just subscribed to your sourdough course. I hope I don’t kill the starter due to my crazy schedule. Thank you! I can’t wait to make this ciabatta 🙂
Oh yay! Let me know if you have any questions along the way. Exciting! And don’t worry: starters are way more forgiving than you think 🙂
Hi Ali!
Can I leave the dough in the fridge for more than 24 hours? Unfortunately I started the process in the afternoon and I would like to bake them in the morning. For at least 12 hours gives me the baking time around noon so I need more hours for the next morning. All together it’s gonna be like 30-34 hours from the fridge to the oven. Next time I need better timing.
Love your recipe!
I think more fridge time should be just fine! Take it out when the timing works for you! Let me know how it turns out. Thanks for the kind words 🙂 🙂 🙂
Hi Ali,
This is rather last minute but after proofing overnight and stretching/forming/cutting, I have more ciabattas than will fit on the large baking sheet. Can two sheets bake at the same time, or would that affect end result?
Hi! Yes, definitely! I would rotate them front to back and top to bottom halfway through when you lower the temp to 450ºF. Alternatively, it is totally fine if one sheet pan hangs out for 20 minutes while the first sheet pan bakes. Hope they turned out OK! I’m likely not getting to you in time.
Thanks so much for all your recipes! I am big time on sourdough since last quarter of 2020. I tried your improvised baguette 🥖 today. It’s so amazingly yummy!
Oh yay! Lillian, so wonderful to hear this! Thanks so much for writing 🙂 🙂 🙂
Hi Ali, we just finished eating yummy sandwiches on these rolls! I followed the recipe as written and it worked perfectly for me (the video was super helpful.) Thank you for sharing!
Wonderful to hear this, Jennifer! Thanks so much for writing! Great to hear the video was helpful 🙂
Hi Ali,
We just made this recipe and it is delicious. We live in Canada and therefore took your suggestion to decrease the amount of water added. Instead of adding 360 grams of water we only added 260 grams and it worked great. We also floured our fingers when performing the stretch and folds instead of water to avoid adding more hydration to the dough.
They look just like yours. Yours instructions were very easy to follow. Thank you!
Question: To achieve darker bottoms, do you think it would be best to add a bit more cooking time at 475 degrees or at 450 degrees?
Susan
Oh yay! So nice to hear this, Susan! Thanks so much for writing and for sharing your experience — this will be so helpful for others from Canada who attempt the recipe.
To achieve darker bottoms, you could either do what you suggested or if you have a baking stone or Baking Steel, you could place the sheet pan on top of that.
Thanks again for writing!
For a darker bottom you could also try baking it lower in your oven.
Thank you! These were so easy, and so delicious! My family raved, and these will go into regular rotation. I made the recipe exactly as written, with Canadian all-purpose flour, and these were lovely and chewy, with a crispy crust. My dough didn’t look as smooth as yours, even after all of the stretch and folds, but the finished product turned out well.
Wonderful to hear this! And I’m so happy to hear your all-purpose flour worked out. Thanks so much for writing 🙂
This recipe was easy and delicious- as advertised.
Wonderful to hear this, Terry! Thanks for writing 🙂
Great results. Easy recipe. Will definitely make again. Only issue was the baking time. Mine took at least 40 minutes plus.
Great to hear, John! Thanks so much for writing!
This was delicious and very easy. Thank you for all of your terrific recipes and gorgeous photos. I had the issue that my ciabattas stuck to the parchment. What do you recommend to prevent that from happening next time?
Great to hear this, Susie! And thank you for the kind words.
Regarding the parchment: such a bummer! I’m sorry to hear this. I have had this happen to me before as well, and it was simply because the parchment I used was poor quality. Do you remember the brand you are using? I have success with Reynolds, If You Care, King Arthur Flour, and a few others I’ve purchased online. But I had a terrible experience with one online source (can’t remember which!) and everything I baked on it stuck.
You could try misting the parchment with nonstick spray if you don’t want to toss it.
Interesting. I buy it in packs from webstaurantstore as it is cheaper and much easier to store and use (no rolling as it is flat). I have never had problems with it but I usually use for cookies and brownies. I will try misting it. My husband who is a bread baker suggested using cornmeal…. which I could also try. Thanks again
Oh, well then it’s probably not the parchment paper! The dough is sticky. I think cornmeal is a great idea.
Does the dough need to come to room temp after it’s been in the fridge?
Nope! It will rest for 1 hour after you cut the dough into rectangles.
Hi Ali, if I want to avoid the temptation of eating all of these in one sitting, at what point can I freeze them, if at all (dough or cooked ciabatta)?
😂 Hi Tasha! I would freeze them post-baking (and cooling). Sourdough dough doesn’t freeze well for long periods of time, so your best bet is to freeze the baked rolls.
The recipe turned out fantastic! It even had the texture of high protein flour. Fabulous!
Wonderful to hear this, Elise! Thanks for writing 🙂
Hi again Ali, when I got to the stage of cutting the dough, I knew I’d gone wrong somewhere; the dough was sticky and a bit sloppy! I thought I’d cook the dough anyway, because of the time invested. The end result seemed to be a crunchy on the outside, with a slightly rubbery/spongy inside. Not a total disaster as the flavour was great. Do you think the dough was over fermented? I did notice lots of massive bubbles.
Hi Tasha! It does sound as though the dough overfermented. How long would you say roughly it was at room temperature before you transferred it to the fridge?
I can’t remember the exact time but possibly 8hours. It seemed to keep getting bigger after I’d put it in the fridge too. Perhaps I have a more active starter than I thought. I will persevere though, as it was only my 1st attempt and I’m determined to make these delicious rolls.
It sounds as though you do have a very active starter! My dough barely rises in the fridge. I think you could definitely shorten the room temperature rise if this is the case. Hope the next go around is more successful!
Just finished a very nice lunch – ham, cheese w/mustard on ciabatta!
Made half the recipe for four sandwich rolls – crispy crust, chewy crumb, excellent flavor! This recipe is a keeper!
Wonderful to hear this, Ken! Your sandwich sounds amazing. Thanks for writing!
Hi Ali,
Well I finally took the leap into SD with your beginer recipe & Breadtopia starter. Needless to say, I was shocked at how well my first loaf turned out! Followed your instructions, used BRM bread flour and baked in my old Romertopf clay pot ( I am an well seasoned baker, meaning old, and still have several bakers). I couldn’t beleive the oven spring of this loaf and it had a wonderful sour taste. I live at 4000ft with a dry, cold climate in Central Oregon.
Now I’m going to try your ciabatta recipe. I picked up an Emile Henry demi baguette baker that I found for a bargin and will bake 4 demi loaves.
Thank you for giving me the confidence to become a SD baker. I love all your recipes and videos. I still make your Peasant bread from time to time when I need a last minute bread fix adding fresh herbs & cheese.
Keep the faith 😊
PattiAnn
So nice to hear all of this, PattiAnn! And thank you for taking the time to write and share all of this. It’s great to hear, too, that it’s all working out at high altitude, which is something I have zero experience doing. I hope the demi baguettes turn out well!
I willl let you know how the demis turn out. Will bake this weekend.
As always, your recipe was a success!! Super easy to put together. So light and airy with such a nice crisp outside and just the right amount of chewiness. Thank you!
Wonderful to hear this, Hannah! Thanks so much for writing 🙂 🙂 🙂
hi, amazing recipe. very easy instructions to follow. I made it last night and it’s a winner. just perfect ciabatta bread. thank you very much!!!
Great to hear, Inna!
I’ve already commented on how much I love this recipe, but I just thought I’d share my second take on it. The first day during it’s bulk fermentation at room temperature, I accidentally let it triple in size but it didn’t over proof thank goodness. It was a very airy and fluffy marshmallow-like dough. Looked amazing. So I decided to test a piece by baking it off instead of refrigerating it for 12 hours. (I was afraid it would over proof since the first batch I made still rose some in the fridge) It baked up wonderfully airy and chewy. So many amazing air pockets! It was even better than the first batch! Sooo good. I added olive oil, garlic, flakey salt and dill to the top of the bread. The olive oil gave it a delicious crust. It was kinda like a focaccia in ciabatta form 😆 I wish I could post photos on here because it came out so well. So if anyone accidentally triples the volume of their dough in the first rise, just bake it off! Totally worth it!
Hannah, yay! Wonderful to hear this. I also wonder if even if you could get good results even with the dough doubling in volume? I’m so in the habit of letting sourdough chill in the fridge for some part of the fermentation time that I don’t ever try experimenting without … but it seems I should! Thanks for writing and for sharing.
Yeah I was curious about that too! But yeah if you need ciabatta that same day, I’d definitely try it! Your recipe is awesome 😎 the flavor was great
So nice to hear this, Hannah 💕💕💕💕💕
I am so excited to make these rolls. I have been baking sd bread now for a year and I have a great starter that is 50/50 white and wheat (following Tartine method). After mixing and a couple of s&f my dough looks nothing like yours, it’s quite soft and sticky. Do you ever check for a “window pane” to see if the gluten is developed? I am now at about 2.5 hours of the s&f and feel I just need to move on to the bulk proof. Is that right?
Hi Melissa! Is the white flour all purpose or bread flour? The dough definitely is sticky during the first two sets of stretches and folds, but it starts changing and becoming more elastic after 3 or 4. Are you wetting your hands to do the stretches and folds?
I never do the window pane test, but that shouldn’t deter you.
Yes, I stop doing stretches and folds after about 2 hours. Hope these turn out well!
Report back if you get a chance. My sense at the moment is that you might need to reduce the amount of water next time around.
Thank you for your reply. It did start to become much more elastic after about 5 s&f/c&f so I left it to bulk proof. It looks great this morning and I’ll bake later today, or tomorrow (taking them camping!). I have already decided to add less water on the next bake. I typically need to on my bread recipes too. It’s a bit humid here now with rain and cool weather. I’ll let you know how they turned out.
Oh good, great to hear! And how fun: camping! We’re camping Memorial Day weekend, and I just can’t wait 🙂
Hi Ali 🙂
Thank you for the best ciabatta recipe ever. Quick Q…after I cut my rolls, as they sit to rest, they seem to flatted out & start to meld into each other. Not sure what I doing wrong….maybe the hit dry Arizona weather, to wet, something! The taste and texture are out of this world, but I know I missing something. Any help would be greatly appreciated. Thank you !!!
Hi Liane! It sounds as though the dough might have over-fermented a bit, but, that said, if the texture was good in the end, then they probably didn’t over ferment.
Questions: what type of flour did you use? Did you use a scale?
I’m thinking you might need to cut the water back slightly.
I make this recipe a couple times a month. It’s perfect and my family loves the sandwiches we make with it!!
Great to hear, Aurea!
After laboring over this for 2 days I got 8 tasty, crispy, puffy ciabattas that have parchment paper stuck to the bottoms. A warning would have been nice.
Really sorry to hear this, Cindy. I have had issues with parchment paper sticking to things but it was due to the brand of parchment I was using. Unfortunately, not all parchment is created equally. Have you had issues with your parchment sticking to other things? Do you recall the brand?
Thank you! I was nervous about this as I had just made a different sourdough ciabatta recipe that turned out ok but not great (King Arthur). This recipe was much simpler, and so much more successful! The dough was really wet and sticky to start although it came together a bit more during the stretching phase. It didn’t rise too much after I made my cuts and I was worried it would come out flat like the other recipe but in fact it rose beautifully in the oven to give me perfect ciabatta. Great recipe and super easy to follow.
So nice to hear all of this, John! I love watching the dough transform from sticky and messy to smooth and elastic over the course of the stretches and folds. So satisfying!
Can I use my own starter. 30g starter fed with 60g flour and 60g water. Flour is 1/2 whole grain 1/2 AP flour
Yes, absolutely!