
Simple Sourdough Ciabatta Bread
This post may contain affiliate links. Please read my disclosure policy.
Last month, while posting a photo of this brioche loaf on Instagram, I posed a question: If 2020 was the year of banana bread and focaccia, what will be THE bread of 2021?
Which bread, I asked, did everyone want to learn how to make most?
Of all the responses, which included everything from fougasse to hoagie rolls, a crusty baguette was the most frequently cited, ciabatta following closely behind.
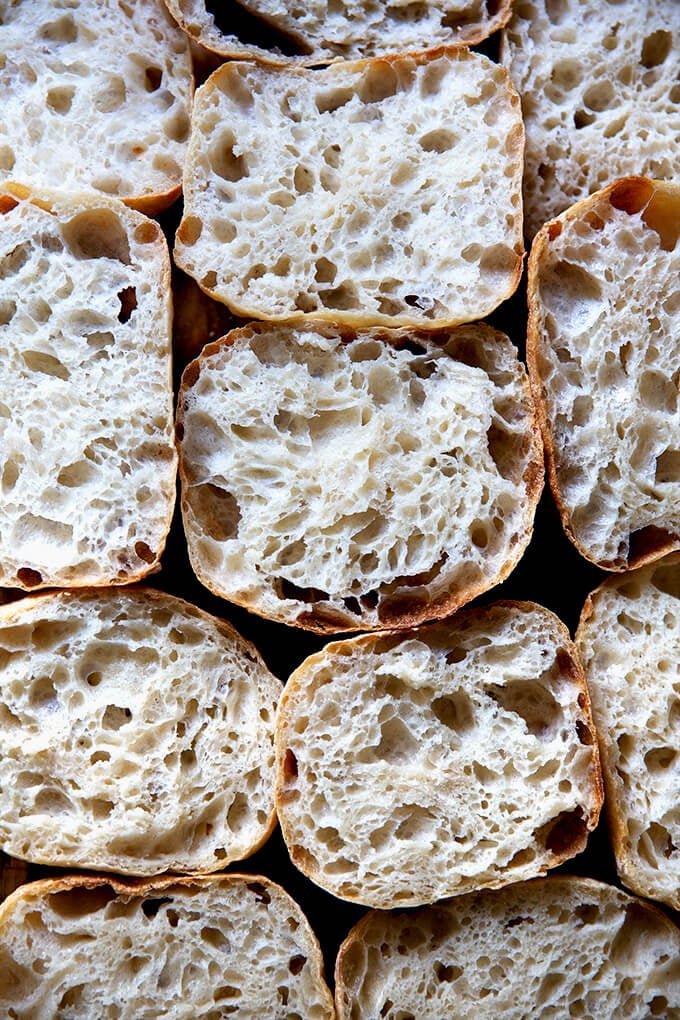
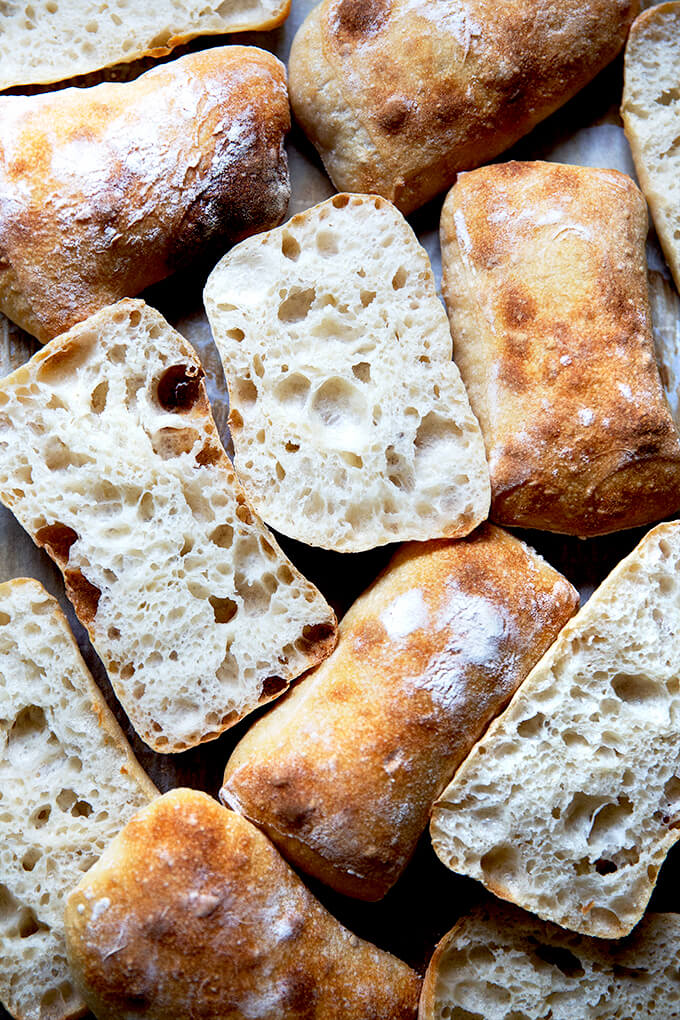
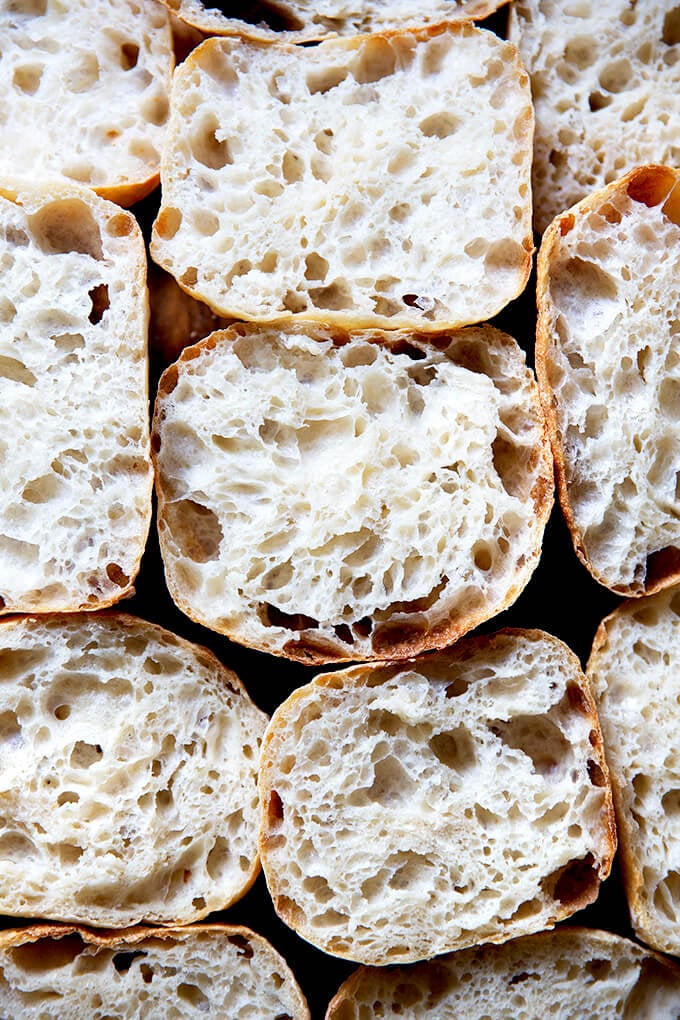
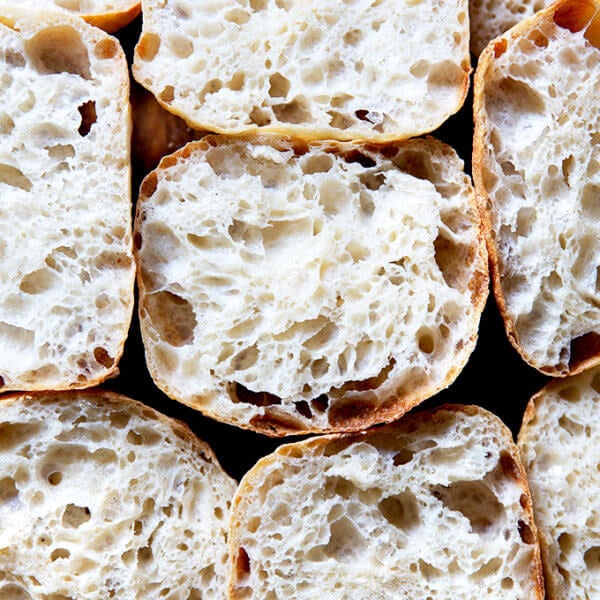
I’m excited to say today, after a few weeks of experiments, I have a wonderful sourdough ciabatta recipe to share. It has a thin, but crisp crust, a beautiful honeycomb crumb, and a lovely lightness and chew. It’s perfect for sandwiches.
And best of all: it’s truly simple. Made with four ingredients, this recipe requires neither an autolyse nor preferment, neither a preheated Dutch oven nor baking stone. If you have a sheet pan, you’re good to go.
What’s more, there’s no shaping or scoring, no balling up dough or creating tension. Truly, after the bulk fermentation, which includes some fridge time, you turn the dough out onto a floured work surface, pat it into a rectangle, and divide it into 8 roughly equal pieces. You then transfer those pieces, irregularly shaped and all, to a sheet pan, and bake them one hour later.
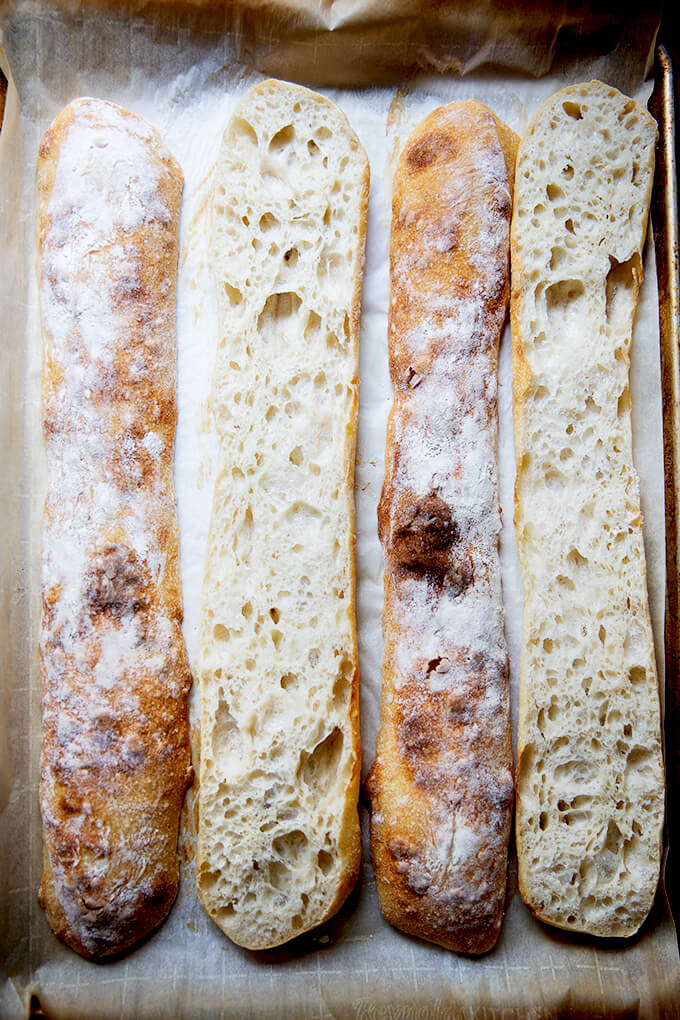
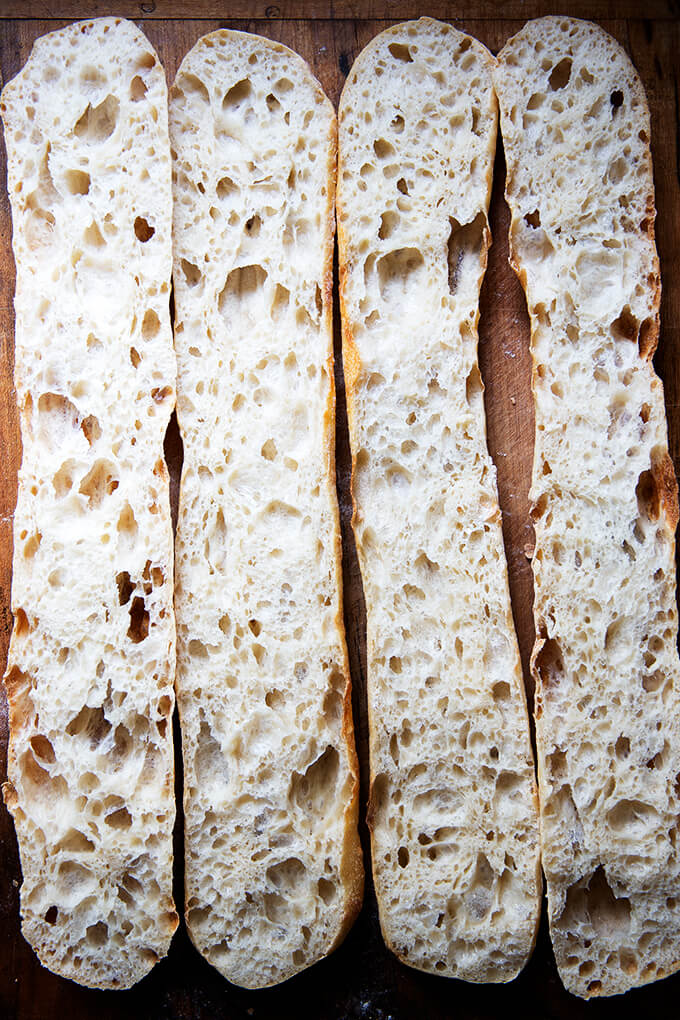
But can I tell you the most exciting part? This dough makes a decent — a more than decent — baguette! It’s not super crusty, but it’s a nice baguette nonetheless, flour-dusted and unscored, with a crumb and flavor better than any other I’ve attempted previously.
Friends, I hope you love this recipe. It’s on par with this sourdough focaccia recipe in terms of simplicity and effort, but it’s a totally different animal. I can’t wait for you to give it a try.
PS: If sourdough isn’t your thing, please try this yeast-leavened ciabatta bread recipe.
This post is organized as follows:
- 3 Tips for Sourdough Success
- What is Ciabatta?
- Sourdough Ciabatta, Step by Step
- Ciabatta Sandwich
- Sourdough Ciabatta “Baguettes” 🥖🥖🥖
3 Tips for Sourdough Success
Before you get started with this recipe, here are my three tips for sourdough bread baking.
- It starts with your starter.
- This will sound obvious, but: it starts with your starter. Before you mix a loaf of sourdough bread, you must ensure your starter is bubbly and active. I like to feed my starter at night before bed, let it rise and fall overnight; then feed it again in the morning. By midday, it’s ready.
- Use a digital scale.
- I say this all the time, but using a scale to measure the ingredients for a loaf of sourdough bread makes all the difference. So much of sourdough bread baking is simply a matter of using the precise amount of water given your environment and given the flour you are using. If you use cups to measure you are simply not being precise, and as a result, you will not be able to make meaningful adjustments should the recipe as written not work out perfectly.
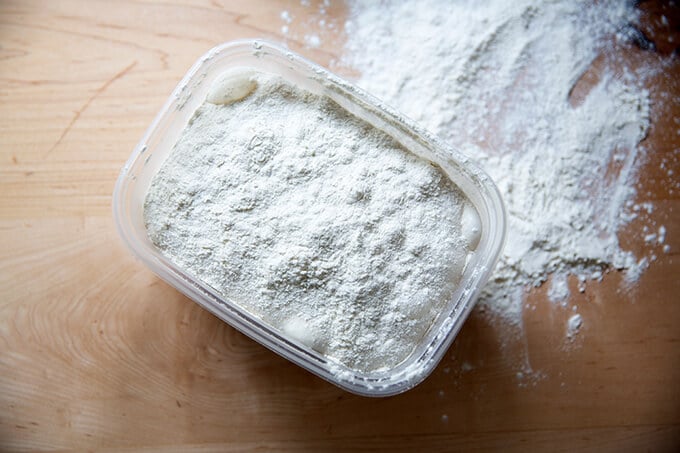
- Use a straight-sided vessel for the bulk fermentation.
- With sourdough bread baking, one frequent problem bakers run into is over-fermentation. If you let the first rise go too long, the dough will over-ferment and become a sticky, unsalvageable mess. A straight-sided vessel allows you to see when your dough has truly increased in volume by 50%, 75%, 100% or whatever volume increase you are after.
- The vessel I use in this recipe, similar to this one, is 8 cups. Most grocery stores carry storage vessels similarly sized.
What is Ciabatta?
- Originating from the Lake Como region of northern Italy, ciabatta means “slipper” in Italian. Traditional ciabatta is characterized by this slipper shape as well as an extremely porous and chewy texture.
- Traditionally, ciabatta dough is very wet, calls for very little yeast, and requires a long, slow rise.
- Traditional recipes, too, often call for making a biga (a preferment), which helps produce that light, porous texture.
Sourdough Ciabatta, Step by Step:
Gather your ingredients: bread flour, water, salt, and a sourdough starter. I am a proponent of buying a starter (see recipe box for sources), but if you are up for it, you can build a starter from scratch in just about 1 week.
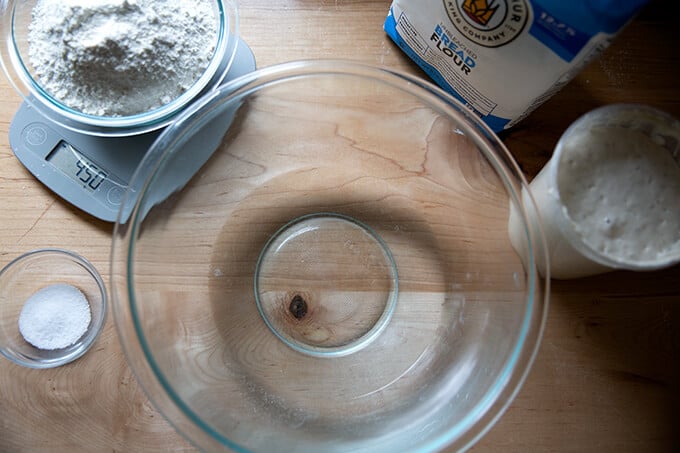
For this recipe, you’ll need: 100 grams sourdough starter, 360 grams water, 450 grams flour, and 12 grams salt. It’s 80% hydration.
Mix together the water, sourdough starter, and salt.
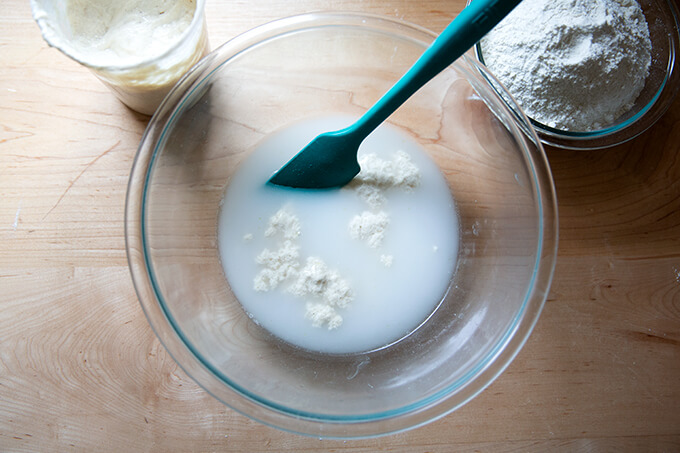
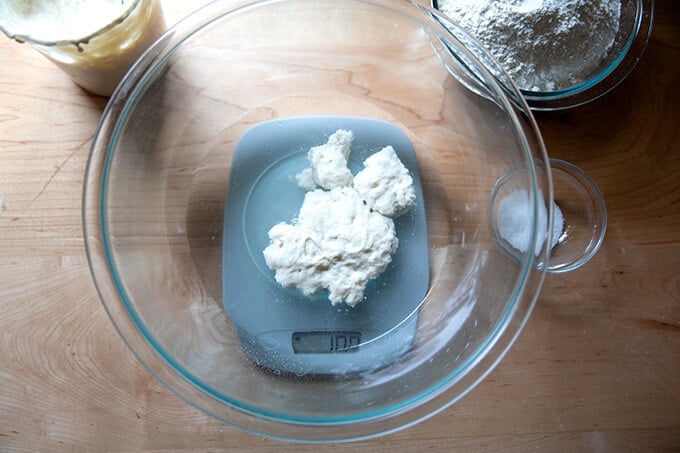
Add the flour and mix to form a sticky dough ball.
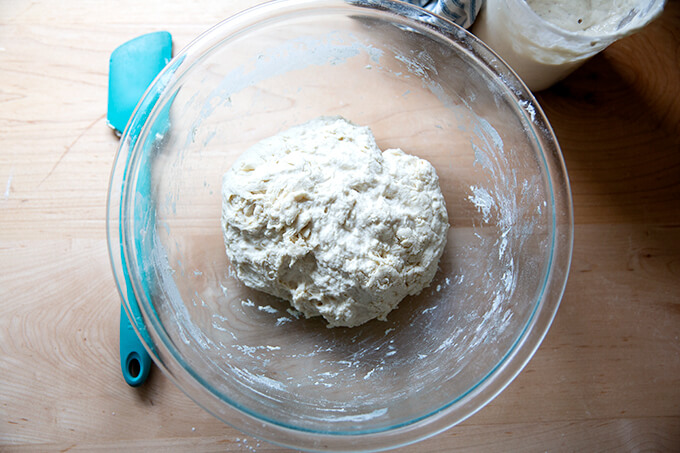
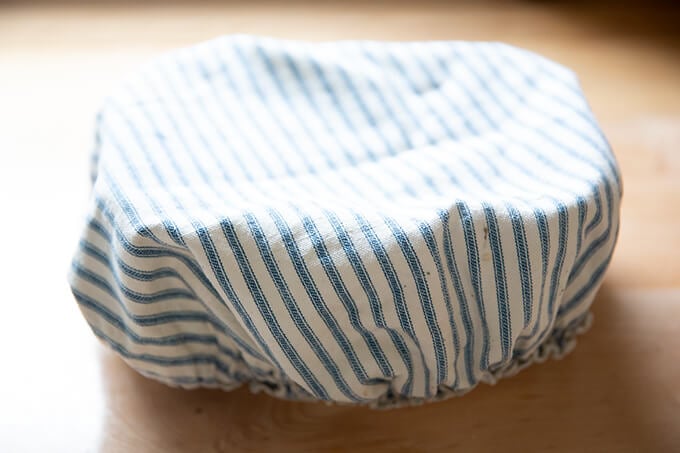
Cover the bowl and let rest for 30 minutes. Then perform a set of stretches and folds. See the video above or in the recipe box for guidance. This is what the dough will look like after one set of stretches and folds.
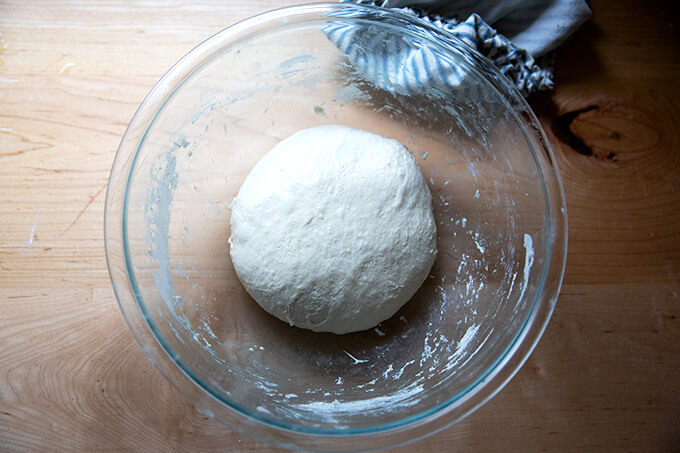
This is what the dough will look like after 4 sets of stretches and folds.
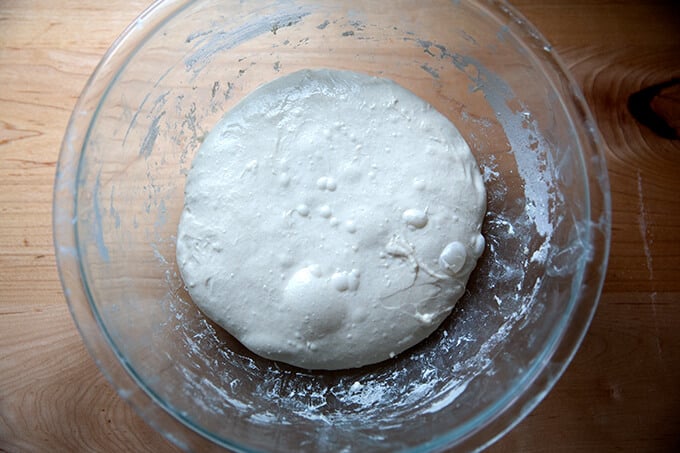
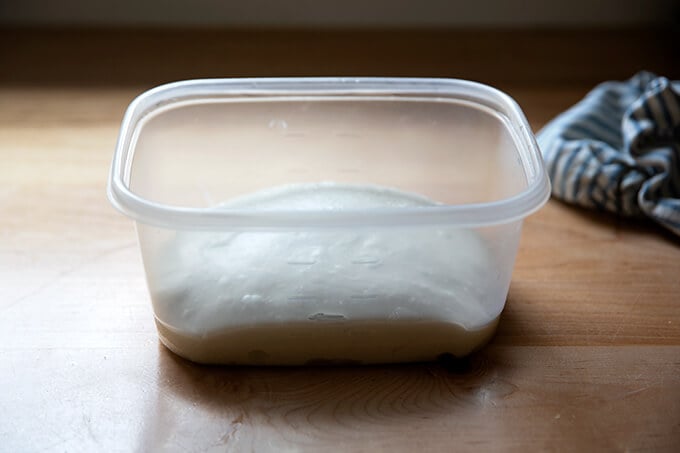
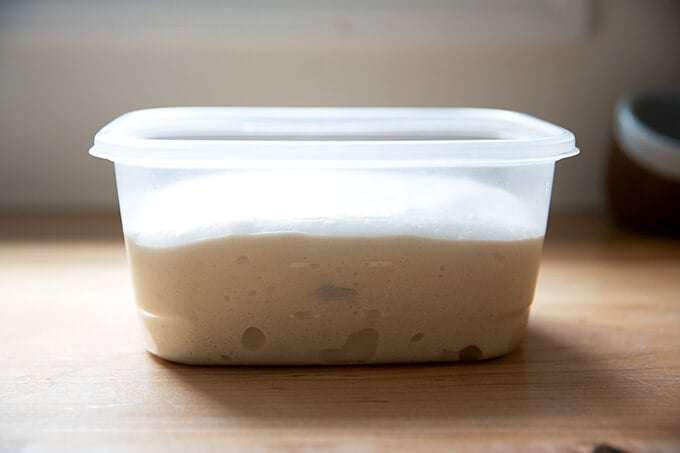
Transfer dough to a straight-sided vessel (this one is 8 cups, but anything similarly sized will do) for the bulk fermentation (the first rise):
Mark the height of the dough on the vessel, cover the vessel, and let the dough rise until it increases in volume by roughly 75%.
When the dough has increased by 75% (roughly), place a lid on the vessel, and transfer it to the fridge for 12-24 hours.
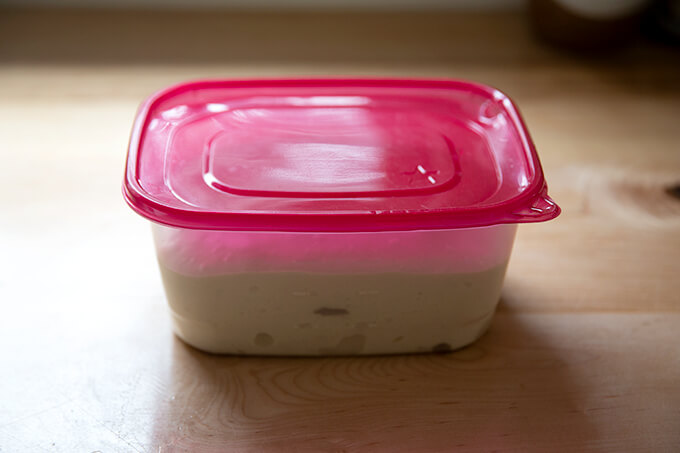
When ready to bake, remove the vessel from the fridge.
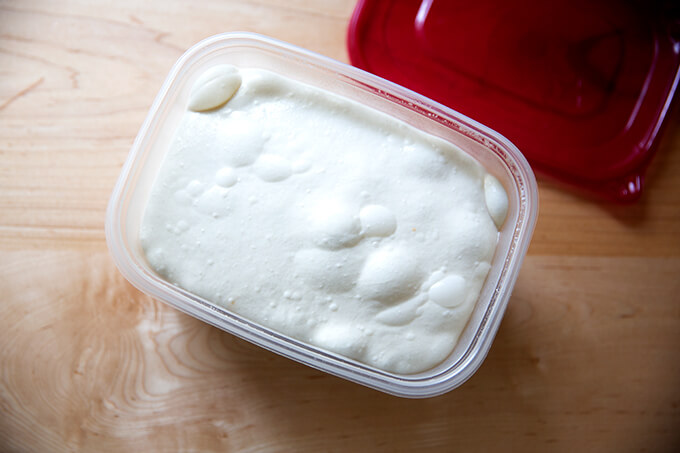
Dust the top of the dough liberally with flour. Dust a work surface liberally with flour, too.
Turn the dough out onto the prepared work surface.
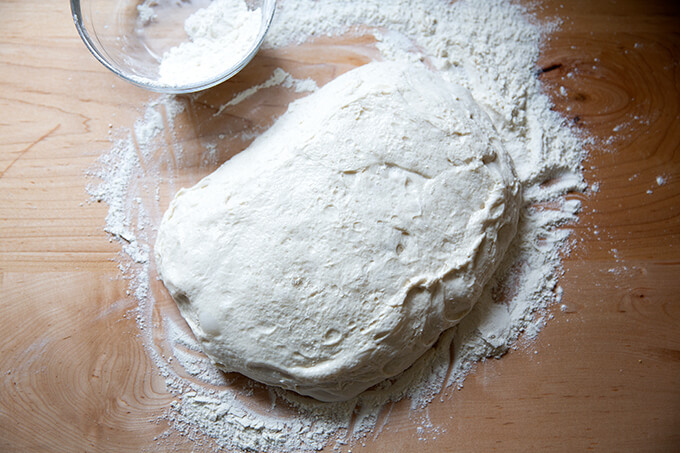
Pat the dough into a rectangle.

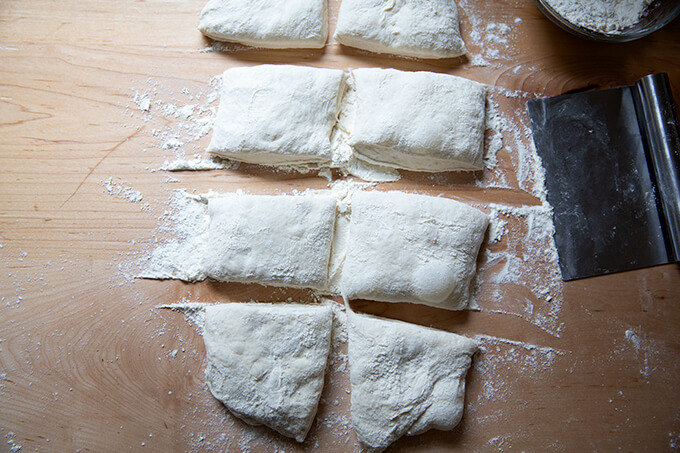
Cut the rectangle into 8 roughly equal portions.
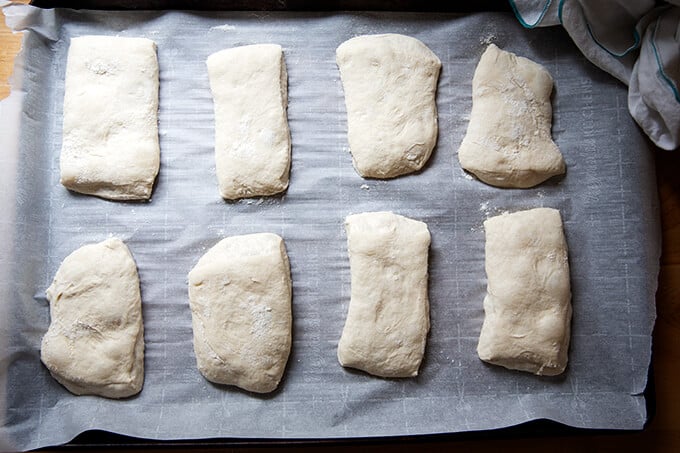
Transfer the portions to a parchment-lined sheet pan. Let rest for 1 hour. Then transfer to a 475ºF oven for 10 minutes. Lower the heat to 450ºF and bake for 10 minutes more.
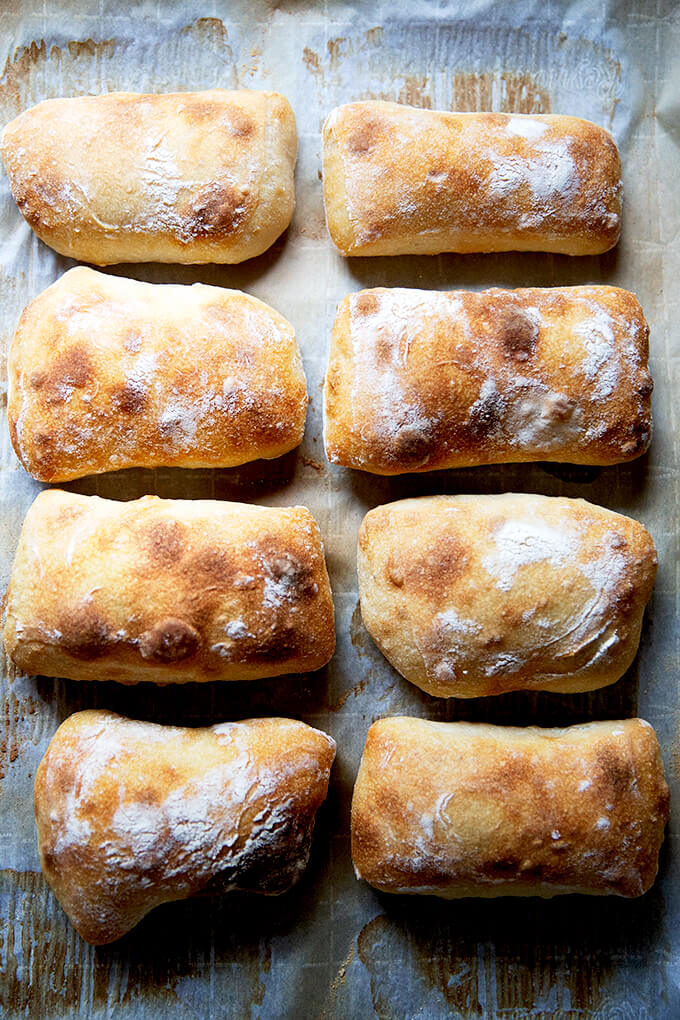
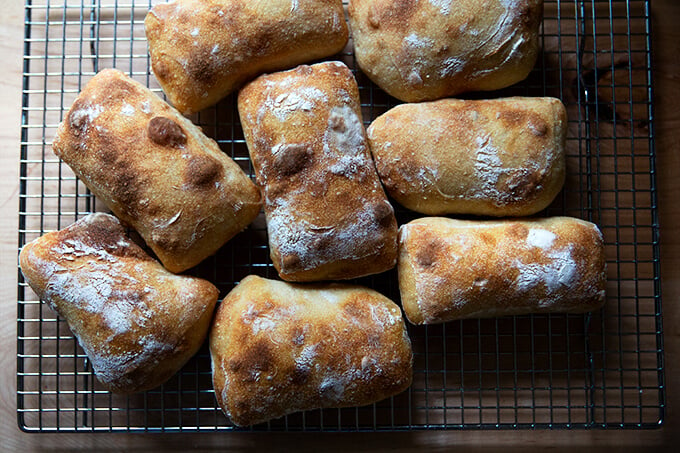
Transfer the rolls immediately to a cooling rack, and let cool for at least 20 minutes before cutting.
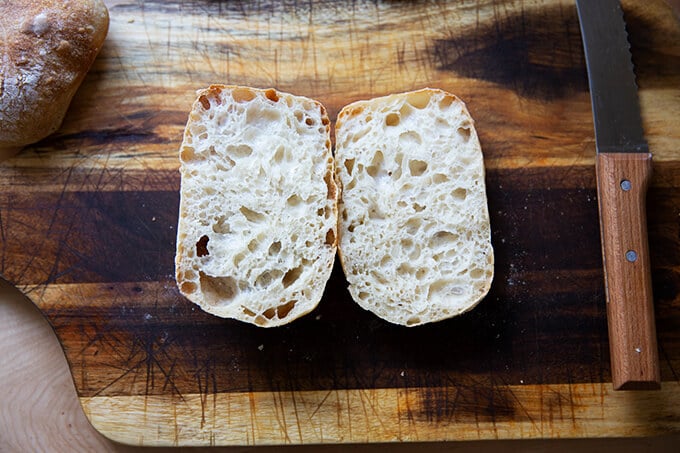
How pretty is that crumb?
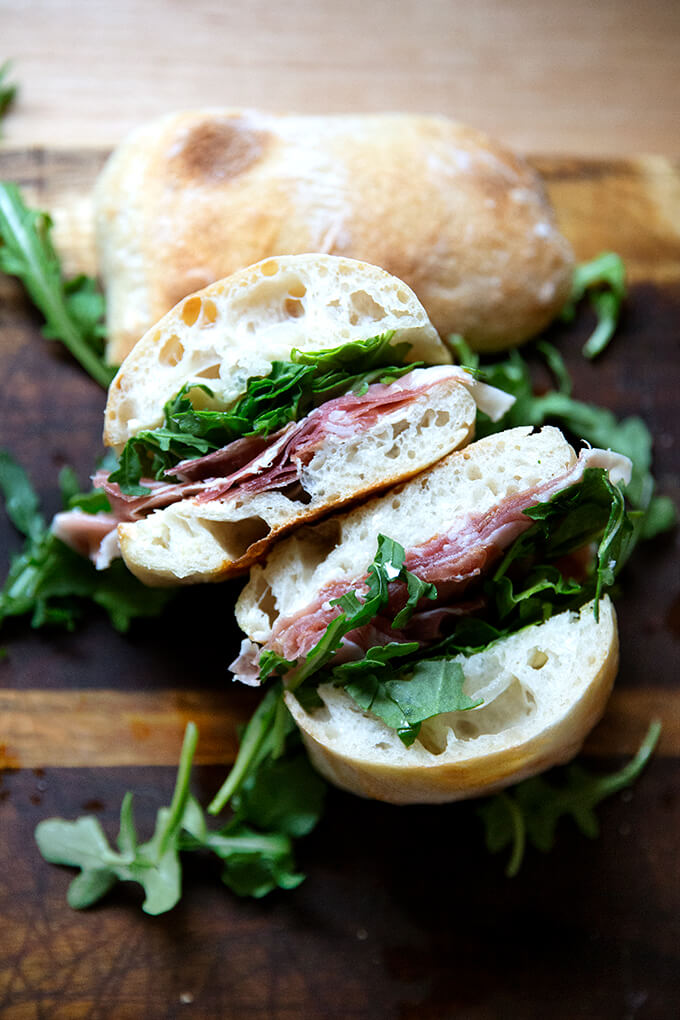
Ciabatta Sandwich
I have written about this favorite sandwich before, so forgive me if you know the story. It comes from Gabrielle Hamilton’s Blood, Bones, and Butter, a favorite book, and it’s something Gabrielle’s ex-husband, Michele, made for her during their courtship. If you have the book, the story is on page 163.
In short, the success of the sandwich relies on a delicate balance: “the perfection of three fats together — butter, olive oil, and the white fat from prosciutto or lardo.” To make it, spread good bread with “cool waxy butter,” top with prosciutto (more than you think), and arugula. Drizzle it all with good olive oil.
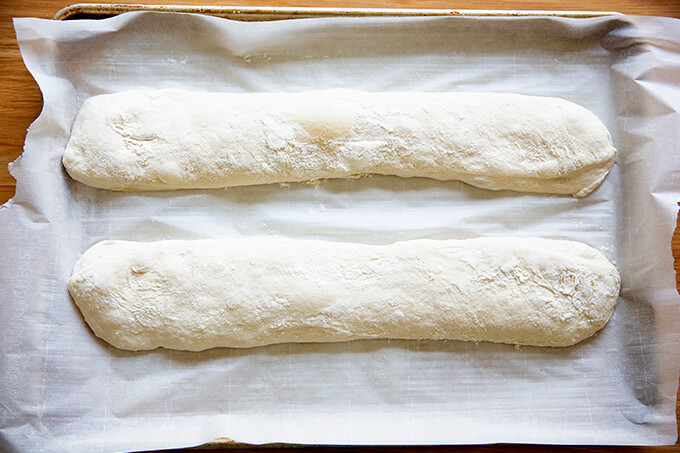
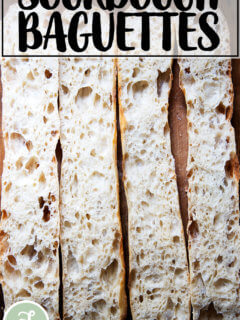
Sourdough Ciabatta “Baguettes” 🥖🥖🥖
To make baguettes, follow the same process, but instead of dividing the rectangle of dough into 8 portions, divide it into two. I find an extra-large sheet pan to be necessary to bake both baguettes at the same time. If you don’t have an extra-large sheet pan, I would bake one baguette at a time, and orient it at a diagonal angle from one corner to another.
Bake the baguettes at the same temperature and for the same amount of time as the rolls.
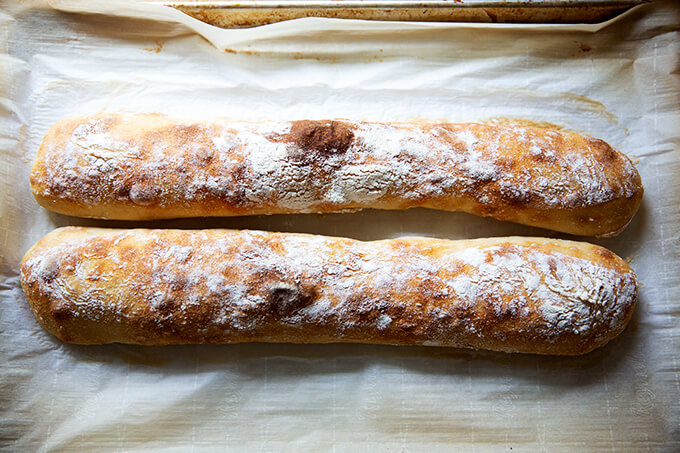
Not bad for the effort, right?
These ciabatta “baguettes” would be great vessels for giant sandwiches. I’ve been craving Bahn mi since
Simple Sourdough Ciabatta Bread
- Total Time: 24 hours 20 minutes
- Yield: 8 Rolls
- Diet: Vegan
Description
Notes:
- You need an active sourdough starter. You can build a starter from scratch in just about 1 week. But I am a huge proponent of buying a starter. Here are two sources:
- As always, I highly recommend investing in a digital scale before beginning any bread baking adventure.
Flour: I have had success using all-purpose flour, but if you can get your hands on bread flour, that is ideal, especially if you live in Canada or abroad. Moreover, if you live in Canada or abroad, you may need to reduce the water amount. Consider holding back some of the water during the mixing process to ensure you don’t end up with a soupy mess.
Straight-Sided Vessel:
- The vessel I use in this recipe, similar to this one, is 8 cups. Most grocery stores carry storage vessels similarly sized.
- Using a straight-sided vessel for the bulk fermentation will help prevent over-fermentation because it allows you to see when the dough has truly increased by 75% (or slightly more or less) in volume.
Ingredients
- 360 grams (about 1.5 cups) water
- 12 grams (about 2 teaspoons) salt
- 100 grams (about 1/2 cup) active sourdough starter, see notes above
- 450 grams (about 3.5 cups) bread flour, see notes above
Instructions
- Mix the dough: Place the water in a large bowl. Add the salt and stir briefly. Add the starter and stir briefly to incorporate. Add the flour, and stir until you have a wet, sticky dough ball. Knead briefly with your hands if necessary to incorporate the flour. Cover with a tea towel or cloth bowl cover and let sit for 30 minutes.
- Stretches and folds: With wet hands, grab one side of the dough, and pull up and to the center. Rotate the bowl a quarter turn, and repeat the grabbing and pulling. Do this until you’ve made a full circle. (Watch the video for more guidance. I do a few more pulls and turns in the video.) Cover the bowl. Repeat this process three more times at 30-minute intervals for a total of 4 sets of stretches and folds over the course of two hours. (In the video, I switch to coil folds for the last two sets of stretches and folds.)
- Bulk fermentation: Transfer the dough to a straight-sided vessel. Cover the vessel with a towel. Let rise at room temperature until the dough nearly doubles in volume (shoot for a 75% increase in volume). Times will vary depending on your environment and the strength of your starter. Recently, this has taken about 4 hours for me, but don’t worry if it takes longer for you. Cover vessel with a lid (ideally) or a towel (if you are using a towel, slick the top of the dough with oil to prevent it from drying out.) Transfer to fridge for 12-24 hours.
- Shape: Remove vessel from fridge. Remove lid. Sprinkle top of dough liberally with flour. Turn dough out onto a floured work surface. Pat dough into a rectangle. Sprinkle top with flour. Use a bench scraper to cut the dough in half vertically. Then make three cuts equally spaced in each half to create 8 small rectangles.
- Line a sheet pan with parchment paper. With floured hands, transfer each rectangle to the prepared pan, gently pulling outward. Cover the pan with a towel. Let stand for one hour.
- Bake: Heat oven to 475ºF. Transfer pan to oven and bake for 10 minutes. Lower heat to 450ºF, rotate pan, and bake for 10 minutes more. Remove pan from oven. Transfer ciabatta rolls to a cooling rack. Let cool for 20 to 30 minutes before slicing.
- Prep Time: 24 hours
- Cook Time: 20 minutes
- Category: Bread
- Method: Oven
- Cuisine: American, Italian
This post may contain affiliate links. Please read my disclosure policy.


496 Comments on “Simple Sourdough Ciabatta Bread”
Thanks for sharing! Does it keep long?
I would say for up to a week in an airtight bag. Always reheat day-old bread to revive it!
Hi, i tried this recipe twice and both times my bread came out sticky/doughy inside. Any tips on how I can fix that issue?
Hi Nelli! Can you tell me a little bit more about your experience? Is your starter strong and reliable? As in, have you made other sourdough breads successfully? Did the bulk fermentation go OK? Did the dough feel strong after the bulk fermentation? As opposed to very loose/wet/without structure?
My starter is very active, but I think I over ferment it. I let it double in size, then leave it in the fridge overnight where I believe it still ferments. Could over fermenting cause this?
Yes, overfermentation could definitely be the cause! How long was your bulk fermentation?
6 hours, but it was also in a warmer spot. I’m trying once again today, keeping my fingers crossed.
So I made it again, this time shortened the fermentation and it still was gooey in the inside. Do you think I need to raise the temperature in the oven to maybe 500°? I see that after you do the pull and fold you turn it over itself a few times, mine is too sticky to do that, maybe my dough is done wrong?
Are you using a scale to measure the ingredients? What type of flour are you using? Where are you located?
Yes I’m using a scale and organic King Arthur bread flour. I’m located on the East coast of USA. Do you think it makes a difference if I use a convection oven?
OK, I’m a little stumped here. I’m thinking you may need to reduce the water. Convection will make the bread brown more quickly.
I’ve made this twice- once as baguettes and once as ciabatta rolls. Somehow when I made the rolls I forgot to fully let it bulk ferment and stuck it in the fridge after it was probably only 25% risen (no clue what I was doing hahah). I worried that they’d be too dense, but they actually came out fine! I never thought of Sourdough as “forgiving” but I feel like this recipe is! Thanks for sharing, Ali!
So nice to hear this, Caroline! I do think that using the fridge makes magical things happen 🙂 🙂 🙂 And I would agree: I do not think of sourdough as being forgiving, but this one and this sourdough focaccia definitely are on the forgiving side. Thanks for writing!
Thanks for this and your other great sourdough recipes! I live in a humid country and heeding the adjustments to temp and amt of water, they all work fabulously for me.
Wonderful to hear this, Leah! Thanks so much for writing and sharing.
My second attempt turn out great!
Great to hear, Kristy! Thanks for writing 🙂 🙂 🙂
Such a fabulous and easy recipe! I’m in Canada and definitely need to reduce the water amount listed for it to turn out properly.
Do you mind telling me what kind of bread knife you’re using in the video? I’m in the market for a new one!
Great to hear, Lindz! Thanks for writing. It’s this Opinel bread knife — I love it!
My dough is about ready to bake. I’m wondering whether I can bake it on my baking steel (which I bought at your suggestion) , and if so, should I be heating to steel for a certain amount of time as one does with pizza? I am VERY happy with the results with your sourdough pizza recipe and the baking steel!
Hi Cathy! I’m likely too late here. You can definitely bake these on the Steel, but I would place them on the baking sheet and then place the baking sheet on the Steel as opposed to trying to bake them directly on the Steel — I worry the bottoms will get too dark if you bake them directly on the Steel. I would heat the Steel for as long as it takes your oven to get up to temperature — it’s not as critical with this recipe as with pizza for it to preheat for 45-60 minutes before using it. So glad you like the Steel!! I find it makes all the difference with pizza.
I threw caution to the winds and went ahead and baked my ciabatta loaves (2 long ones instead of 6 smaller ones) on parchment on the steel after just preheating the oven to 475. I was afraid the bottoms would get too dark as well, but they turned out perfectly. A big hit with my family! I’ll post pics of the result on Instagram, since I don’t seem to be able to do it here.
Oh yay! I’m so happy to hear this, Cathy 🙂 🙂 🙂 Glad you went with your instincts. Yes, unfortunately, there’s no way to upload photos in the comments section here … I would love to add that feature.
Made the little ciabatta breads and ate them all before I could use them for sandwiches – oops! So delicious. Added to my list of favorite bread recipes 🙂
🤣🤣🤣🤣🤣 It happens! Thanks for writing and sharing 🙂 🙂 🙂
Perfection. My favorite sourdough recipe thus far. Great recipe. I actually left my dough in the fridge an extra 24 hours because I got busy yesterday and results were still great. Thanks fsharing your knowledge with us.
Great to hear, Nancy! Thanks so much for writing 🙂 🙂 🙂
These are great! Was psyched to find a recipe that didn’t call for commercial yeast but still had the right ciabatta crumb and texture! Was curious whether you’ve experimented with steam to get a softer/chewier crust? Thanks!
Great to hear Bailey! Thanks for writing. I have not experimented with steam.
Made rolls and baguettes. Both excellent. Adhered to recipe. I’m in dry climate in California. These froze very nicely and did not lose texture or taste with thawing
Great to hear Michele! Thanks so much for writing and sharing your notes.
Hey! Thank you you all these fab bread recipes!
Just wondering, when I make your focaccia, should I/ can I also do the stretches and folds like how you do them in this recipe?
Thanks
Alila
Hi Alila! You can, but it’s not necessary. I like to simplify recipes whenever I can, but if you enjoy the stretches and folds, you can’t hurt it 🙂
I made this and my dough hasn’t risen. My starter passed the float test but hasn’t passed my sharpie line on the container. Any thoughts as to why or what I can do to help?
Hi Hope,
Have you had success with other sourdough bread recipes? Can you tell me about your starter? Is it homemade? After you fed it, how long did it take to double in volume? Are you using a scale?
Love this recipe! Just wondering if there is a trick to make it less crusty? Something I can do while I bake? Would baking it with steam help? Or is that going to make it more crusty? Thanks!
Hi Alila! I’m not sure … I feel like people usually use steam to encourage crustiness. My only thought would be to wrap them in tea towels as soon as they come out of the oven. This technique is used with flatbreads to keep them pliable.
Hey Alexandra,
Thanks for sharing this recipe.
Question….how do you feed your starter on the morning of the preparation of the dough? Some recipes call for 30g starter to 50g flour and 50g water for a longer fermentation. Do you use the regular measurements to feed…. As in feed as normal?
Hi! Yes, I feed my starter a normal amount (50 grams each flour and water … sometimes a little more). I love to feed my starter at night before bed; then again in the morning. Then I’m ready to mix dough by midday.
My favorite easy sourdough recipe – we live full time in a Travel trailer at Florida state parks . I have to use a portable oven and it’s just not big enough to make the big loaves so I make this dough once a week . I have great success keeping it in the fridge and just baking off two rolls at a time . Make the dough on Saturday for Sunday morning ciabatta/ smoked salmon and mimosas. Then use the same dough throughout the week for fresh bread or fill it for Stromboli . I just use kitchen scissors to cut off some dough
Yes it’s an extra wet dough but that adds to the airiness after it’s baked and it’s an extra forgiving dough. Do my rolls look “rustic” Yup but they taste just as good as if they were pretty and perfectly square
Wow, I love this all so much. Thank you so much for taking the time to write and share your notes. Your Sunday ritual of ciabatta, smoked salmon, and mimosas sounds absolutely dreamy. And I love that you use this recipe to make stromboli, which I love, but which I have not yet attempted to make at home.
I have to tell you this has become my favorite sourdough “rainy day” bread; I call it that because it is pretty hands on, so I have made it while I am inside for most of the day. I tried as ciabatta rolls and tonight we had the baguettes; one is already gone. 🙂
The time invested is so worth it. I am very experienced baker but I have to say this has shot to the top of my list for my and my family’s favorite sourdough.
Can’t wait to try out some of your other recipes! Thanks so much.
So great to hear this, Beth 🙂 🙂 🙂 Thank you so much for writing. It’s one of my favorite sourdough bread recipes as well. Wonderful to hear your family approves, too.
Thanks for sharing! Do they keep long?
Yes! Store in an airtight bag at room temperature for up to a week. Or freeze for up to 3 months.
This recipe works perfect each time, you cant go wrong with it. Of course every sourdough recipe requires basic knowledge of making sourdough and dealing with starter. My cooking time is a lot shorter than suggested. It cooks in 12 min in my oven. Thanks for the easy recipe
Great to hear, Dotti! Thanks so much for writing 🙂 🙂 🙂
Great ciabatta recipe! Just follow and it turn out great!
Great to hear, Paula! Thanks for writing 🙂
Hi! Alexandra, I’m currently living in Vietnam, the weather is 28c everyday, for the bulk fermentation time, how long do you think I should do it roughly? And should i reduce time for every steps? Thank you!
Hi Vicky! It’s hard for me to say. I would suggest relying on the visual cues more than the timing. You likely will need to reduce the time, but reference the photos and the video for the visual cues, and go from there. Good luck!
Hi Alexandra! So far my dough is looking good!! I’m so surprised! The dough now is in cold fermentation since yesterday 11pm and now is 6pm. I have a question, can I leave the dough in the fridge longer? Since it hasn’t double yet and not many big bubbles on the surface, but lots underneath and sides too. 🙂 I’m planning to wait until next morning, but I worry if it’ll overproofed?
Great to hear, Vicky! And yes, it should be fine to leave in the fridge longer. Go for it!
Thanks for sharing! Does it freeze well?
Yes!
Love this recipe! Just wondering how it would change the structure of the bread if added a bit (2TBLS each) of olive oil and honey to enhance the flavor? I’m assuming you may need to reduce the water in this case as well. Thoughts?
Hi! I’m not sure how those additions would change the structure … my guess is that the crumb might be a little tighter. I think reducing the water slightly (25 g or so?) is a good idea.
This is my new go to for “Chewbacca” rolls (kids…🤷🏽♀️) so easy and so good. Thank you!
Ha! Love it 🙂 🙂 🙂 Thanks so much for writing and sharing. Totally going to adopt the name “Chewbacca” for these rolls moving forward 🤣🤣🤣
Hello Alexandria! My question is:
Do you still use 100g of Sourdough in the summer for your Ciabatta? I noticed in some of your other sourdough recipes you use less.
I do! I actually always use 100 grams of starter in nearly all of my recipes now 🙂
Best sourdough recipe I’ve tried bar none! Have always thought that ciabatta would be beyond my capabilities, but I got great results with this easy to follow recipe. Just made a toasted panini using this bread. As good as you’d get in an Italian deli! (Note: as suggested in the instructions, I reduced the water a little (by around 40-50ml) for my second batch, which kept the dough a bit more manageable and less fluid, so retained shape better). Looking forward to trying some of your other recipes!
Wonderful to hear this, Mark! Thanks so much for writing and sharing your experience. I think this is my favorite bread for sandwiches — the crisp crust, the porous crumb… it’s a perfect combo!
This is a great recipe! I like the wetter dough and the shorter fermentation than I was using. Also, a hotter oven. I tweaked a few things for my taste, but overall very happy. Thanks.
Great to hear, Cindy! Thanks so much for writing 🙂 🙂 🙂
This is the first time I’ve used sourdough and your recipe for ciabatta rolls is brilliant. It worked great first time and the rolls are just right for me. I’m thinking of doubling the ingredients the family love it so much.
Do you increase all ingredients by 2 or would that be too much starter?
Thanks for making my adventure in sourdough successful.
Hi Helen! Great to hear all of this. Yes, I would double the starter as well. Thanks for writing!
Hi! Quick question. My first batch, while delicious, did not rise a lot and were more like pita pockets than sandwich rolls. I’m attempting a second batch now but, same as my first batch, the dough doesn’t seem to rise much in the fridge. Should I be doing less time in the fridge? More? Is it a starter issue? Thanks!!!
Hi! Sourdough doesn’t change much visually in the fridge, so don’t worry about that part. I am concerned about your starter. Can you tell me about it? Is it homemade? Does it double in volume within 6 hours of feeding it? How do you feed it? Have you made other sourdough breads successfully with it?
I’ve made bread recently with it, it doubles in size within 6 hours. I usually feed it with 30g water, 30g flour, I fed it a bit more recently with more 40g to get more starter for this recipe.
OK, good to hear. My only thoughts are to really try strengthening your strater before you try again. I like to feed it at night and then again in the morning, so that by mid-day it’s really strong. Be aggressive with how much starter you discard every time you feed it — there should only be 1 to 2 tablespoons of starter left in your container when you feed it with fresh flour and water.
Also: if your dough felt very wet and sticky, it’s possible you need to reduce the water in the recipe. Finally, do you think the dough over-fermented by any chance?
I started playing with sourdough at the front end of the c word like many others and had many flops until i started following your recipes! This ciabatta and your sourdough focaccia are my absolute favorites (and my families, and my friends, and my neighbors…lol) i have definitely found that as you recommended, the straight sided vessel is so helpful for bulk fermentation. Thank you for your tips, your recipes and for making me the local bread girl hahahaha
Awwww so nice to read this, Yvette 🙂 🙂 🙂 The straight-sided vessel is the best tool for sourdough. Thanks so much for writing and sharing. Love reading that you’ve become the local bread girl 💕💕💕💕