Description
Adapted from Peter Reinhart’s method outlined in Perfect Pan Pizza (and many of his other books as well). My method differs mostly in that I start with a different amount of pineapple juice — I use the whole can — and I build my starter at 100% hydration (equal parts by weight flour and water) whereas Peter builds his starter at 80% hydration.
This recipe below outlines how to build a sourdough starter from scratch. If you are looking for guidance on how to feed, maintain, and store your already strong starter, see this post: How to Feed, Maintain, and Store a Sourdough Starter.
Four Tips for Success
- Use a scale to measure. It is the only way to measure accurately.
- Attempt this project while it’s hot outside.
- Start with pineapple juice.
- Use freshly milled stone-milled flour. If you have a source local to you, use it! Health food markets, co-ops, or markets such as Whole Foods often carry freshly milled flour. Here are a few mail-order options:
Pineapple Juice: My small cans of pineapple juice are labeled as 6 ounces (177 ml), but when I actually weigh the juice inside, it always weighs around 192 grams. The important thing is to use an equal amount by weight of flour and pineapple juice.
Water: I have no trouble using tap water when building a sourdough starter or when making a sourdough bread recipe. If you have concerns about your water, you can:
- Use water that you’ve left out overnight to ensure any chlorine has evaporated.
- Buy spring water. In some places, letting water sit out overnight will not be effective, and your tap water may kill your starter.
Discard: At the end of the four-day process, you’ll be left with a decent amount of sourdough discard, which you can use in countless recipes. Here are a few of my favorites:
Ingredients
- 1 small can (192 grams) pineapple juice, see notes above
- stone-milled flour, see notes above
- Room temperature water, see notes above
Instructions
- Day 1: Pour the can of juice (roughly 192 grams) into a large bowl or ideally a straight-sided vessel on a tared scale. (A straight-sided vessel allows you to truly see how much your starter is growing. I’m using this Cambro.) Add an equal amount of flour (roughly 192 grams) by weight. Stir the flour and juice together until the flour is absorbed. Cover the vessel. Record the date, time, and measurements — you will forget which day you started if you don’t. Let it sit at room temperature for 24 hours.
- Day 2: Uncover the vessel. Stir the mixture. Re-cover the vessel, and record your work. Let it sit at room temperature for another 24 hours.
- Day 3: Uncover the vessel. Add 128 grams (1 cup) flour and 128 grams (about 1/2 cup) water. Stir to combine. Cover the vessel and record your work again. Let it sit at room temperature for 24 hours, stirring once or twice.
- Day 4: Uncover the vessel. You should see a little action (bubbles) and it should smell pleasant, not unlike a fruity yogurt. Measure out 128 grams (about 1 cup) of flour and 128 grams (about 1/2 cup) of water. Add them to the container. Stir to combine. Cover the vessel. On this day, record your work again, and mark the height of your mixture with tape on the side of your vessel. Let it sit at room temperature for 24 hours, keeping a closer watch this time around. You may see action — rising and bubble formation — within a few hours. If your mixture is in fact rising, let it rise until it nearly doubles in volume; then drop a spoonful of it in water. If it floats, you’re in business. Note: Your starter might rise (and possibly fall) while you are sleeping — don’t worry if you don’t “catch” it at its peak. Continue on with the process.
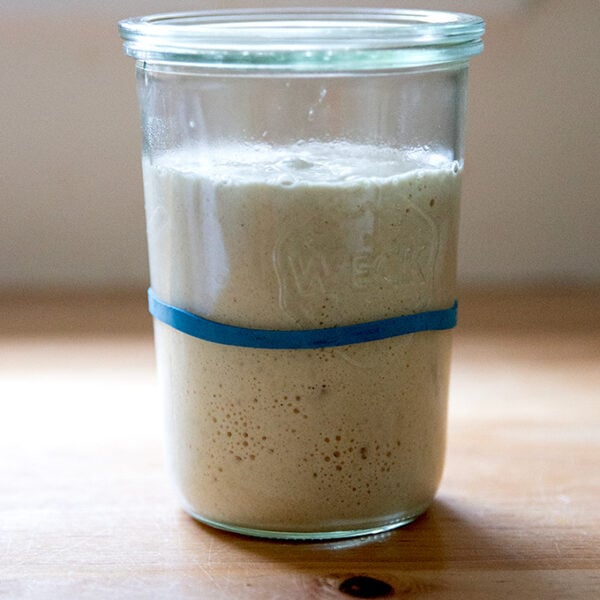
- Day 5: At this point, you should be observing some activity in your starter, meaning the starter should have risen slightly (perhaps doubled but perhaps not) and fallen with bubbles transforming from big to small. You’ll now take a small portion of this mixture and build a new starter: Transfer 128 grams of the starter to a new jar or vessel, and add 128 grams (about 1 cup) of flour and 128 grams (about 1/2 cup) of water. Stir well to combine, then cover the jar. Mark the height with a rubber band. Let sit at room temperature. Transfer the remaining starter to the fridge — this original mixture is now your sourdough discard and can be used in all sorts of recipes, see notes above. When your new starter doubles in volume, you can do one of three things:
- Repeat this process: spoon 128 grams of starter into a new vessel and add 128 grams each flour and water. (Transfer the remaining starter to your bucket of discard.) Let the new starter rise until it doubles. Your starter will get stronger with every feeding.
- Transfer it to the fridge if you need to take a break from the process. You can pick up where you let off when you are ready.
- Test it out in a sourdough bread recipe.
- Maintaining your starter: Once you have a strong, active starter on your hands, follow the steps in this post: How to Feed, Store, and Maintain a Sourdough Starter.
- Category: Bread
- Method: Stir
- Cuisine: American