
How to Build a Sourdough Starter from Scratch
This post may contain affiliate links. Please read my disclosure policy.
This post outlines how to build a sourdough starter from scratch simply and quickly. In less than a week and with minimal effort, you will have on your hands a bubbly, active starter to use in all of your favorite sourdough recipes.
Nearly every week I am asked if I have a tutorial on how to make a sourdough starter, to which I always answer No and then suggest: Save yourself the trouble: buy it!
The truth is that until a few months ago, I never found the exercise of building a sourdough starter from scratch to be worth the effort. Invariably the process would take over two weeks, during which I would waste lots of flour not to mention time. Knowing how little it costs to buy a strong, ready-to-go starter online, I didn’t dare encourage such an undertaking.
Earlier this year, however, I came across a passage in Peter Reinhart’s Perfect Pan Pizza, which outlined his tried-and-true method for making a sourdough starter, one he’s shared in several of his other books as well. Peter’s method calls for starting with pineapple juice as opposed to water because “the acidity in the juice helps shorten the time to get the process started.” I very much liked the sound of this.
Let’s back up: a sourdough starter is a fermented mix of flour and water containing wild yeast and bacteria. It both leavens and flavors sourdough bread.
Curious to learn more, I searched the web, where I discovered the use of pineapple juice for sourdough starters is quite common. Why? In sum, because wild yeast cells prefer a somewhat acidic pH (which pineapple juice is) in which to grow. But also, as Deborah Wink writes on The Fresh Loaf, pineapple juice “insures against unwanted bacteria and the problems they leave in their wake.” Read about this in much more depth here.
At the beginning of August, I tried Peter’s method using all-purpose flour and was shocked to see activity — bubbles and rising — in just four days. Moreover, his process was so simple: mix together flour and pineapple juice, let it sit for two days, add flour and water on the 3rd day, add more flour and water on the 4th day.
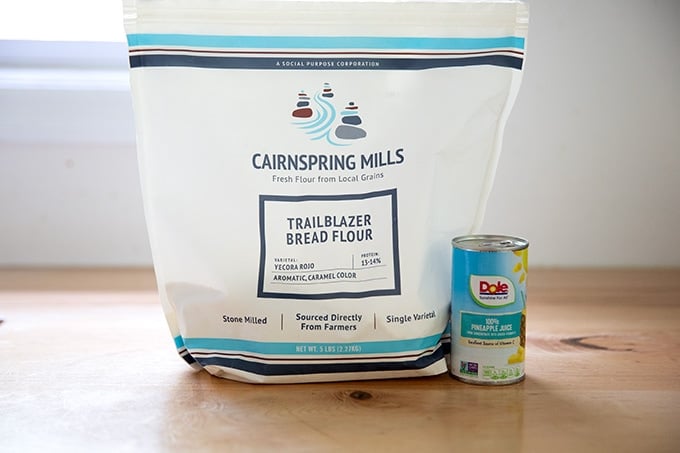
A few weeks later, while talking with my friend Christy Alia, an avid bread and pizza maker (@realcleverfood on Instagram), about my experience, she suggested I try the method with whole wheat flour because the added minerals and nutrients would provide even better food for the microbes (the yeast and bacteria) to thrive. And so a few days later, I followed Peter’s method using freshly milled stone-milled flour from Cairnspring Mills.
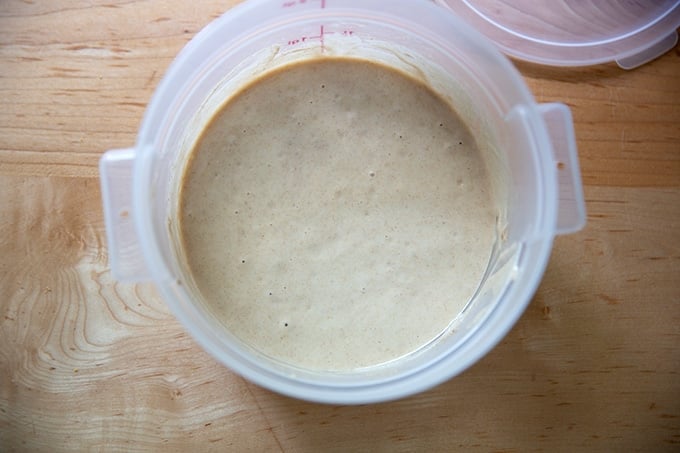
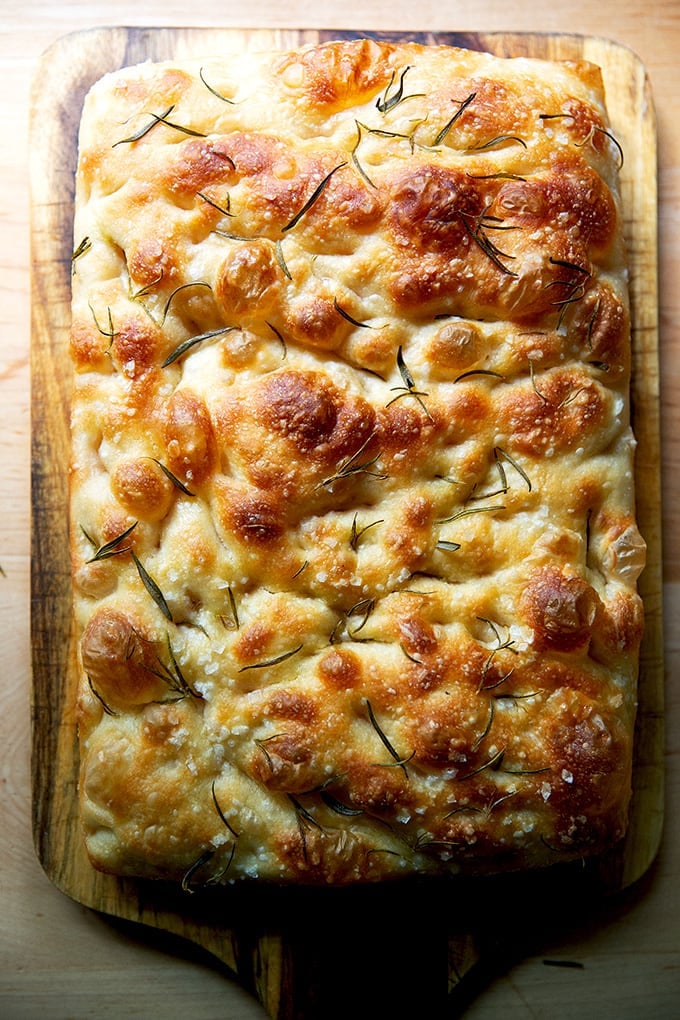
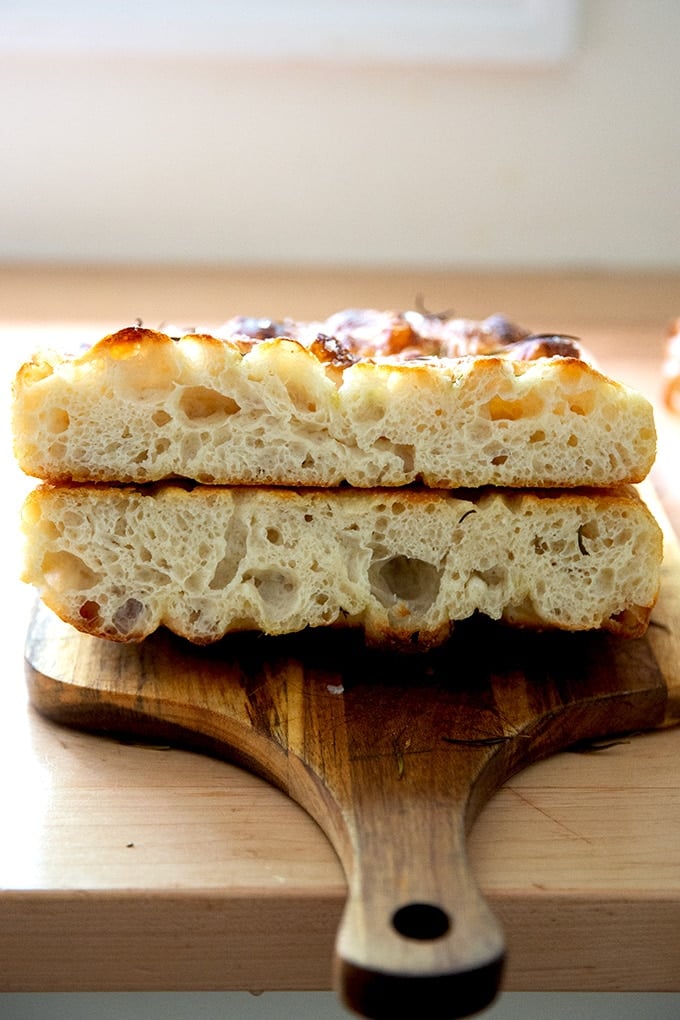
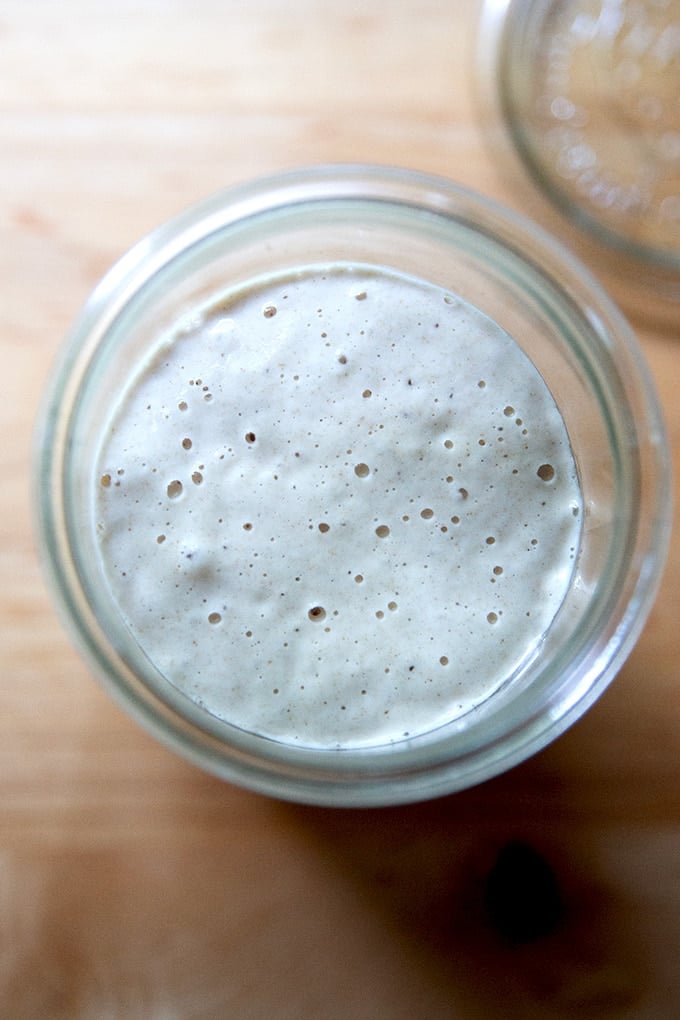
Friends! Oh my word. On day 4, my starter doubled in volume. While it was not ready to be used in a sourdough bread recipe yet, it was strong and active, and after just a few more feedings, it was ready to go. On day 6, I made a loaf of sourdough focaccia and couldn’t have been more pleased with the light, airy loaf my young starter produced (photos below).
Importantly, I made this starter at the height of a heat wave, which no doubt contributed to its success. I successfully repeated the process again last week during another heat wave. I could sum up the tutorial that follows below as such: pineapple juice + freshly milled flour + heat wave = sourdough starter from scratch success.
Below I’ve outlined how to make a sourdough starter from scratch, with tips for how to set yourself up for success. Let me know if you have any questions along the way. And if you have any tips of your own to add, please share!
Equipment
For best results, I recommend ensuring you have on hand:
- a digital scale — it’s the only way to ensure you are measuring accurately.
- a straight-sided vessel, which will help you more accurately see how much your starter is growing.
Four Tips for Success
- Use a scale to measure to ensure you are measuring accurately.
- Attempt this project while it’s hot outside (or see notes below if attempting in colder months). In his book The Perfect Loaf, Maurizio Leo recommends a temperature range of 80º-86ºF (26º to 30ºC).
- Start with pineapple juice because wild yeast cells prefer a somewhat acidic pH.
- Use freshly milled, stone-milled flour because the added minerals and nutrients provide even better food for the microbes (the yeast and bacteria) to thrive. If you have a source local to you, use it! Health food markets, co-ops, or markets such as Whole Foods often carry freshly milled flour. Here are a few mail-order options:
How to Keep Your Starter Cozy (and Happy!)
I can’t emphasize enough the importance of a warm environment for the success of this endeavor. If you are attempting to build your starter when it’s cold outside, here are some suggestions for how to keep it warm:
- Find a warm place in your kitchen (like on top of your refrigerator).
- Try the warm oven trick: turn your oven on for 1 minute (at any temperature) and then turn it off. It likely won’t get above 100ºF — it will just create a cozy spot for your dough to rise. Consider sticking a post-it note to the oven to remind you that you have a starter in there so that you don’t accidentally preheat your oven and kill your starter. (Note: I do not recommend using the oven with the oven light on, because I discovered the hard way that the oven light can actually be too hot and cause your starter or sourdough bread to overferment.)
- Invest in the Brod and Taylor Sourdough Home: I do not own this, but it gets good reviews should you have the space for it.
- Build your own “sourdough home”: See comments below, but one of you ingeniously made a homemade proofing box by placing a seed heating pad in a box and covering it with a towel.
How to Build a Sourdough Starter From Scratch, Step by Step
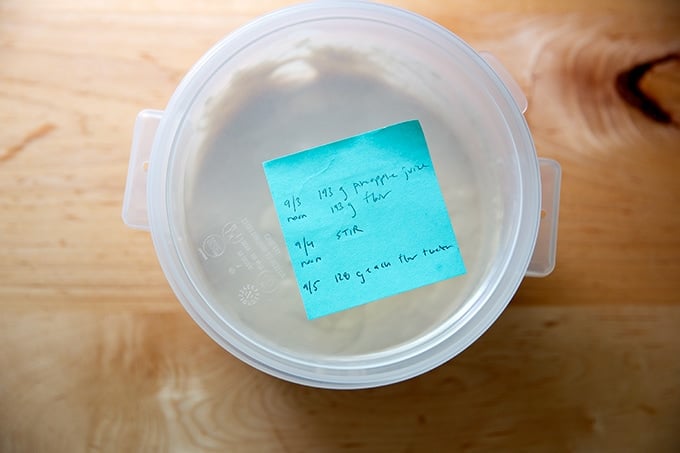
Day 1: Gather your materials: flour and pineapple juice. (If possible, pick up a bag of freshly milled stone-milled flour; see the recipe box for sources.)
Pour the can of juice into a large bowl or ideally a straight-sided vessel on a tared scale.
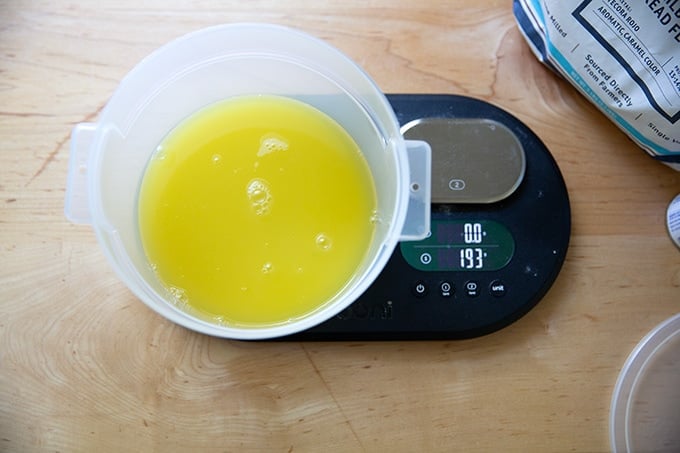
Add an equal amount of flour by weight. It should be about 192-193 grams of juice and flour each.
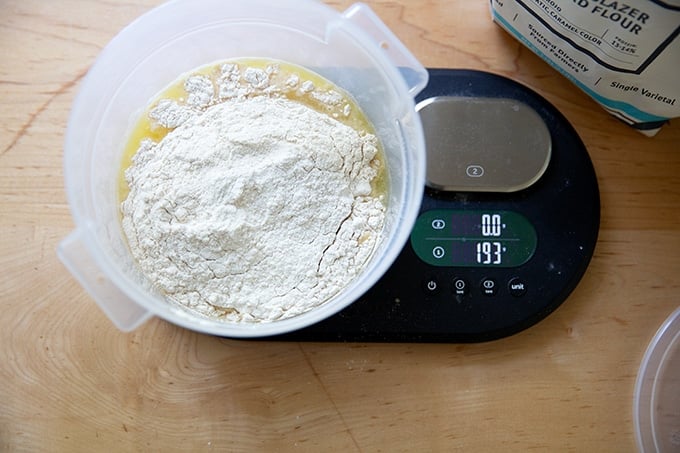
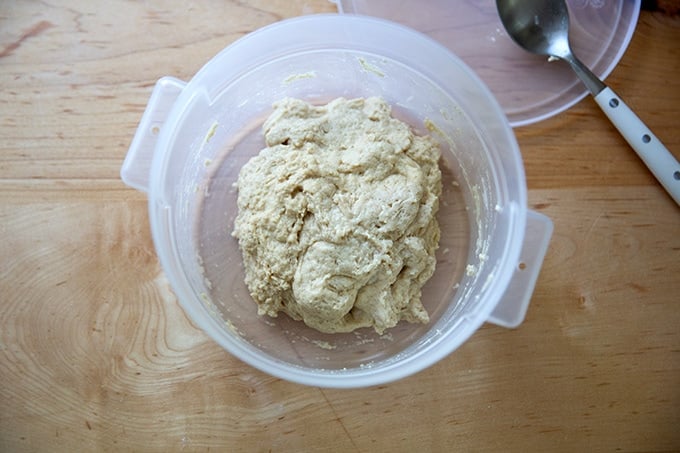
Stir the flour and juice together until the flour is absorbed.
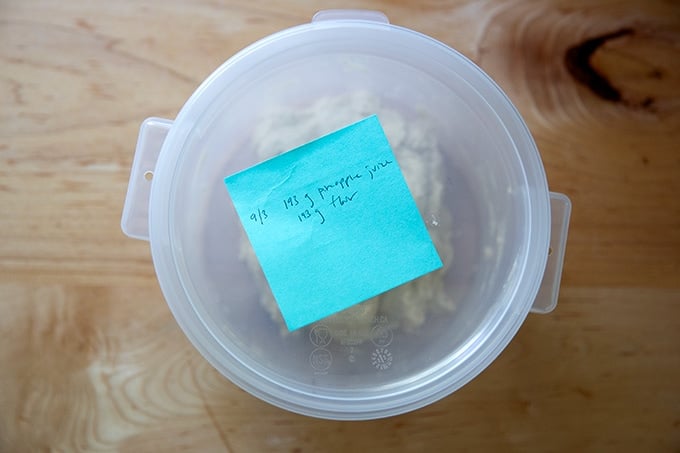
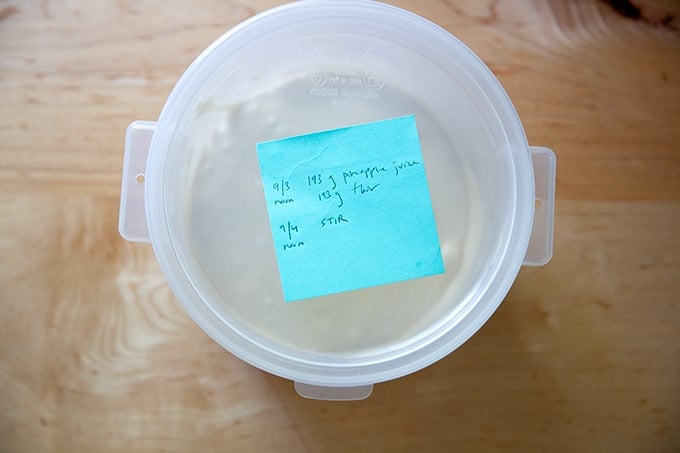
Cover the vessel. Record the date, time, and measurements — you will forget which day you started if you don’t. Let it sit at room temperature for 24 hours.
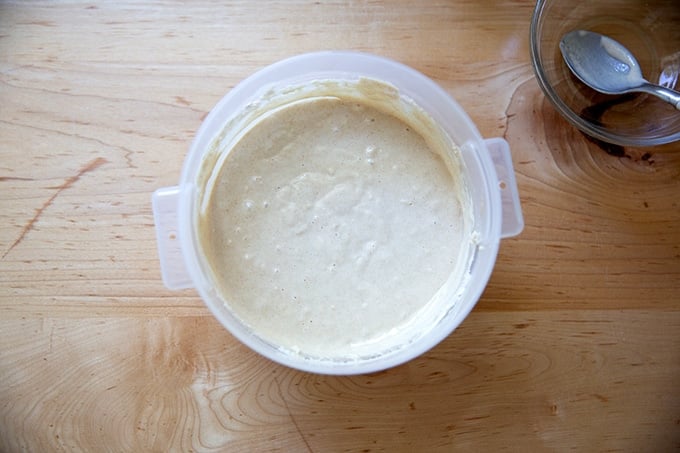
Day 2: Uncover the vessel and…
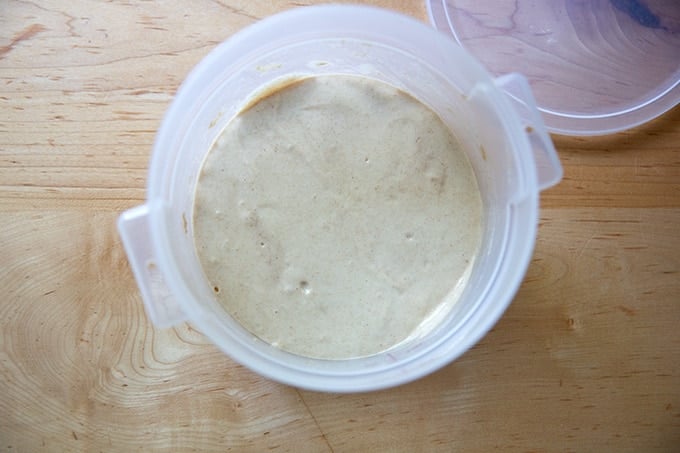
… give it a stir.

Re-cover the vessel, and record your work. Let it sit at room temperature for another 24 hours.
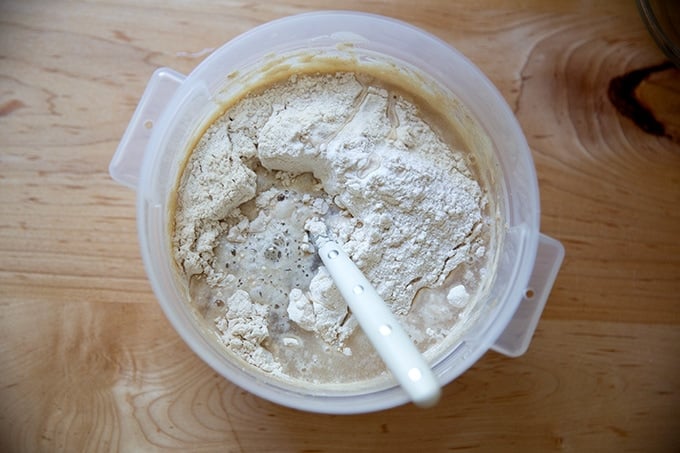
Day 3: Uncover the vessel.
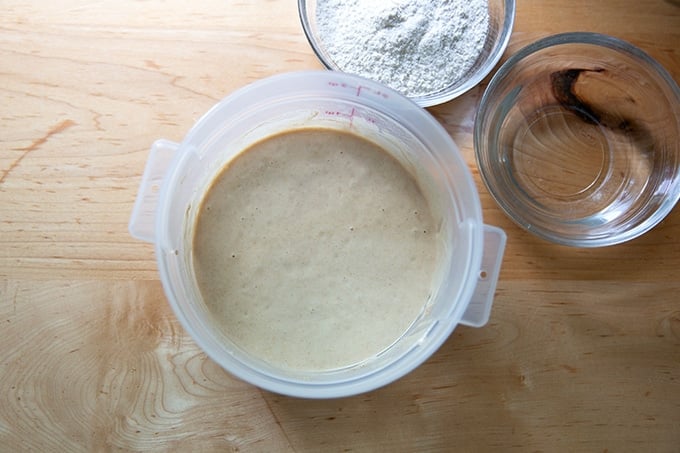
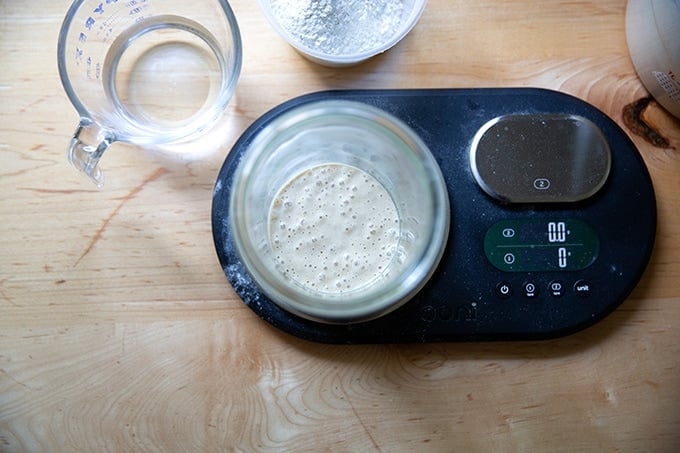
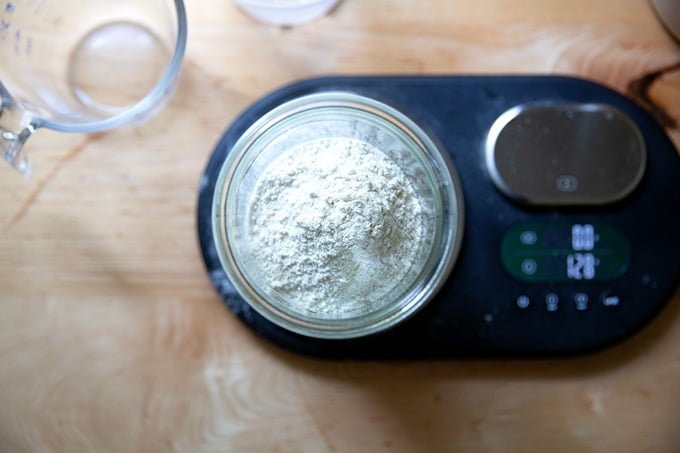
Measure out 128 grams (about 1 cup) of flour and 128 grams (about 1/2 cup) of water:
Add them to the vessel.
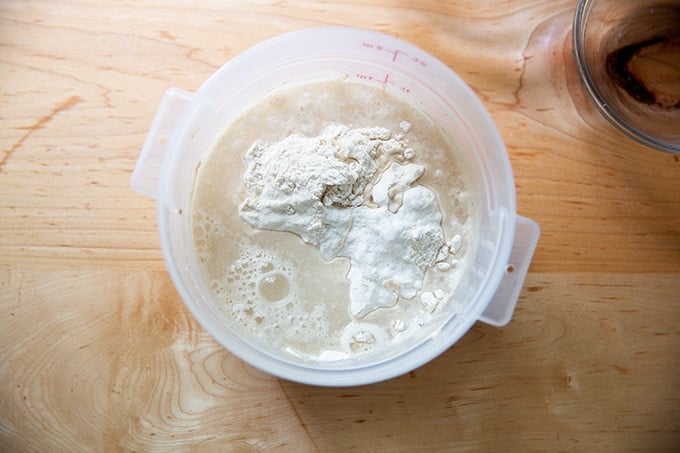
Stir to combine.
Cover the vessel and record your work again. Let it sit at room temperature for 24 hours, stirring once or twice.
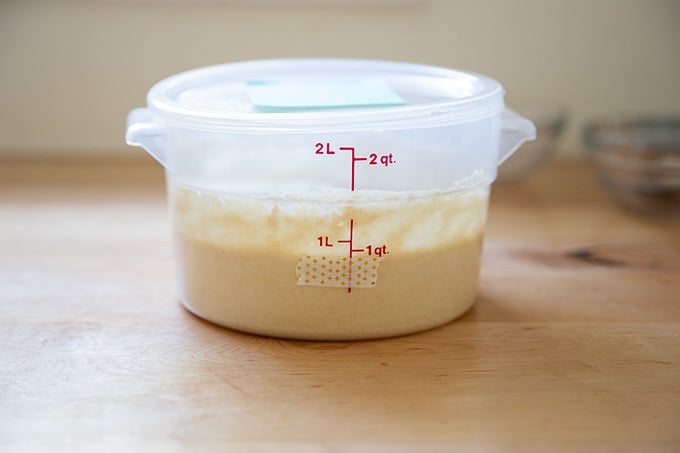
Day 4: Uncover the vessel. You should see a little action (bubbles). Measure out 128 grams (about 1 cup) of flour and 128 grams (about 1/2 cup) of water:
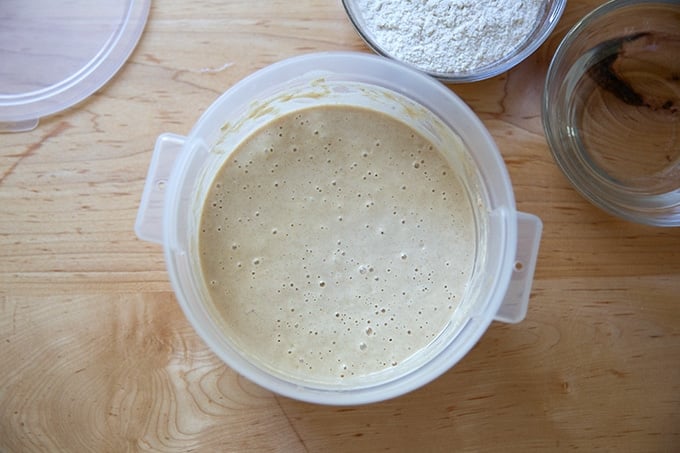
Add them to the container.
Stir to combine.
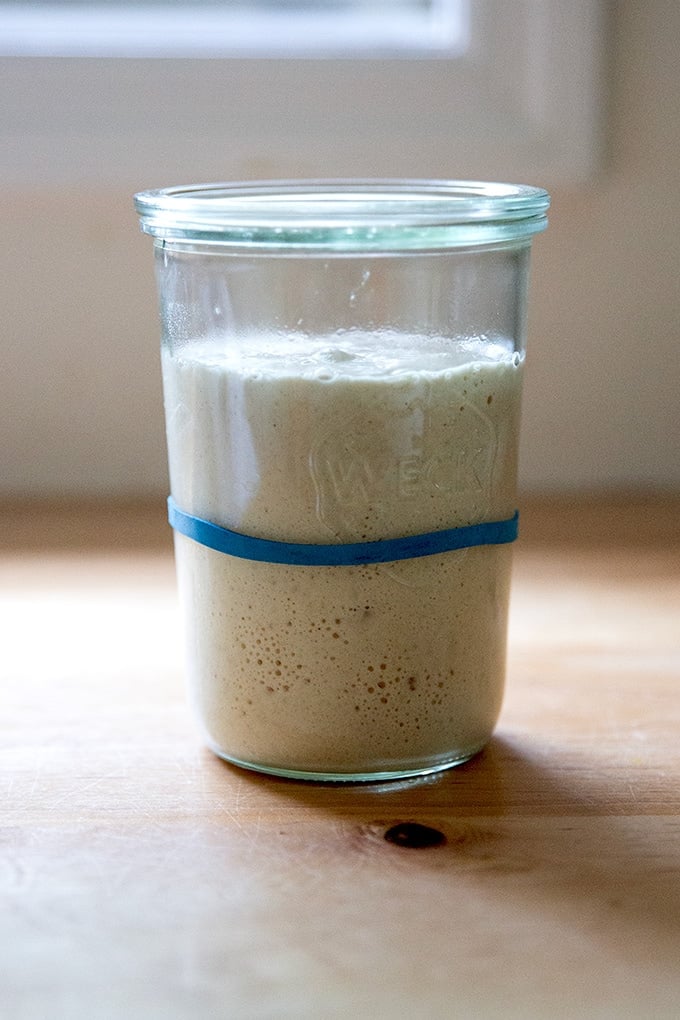
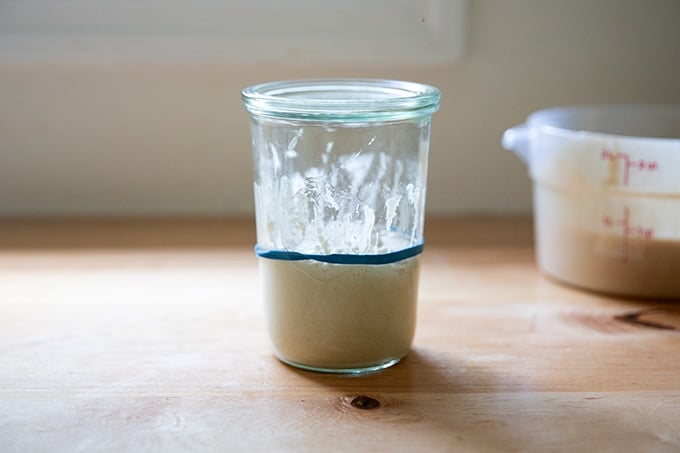
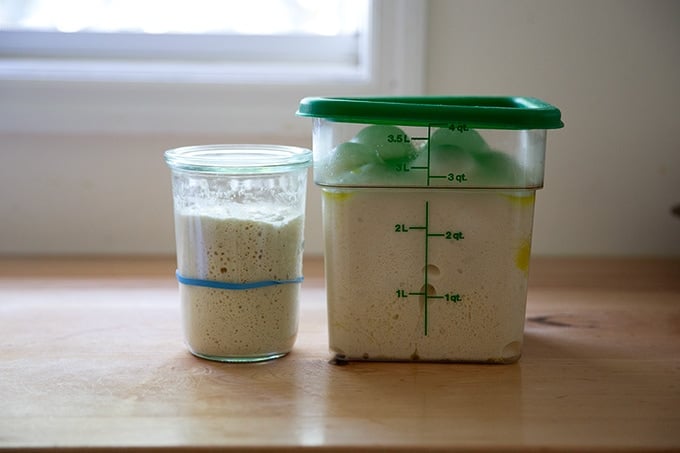
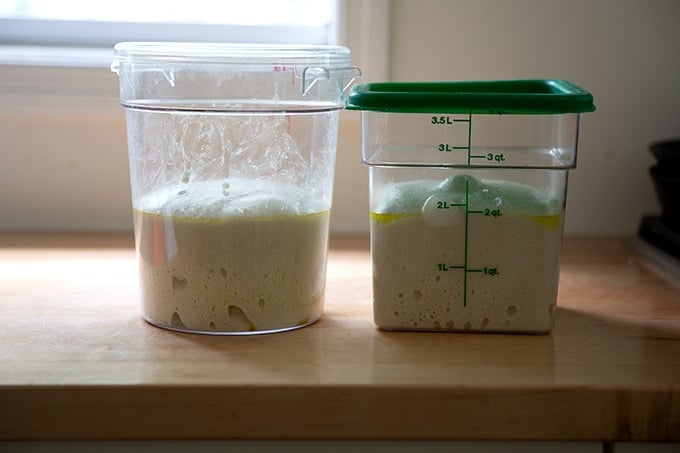
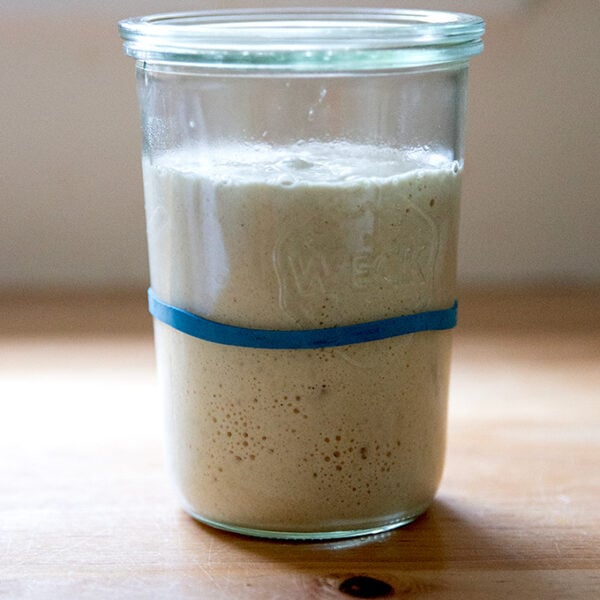
On this day, record your work again, and mark the height of your mixture with tape on the side of your vessel. Let it sit at room temperature for 24 hours, keeping a closer watch this time around.
You will likely see some action…
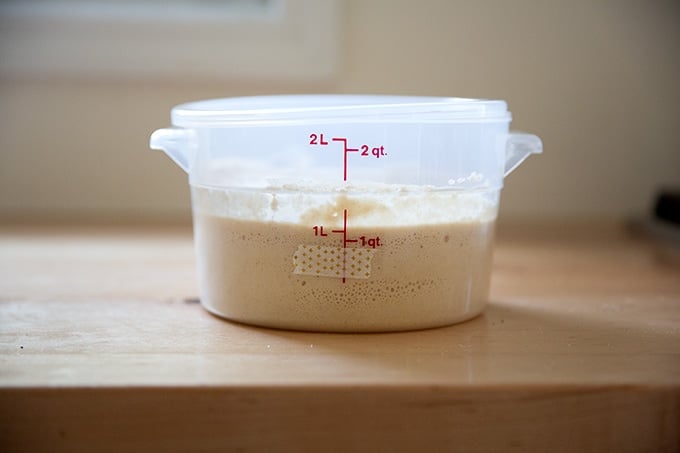
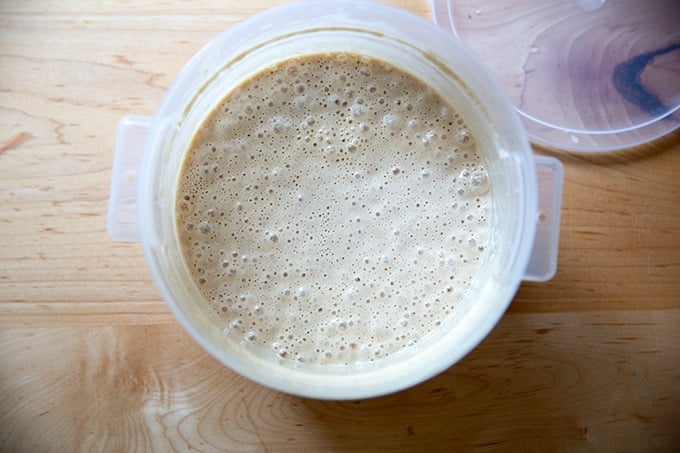
The mixture might even double in volume.
And you should see lots of bubbles on the surface.
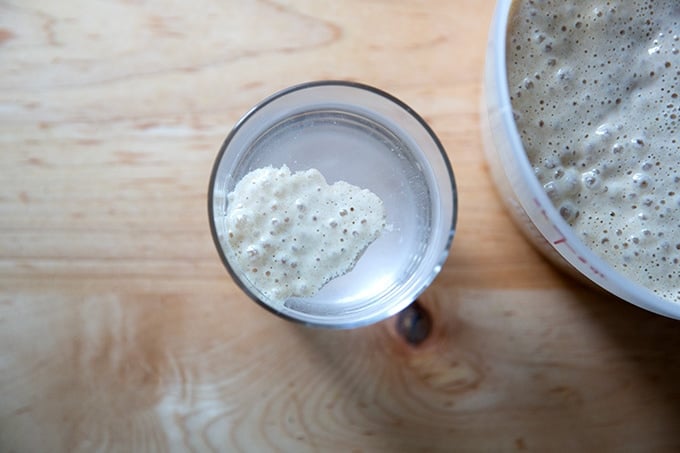
If your mixture is in fact rising, let it rise until it nearly doubles in volume; then drop a spoonful of it in water. If it floats, you’re in business. Note: Your starter might rise (and maybe fall) while you are sleeping — don’t worry if you don’t “catch” it at its peak. Continue on with the process that follows.
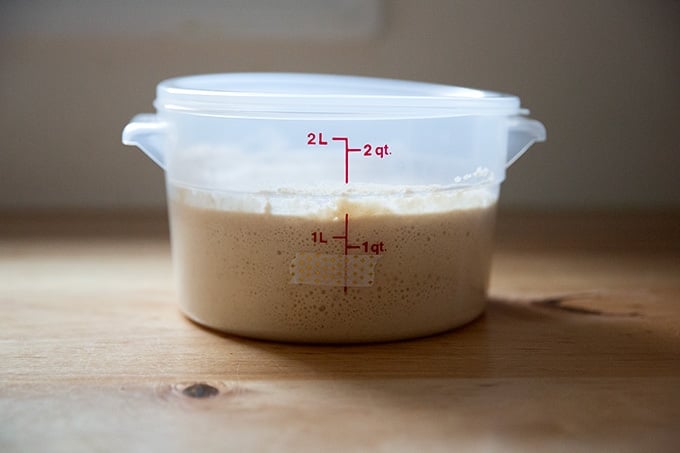
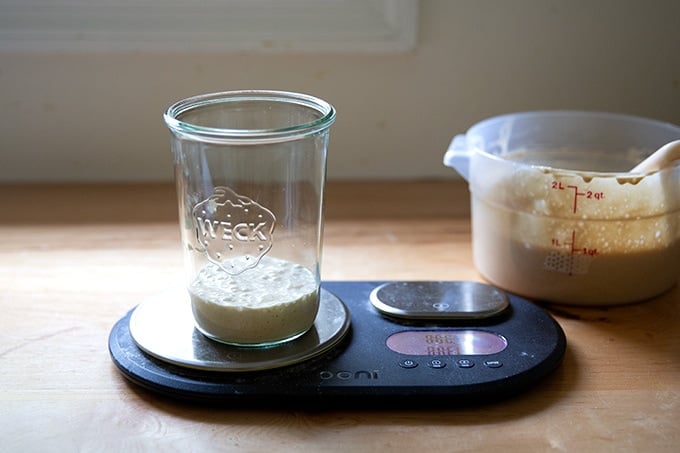
Spoon 128 grams of the starter into a new vessel.
Measure another 128 grams of flour and water each.
Add the flour and water to the starter.
Stir to combine.
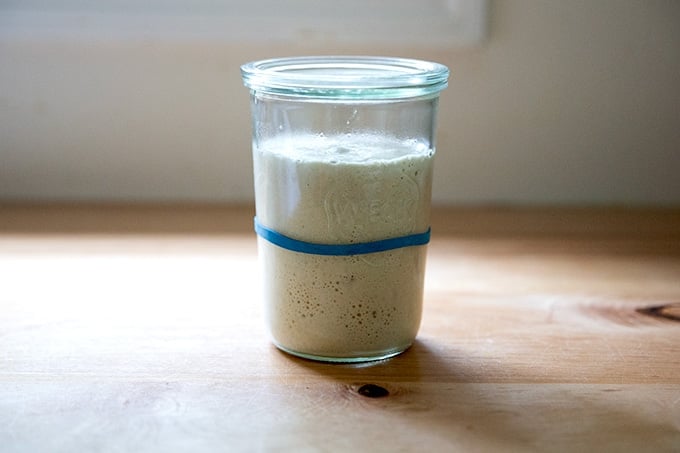
Mark the height with a rubber band.
This original vat of sourdough starter is now your discard bucket. Transfer it to the fridge or use it in one of your favorite sourdough discard recipes: tortillas, crackers, pancakes, soda bread.
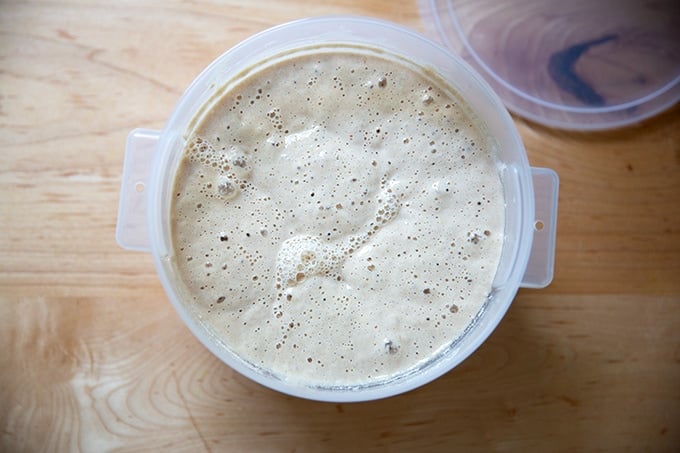
Day 5: When your starter doubles…
… and floats, you can do one of three things:
- Repeat this process: spoon 128 grams of starter into a new vessel and add 128 grams each flour and water. (Transfer the remaining starter to your bucket of discard.) Let the new starter rise until it doubles. Your starter will get stronger with every feeding.
- Transfer it to the fridge if you need to take a break from the process. You can pick up where you let off when you are ready.
- Test it out…

… in a sourdough bread recipe. I recommend starting with…
… focaccia, one of the easiest breads to make.
More Sourdough Recipes to Try
Here are a few other favorite sourdough bread recipes to make with your new starter.
- Simple Sourdough Bread, Step by Step
- Simple Sourdough Ciabatta
- Simple Sourdough Pizza
- Sourdough Sandwich Bread
- Whole Wheat-ish Sourdough Bread
- Sourdough English Muffins
Next Steps
Although your starter might be doubling in volume and floating, it likely still could use some nurturing to get stronger. Please read this post, which explains in detail how to activate, feed, and maintain a starter.
How to Build a Sourdough Starter from Scratch
- Total Time: 5 days
- Yield: 3 cups
Description
Adapted from Peter Reinhart’s method outlined in Perfect Pan Pizza (and many of his other books as well). My method differs mostly in that I start with a different amount of pineapple juice — I use the whole can — and I build my starter at 100% hydration (equal parts by weight flour and water) whereas Peter builds his starter at 80% hydration.
This recipe below outlines how to build a sourdough starter from scratch. If you are looking for guidance on how to feed, maintain, and store your already strong starter, see this post: How to Feed, Maintain, and Store a Sourdough Starter.
Four Tips for Success
- Use a scale to measure. It is the only way to measure accurately.
- Attempt this project while it’s hot outside.
- Start with pineapple juice.
- Use freshly milled stone-milled flour. If you have a source local to you, use it! Health food markets, co-ops, or markets such as Whole Foods often carry freshly milled flour. Here are a few mail-order options:
Pineapple Juice: My small cans of pineapple juice are labeled as 6 ounces (177 ml), but when I actually weigh the juice inside, it always weighs around 192 grams. The important thing is to use an equal amount by weight of flour and pineapple juice.
Water: I have no trouble using tap water when building a sourdough starter or when making a sourdough bread recipe. If you have concerns about your water, you can:
- Use water that you’ve left out overnight to ensure any chlorine has evaporated.
- Buy spring water. In some places, letting water sit out overnight will not be effective, and your tap water may kill your starter.
Discard: At the end of the four-day process, you’ll be left with a decent amount of sourdough discard, which you can use in countless recipes. Here are a few of my favorites:
Ingredients
- 1 small can (192 grams) pineapple juice, see notes above
- stone-milled flour, see notes above
- Room temperature water, see notes above
Instructions
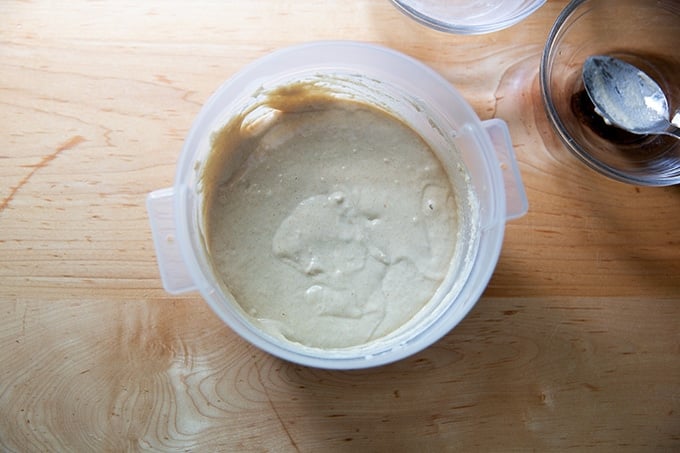
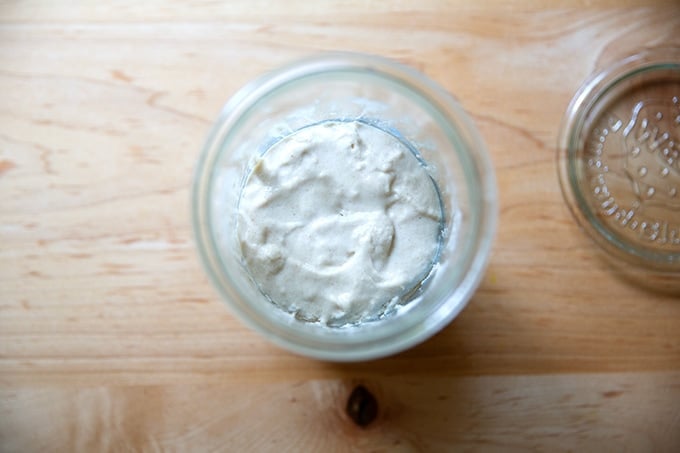
- Day 1: Pour the can of juice (roughly 192 grams) into a large bowl or ideally a straight-sided vessel on a tared scale. (A straight-sided vessel allows you to truly see how much your starter is growing. I’m using this Cambro.) Add an equal amount of flour (roughly 192 grams) by weight. Stir the flour and juice together until the flour is absorbed. Cover the vessel. Record the date, time, and measurements — you will forget which day you started if you don’t. Let it sit at room temperature for 24 hours.
- Day 2: Uncover the vessel. Stir the mixture. Re-cover the vessel, and record your work. Let it sit at room temperature for another 24 hours.
- Day 3: Uncover the vessel. Add 128 grams (1 cup) flour and 128 grams (about 1/2 cup) water. Stir to combine. Cover the vessel and record your work again. Let it sit at room temperature for 24 hours, stirring once or twice.
- Day 4: Uncover the vessel. You should see a little action (bubbles) and it should smell pleasant, not unlike a fruity yogurt. Measure out 128 grams (about 1 cup) of flour and 128 grams (about 1/2 cup) of water. Add them to the container. Stir to combine. Cover the vessel. On this day, record your work again, and mark the height of your mixture with tape on the side of your vessel. Let it sit at room temperature for 24 hours, keeping a closer watch this time around. You may see action — rising and bubble formation — within a few hours. If your mixture is in fact rising, let it rise until it nearly doubles in volume; then drop a spoonful of it in water. If it floats, you’re in business. Note: Your starter might rise (and possibly fall) while you are sleeping — don’t worry if you don’t “catch” it at its peak. Continue on with the process.
- Day 5: At this point, you should be observing some activity in your starter, meaning the starter should have risen slightly (perhaps doubled but perhaps not) and fallen with bubbles transforming from big to small. You’ll now take a small portion of this mixture and build a new starter: Transfer 128 grams of the starter to a new jar or vessel, and add 128 grams (about 1 cup) of flour and 128 grams (about 1/2 cup) of water. Stir well to combine, then cover the jar. Mark the height with a rubber band. Let sit at room temperature. Transfer the remaining starter to the fridge — this original mixture is now your sourdough discard and can be used in all sorts of recipes, see notes above. When your new starter doubles in volume, you can do one of three things:
- Repeat this process: spoon 128 grams of starter into a new vessel and add 128 grams each flour and water. (Transfer the remaining starter to your bucket of discard.) Let the new starter rise until it doubles. Your starter will get stronger with every feeding.
- Transfer it to the fridge if you need to take a break from the process. You can pick up where you let off when you are ready.
- Test it out in a sourdough bread recipe.
- Maintaining your starter: Once you have a strong, active starter on your hands, follow the steps in this post: How to Feed, Store, and Maintain a Sourdough Starter.
- Category: Bread
- Method: Stir
- Cuisine: American
This post may contain affiliate links. Please read my disclosure policy.


52 Comments on “How to Build a Sourdough Starter from Scratch”
Why pineapple juice? Is it the enzymes?
Hi! It’s the acidity: wild yeast cells prefer a somewhat acidic pH (which pineapple juice is) environment in which to grow.
Do you use your AP flour starter and your whole wheat starter for different recipes or can you use the the wheat flour starter for all? And do you then feed starter with wheat flour as well? Thanks so much for all your recipes and advice! 💕
Hi! I know only keep this one starter, which I feed with the freshly milled flour — it’s freshly milled bread flour, however, so while it looks more like a whole wheat flour in hue, it’s not as whole wheaty as it might be if I use 100% whole wheat flour… does that make sense? So yes, I use this starter for all of my sourdough bread recipes. And I’ve been loving feeding it the freshly milled flour (as opposed to using the freshly milled flour only for building it). Let me know if you have any other questions.
This is awesome. I need to give it a try. Like you, I’ve tried before with not great success. I thought…humm…wasting a lot of good flour here. why. But, I have always wanted Toto make this kind of bread, etc. thanks
Let me know if you have any questions once you get started Joyce!
Am I missing something? When do you put the yeast in? I’m a 100% new bread maker so I need all the help I can get! Thank you!!
Hi! No yeast here. You’re simply combining flour and water (and pineapple juice at the start) and creating an environment for wild yeast and bacteria to thrive. Let me know if you have any more questions!
Hi Ali,
This is really so exciting! I can’t wait to build a starter from scratch. My old starter got black and gross from neglect. Thank you for explaining the process step by step. My question is about the flour. What is stone-milled compared to whole wheat or bread flour? And are you always feeding the starter with the stone-milled? Do you use that for bread making as well? Or just AP? Do you ever add other flours such as rye? Thank you again!!
Hi Wendy! Great question, and I’m realizing I should add some notes to the post. I explain in more detail the difference between commercial whole wheat flour and stone milled flour in this post: Easy Sourdough Bread (Whole Wheat-ish). It comes down to the milling process: with stone-milled flour, the bran, germ and embryo are crushed together through a stone mill, which preserves lots of the nutrients and minerals; with commercial whole wheat flour, the bran, germ and embryo are separated using a roller mill, then mixed back together in various proportions. Much research shows that as soon as the grain is separated into its various parts, lots of the nutrition is lost. So, in sum, stone-milled flour should overall be more nutritious (and great for building a sourdough starter) than commercial whole wheat flour.
I do use this Cairnspring Mills flour for bread baking as well — it’s excellent! And I do use rye flour: How to Make Homemade Rye Bread
In reference to your response to Angelica’s question. Only use the pineapple juice in the beginning(one time)? Beginner here, obviously!
Yes! Just one time: the initial mixing calls for stirring together flour and pineapple juice. After that, you’ll use water 🙂
Hi Ali! Quick question regarding covering the vessel. My research varies greatly. Some say do not cover (starter needs no air), some say cover partially either with a lid or cheesecloth so it gets some air circulation. I see your glass jar has a lid and your plastic one has a lid but looks slightly uncovered. Any advice would be so helpful!
Hi Jen! I do not use cheese cloth or breathable lids anymore because I found that when I used those, my starter would form a top hard crust — in other words, the top layer would dry out. When I am builing my starters, I use a lid, but I rest it on top — so it’s not sealed tightly. (Honestly, I want to go through this process again sealing the lid to see if it makes any difference… I will report back if I do.) Once I have a strong starter, I do seal the lid after I feed it and when I store it in the fridge — I either use deli quart containers with lids or the glass weck jar, which I top with the lid but don’t use the clasps.
Let me know if this helps/if you have other questions.
Help! I live in Michigan. It is the beginning of September and the temps are already falling. Is it possible to attempt the sourdough starter now or should I just wait until next summer? I so much wanted to have my starter for winter baking!!
Marilyn, I woke up this morning and it felt like winter here in Upstate New York! I’m hoping we’ll get another heat wave before winter really settles in, but I hear you.
A few thoughts: if you have a warm spot in your kitchen — some people suggest on top of your fridge — you can try that as a place to set your starter. I do not recommend using the oven with the oven light on, because I discovered the hard way that the oven light can actually be too hot — I had a batch of sourdough bread rising in the oven with the light on and it overfermented bc it was too hot. I do wonder if you could try the warm oven trick which is to turn the oven on for 1 minute (at any temperature) and then turn it off. It won’t get above 100ºF (likely) and it will just create a cozy spot for your dough to rise. But maybe stick a post-it note to the oven to remind you that you have a starter in there so that you don’t accidentally preheat your oven and kill your starter.
Hope that helps!
Hi Ali! Thank you so much for answering and the help. I decided to jump into my “big girl” pants and go forward with the starter in the morning. Thank you for warning about the light in the oven trick. I have turned on the oven for one minute and put dough in to rise (actually with your peasant bread recipe) and it seemed to work out well. I have also turned on the dryer for a minute and wrapped the bowl of dough in a heavy towel and placed it in the warm dryer. That also works. Fun living up North, eh? Anyway, fingers crossed. I will report back one way or another.
Oh good! So glad to hear this. I hope you have success. Please do report back when you have time. And yes: so fun 🙂 I just ordered a heated vest!
Hi Ali! First of all, I’d like to say this has been quite a journey, filled with (some) tears, laughter, and much joy. My husband (Bill) and I have had such a great time. I will explain how he became involved later. The end result is I am sitting here eating fresh sourdough crackers (of course, your recipe), which are wonderful. I am so proud. I started on September 16 and made my (first) starter, who I named “Bob”. After three days of special care and taking his temperature, I had to pronounce “Bob” as DOA. I had him in a slightly warmed oven and took his temp, etc., but he remained a cold lump. After reading him his last rights, I announced to my husband that he would have to wait until Spring for his sourdough bread experience. Bill immediately jumped into action and gave me a riveting motivational speech. (His motivation was warm sourdough bread, my motivation was driven by being told I was a quitter and where was my spunk.) We decided to give it one more try. Bill got a box, lined it with a towel and brought in our seed heating pad (I live in rural Michigan, of course I have one). Note: A regular heating pad set on low would also work. He put the heating pad in the box, put another towel over that and plugged her in. This time I warmed the pineapple juice to 90 degrees (also did this for the water for future feedings), and used half KAF whole wheat flour and KAF bread flour. We named him Frederick von Fronkensteen (love Mel Brooks and Gene Wilder) and said a little prayer to please “give our creation life”. We put FvF in his cozy little room and waited. After two days of feedings, FvF started to show some positive signs. Bubbles along the side and a few little holes on top. We were encouraged and kept on with the feedings. By day 5, FvF was bubbling away, but had not risen very much above the rubber band. I wanted the rise!! I gave it an extra day and by Day 6, he was bubbling and had definitely doubled in size. After we did our happy dance, we gave it a stir and a rest, and plopped some in lukewarm water. He floated… he swam… he did the back stroke!! I now have a fresh jar of “Frau Blucher” (no, I’m not obsessed with the movie, I just like the names) and will make my first sourdough focaccia. Frederick von Fronkensteen is in some lovely crackers. Thank you so much for this great recipe… and the fun we had. My husband also sends a thank you for the sourdough bread he will be eating with soups, stews, and “stewy beans”.
XXOO – Marilyn and Bill
P.S. Heated vests! Who knew? It is now on my Christmas list. OK, 5 stars for the sourdough, 5 stars for the crackers, and an extra 5 for the vest idea.
Oh boy! Sourdough is indeed a journey, and I suppose that journey starts with the Odyssey that is making the starter from scratch 🤣🤣🤣🤣 You are a trooper to push on after the passing of Bob (RIP) and your husband is a hero for encouraging you not to throw in the towel. And his DIY “starter home” is genius! I think I need to add some notes re-emphasizing the importance of temperature, and I may need to fashion my own homemade proofing box with a heating pad (I have the kind you use on a back) and a towel. So smart. Thank you so, so very much for sharing this adventure, which was not only fun to read but also so helpful for me and others, especially as we head into the cold season. I wish Frau Blucher a prosperous and happy life. May she bring you and your husband many a crusty boule, pillowy focaccia, and crisp seed-topped cracker.
PS: I noticed many of the other hockey moms wearing heated vests last season and I was so jealous but couldn’t get myself to do it. When I found myself shivering in a rink in September, I decided it was time. Maybe the heated vest could work in the homemade sourdough home??
PPS,,, It was supposed to be 105 stars for the vest!!!
Can I use homemade pineapple juice for this? Blending pineapple and water?
Theoretically yes, but for whatever reason, I worry. I worry because I’d hate for you to go through the effort — 4 days of work + using up flour — for it to not work. You also don’t want chunks of pineapple in there and you don’t want it to be thick… would you strain it? Again, this should work: it’s the acidity that the yeast likes, but I just don’t want to say “go for it” and have it not work bc I haven’t tried this out myself.
good to know, nice, and great to have this on hand, thank you!
Hi Ali! quick question. I saw on day 4 my starter rose and fell overnight. However, I tested the starter (this morning) in water and it did not float. Where should I go from here? Continue on with Day 5 instructions with discarding and transferring 128 grams to a new a vessel? or keep feeding the original starter until it doubles in volume (but it could do the same thing and with rising and falling overnight and not float in the morning) and test if it floats? I want to add the starter has bubbles but not overly active.
Thank You!
Jeanie
Jeanie, apologies for the delay here!
Great to hear about the rise and fall — that is such a good sign.
Yes, I would move on with transferring 128 grams of that starter and feeding it with flour and water. Your original batch of starter is now your discard batch and can be store in the fridge for weeks.
With this new batch continue to keep it in a warm-ish spot in your kitchen and mark the height of it with a rubber band or tape.
Let me know if you have other questions and good luck!
Your instructions for making sourdough are excellent. I have my sourdough for a few months now, it’s getting stronger. I bake great breads according to your recipe and also feel confident to combine different types of flours.
Thank you!
Great to hear this Inbar! Thanks so much 🙂
I am still gathering ingredients and tools for my first try at a sourdough starter. I have not found any fresh stone-milled flour sources in Florida, go figure! I read with interest the story of Bob and FvF and am planning to try a similar technique. I do have to say the heated vest has been on my Amazon list for over a year now after one very cold weekend running dog agility last January – they are awesome!
🤣🤣🤣🤣 … it’s life changing!
I think using Bob’s Red Mill flour or even an organic King Arthur Flour will work. You could also try mail ordering some stone-milled flour.
Good luck!!
It is the morning of Day 4 and Jan Arch (starter name, for January and initial starter) doubled in bulk overnight after I fed her at 9pm last night.
I made some adjustments to Marilyn’s box with FvF:
1. I am using a small styrofoam cooler (finally, a use for coolers sent with medications!)
2. I added a smart plug and run the seedling heat pad for 20 minutes every six hours and again for 20 minutes after feeding
3. I put a room thermometer on top of the jar that I can monitor on my phone to ensure it doesn’t get too hot or cold
This may be overkill but we keep the house 66F-73F and this keeps the starter cozy.
Oops! I forgot to mention I used Arrowhead Mills Organic Whole Wheat flour – they were even out of Bob’s Red Mill Organic Whole Wheat. I guess I will be ordering online in the future.
I have a few questions, so sorry to spam you!
I read the article RE: How to Feed, Maintain and Store a Sourdough.
In that article, you indicate 45g of water and flour for feeding and only keeping that amount. In this one, you indicate 128g of each for feeding. I know you said the amount to feed depends on the amount you keep after discarding. Is there a “best” amount to keep? Or does it depend on how much you will need for the recipes?
Is it unwise to keep multiple starters in the fridge for different types of flour? Example: Whole Wheat, White, Rye
I cannot begin to express my gratitude for all of the very useful and detailed information you have provided. Thank you!!!
Hi! And thank you for your kind words. I think I need to update this post to make the info a little more consistent.
If you have a strong, vigorous, mature starter on your hands, you can get away with using less flour and water for feeding. Of course, if you need a certain amount of starter for a certain recipe, you’ll need to scale up the feeding as necessary.
When you are building the starter, I think it’s helpful to use more flour and water. And I can’t really explain scientifically why, but I just think you’re giving your starter a better chance to thrive/mature if you use slightly more flour and water.
Once you are confident in the strength of your starter, I think you absolutely can cut back the amount of flour and water.
Hope this makes sense! Let me know if you have other questions.
Marie, great to read all of this! Thanks so much for writing and sharing all of these notes. Very helpful for others. My house is freezing, and I’m considering fashioning some sort of cozy space for my starter because it is rising so slowly. Will answer your other questions in a sec.
Hi Alexandra.
I landed on this page from your pizza dough/crust recipe. Is pizza dough one of the things you can make with the dicard starter?
You can, but I would definitely add some yeast to the mix, too, because the discard likely won’t have enough oomph to make the dough rise.
Aplologies in advance. I’m new to sourdough starter.
I guess my question is this, If I’m making this sourdough starter…at which point in the process would I grab some of the starter from here in order to make your pizza recipe here: https://alexandracooks.com/2020/05/01/simple-sourdough-pizza-a-step-by-step-guide/
It looks like I only need 100g of the starter to make the dough…but at which point (or which day) in the starter process do I grab the 100 grams?
Hi Joseph, no apologies necessary 🙂
You shouldn’t take any starter from here until you have built a strong starter that is consistently doubling in volume after feedings. So for here, the earliest would be 5 or 6 days into the process, but ideally even a few days after, when you’re continuing to strengthen the starter you’ve built.
Let me know if you have any more questions.
Y’all! If you cannot find a local source for Freshly Milled Flour–get a grain mill and grind your own! I just got a mill, and that is what I am planning to do, using this method. What a great find your site is. And for GREAT information on FMF, Sue Becker of Bread Becker’s is an awesome resource. Her podcast, Sue’s Healthy Minutes, has been life-changing for me and my family. Thanks for this terrific information!
I did 190 g of pineapple and 190 g stone ground rye flour. It’s a paste, like really thick. Is that right? Mine have always been more like “glue” consistency.
Yes, it’s pretty thick! Reference the photos above — there’s one that shows what the mixture looks like right after the flour and pineapple have been stirred together.
This is what works for me:
To make sour dough starter mix 1/3 cup flour with 1/3 cup warm kefir. Mix in 1/4 tsp. of yeast. Mix in the morning, in the evening add same amount of flour and kefir and another pinch of yeast. Put in warm place overnight. The next morning it will have risen to top of jar and you’re ready to mix your dough.
I was discarding part of the starter for every feeding. Should I just use the “starter” that I currently have and start at day 2, or do I need to restart?
Did you start with pineapple juice and this recipe? Or did you start with a different recipe?
How come you don’t discard for the first feedings? Recipe did work great for me, just wondering why you don’t discard like you do with a “normal” starter.
Hi Ali! Love the idea of starting with a fruit juice and want to try this. But I noticed on Day 3 and 4 you don’t discard. You are only saying to add. At that rate I’d have four cups of starter. Is that right? From all my experience with starters, this doesn’t make sense. Am I missing something? Thanks!
Yep, that’s right! I know, very different than many other recipes for starters out there 🙂
If I am reading this right you don’t discard until day 5 is that correct? Also do you have a general amount that you will put in a new jar on the 5th day?
Correct! I transfer 128 grams from the big vat of starter to a new jar and add 128 grams each flour and water.
Thank you so much. I have tried a couple of different times to make a sourdough starter and they were both a flop. I am very hopeful for your recipe.