
Easy Sourdough Sandwich Bread
This post may contain affiliate links. Please read my disclosure policy.
As I mentioned a few weeks, a number of requests about how to make my mother’s peasant bread with a sourdough starter encouraged me to dip my toe into the wonderful world of naturally leavened breads. You can read more about that experiment here, which led to this simple sourdough focaccia recipe, an adaptation of my favorite yeasted, refrigerator focaccia.
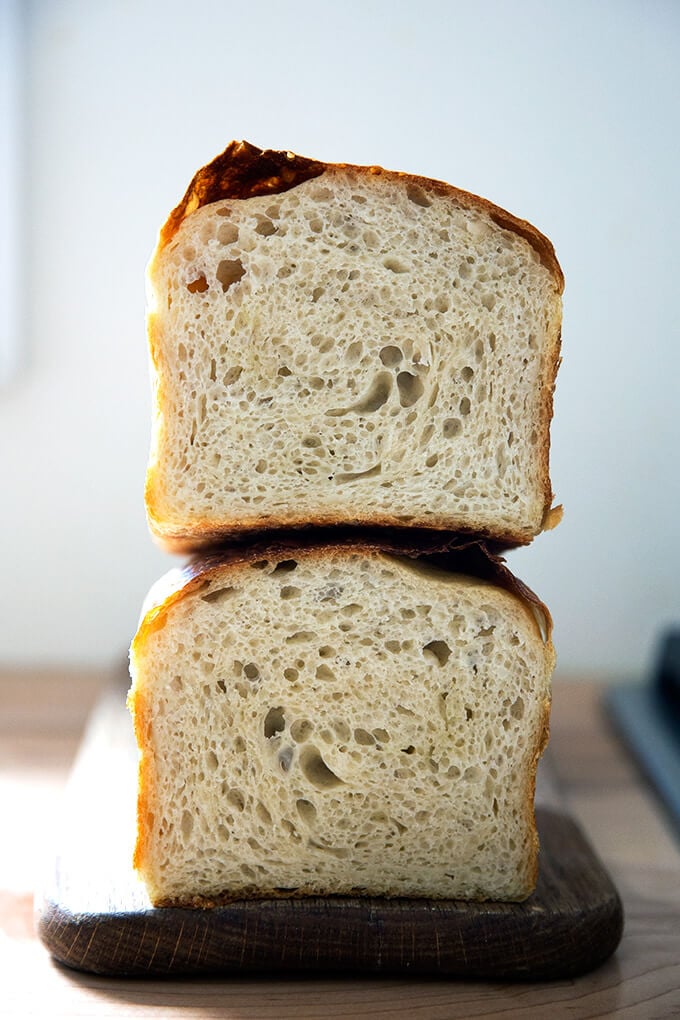
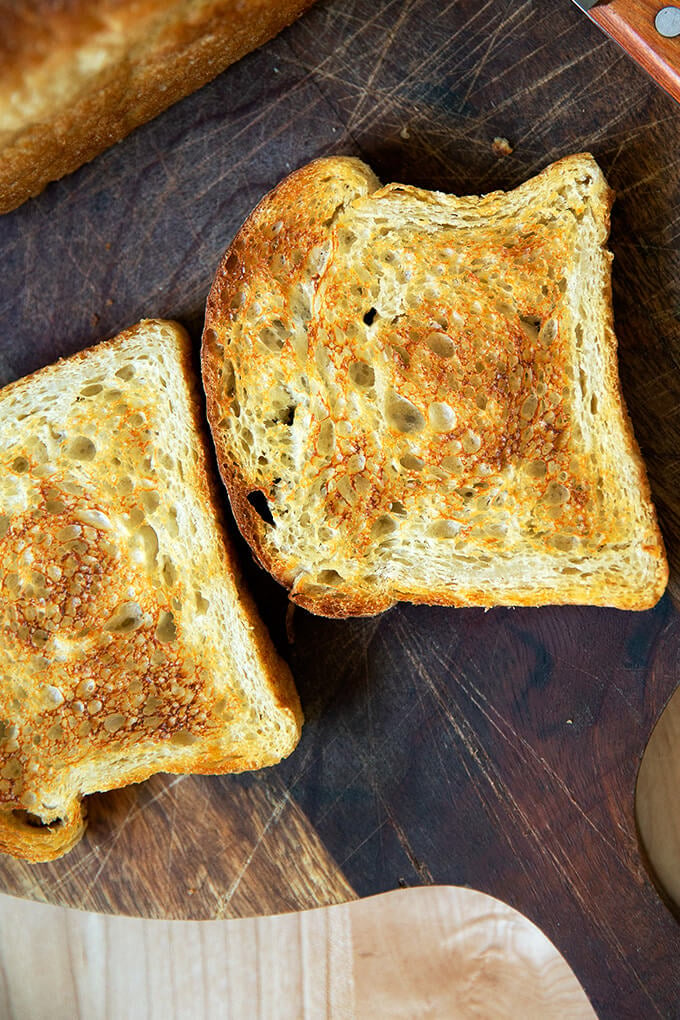
It also led to this sourdough toasting bread, which is essentially the same formula, just baked in a different vessel and without the slick of oil and sprinkling of sea salt on top. I’ve been making this bread even more often than the focaccia these days because I love the shape: it’s so nice for morning toast and for sandwiches.
PS: How to Build a Sourdough Strater from Scratch
PPS: How to Activate, Feed, and Maintain A Sourdough Starter
Simple Sourdough Toasting Bread: What You Need
- A sourdough starter. I recommend buying one (read why here). But if you’re up for it, you can make one from scratch in just about a week.
- Time. As with the focaccia, this bread rises first for about 6 to 18 hours (depending on the time of year and strength of your starter), then again for another 4 to 6.
- A large loaf pan. I’ve been using this 10 x 5-inch loaf pan. If you only have two smaller loaf pans, such as 8.5 x 4.5-inch pans, you’ll need to split the dough in half after the first rise.
That’s it! Ready? Here’s the play-by-play:
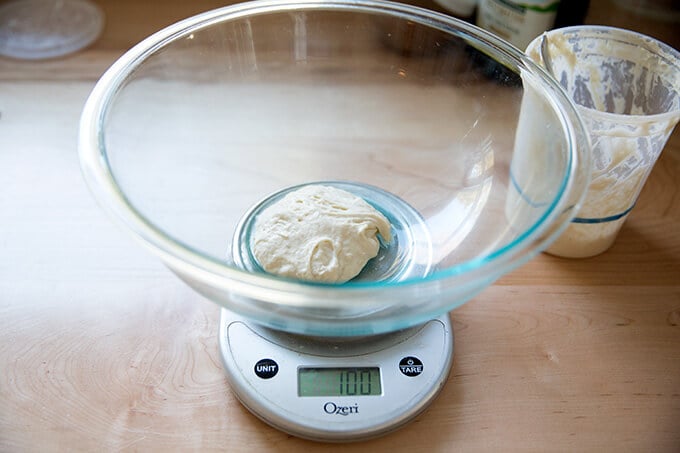
As always, when mixing sourdough doughs, it’s best to weigh everything with a digital scale. Start with 100 g starter. (If this looks familiar, it is: this is the same basic process for the sourdough focaccia.)
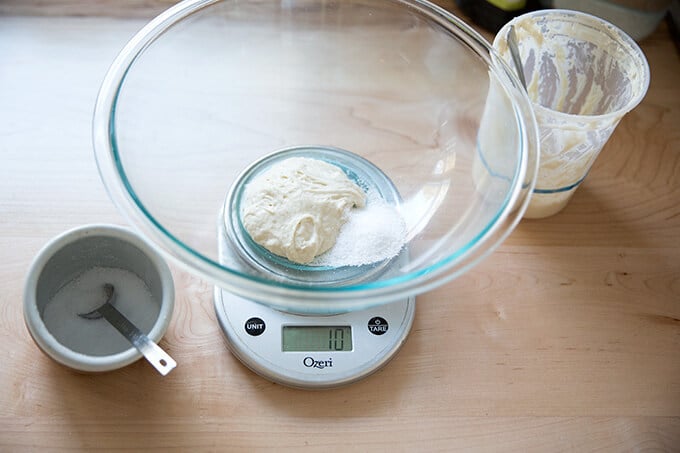
Add 10 g kosher (or other) salt.
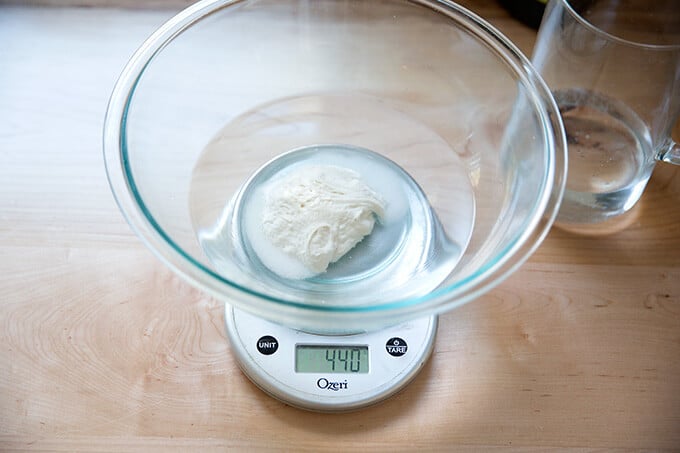
Add 430 g water. (Or less, see recipe for notes.)
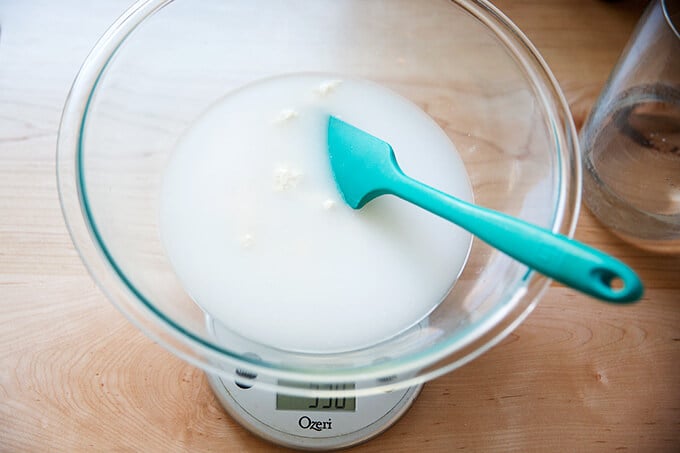
Stir to combine.
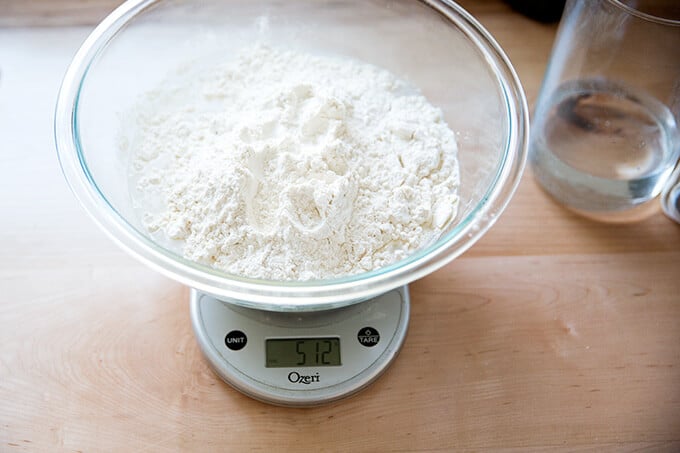
Add 512 g bread flour.
Stir to form a sticky dough ball.
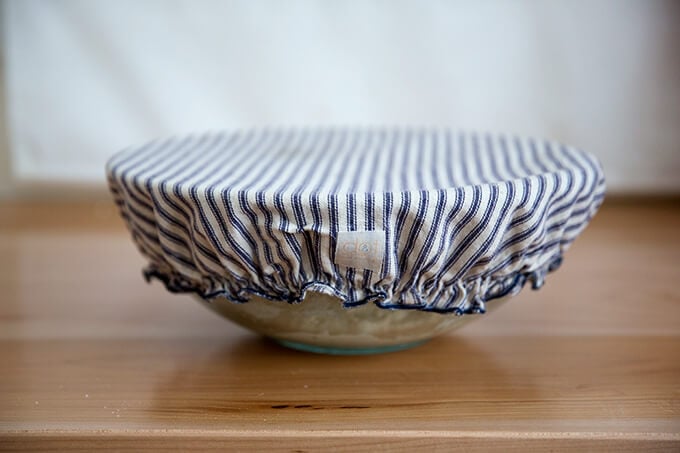
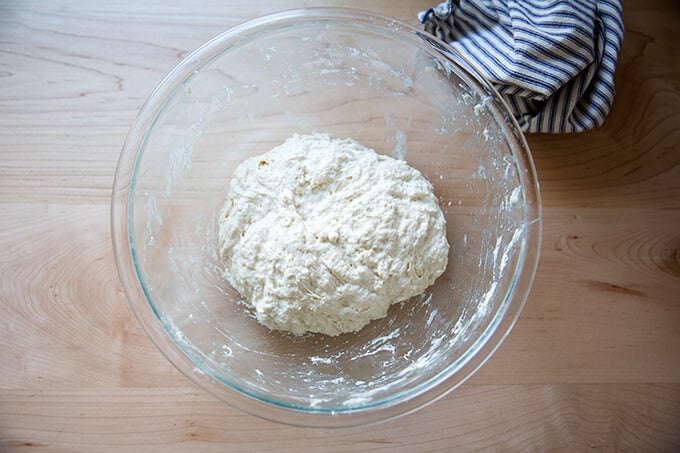
Cover with a towel or bowl cover, and let rest for 30 minutes. Then, perform a series of stretches and folds. See video for guidance. Repeat this 3 more times for a total of 4 sets of stretches and folds during the first two hours. Then, let rise for 6 to 18 hours* (see recipe notes) at room temperature:
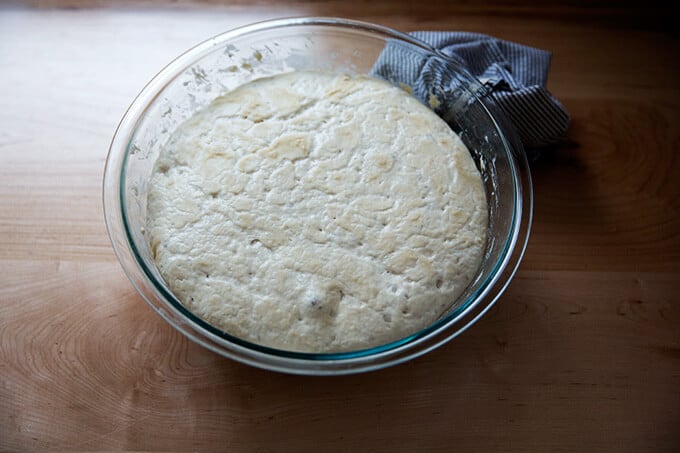
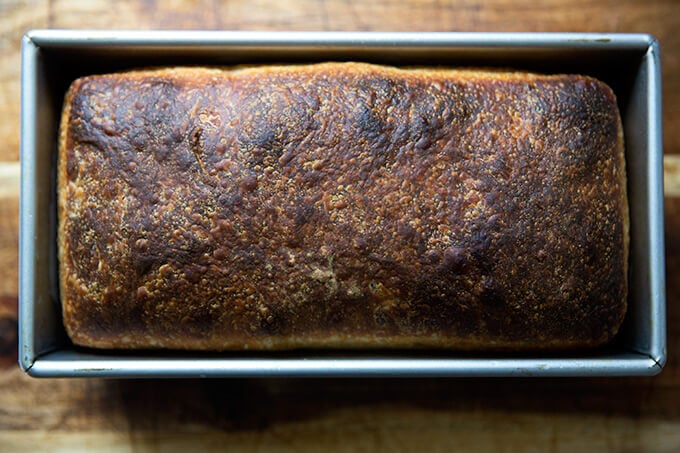
After 6 – 18 hours, it will look something like this:
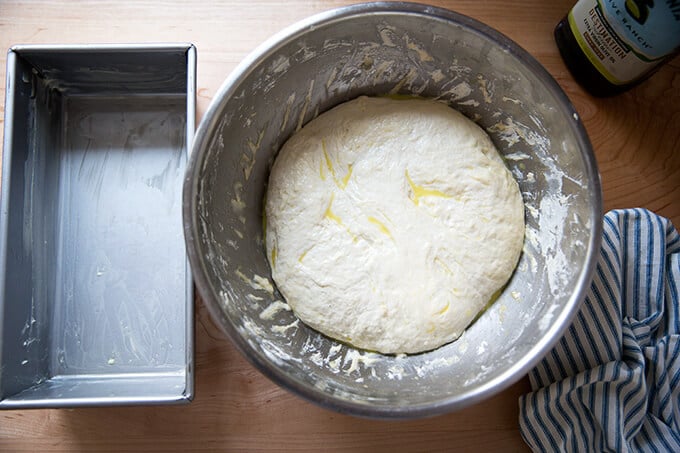
Drizzle the surface of the dough with a little bit of olive oil; then fold the dough inwards from the sides to deflate.
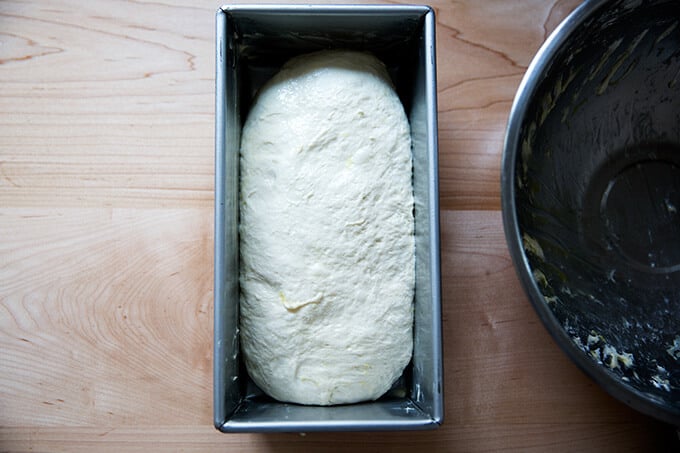
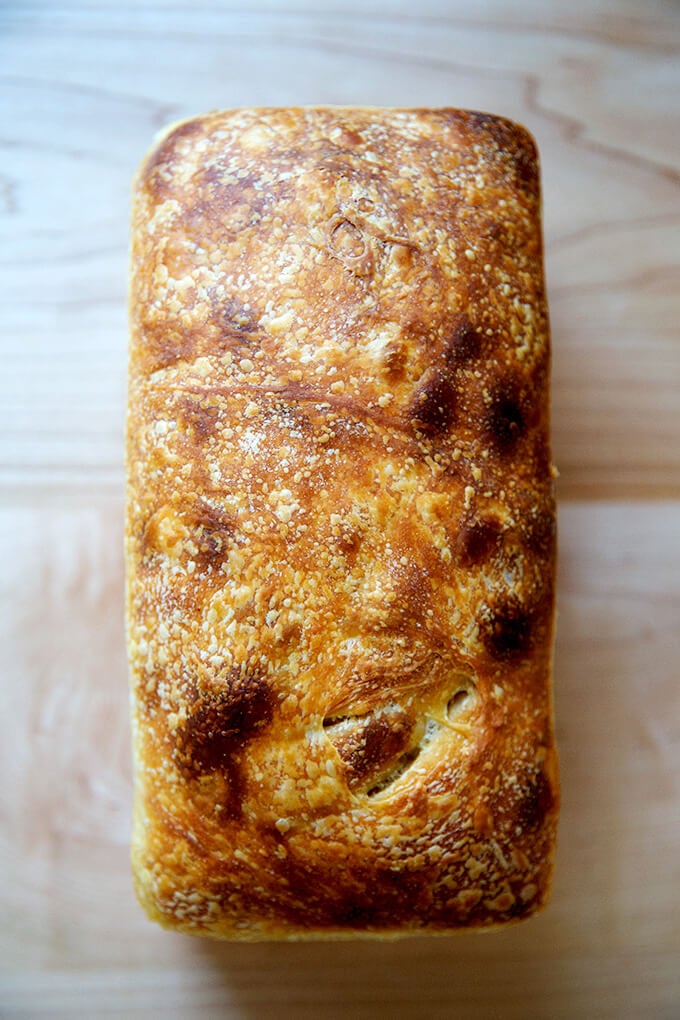
Transfer dough to loaf pan.
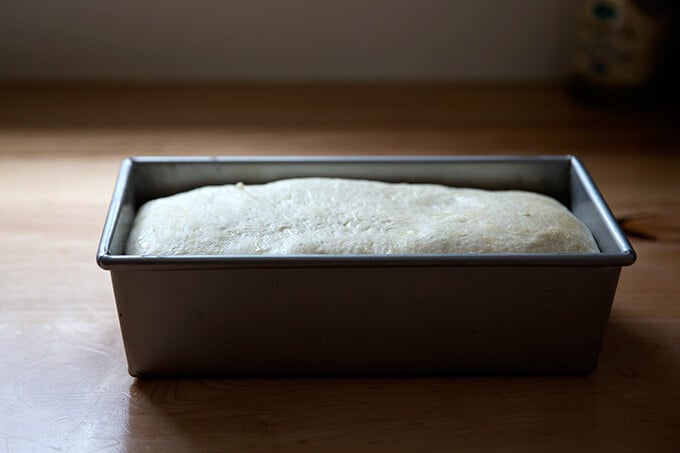
Let rise till dough just begins to crown the rim of the pan, about 6 hours.
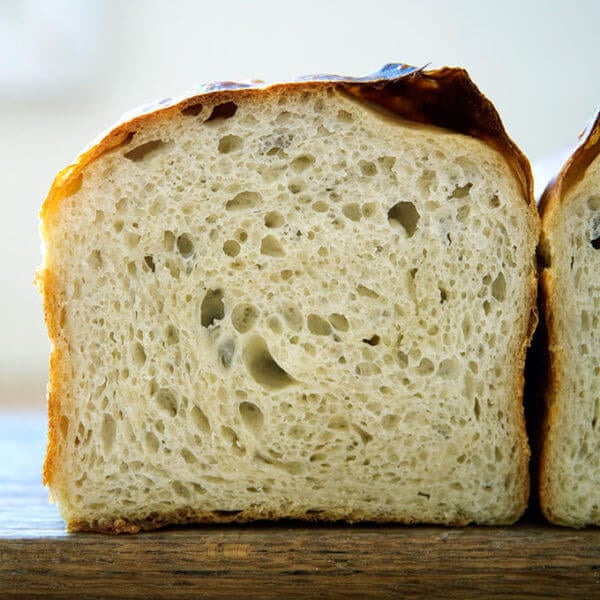
Bake for about 45 minutes.
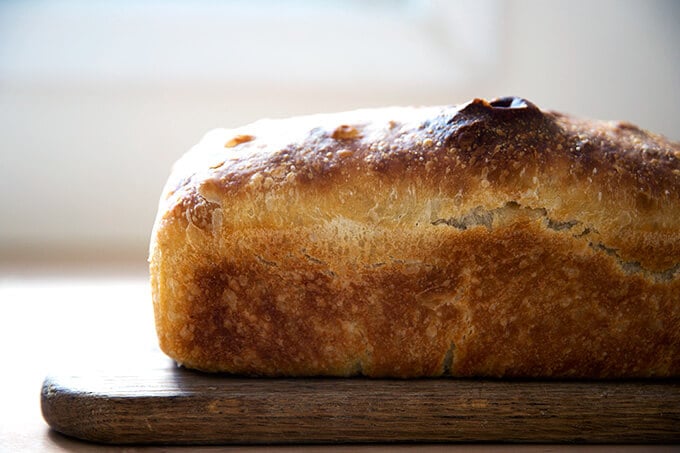

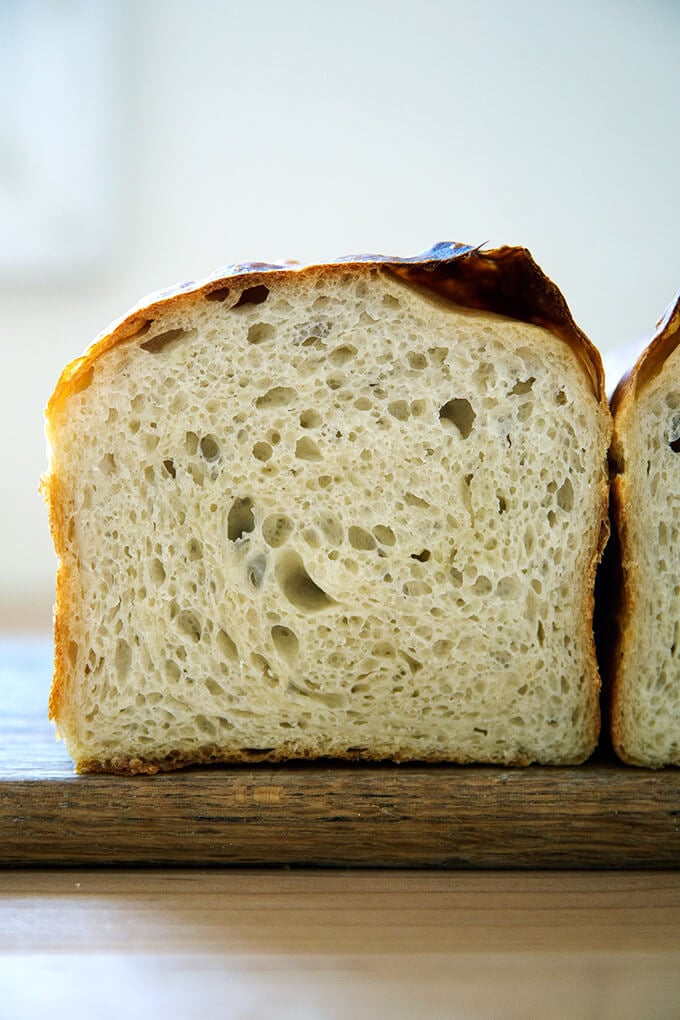
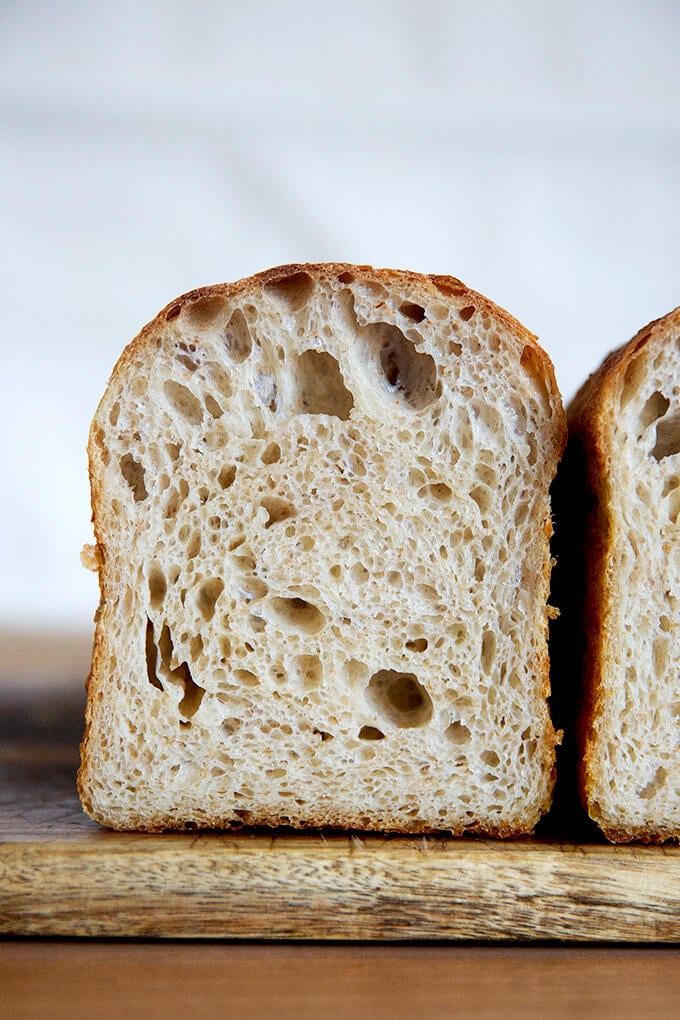
I baked this loaf in a tall-sided pullman loaf. Love the shape!
Easy Sourdough Sandwich Bread
- Total Time: 24 hours 40 minutes
- Yield: 1 loaf
Description
** UPDATE: VIDEO GUIDANCE IS HERE **
The makeup of this dough is the same as this sourdough focaccia. Here, the dough is baked in a loaf pan, and there is no sea salt on top.
This recipe yields one large loaf. You’ll need a 10 x 5-inch loaf pan, such as this one. If you only have two smaller loaf pans, such as 8.5 x 4.5-inch pans, you should probably split the dough in half after the first rise.
Plan ahead: This dough rises first for 6 to 18 hours (or less if it is super hot out or if you live in a humid area) or until the dough doubles in volume; then again for about 4 to 6 hour or until the dough crowns the rim of the baking vessel.
Troubleshooting: If you have issues with your dough being too sticky, please read this post: Why is my sourdough so sticky? The 4 common mistakes.
If you’re just getting started with sourdough, check out this post first. You’ll find tips there on procuring a starter as well as how to feed it and maintain it. If you’re up for making your starter from scratch, you can do so in just about 1 week.
Water: Chlorine in water can adversely affect sourdough. Leaving water at room temperature for 24 hours will allow most of the chlorine to escape. When I am in the habit of making sourdough bread, I fill a large pitcher with water and leave it out at room temperature. I use this for my sourdough breads and starter. Truth be told, I’ve used water straight from the tap and have not noticed a difference.
Water quantity: Also, depending on where you live and the time of year, you may need to cut the water back. If you live in a humid environment, for instance, I would suggest starting with 400 g or 420 g water. If you are not using bread flour, you also may need to cut the water back a bit. So much success with sourdough relies on getting the water quantity right.
Starter: I use a 100% hydration starter, meaning it is equal parts by weight flour and water. If you need guidance on how to maintain a starter, see this post.
Ingredients
- 100 g (about 1/2 cup) active starter, see notes above
- 10 g (about 2.5 teaspoons) kosher salt
- 430 g water, (or less, see notes above) room temperature
- 512 g (4 cups) bread flour, such as King Arthur Flour
- a few tablespoons extra-virgin olive oil
- room temperature butter, for greasing
Instructions
- Mix the dough: Place the starter, salt, and water in a large bowl. Stir with a spatula to combine — it doesn’t have to be uniformly mixed. Add the flour. Mix again until the flour is completely incorporated. If you have a straight-sided vessel, transfer the dough to it — it really helps monitor the rise and allows you to see the true growth in volume of the dough.
- Perform one (or more) “folds”: 30 minutes after you mix the dough, reach into the bowl and pull the dough up and into the center. Turn the bowl quarter turns and continue this pulling 8 to 10 times. See video for guidance. If time permits, repeat this “folding” step every 30 minutes for the first two hours. (Note: even if you perform just 1 fold, your dough will be in good shape.)
- Drizzle with a splash of olive oil and rub to coat. Cover bowl with a tea towel or bowl cover and set aside to rise at room temperature (70ºF/21ºC) for 4 to 18 hours — if it is super hot out or if you live in a humid environment, it may only take 4-6 hours. When the dough has nearly doubled in volume (or UPDATE: increased in volume by 50%, which is when I now end the bulk fermentation), it is ready. (Note: Do not use an oven with the light on for the bulk fermentation — it will be too warm. It is best to rely on visual cues (increasing in volume by 50% or doubling if you’ve had success with doubling) as opposed to time to determine when the bulk fermentation is done. A straight-sided vessel makes monitoring the bulk fermentation especially easy.)
- When the dough has nearly doubled, grease a 10 x 5-inch loaf pan with butter (or nonstick spray). Drizzle dough with a few tablespoons of olive oil. Rub your hands with a little bit of oil to coat. Use your hand to release the dough from the sides of the vessel, being careful not to completely deflate the dough. Video guidance here. Turn dough out onto a work surface. Quickly, shape the dough into a rectangle — I fold the dough envelope-style first; then I use a bench scraper to shape the dough into a rough rectangle. Transfer dough, seam-side down to prepared loaf pan and gently stretch into an oblong shape. (At this point, you can transfer the pan to the fridge if it makes sense with your schedule: rub the dough with oil and cover with a cloth bowl cover or plastic wrap. Transfer to the fridge will the next day. Then proceed with the recipe.)
- Leave alone for 5 to 6 hours or until dough begins reaching the rim of the pan — this may take less time when it is very warm out. Do be patient with this second rise: to get good height, the dough should be near the rim of the pan before you transfer it to the oven.
- Heat oven to 425ºF. Transfer pan to the oven and bake for about 20 minutes. Reduce heat to 375ºF. Bake for 20 to 25 minutes more or until golden all around. If you have an instant read thermometer, it should register 206-210ºF or so before removing. Remove pan from oven and turn bread out onto a cooling rack. Cool at least 30 minutes before slicing.
- Prep Time: 24 hours
- Cook Time: 40 minutes
- Category: Bread
- Method: Sourdough/Natural Leavening
- Cuisine: American
This post may contain affiliate links. Please read my disclosure policy.


901 Comments on “Easy Sourdough Sandwich Bread”
In your video you coat the bulk fermented dough with oil and the pull it out to shape. In your instructions you also say to coat the shaped dough with oil after it goes in the pan. So oil twice?
Hi Charlie,
I like to slick the surface of the dough with oil when it is in the pan for a few reason: it protects the dough from drying out while it is proofing, and it promotes browning. So yes, oil twice. Sorry for the confusion!
Hi Alexandra! I love this recipe. I double it, do the stretch and pull then refrigerate the dough for 2-3 days depending on my schedule. We eat a loaf and I freeze one. Comes out perfect everytime! I am experimenting with cinnamon raisin for Easter. 2 loaves going in the oven now! Thank you!!!
Wow, that’s awesome! Great to hear! Thanks so much for writing and sharing these notes. Love the long cold proof idea! Can’t wait to try it.
Can I use milled wheat flour in this recipe? Any tips on why this bread falls apart when I cut it? I have made it several times and my family loves it, the consistency has just been different each time. It tends to fall apart when making it for sandwiches (other than this last time as I let it rise in the refrigerator but it wasn’t as soft and had less flavor.) Thanks in advance for the tips!!
Hi Tiffany! It’s possible you need to reduce the water from the start — that will give you a sturdier loaf. Regarding milled wheat: are you milling the wheat yourself? Do you know the extraction rate?
Hi! If you wanted your loaf to be 50% whole wheat, would you need to change anything other than the flour?
You shouldn’t have to with this recipe because it’s pretty high hydration. Sometimes with whole wheat flours, you need to add more water, because they’re thirstier, but you shouldn’t have to with this recipe.
Hi! Wanting to make this in a 13×3 ish ceramic baker. Do I need to make any adjustments? Been using your simple sourdough at 1.5 measurements but can’t quite get it right (I think both a little too much water and overproofed) so wanted to try something new Thanks!
Hi Ellen! I don’t see why not! You can also definitely reduce the water from the start.
Been doing artisan sourdough breads for a couple years and have a favorite or two, but was looking for a bread pan recipe. THIS IS IT!
I’ve been making double loaves and share the second one with friends. They say it’s my best sourdough bar none, and I have to agree. It really is because of the focaccia base and olive oil, but it tastes wonderful, cuts easy for sandwiches, and toasted? Best out there.
I want to do a 50/50 whole wheat loaf, and I saw the earlier note about not needing to up the hydration, so will give it a try.
Fantastic recipe, thanks for sharing.
Great to hear, Stephen! Thanks so much for writing. Regarding the hydration, you may not need to add more water because this is so high hydration as is. Hope I’m getting to you in time. Generally, whole wheat flours are thirstier and therefore require more water, but again, that might not be necessary here. Play around!
This is by far the best sourdough sandwich bread I have made. I have tried so many recipes and just don’t like the ones with milk, butter and sugar in the dough. My family loves this bread too!!! Thank you so much for all your delicious recipes!!!
I’m new to sourdough but I think my starter has matured enough to be successful. I’ve tried this recipe and Alexandra’s easy focaccia and both were so easy and to my estimation really good. I needed to let my loaf rise a little longer to get taller otherwise it came out great – soft with a spongy crumb ( holes not too big either) AND I haven’t done this well with other recipes I tried recently. Thank you for this super easy recipe. These recipes are both keepers!
Great to hear, Tiffany! Thanks so much for writing and sharing your experience.
Please ignore and remove my previous comment… so sorry. I got mixed up between recipes. I actually have made this several times and it is a wonderful recipe!
No worries 🙂 🙂 🙂 Great to hear.
I know I must be doing this wrong. I followed the instructions to a T the first time I baked this and ended up with a batter-like dough (calling it dough is generous) and an inedible loaf.
The next time I decreased the water to 400 grams, but still followed the directions to a similar effect. Didn’t even bother baking it.
The next time I tweaked how I fed my starter and dramatically increased how much I stored the dough. Got a very smooth batter, still nothing resembling dough. I also increased the heat to 425 for the whole bake time. Ended up with a slightly more palatable bread, but it was basically just like eating sour play-doh (my friends were very generous, nibbling at slices and telling me ‘it’s coming along’)
Finally I caved to the suggestion of my friend who gave me the starter, who told me the water/flour ratios I was using were absurd. So I increased the flour to 600 grams, kept the water at 400, and kept the over at 450 for half the bake time before decreasing to 400. And I finally got bread! Actual bread! With actual dough.
Clearly these ratios work well for a lot of people, since the comments are full of rave reviews, but the initially stated water:flour ratios ended up with a goopy, liquidy batter that never ended up producing something resembling bread.
What types of flour are you using to feed your starter? And is this the first sourdough bread you baked? Or have you have success with other recipes?
Clearly, the hydration is too high for where you are, but I’m wondering if you are getting your starter to where it needs to be before you begin baking. You should be discarding most of it, leaving just a tablespoon behind or so, before feeding it with equal parts by weight flour and water, and then it should double in volume within 6 to 8 hours of feeding it.
Can you bake two loaves at the same time?
Yes!
I used a whole wheat starter but the regular bread flour for the recipe and it still turned out great! Thanks!
Great to hear, Alex! Thanks for writing 🙂
Just made it! Turned out perfect! Easy to follow recipe.
Great to hear, Karen! Thanks so much for writing 🙂 🙂 🙂
Thanks for the great recipe! I’ve been making it for several weeks now. Have you tried lining the tin with baking paper? I can’t use butter anymore and olive oil doesn’t work well enough. I’d rather not use margarine.
Parchment paper should work out great!
Can i bake this in a pullman tin with lid on? Love all your sourdough recipes – you have renewed my love of sourdough baking!
Thank you
Vic
So nice to read this, Vic 🙂 I have never tried, but I don’t see why you wouldn’t be able to. You may have to increase the baking time by 10 minutes or so to ensure it cooks through.
I really love this bread recipe!! It is my absolute favorite!! I’m just curious though, I recently started using a Pullman loaf pan and the bread is doughy in the middle, I was just using a smaller loaf pan before and it seemed ok. Do I need to bake the bread longer using the Pullman pan? I’ve been baking the bread at 425 for 20 minutes, then at 375 for 20 minutes. Or any other recommendations? Thanks so much!!
Hi! Great to hear all of this. With the pullman loaf pan, is it covered? Regardless, yes, it sounds as though you need to add some baking time: try adding 10 minutes and see how it turns out.
I don’t have a pullman loaf pan, but have a couple of the smaller regular size bread pans. Does this recipe as written make two regular size loaf pans? Or should I keep it in one and end up with a taller loaf?
What size are your “regular” pans? This recipe yields one loaf, but it should be baked in a 9×5-inch pan or larger.
Yup! I ended up using a 9×5 loaf pan, it came out tall and beautiful! Great, easy recipe. I used “healthy” but not too recently fed starter and a pinch of yeast for insurance, and it came out great!
Oh yay! Great to hear this. Thanks for reporting back 🙂
Hi again Alexandra,
I have been reading about pullman pans. I like my regular loaf pans ok but am interested in a straight sided option.
Would the pullman loaf pan you used for this sourdough bread, work for the bowl breads in your book that you have converted to a loaf shape, including the newly reworked No-Knead Oatmeal-Maple loaf?
Thanks.
Susanna in Seattle
I love the shape of a straight-sided pullman pan as well! The pan will definitely work in terms of volume — I did the math, and it’s actually slightly larger than the 8.5×4.5-inch pan I’ve been using.
Loving the ease of this recipe so far. I have my loaf in the fridge right now. When I’m ready to bake it this afternoon, how long should I let it sit out before putting it in the oven?
Hi! I’m likely too late here. I let it rise at room temperature until it begins to crown the rim of the loaf pan. How long did you wait? And how did it turn out?
Thanks for responding. I did let it get to room temp. then continued the rest of the recipe as normal. It turned out perfect. Love this recipe and so does my family.
Great to hear, Kayla!
I love this recipe and have made it many times. My question is; how long can it stay in the fridge? I often make artisan loaves and do a long cold ferment, anywhere from 24 to 48 hrs. Will this dough rise too much if left for a long time in the fridge? Also, can it be baked cold from the fridge if it has already risen to the rim of the pan or should it still come to room temp before baking?
Thanks so much!
Great to hear 🙂 I think it would be fine in the fridge for 24-48 hours — this depends partly on how cold your fridge is, but it should be fine. And I think you can get away with baking it cold if the dough is at the rim of pan.
Hi!! I started making this recipe however I want to just make it into a artisan style bread loaf could I do that with this recipe instead of the sandwich? I just completed the folds and allowing it to rest at room temperature for 10 hours.
Hi! I worry this dough is a little too high hydration for that — you can try, but I’m just not sure you’re going to be able to shape it into a ball or a batard that will hold its shape.
Do I leave the bread in the oven between temperature changes? Or do I take it out?
Leave in the oven!
So moist and crunchy and amazing flavor. Best part is I doubled it and
made a sandwich loaf with the other half. Only issue was it stuck on the bottom but I think it was because I used a glass baking dish. Metal next time.
Great to hear Laura! Bummer about the sticking. More butter might help or parchment paper or, as you note, metal 🙂
I love this recipe so easy and oh so good to eat! I have made a few sandwich loaves but they all have honey, sugar, egg, butter, milk or a combo of all. I just wanted simple sourdough in a sandwich loaf. This recipe took me way out of my comfort zone with high hydration and long bulk fermentation. I had to change my schedule because the room
temperature. I started early in the morning and watched the dough. When the dough doubled in the I shaped as best I could. It was like handling a blob of jelly but I got the dough into the pan let it rise to the top of the pan then baked. Total time from start to the oven was 9 hours. The bread look exactly like the images.
So great to read all of this Lia! And so helpful for others to have the encouragement to not be afraid of the high hydration dough: “a blob of jelly” is such a good description 🙂 Thanks for sharing your timing notes, too.
I followed your recipe exactly, except added 40 g less of water. It more than doubled overnight on top of the refrigerator. Baked it in a loaf pan and it looked great, but the inside is still gummy. I can only eat it if I toast it, although it is delicious. This actually happens with all my breads and I have yet to figure out why. Help!
Hi! Two thoughts:
1. It’s possible that your dough over fermented: when you shaped it before putting it in the loaf pan, did it have strength and structure? Or was it puddly and slack?
I don’t think that is what happened, however, if it baked up nicely and if you are able to eat it once toasted.
2. Too much water. Try holding back even more water next time around. What type of flour are you using? Do you live in a humid environment?
My dough was puddly and slack before I put it in the loaf pan. Then I put it in the refrigerator overnight , took it out the next morning, and let it sit on the counter until it rose to the rim.
I use King Arthur bread flour. The humidity was only 30% today.
Thank you for replying.
OK, this is tricky: the fact that it still rose to the rim, means that it wasn’t totally over fermented but the texture you are describing indicates that the dough was over-fermented.
Are you using a scale to measure? And a straight-sided vessel for the bulk fermentation?
I think you should deduce the water, and I think you need to shorten the bulk fermentation: let the dough rise until it increases in volume by 50-75%.
Yes, I am using a scale and a straight sided plastic bucket. I think I left it overnight too long because it seemed to have tripled in size. I will try shortening the bulk fermentation, And decreasing the water – thank you.
This has got to be the easiest recipe for sourdough. I woke up my starter after months in the fridge and he is so active within even an hour of feeding. I have made this recipe 3 times this week, my husband and four kids keep asking for more. I’ve been using the same pan size that you listed, but I’m debating buying the 12×4.5 inch loaf pans off Amazon. Does this change any of the ratios of ingredients? Thank you for all of your amazing recipes! Also starting chibatta bread for Sunday dinner tonight as well.
So nice to read all of this, Meaghan 🙂 🙂 🙂
The size of the pan won’t change the ratio of ingredients. Were you thinking of doubling the recipe for that size pan?
Hope you love the ciabatta, too!
Update: I actually used your same exact measurements and when the dough rises in the pan it actually filled my entire larger pan. I am making 2-3 loaves per week now and my kids are telling me that they HATE the sandwhich bread from the store now ❤️
Awwww, yay 🙂 🙂 🙂 So nice to read this, Meaghan! Thanks so much for reporting back and sharing your notes.
Hi Ali, if I only have 1 8.5×4” loaf pan, could I split the recipe in half (following all gram measurements) and just bake the dough in my single pan? Thank you in advance!!
Yes! That should work just fine.
This is a great recipe. I’ve tried it several times and I enjoy it but my second rise seems to be unnecessary. I leave the dough to rise for about 8-10 hours (overnight) and when I shape and put it into the 10×5 inch loaf pan it completely fills it to the edge. I only leave it for maybe an hour and it doesn’t rise much more before baking it. I wonder if I my first rise is too long?
Hi! I don’t think you’re doing anything wrong if the bread is coming out well. Maybe your starter is just very active?
Hi, Alexandra—
I have made this recipe twice with reasonable success. Even with my rookie mistakes, the family chose it as their favorite sourdough sandwich loaf. I think it will be my “go to” sourdough sandwich bread recipe as soon as I get a couple of things figured out.
I baked the bread in 2 smaller (probably 8 1/2 by 4 or 5) loaf pans. I know I overfermented it both times, but I still got a decent second rise and the texture was surprisingly good—not packy. The loaves were short, but I think that is a result of splitting that volume of dough between two pans.
My issue is this. The dough is REALLY soft and wobbly. I just patted and pushed it into a somewhat rectangular shape and plopped it in the loaf pans, counting on them to give it shape.
Am I supposed to actually be able to pat the dough out into a rectangle then roll it up into a loaf shape? If I am, I probably need to reduce the amount of water I use.
Do you have any suggestions?
Thank you!
Sharon
Hi Sharon! Great to hear. The dough definitely is on the wobbly side, but it sounds as though reducing the water will help a lot. I would start by holding back 50 grams of water or even more if you are in a very humid environment. What kind of flour are you using?
Hi Alexandra, I’ve been making sourdough now since 2020. During the pandemic (like many others) I started a sourdough starter. I’ve tried several other sourdough recipes but yours is by far mine and my family’s favourite! Thank you so much for all of your advice/tips and your videos which are very helpful!!
So nice to read this, Tracey! Thanks so much for writing 🙂 🙂 🙂
I recently inherited some starter from a friend and am completely new to the world of sourdough. I have made this recipe 5 times over the past month, and while it’s not always photogenic it’s is always soooo good. I absolutely love having sourdough sandwiches or toast with homemade jam! Excellent recipe and instructions! It also freezes well as individual slices, just pop the frozen slice right into the toaster.
Great to hear, Amanda! Thanks so much for writing!
Love this one Ali! Have been making it weekly, it’s perfect for sandwiches and comes together quickly
Great to hear Sam! Thanks for writing 🙂
Your recipes are great, thx sm!! I’ve been baking the sourdough bread in a sandwich tin recently and my family love it! However I tried baking 2 loaves (at the same time) tday n they came out undercooked 😔 If I want to bake 2 at the same time, shld I be baking for longer or change the temp? Pls help n thanks again! Peen
It sounds as though you do need to bake them longer in your oven — it all depends on your oven and how it retains heat. You can definitely try increasing the temperature, too, but keep an eye on it. If the loaves are browning too quickly, turn down the oven temp.