
No-Knead Soft Pretzel Rolls
This post may contain affiliate links. Please read my disclosure policy.
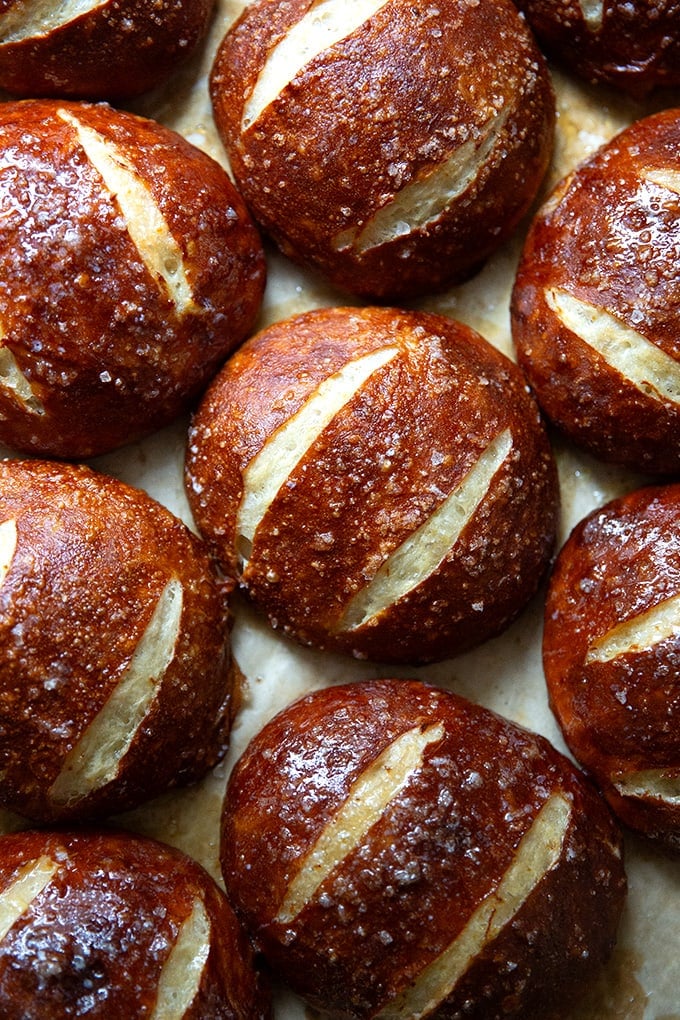
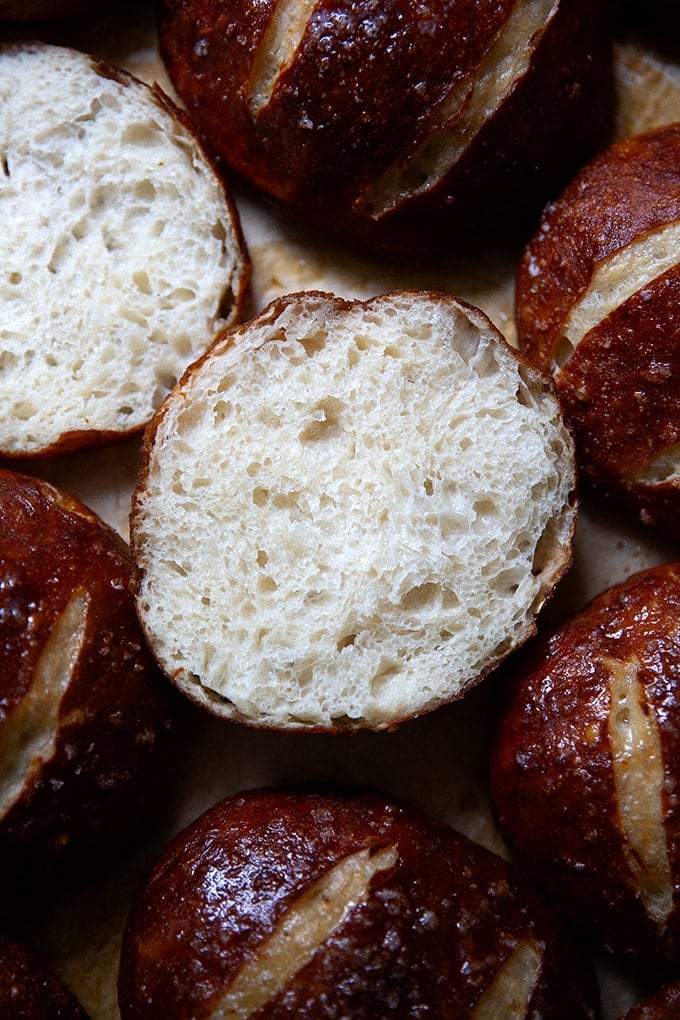
Soft-crumbed with a nice chew, these no-knead pretzel rolls are perfect for sandwiches of all kinds: egg and cheese, turkey and brie, roasted vegetables and mozzarella. The dough takes no time to mix together, and time does the work from there. Simple and delicious!
At some point this summer, my youngest child introduced the family to pretzel rolls. She had tried one at her grandparents’ house and asked me if I could start buying them, which I did.
A bag of four soon proved not to be enough for the family. As soon as I would bring them home, the kids would break into the bag, savagely grabbing them as though they hadn’t eaten all day, as though they feared I might never buy them again. On our recent camping trip, my youngest, before going to bed, staked her claim on the last pretzel roll for breakfast, and when she awoke the following morning to find it eaten, tears ensued.
Friends, while these pretzel rolls from the local grocery store are good, they are nothing to write home about. I am still a little perplexed, in fact, by my children’s enthusiasm for them. Deeply brown in hue, like a dark rye bread, the rolls are not terribly inviting (for children anyway), and while the crumb is light, the crust (to me) tastes like cardboard.
After buying bag after bag of pretzel rolls, I had to try making them from scratch. The recipe below is the product of several experiments, which began with this favorite soft pretzel recipe. It yields a tender-crumbed but sturdy roll, with an irresistible very pretzel-y tasting crust.
In short, I’ve changed the recipe by increasing the water and reducing the yeast, which means the dough comes together without kneading and requires a long, slow rise. I like mixing the dough in the evening, shaping the rolls in the morning, then boiling and baking them around lunchtime. See the recipe box for timing variations.
Friends, I hope you love these pretzel rolls as much as I do. My children still have yet to use the rolls for sandwiches, favoring eating them whole, but I have been halving them, spreading them with pesto, and loading them with roasted red peppers, eggplant, arugula, and mozzarella. I think they’d make an excellent egg sandwich, and, around the holidays, they’d be wonderful to have on hand for leftover turkey or ham sandwiches.
How to Make Pretzel Rolls, Step by Step
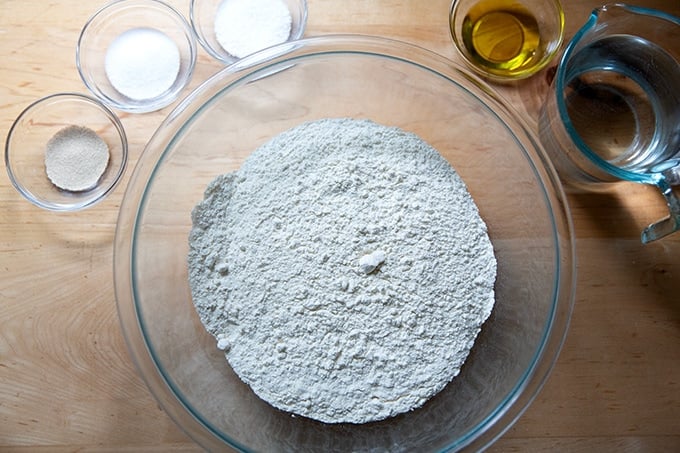
First, gather your ingredients:
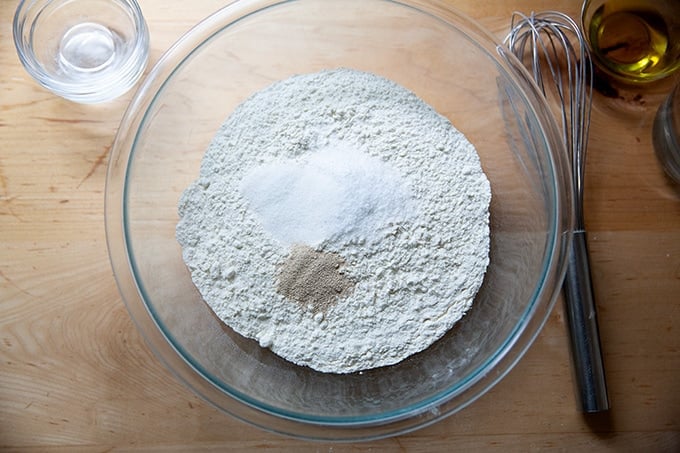
Whisk together the flour, salt, sugar, and instant yeast:
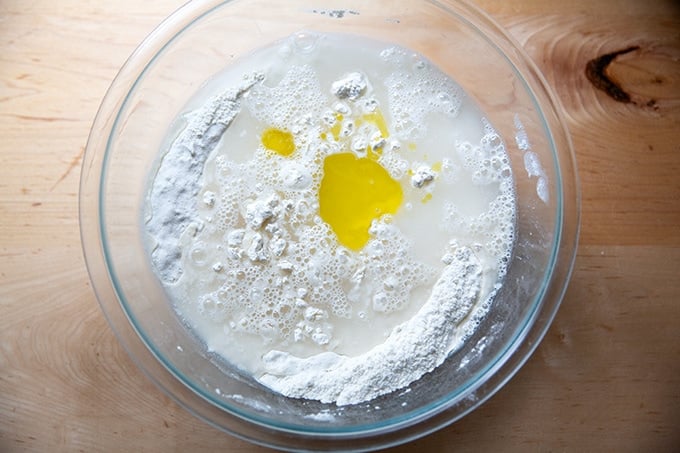
Then add the water and olive oil:
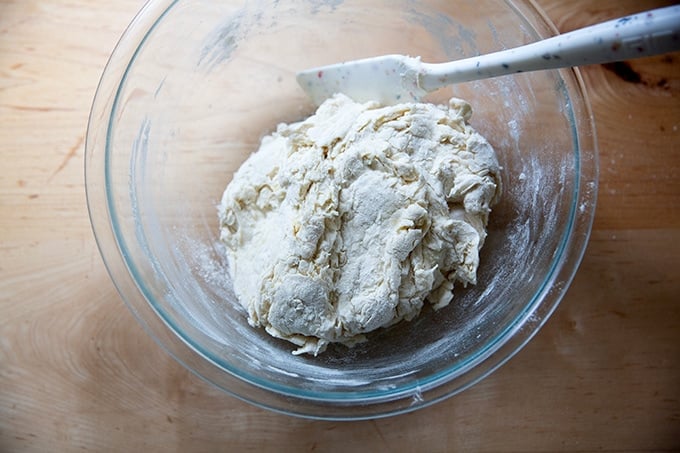
Using a spatula, mix until a shaggy dough forms:
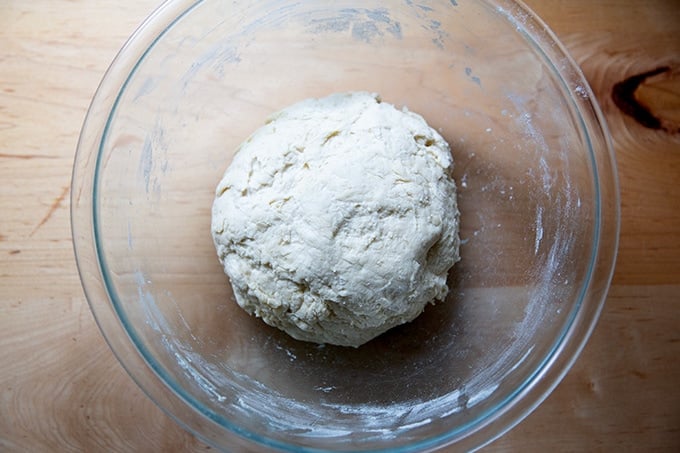
Knead briefly with your hands just until a sticky dough ball forms:
Cover the bowl tightly with a lid:

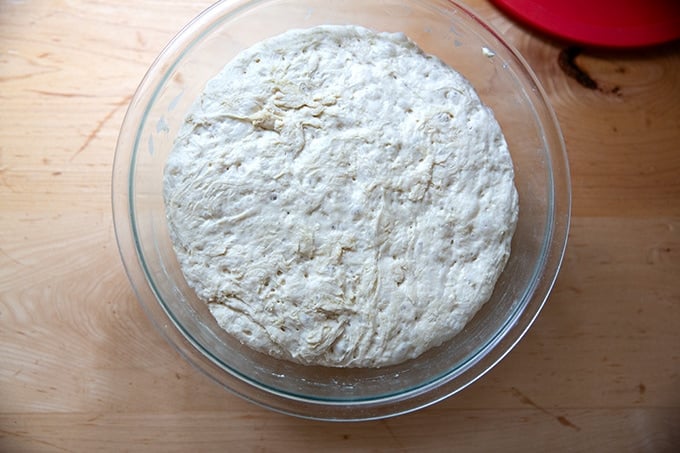
And let rise at room temperature for 8-10 hours or until doubled in volume:
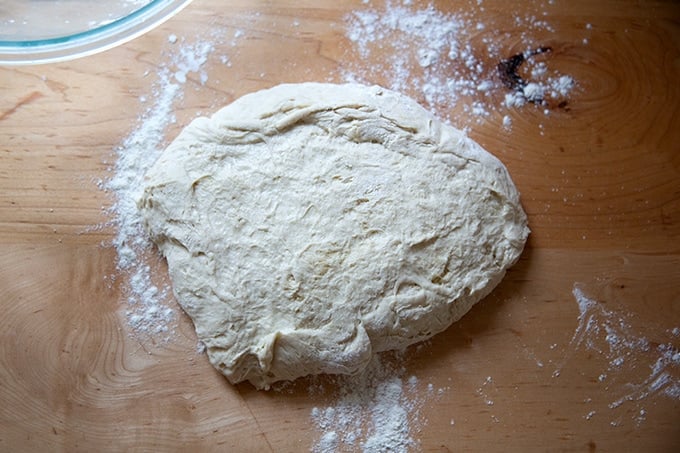
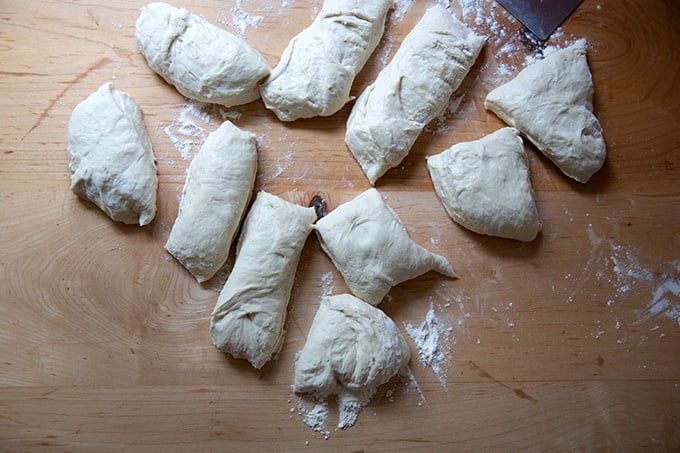
Turn the dough out onto a lightly floured work surface:
Divide the dough into 10 portions. Use as scale if you want evenly shaped rolls:
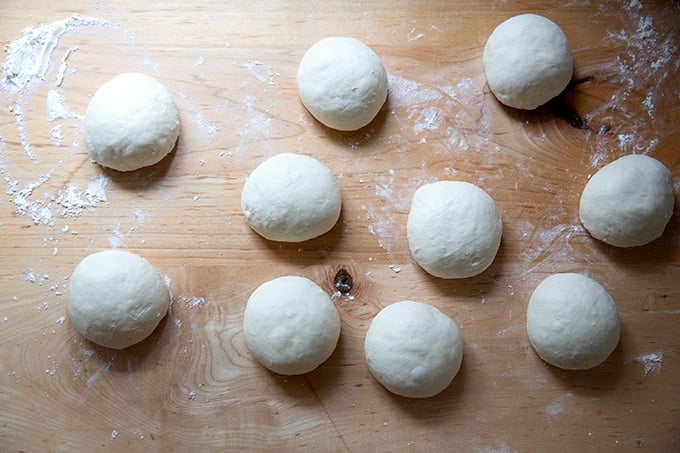
Ball up each portion:
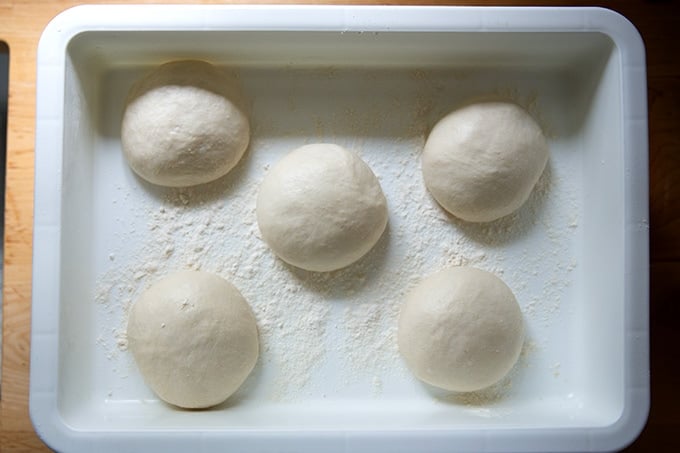
Then transfer to a lightly floured, roomy vessel to proof:
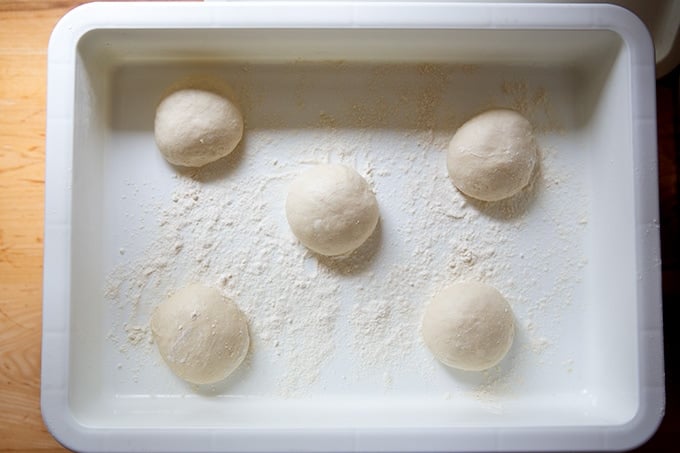
I love these DoughMate lidded containers and can’t recommend them enough if you have the space. If you don’t, use two 9×13-inch pans and cover with plastic wrap to ensure the dough balls don’t try out as they proof:
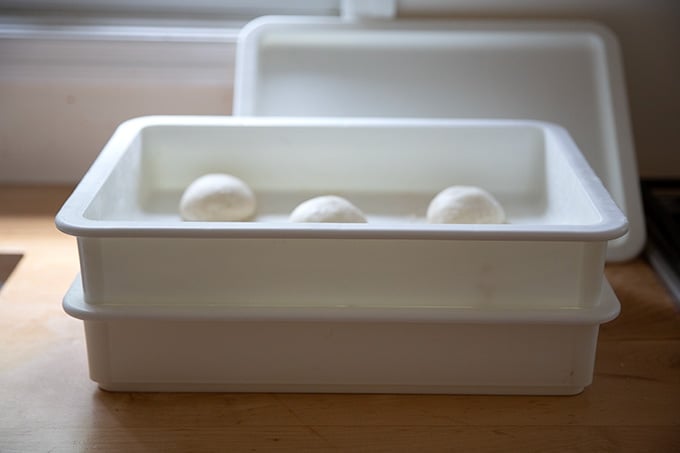
Four to five hours later or when the dough balls have doubled in volume…
… it’s game time! Preheat your oven to 400ºF. Line a sheet pan with parchment paper. Fill a large pot with 8 cups of water and bring to a boil:
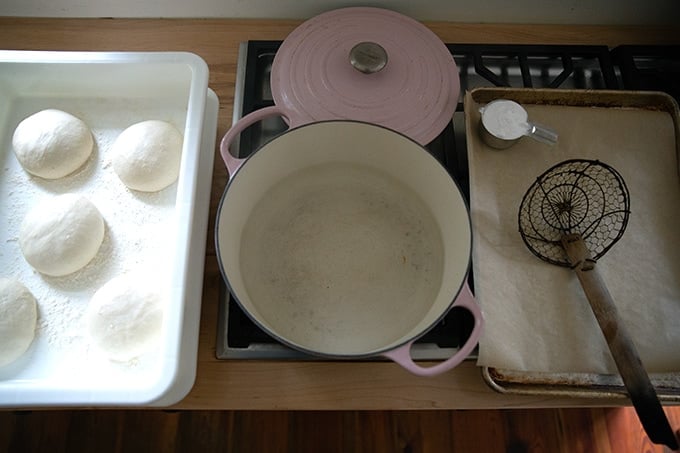
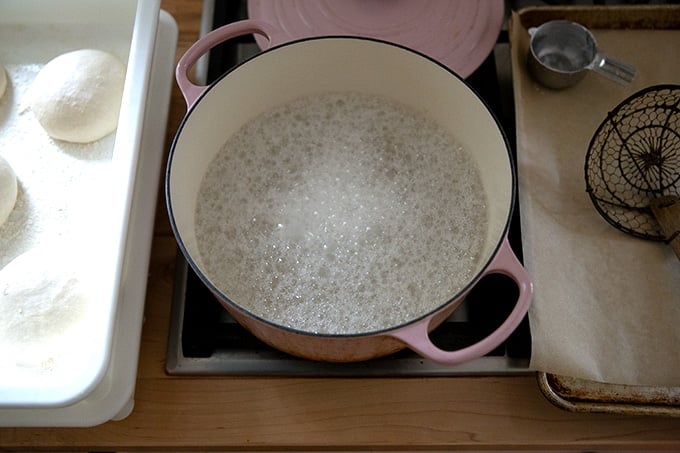
Add 1/2 cup of baking soda to the pot and stir to dissolve:
Working with one ball at a time, carefully lower it into the pot, flip it once or twice to submerge, then transfer it to the sheet pan:
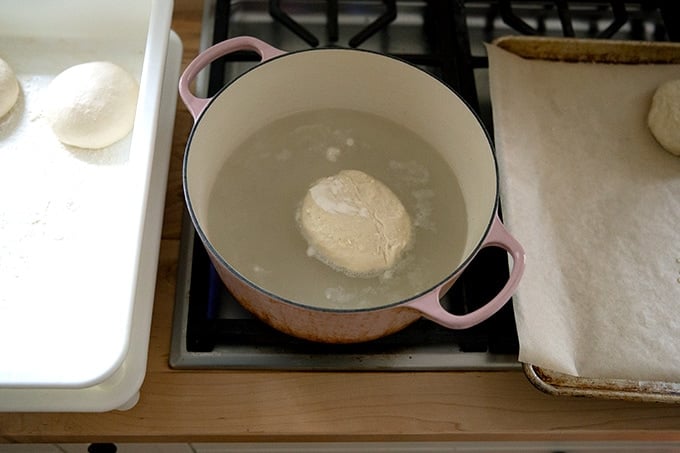
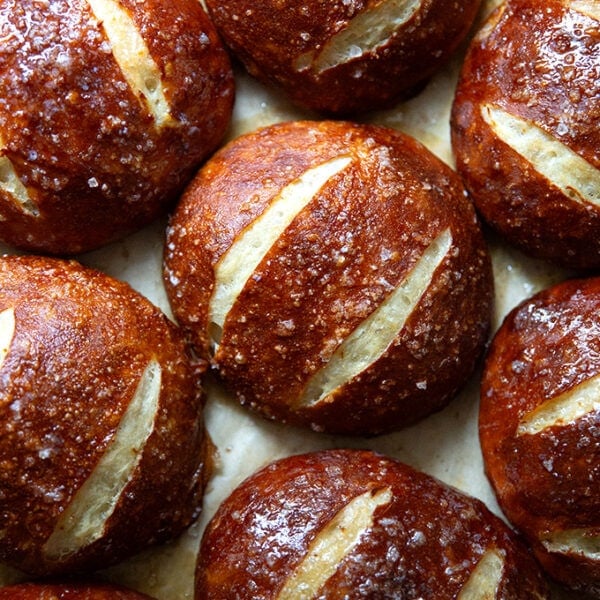
Once you’ve dunked five dough balls in the hot water, brush each with melted butter and sprinkle generously with flaky sea salt:
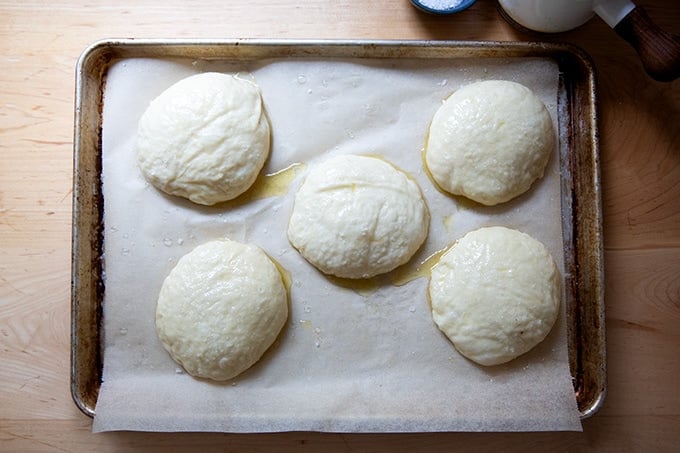
Use a sharp blade to make two slashes:
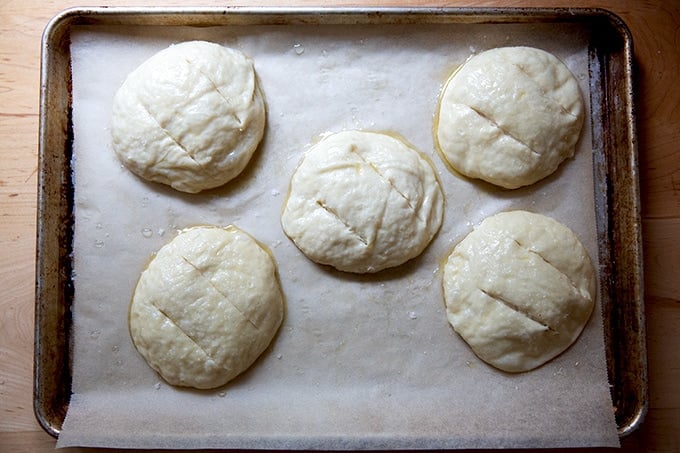
Then transfer to the oven for 22-25 minutes or until deeply golden brown:
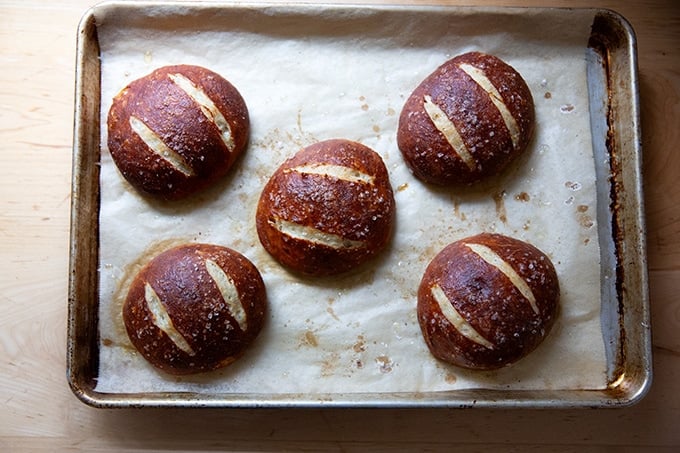
Brush with more melted butter immediately:
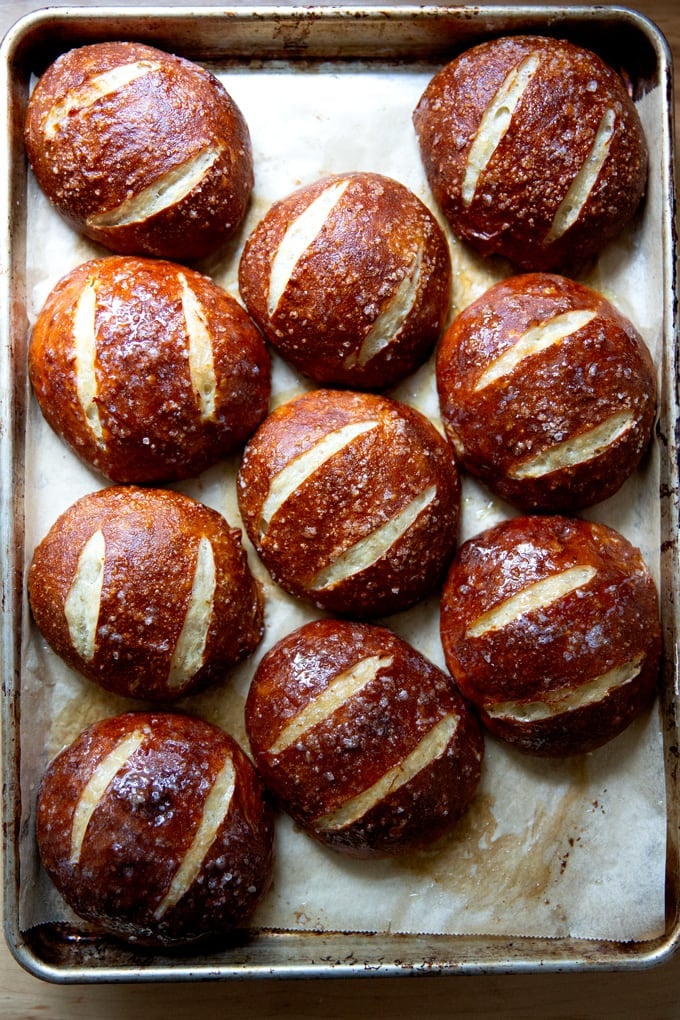
Let cool briefly before halving:
No-Knead Soft Pretzel Rolls
- Total Time: 18 hours 25 minutes
- Yield: 10
- Diet: Vegetarian
Description
Adapted from this recipe for buttery soft pretzels, these homemade soft pretzel rolls are tender-crumbed, sturdy, and perfect for sandwiches.
Notes:
- For best results, please use a scale to measure. It is the only way to measure accurately.
- Plan ahead: These rolls require an overnight rise (or an all-day rise, 8-10 hours), a 4- to 5-hour proof, a brief boil, and a 22- to 25-minute bake.
- Faster Method: Though I have not tried this yet, if you are looking for a faster way to make these pretzel rolls, try this: use 2 teaspoons of instant yeast and lukewarm water. Let the dough rise for 2 to 3 hours initially; then let the shaped rolls proof at room temperature for at least an hour before proceeding.
- Timing Help: If you are wondering how you might make the timing work with your schedule, consider this: after the dough doubles in volume, you can deflate it, and stick the bowl in the fridge until you can tend to it. The shaped rolls similarly can be stashed in the fridge until you can tend to them. The key is letting the shaped rolls proof at room temperature sufficiently — they should be very light to the touch before boiling,
- Yeast: If you are using active-dry yeast, sprinkle it over the cold water. Let it stand for 15 minutes; then proceed with the recipe.
- Salt: If you are using Morton Kosher salt or fine sea salt, use half as much by volume or roughly 2 teaspoons. (If you are measuring by weight, use 13 grams.)
- Equipment: You’ll need a spider or a large slotted spoon to remove the dough balls from the pot of water. You’ll also need a pastry brush to brush the dough balls with melted butter. Finally, you’ll need a sharp razor blade to slash the dough.
Ingredients
For the dough:
- 640 grams (about 5 cups) all-purpose flour
- 2 grams (about 1/2 teaspoon) instant yeast, see notes above if using active-dry
- 13 grams (about 4 teaspoons) Diamond Crystal kosher salt, see notes above
- 12 grams (about 1 tablespoon) granulated sugar
- 450 grams (about 2 cups) cold water
- 14 grams (about 1 tablespoon) olive oil or neutral oil
For finishing:
- 115 grams (about 1/2 cup) baking soda
- 8 cups water
- flaky sea salt
- 6 tablespoons melted butter
Instructions
- In a large bowl, whisk together the flour, yeast, salt, and sugar. Add the water and oil and stir with a rubber spatula until a shaggy dough forms. Use your hands to knead the dough briefly in the bowl just until it comes together — it will be wet and sticky.
- Cover the bowl with an airtight lid or plastic wrap and let rise until doubled in volume, 8 to 10 hours (or more or less depending on the time of year and the temperature of your kitchen).
- Turn the dough out onto a lightly floured work surface. Use a bench scraper to portion it into 10 pieces, using flour as needed. (Note: If you want identically sized pretzel rolls, weigh your total dough, then divide by 10. Each portion should weigh roughly 112 grams.)
- Ball up each portion: Using flour as needed, form each portion into a ball by grabbing the edges of the dough and pulling them toward the center to create a rough ball. Then flip the ball over, cup your hands around the dough, and drag it toward you, creating tension as you pull. Repeat this cupping and dragging until you have a tight ball.
- Transfer the balled portions to a roomier, lightly floured vessel to proof: I use two of these DoughMate containers, but you could use two 9×13-inch pans or something similar. Cover the pans with an airtight lid or plastic wrap to ensure the dough balls do not dry out. Let the dough balls proof for 4 to 5 hours or until doubled in volume and very light to the touch.
- Heat the oven to 400ºF. Line two sheet pans with parchment paper.
- Bring the 8 cups of water to a simmer in a large pot. With the heat on low, add the baking soda and stir to dissolve. Adjust the heat so that the water is barely simmering.
- Working with one ball at a time, carefully lift it from its proofing vessel — I like to use a bench scraper — and lower it into the water top-side down. Use a spider to flip it over immediately, then over again so that the ball is top-side down. Use the spider to remove the ball (still top-side down) and flip it onto the sheet pan top-side up. This should take no more than 30 seconds. Repeat until 5 balls have been dipped and transferred, evenly spaced, to one of the sheet pans.
- Brush the balls with melted butter. Sprinkle generously with sea salt. Use a razor blade or sharp knife to make two slashes on the top of the dough ball — don’t worry if the dough balls deflate slightly. Transfer the pan to the oven and bake for 22 to 25 minutes or until the rolls are a deep-brown hue.
- Remove the pan from the oven and immediately brush the hot rolls once more with melted butter.
- Repeat with the remaining dough balls using the remaining prepared sheet pan.
- Let cool briefly before serving or let cool completely if using for sandwiches.
- Prep Time: 18 hours
- Cook Time: 25 minutes
- Category: Bread
- Method: Oven
- Cuisine: American
This post may contain affiliate links. Please read my disclosure policy.


51 Comments on “No-Knead Soft Pretzel Rolls”
Thank you for developing this recipe! I am excited to try it soon. How crucial is the butter? I wonder if a vegan substitute might also work (?).
A vegan substitute would be great! It serves a few purposes: helps with browning in the oven, provides a nice sheen out of the oven, and lends some flavor, too. But I do think a vegan substitute would work great!
Have you tried this with food grade lye? Love pretzels and pretzel rolls, definitely want to try yours, but prefer lye for the darker crust and ease.
I have not! I was really pleased with the color that materialized using the baking soda bath + butter brush pre-bake. If you give the lye a go, I’d love to hear how it turns out!
These sound wonderful! Do you think they could be shaped and used for hot dog buns?
Absolutely! I have another batch rising, and I’m thinking about making larger, hoagie-style rolls. If I remember, I’ll try to snap a picture!
I love your pretzel bread, so I’m sure these will be great too. Thanks so much for all your great recipes
Thank you, Katy!
Could I use olive oil instead of butter? Thank you!
Worth a shot! I don’t know how the oil will do in the oven — the butter helps brown the pretzels and I imagine oil will work similarly, but I haven’t tried. Someone else asked if a vegan butter substitute would work, and I think that would work, too.
Whoa! I came here to report on that fabulous lemon-blueberry loaf recipe (totally great though I did make some tweaks for personal preference reasons.) But I am so psyched for this recipe! They have pretzel rolls in Germany and whenever I go there for work, I hog the bread basket for them!! So will definitely try this!! I hope you are well—I don’t post/react much anymore but I am still lurking 😜
Mama Poule, it’s always great to hear from you whenever the spirit moves you 🙂 🙂 🙂 So great to read this. I hope you love them.
This recipe looks great, but I’m hoping you will also develop a sourdough version. I find that yeast-risen breads don’t agree with me, but sourdough breads are fine. I make your sourdough pizza crust, focaccia and ciabatta regularly, all of which are a big hit in my family!
Great to hear this Cathy! I am working on a sourdough recipe, in the meantime, I think you could try simply adding 100 grams of starter and 50 grams less flour and water each. I’d do 2 to 4 sets of stretches and folds and then bulk ferment for 4 to 10 hours or until it nearly doubles in volume. Stay tuned!
I am an excellent cook and am always learning from others, never satisfied with the average dish. I have to tell you how much I enjoy and learn from your approachable yet delicious recipes. You make me an even better cook. The way you show how it’s done with such ease is really terrific. Thank you for all that you teach us! Well done💜
Aww thank you 🙂 It’s so nice to read this. Thank you for reading along and thank you for your kind words.
Bookmarked this recipe! I might make them this evening for lunch tomorrow. They look and sound delicious. When I do, I am planning on using lye, so I will report back!
Hope you love them, Ariel!
I just made these, and they look nothing like the picture!
I’m an experienced baker, but can’t figure out what went wrong. I rose them for 4:30 hours, which may have been too long – they had doubled but were kind of flat. I had a really hard time getting them into the water – they were quite flacid and very sticky. Baked up to good color, but taste a lot like the baking soda. What do you think? I so wanted to like these!
Oh no! Questions: Are you using a scale to measure? How long were the rolls in the water bath? Did the first rise go OK? As in did the dough double in volume in the 10 hours? What type of flour are you using?
Yes, I used a scale. The first rise went just fine, as did the shaping of the rolls. The rolls were in the bath 5-8 seconds. King Arthur all purpose flour!
Wow, OK, you’re doing everything right. I’m not sure why the taste of baking soda is too strong with such a short time in the water… 1/2 cup baking soda for 8 cups of water is pretty standard for this sort of recipe. You could try adding another quart of water next time around.
As you suggested in your previous comment, it’s possible the rolls over-proofed, but your timing sounded right to me. If your kitchen is very warm, you could try shortening the room temperature proof to 3 hours. I found a longer proof made for a lighter roll, but it’s definitely a balance and you don’t want your rolls to overproof and then deflate. My rolls are not super round like a brioche bun… they’re definitely flatter, which I think is actually better for sandwiches. Anyway, I’m sorry for the trouble with this one!
Hi, just a follow up on the question I posted. I didn’t mean to say, put the dough “back” in the refrigerator since it was never in the refrigerator to begin with. I just deflated each roll, reformed them and let them rise again, but for a much shorter time. My kids and their friends who were over devoured them! One of the boys, mom’s text me later that evening because her son had come home raving about how delicious they were 🙂
Thank you!
The rising time feels very sensitive in that the second half of the batch seemed over risen when they went through the soda bath and into the oven. Do you think I could just put them all in at the same time and switch the racks halfway through? Thank you for all the work you share!
So nice to read all of this Maureen! Yes, you can definitely bake them all at once, switching and rotating the racks as needed. Thank you for your kind words and thank you for writing 🙂 🙂 🙂
I’ve made the pretzels that this recipe is based on and absolutely love them (they freeze great too). In that recipe you utilize hot water with the baking soda dissolved – not simmering as in this recipe. Is there any reason that would not work with this recipe? I thought that was genius and find it works very well without heating up the kitchen (it’s so hot now).
It might work! I did it once, and I wasn’t as happy with the browning, but I didn’t brush the rolls with butter before baking for that batch, so it’s worth a re-make with the hot water + the butter. I will report back.
This recipe was incredible snd fun to make. I’m new at making bread so the clear instructions along with the video made it easy to follow along step by step. Thanks for sharing.
So nice to hear this, Stephanie! Thank you for writing 🙂
Just finished making these. Delicious but definitely didn’t look like the pictures. Getting them off the parchment paper into the hot water soda bath didn’t go well. Very sticky. I tried a bench scraper, spatula, and my fingers. Any suggestions? I had sprinkled flour in the paper in the proofing pan but thinking next time I’ll try olive oil.
Thanks
I think olive oil might work, but I find I just need to flour my hands and gently but swiftly coax the buns out of the box and into the pot of water.
I just made these and they were delicious! They worked great with brushing them with olive oil before and after baking. I proofed them 3 hours which was plenty. The only tricky part was getting them out of the proofing box without sticking to my hand and the bench scraper. I will keep practicing. My husband loved them for our burger buns last night and had one this morning for his breakfast. Definitely a repeat. Thank you so much! A delight!
Great to hear, Susan! And yes: that part is tricky for me as well. I find I need to really flour my hands to help with the move. So glad your husband approved! I have been halving the days-old ones, toasting them, and slathering them with butter… so good!
Hello! I have just made these, and my mother and I loved the finish! Thank you for your amazing method. I definitely try this recipe again soon. From your big fan in Japan.
So nice to hear this, Hitomi! Thanks so much for writing. I am dying to visit Japan. My kids love sushi, and dinner out at our favorite local Japanese restaurant has become our favorite family meal 🙂
I made these yesterday and they tasted great! I did have similar issues with the rolls sticking and losing their shape when I tried to get them into the water bath. Then they did not rise as much as expected when baking. I’ll try flouring my hands next time, as you suggested in one of the comments. I will also try making them with slightly more flour and/or less water. I did use a scale but I find that bread recipes tend to run wet in my kitchen, somehow. But I will definitely be making them again!
Hi Kendra! I think using slightly less water definitely will help. Also: although I suggest all-purpose flour, you might have better luck with bread flour as it absorbs more water and might make for a less sticky/wet dough.
This recipe is becoming a go to for me! I use the faster method which has been foolproof. I’ve been baking my baking soda which has given great results too.
Thank you for this simple but crowd pleasing recipe 🙂
Great to hear, Petra! Can you elaborate on what you mean by “baking my baking soda” — I’m intrigued!
Baking the baking soda changes the chemical composition which makes it more alkali and yields something closer to using lye. 🙂
This recipe is amazing! The texture and flavor of the rolls are a 10 out of 10! All of the instructions and the video make it easy to have pretzel roll success right out of the gate! I will for sure be making these again very soon. Thanks for such a delightful recipe! 😊
So great to read this, Maggy! Thanks for writing 🙂 🙂 🙂
Sorry, but I don’t understand?? In the recipe Notes, you say “Plan ahead: These rolls require an overnight rise, a 4- to 5-hour proof, etc.” But nowhere in the Instructions does it say anything about an overnight rise nor are there instructions on when to place the dough in the fridge? Does it go thru the 8 to 10-hour proof at room temp and THEN it goes into the fridge? If so, when you pull the dough from the fridge, does it have to warm to room temp before you portion and ball it up? I know I can’t make this recipe as written when it involves, at minimum, a 13-hour process before you even bake them?? I’d love to make these—just can’t quite mesh the “Notes” with the “Instructions.” And yes, I’m a beginner baker.
Hi Ruth:
This is where the overnight rise (or all-day rise) occurs:
Step 2: Cover the bowl with an airtight lid or plastic wrap and let rise until doubled in volume, 8 to 10 hours (or more or less depending on the time of year and the temperature of your kitchen).
After you ball up the rolls, if you don’t have time to do the 4- to 5-hour room-temperature proof, you can stick the shaped balls (in an airtight container) in the fridge. The balls will need to proof at room temperature for 4 to 5 hours before proceeding.
These are really good! The crumb is nice and soft and the rolls have a salty pretzel flavor. I did have some minor issues while making and was wondering how I might avoid these problems if I make this again. While making the dough balls, they flattened out pretty much immediately- not all the way, but they were a lot less of a ball than they look in your pictures. I did make sure to dust the bottom in flour, but when it came time to boil, I had a really difficult time getting them out gently without losing shape. I know I will need a bigger container for next time because they were all sticking together, but I’m not sure what else I could do to avoid this. Finally, the color didn’t turn out nearly as deep as it did for you- it only good to a light/medium brown. I’m guessing that has to do with the boiling process- the water was barely simmering like you said, but maybe I didn’t leave the rolls in long enough?
Hi! Did you use a scale to measure? And what type of flour (brand included) did you use?
Definitely a learning curve. Second batch came out nicer but not nearly as nice as yours! Mine spread out a lot during the baking soda water bath. Anyway, after forming the dough into balls for the second rise I laid them onto parchment paper and cut around each dough ball into circles using scissors so I could just pick them up individually when it was time for water bath. Then I dunked them face down, and carefully peeled the parchment paper using a plastic dough scraper. The steam from the bath made it easier to peel, and they deflated less. A lot of fun but gotta work on my technique. Thanks for your recipe!
This happened to the first few I did too, but then I pinched the bottom forming a ball before dunking and it kept its shape. A tip I got from a YouTube tutorial. Hope it works for you.
I tried several recipes and this was the only one that gave me the look and texture I was after. True to photos. Great recipe! Thanks for sharing!!!!
So nice to read this, Angelica! Thanks for writing and sharing your notes and tips, too 🙂
Hi there, why do you use cold water and not warm, wouldn’t warm water make them rise better? Thankyou
Because it’s such a long slow rise, there’s no need to use lukewarm water.