
Homemade Sourdough Bread, Step by Step
This post may contain affiliate links. Please read my disclosure policy.
If you love fresh sourdough bread with a golden, crisp crust and a light, airy crumb, this recipe is for you. It’s one of the simplest homemade sourdough bread recipes, and one of the best, too. It requires only 25 minutes of hands-on work and no autolyse or preferment. Below you will find guidance for every step of the way. 🍞🍞🍞
⭐️⭐️⭐️⭐️⭐️ Review:
“Absolutely the best sourdough recipe EVER! I have been baking bread for years (sourdough included,) and things were many times hit or miss. Not with your recipe. You have nailed it. I thank you!” — Rosemary Patterson
This post will show you how to make the simplest of simple sourdough breads. There is no autolyse or preferment, which means the dough itself comes together in less than five minutes.
For those intimidated by sourdough bread baking, this recipe, as well as this sourdough focaccia recipe, are the recipes I suggest making first, both for their simplicity and flavor. Another great beginner’s bread recipe to try is this overnight, refrigerator focaccia or my mother’s simple peasant bread recipe, both of which require minimal effort but yield spectacular results.
This post is divided into 13 sections:
- What is Sourdough Bread?
- What is a Sourdough Starter?
- How to Feed a Sourdough Starter
- When is My Starter Ready to Be Used?
- Equipment
- How to Make Sourdough Bread: A 5-Step Overview
- How this Sourdough Bread Recipe Differs From Others
- Simple Sourdough Bread: A Step-by-Step Guide
- #1 Sourdough Bread Baking Tip
- Troubleshooting: Where Sourdough Goes Wrong
- Sourdough Baking Resources
- Other Sourdough Bread Recipes to Make
- Sourdough Bread Baking Schedule
What is Sourdough Bread?
Sourdough bread is bread that has been leavened naturally, meaning it has been leavened by a sourdough starter as opposed to by commercial yeast or a chemical leavening agent such as baking powder or baking soda.
What is a Sourdough Starter?
A sourdough starter is a fermented mix of flour and water containing wild yeast and bacteria (lactobacilli). Provided it is healthy and active, a sourdough starter is what will make your bread rise.
You can make a sourdough starter from scratch in just about a week. I only recommend doing so if it currently is summer (or a very warm fall) where you are. While it is immensely satisfying to build a starter from scratch and subsequently use it to make a beautiful loaf of bread, I am a huge proponent of purchasing one for a few reasons, namely: when you purchase a starter, you are guaranteed to have a strong, vigorous starter from the start. In other words, you can start baking with confidence right away.
Here are three online sources for reasonably priced sourdough starters:
How to Feed a Sourdough Starter
In order to keep your starter alive, you have to feed it — it’s not unlike having a pet, but know this: caring for a sourdough starter is akin to caring for a very low maintenance pet, one that requires feeding only once every two to three weeks to stay alive, but one that requires feeding much more regularly if you like to bake frequently.
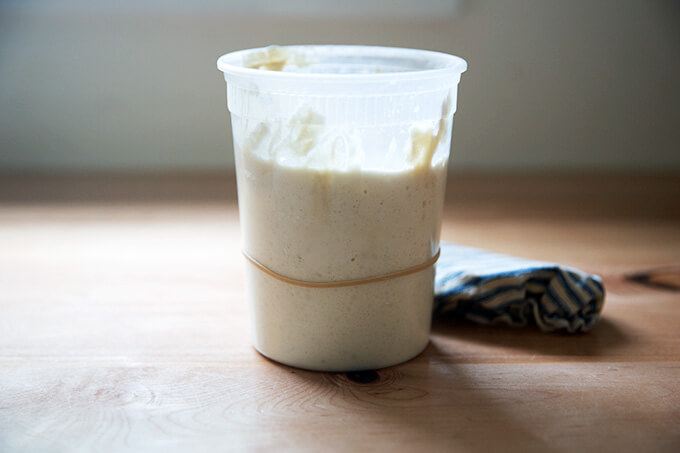
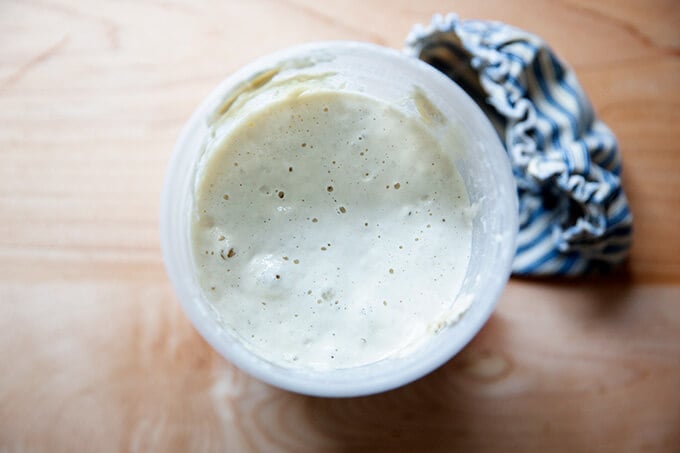
When I am not baking regularly, I store my starter in the fridge in the above-pictured vessel with its lid on. As noted above it can hang out there for 2-3 weeks (if not longer) without being touched. To wake it up or activate it, I like to feed it twice before using it. Often I’ll remove it from the fridge after dinner and feed it: this involves discarding most of it and replenishing it with equal parts by weight flour and water. (Please read this post, which explains in detail how to activate, feed, and maintain a starter.)
I will repeat this process in the morning — discard most of it; then replenish it with equal parts by weight flour and water. By midday, or when my starter has doubled in volume, it is ready to be used.
To store your starter, you should feed it, let it rise till it nearly doubles; then cover it and stash it in the fridge for 2 to 3 weeks until you are ready to use it again.
How Do I Know if My Starter is Ready to be Used?
If your starter doubles (or triples!) in volume within 4 to 8 hours after a feeding, it is ready to go. And ideally, you want to use your starter 4 to 8 hours after you feed it or when it has doubled. Every time I feed my starter, I place a rubber band around the vessel it is in to mark its height. This helps me see when it has doubled in volume and is, therefore, ready to be used.
If your starter is not doubling within 4 to 8 hours of feeding it, you should spend a few days strengthening it. This will involve discarding most of it — truly, don’t be afraid to be aggressive with how much you are discarding — and replenishing it with equal parts by weight flour and water. If you do this twice a day for several days, your starter will be in great shape.
What Equipment Do I Need?
At a minimum, you’ll need:
- a sourdough starter (see above)
- flour, bread flour if possible, my preference is King Arthur Flour
- salt
- water
Ideally, you’ll also have:
- digital scale
- straight-sided vessel for monitoring the bulk fementation
- bench scraper
- flour sack towels
- parchment paper
- banneton, such as this one or this one
- razor blade
- heavy lidded vessel, such as this one or this one
How to Make Sourdough Bread: A 5-Step Overview
There are essentially 5 steps to making sourdough bread. Each of these steps is explained in more detail below.
- Mix the Dough: This is simply a matter of combining water, sourdough starter, salt and flour in bowl, and stirring to form a sticky dough ball.
- Bulk Fermentation: This is just a fancy name for the first rise. During the first two hours of the bulk fermentation, you’ll perform a series of stretches and folds, which will give the dough strength and elasticity.
- Shape + Bench Rest: This step ends the bulk fermentation. You’ll shape the dough, let it rest, then shape it once more.
- Proofing the Dough: In this recipe, you’ll cold proof the dough in the fridge, ideally for 24 to 48 hours, though you can get away with a shorter proof.
- Scoring + Baking the Dough: After the dough has proofed, you’ll turn it out onto a piece of parchment paper, score it; then transfer it to a preheated baking vessel.
How This Sourdough Bread Recipe Differs From Others
This recipe differs from others in three main ways:
- No Autolyse. Why? I’ve never found employing an autolyse makes a big difference in the final texture of the bread, and I find the process of doing an autoylse frankly to be kind of a pain. What is an autolyse? Autolyse is a technique that calls for mixing flour and water together and allowing them to sit for several hours before adding the salt and sourdough starter. This process allows gluten to develop in dough prior to mixing. It also makes the dough more extensible. This is due to the hydrating effects of soaking the flour, as well as — and this is getting a bit scientific — from the enzymatic activity of protease, which breaks down some of the gluten that forms as the dough hydrates. This process weakens the dough’s elasticity, in turn increasing its extensibility. If you are after a super open crumb, autolyse is something to consider.
- 50% (roughly) Increase in Volume. If you come from the yeast-leavened bread world, you are accustomed to letting your dough double in volume during the first rise. When I first got into sourdough, I was applying this same method, and while I had success, I realized I was often letting my dough overferment — I was pushing the bulk fermentation too far. As soon as I stopped the bulk fermentation when the dough increased by 50-75% in volume, I got a much better oven spring.
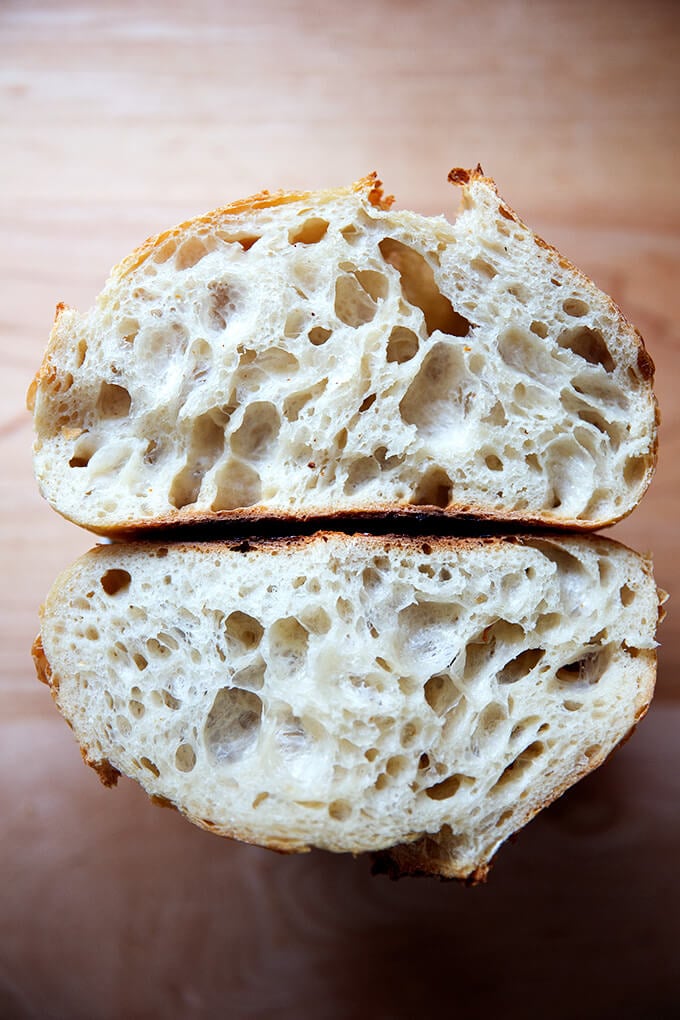
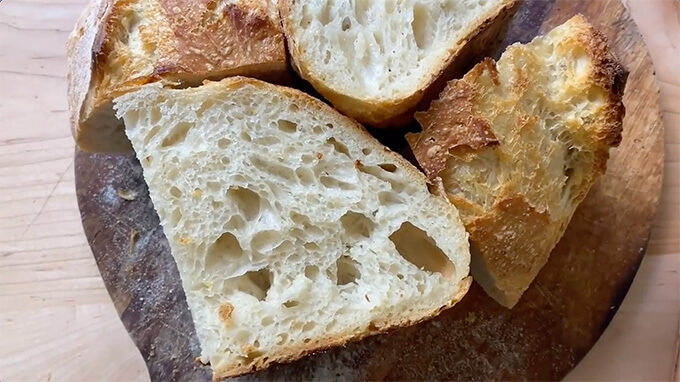
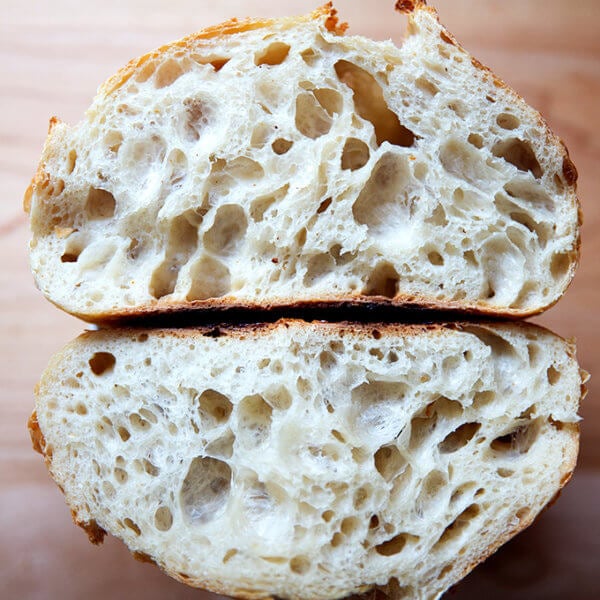
- Long Cold Proof. After the bulk fermentation, you’ll shape the dough, and store it in the fridge ideally for 24 hours but it can hang out there for 48 hours or even a bit longer. This long, cold proof will make for a much lighter, open, airy crumb. (Note: If you were to leave the dough in the fridge for 12 hours or less, which you can do, the crumb will be tighter and denser.) After you remove the dough from the fridge, you score it, and transfer it immediately to the oven — there is no need to do a room temperature proof first.
Simple Sourdough Bread: A Step-by-Step Guide
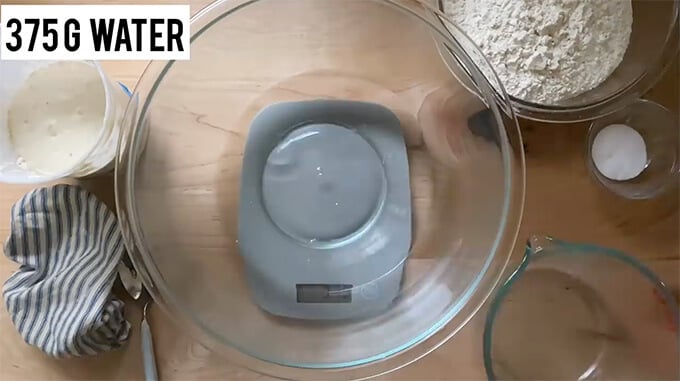
Mix the dough.
To start, pour 375 grams of water into a bowl:
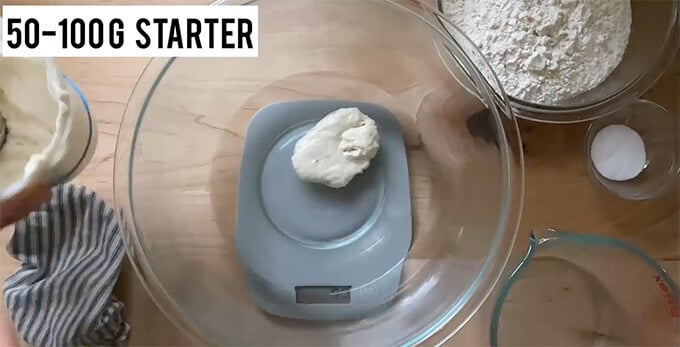
Add 50 to 100 grams of sourdough starter.
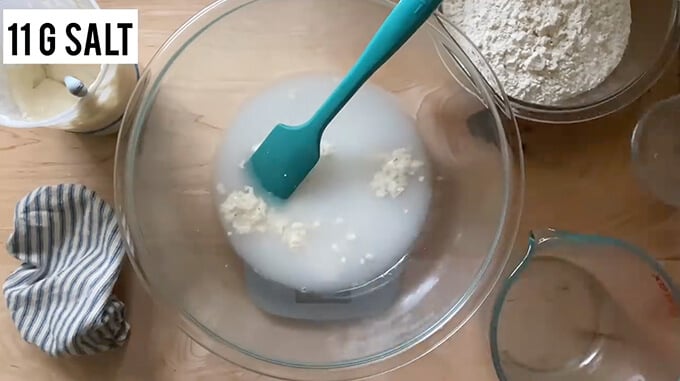
Stir to combine; then add 11 grams of salt:
Finally, add 500 grams of bread flour:
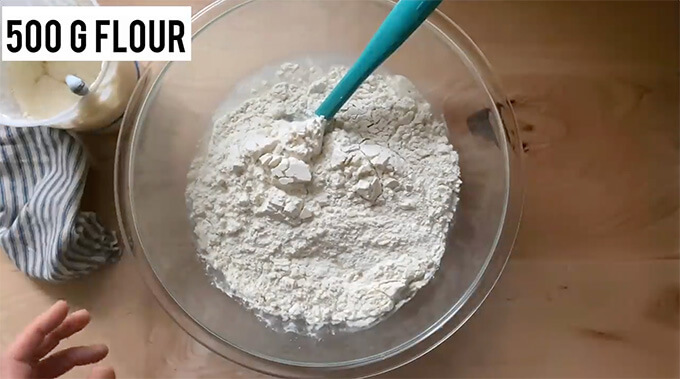
Stir to combine:
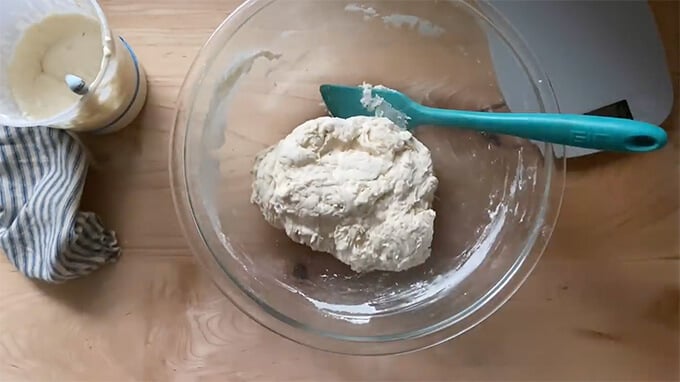
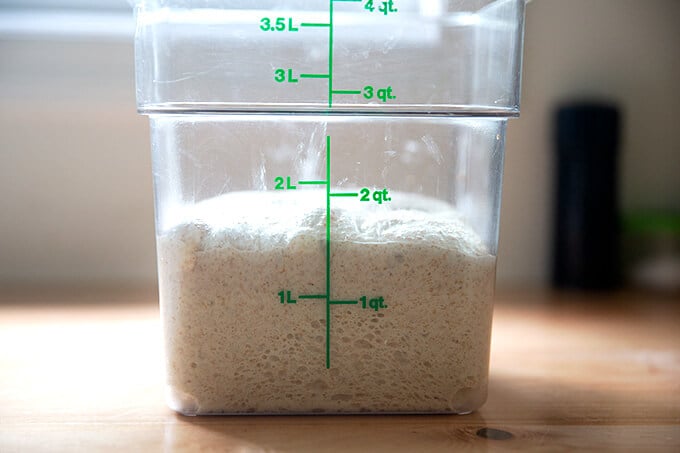
Let it Rise. (Bulk Fermentation)
Transfer the dough to a straight-sided vessel. Cover it, and let it rest for 30 minutes.

Perform a set of stretches and folds:
If time permits, perform four total sets of stretches and folds every 30 minutes for the first 2 hours. You should notice the dough getting stronger and more elastic with every set of stretches and folds. This is the 4th set:
After the 4th set of stretches and folds, cover the vessel — I love these Dot and Army cloth bowl covers for this — and set it aside until it increases in volume by 50% or so.
How long should the bulk fermentation take?
The time will vary depending primarily on the strength of your starter and the temperature of your kitchen. Rather than rely on a time period, however, you should rely on visual cues.
This video shows the dough nearly doubling (increasing by 100%) in volume, but the more I bake sourdough, the more I realize I have better success when I stop the bulk fermentation when the dough increases by 50%. It may take some trial and error to know what works best for you. You may find a 75% increase in volume is best or you may find that to be too long. Sourdough is all about experimenting and adapting based on your experiences.
Shaping
Turn the dough out onto a lightly floured work surface:
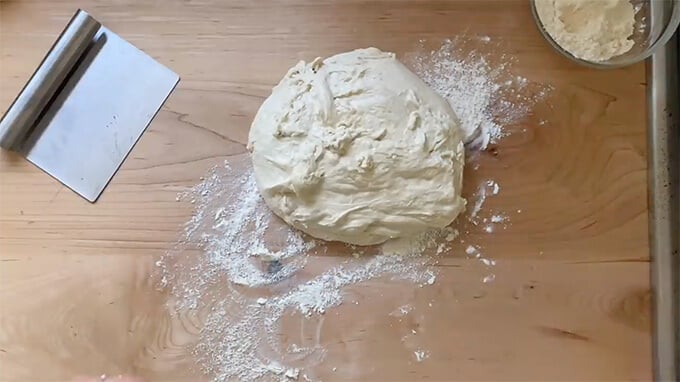
Shape the dough gently into a round and let it rest for 20-40 minutes. This is called the bench rest.
Meanwhile, prepare a bowl or banneton with a flour sack towel and rice flour.
Proofing
Shape the round again; then place in prepared bowl for proofing. Transfer to fridge for 12 to 48 hours.
Bake It.
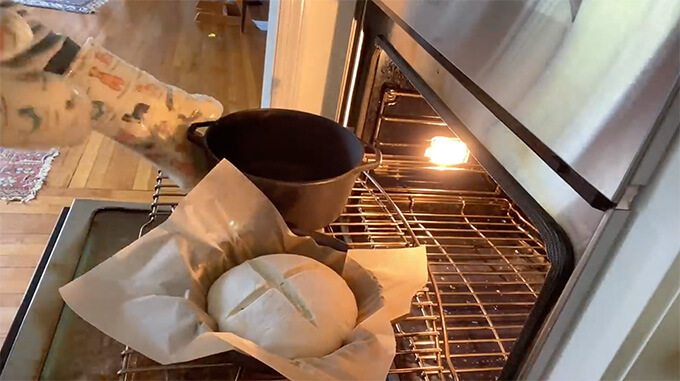
Remove bowl from fridge, and turn it out onto a sheet of parchment paper.
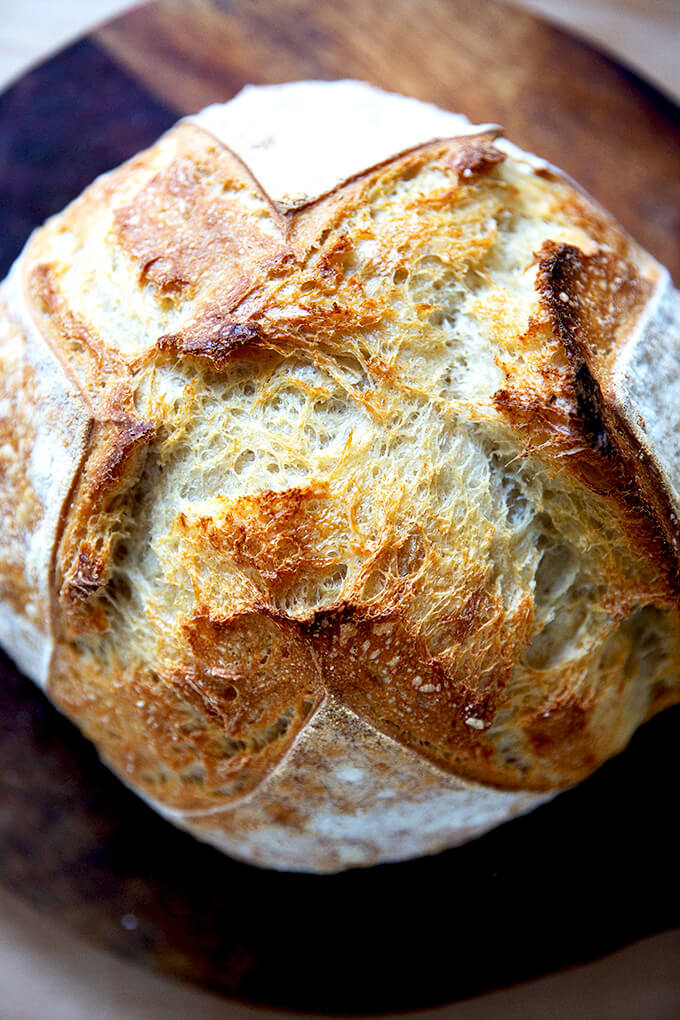
Score it.
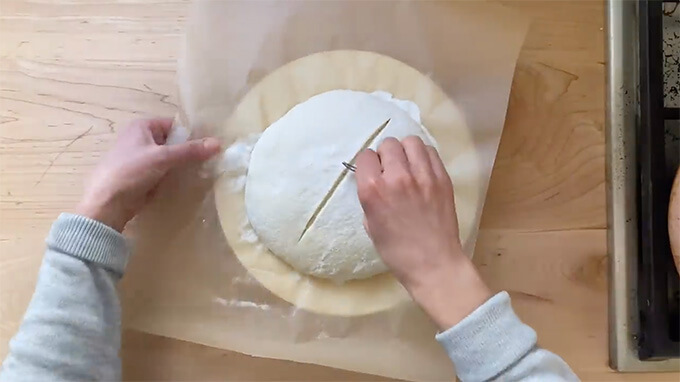
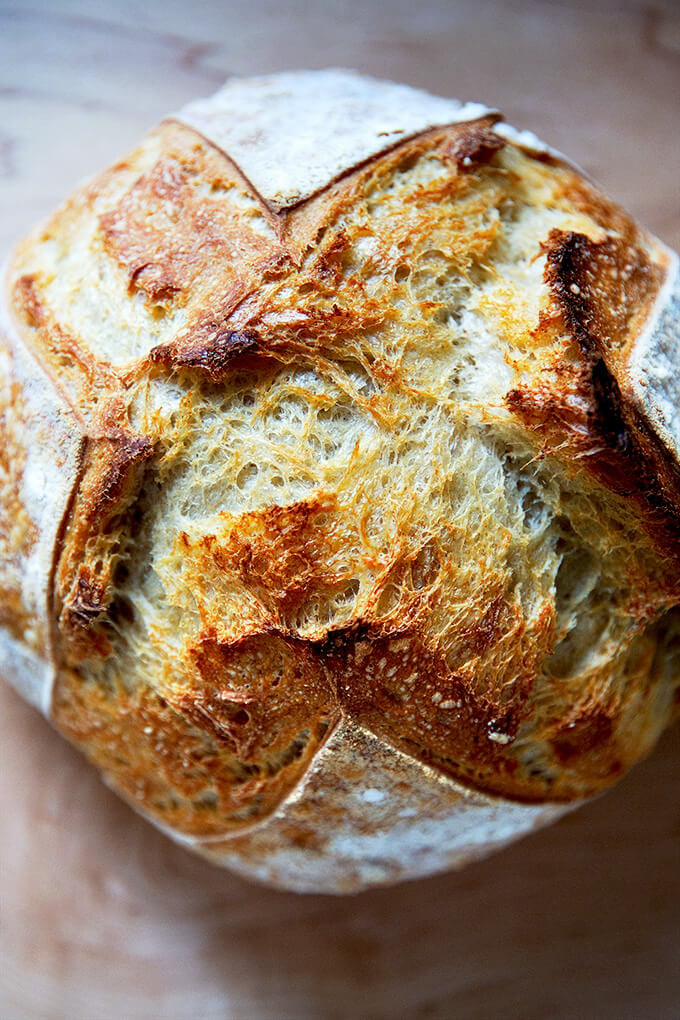
Transfer to preheated Dutch oven. Bake covered at 450ºF for 30 minutes; uncover, lower the temperature to 400ºF, and bake for 15 minutes more:
Remove from oven and let cool one hour before slicing.
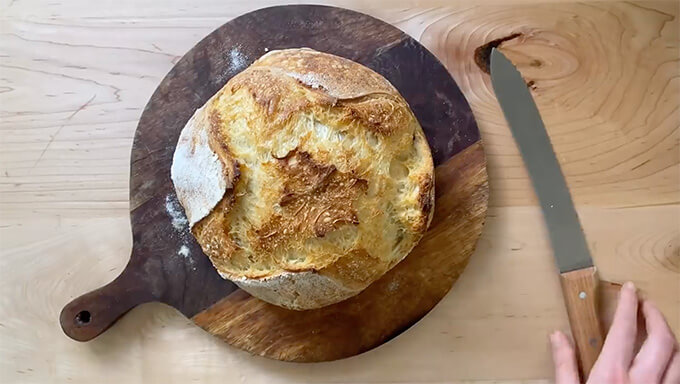
You’ll need a sharp knife (like this one or this one) when it’s time to slice:

#1 Sourdough Bread Baking Tip
The refrigerator is your friend. Use it.
The most common mistake I see people make when making sourdough bread is letting the bulk fermentation go too long. They mix the dough at night; then wake up to dough that has tripled in volume and is a sticky mess.
To prevent over fermenting your dough, use your refrigerator as needed. After you complete the 4 sets of stretches and folds, you can put your dough in the fridge at any time. If you are tired and need to go to bed, transfer the dough to the refrigerator; then pick up where you left off in the morning: remove the dough from the fridge and let it continue to rise until it increases in volume by roughly 50%.
To accurately gauge when your dough has risen to roughly 50% in volume, I highly recommend investing in a straight-sided vessel such as this 4-qt Cambro (or this one, which is BPA-free!). When dough rises in a bowl, judging when it has risen sufficiently is tricky. There’s no question with a straight-sided vessel.
Troubleshooting: Where Sourdough Goes Wrong?
If you have ever had trouble baking sourdough bread, your issues likely stem from one of four places:
- Using a weak starter or not using starter at its peak.
- Using too much water relative to the flour.
- Over fermentation: letting the bulk fermentation (first rise) go too long.
- Using too much whole wheat flour, rye flour, or freshly milled flour.
I address each of these issues in this post: Why is my sourdough so sticky? 4 Common Mistakes, so please give it a read if you’ve had trouble with sourdough bread baking.
Sourdough Resources
- Sourdough Troubleshooting: This post addresses 4 common mistakes people make when baking sourdough bread and answers many FAQ’s as well.
- The Nutritional Benefits of Sourdough Bread + 6 Healthy Toast Topping Ideas
- Feeding Your Sourdough Starter
- Essential Equipment For Sourdough Bread Baking
- A tip for getting a more open crumb? Shape a batard as opposed to a round:
Other Sourdough Bread Recipes to Make
- Simple Sourdough Focaccia
- Sourdough Bread, Whole Wheat-ish
- Simple Sourdough Pizza
- Sourdough Detroit-Style Pizza
- Simple Sourdough Sandwich (or Toasting) Bread
- Sourdough Ciabatta
- Two Sourdough Discard Recipes: Sourdough Flour Tortillas & Irish Soda Bread
Sourdough Bread Baking Schedule
If you are new to sourdough bread baking, the timing of it all may feel overwhelming — you may find yourself asking: How can I do this without baking at midnight?
It’s a very good question! As noted above, your biggest friend when it comes to sourdough bread baking is your refrigerator. If after you’ve performed your stretches and folds, you don’t have time to stay up for the dough to complete the bulk fermentation, stick the vessel in the fridge and pick up where you left off the next day or the day after that.
Here is a rough schedule I like to follow. Adapt it to work for you:
Wednesday Evening: Remove starter from fridge. Feed it by discarding most of it and replenishing it with equal parts by weight flour and water.
Thursday Morning: Feed starter by discarding most of it and replenishing it with equal parts by weight flour and water.
Thursday Afternoon: Mix dough, let it rise. On Thursday evening, when the dough has completed the bulk fermentation, I’ll shape it and stick it in the fridge to proof. (As noted: If the dough hasn’t completed the bulk fermentation, I’ll stick the vessel in the fridge, and pick up where I left off the following day.)
Friday Evening or Saturday Morning: Score and Bake it. There is no need to let the dough come to room temperature before baking it. Simply remove it from the fridge, turn it out, score it, and bake it!
Homemade Sourdough Bread, Step by Step
- Total Time: 18 hours 45 minutes
- Yield: 1 loaf
Description
Inspired by The Clever Carrot
If you are new to sourdough, watch the step-by-step video here: Simple Sourdough Bread or in the post above.
Troubleshooting: If you have issues with your dough being too sticky, please read this post: Why is my sourdough so sticky? The 4 common mistakes.
Notes:
- You need an active sourdough starter. I have had success activating starters from:
- As always, I highly recommend investing in a digital scale before beginning any bread baking adventure.
- This is the Dutch Oven I use for sourdough bread. I used this Dutch oven for years, and it’s a great one, too.
- Flour sack towels are a great investment because they ensure your dough will not stick while it is proofing.
- I love using rice flour for dusting (as opposed to ap or bread flour) because it doesn’t burn. When you use a flour sack towel, however, you don’t need to use any flour.
- Find all of my sourdough essentials here: Essential Equipment For Sourdough Bread Baking
- I love a high-hydration dough, and I have great success using 380 grams of water in this recipe, so feel free to play around and push the hydration here.
- Salt: I have had success using both kosher salt and fine sea salt here. When I use kosher salt, I use the Diamond Crystal brand. When I use sea salt, I use the Baleine Fine brand. Regardless of the brand, I use 12 grams.
- Shaping: If you’re looking to get a more open crumb, try shaping a batard (as opposed to a round). Watch this video for guidance. Also: The recipe below follows the traditional shape once, rest, then shape again method. I often skip the preshape now and simply shape the dough once. I still get a nice open crumb.
How much Sourdough Starter to Use?
- Because my kitchen is cold for much of the year, I like using 100 g (1/2 cup) of starter as opposed to 50 g (1/4 cup). When determining how much starter to use, consider a few things: If you live in a warm, humid environment, 50 g should suffice. If you plan on doing an overnight rise, 50 g also should suffice. If you want to speed things up or if you live in a cold environment, consider using 100 g starter. Note: If you use 100 g of starter, your dough may rise more quickly, so keep an eye on it. As always, rely on the visual cues (increasing in volume by 50%) when determining when the bulk fermentation is done.
- A straight-sided vessel makes monitoring the bulk fermentation especially easy because it allows you to see when your dough has truly doubled.
Ingredients
- 50 – 100 g (1⁄4 – 1/2 cup) bubbly, active starter — I always use 100 grams, see notes above
- 375 g (1 1/2 cups plus 1 tbsp) warm water, or more, see notes above
- 500 g (4 cups plus 2 tbsp) bread flour
- 9 to 12 g (1.5 – 2.5 teaspoons) fine sea salt, see notes above
Instructions
- Make the dough: Whisk the starter and water together in a large bowl with a fork or spatula. Add the flour and salt. Mix to combine, finishing by hand if necessary to form a rough dough. Cover with a damp towel and let rest for 30 minutes.
- Stretch and fold: After 30 minutes, grab a corner of the dough and pull it up and into the center. Repeat until you’ve performed this series of folds 4 to 5 times with the dough. Let dough rest for another 30 minutes and repeat the stretching and folding action. If you have the time: do this twice more for a total of 4 times in 2 hours. Note: Even if you can only perform one series of stretches and folds, your dough will benefit. So don’t worry if you have to run off shortly after you mix the dough.
- Bulk Fermentation (first rise): Cover the bowl with a towel and let rise at room temperature, about 8 to 10 hours at 70°F (21°C) or even less if you live in a warm environment. The dough is ready when it has increased by 50% in volume, has a few bubbles on the surface, and jiggles when you move the bowl from side to side. (UPDATE: In the past I have recommended letting the dough rise until it doubles in volume. If you’ve had success with this, continue to let the dough double. Recently, I have been stopping the bulk fermentation when the dough increases by 50% in volume, and I feel I am actually getting better oven spring in the end.) (Note regarding timing: If you are using 100 g of starter, the bulk fermentation may take less than 8 to 10 hours. If you live in a warm, humid environment, the bulk fermentation may take even less time. In the late spring/early summer, for example, my kitchen is 78ºF and the bulk fermentation takes 6 hours. It is best to rely on visual cues (increase in volume by roughly 50%) as opposed to time to determine when the bulk fermentation is done. A straight-sided vessel makes monitoring the bulk fermentation especially easy because it allows you to see when your dough has truly increased in volume by 50%.)
- Shape (See notes above): Coax the dough onto a lightly floured surface. Gently shape it into a round: fold the top down to the center, turn the dough, fold the top down to the center, turn the dough; repeat until you’ve come full circle. If you have a bench scraper, use it to push and pull the dough to create tension.
- Rest: Let the dough rest seam side up rest for 30 minutes. Meanwhile, line an 8-inch (20-cm) bowl or proofing basket with a towel (flour sack towels are ideal) and dust with flour (preferably rice flour, which doesn’t burn the way all-purpose flour does). Using a bench scraper or your hands, shape it again as described in step 4. Place the round into your lined bowl, seam side up.
- Proof (second rise): Cover the dough and refrigerate for 1 hour or for as long as 48 hours. (Note: I prefer to let this dough proof for at least 24 hours prior to baking. See video for the difference in the crumb of a loaf that has proofed for 6 hours vs one that has proofed for 24 hours. If you choose to proof the dough in the fridge for an extended period of time, you may want to tuck it into a loosely tied bag — produce bags from the grocery store are great for this purpose — to ensure the dough does not dry out. The original recipe calls for a 1-hour rise, and if you have had success doing that, by all means, keep doing it.)
- Place a Dutch oven in your oven, and preheat your oven to 550°F (290°C). Cut a piece of parchment to fit the size of your baking pot.
- Score: Place the parchment over the dough and invert the bowl to release. Using the tip of a small knife or a razor blade, score the dough however you wish — a simple “X” is nice. Use the parchment to carefully transfer the dough into the preheated baking pot.
- Bake: Lower the oven to temperature to 450ºF (230ºC). Carefully cover the pot. Bake the dough for 30 minutes, covered. Remove the lid, lower the temperature to 400ºF (200ºC) and continue to bake for 10 – 15 minutes more. If necessary, lift the loaf out of the pot, and bake directly on the oven rack for the last 5 to 10 minutes. Cool on a wire rack for 1 hour before slicing.
- This loaf will stay fresh up to 3 days stored at room temperature in an airtight plastic bag or container. It freezes beautifully, too.
Notes
- This recipe has been adapted from Artisan Sourdough Made Simple. Changes I have made to the original recipe include:
- Using 11 g salt as opposed to 9 g.
- Performing 4 stretch and folds during the first 2 hours of the bulk fermentation, which build strength in the dough.
- Doing a cold proof for at least 24 hours before baking, which produces a lighter airier crumb. In the video, you can see the difference between the crumb of a loaf that has proofed for only 6 hours vs a loaf that has proofed for 24 hours.
- Finally, I like preheating my Dutch oven, which makes a crisper crust.
- Prep Time: 18 hours
- Cook Time: 45 minutes
- Category: Bread
- Method: Oven
- Cuisine: American
This post may contain affiliate links. Please read my disclosure policy.


3,043 Comments on “Homemade Sourdough Bread, Step by Step”
Hi Alexandra
I’m new to making sour dough and have a recipe where you knead the dough for 10mins. I’ve looked at a couple of your sourdough recipes and you don’t do any kneading. Why is this?
Thanks
Helen x
Hi Helen! Truthfully, this is just the way I learned to make sourdough bread: rather than knead, a series of stretches and folds spaced out at 30 minute intervals (roughly) over the course of two hours builds gluten and strength in the dough. You absolutely can knead sourdough bread, but for whatever reason, the stretch-and-fold method seems to be more popular.
Hi Ali,
I’m going to make this recipe soon and I’ll leave a rating then but I was just wondering, can I use All-Purpose flour instead of bread flour? Does it make a difference? Or are there some adjustments I should make?
Thanks so much in advance!
Hi Sarah! All-purpose flour should be fine. A dough made with all-purpose flour will be a little bit wetter than that made with bread flour, but honestly it should be fine. If you live in a humid environment, you could consider holding back 25 g of water. Otherwise, I wouldn’t change the recipe.
Love this recipe! This is my go-to sourdough recipe now, it’s so easy and foolproof!
Wonderful to hear this, Kate!
Ali,
I love this recipe and now make it weekly. Thank you for that. I have a garden and just dehydrated tomatoes. I would like to add some “sun” dried tomatoes, some of my fresh basil and garlic. Any tips of when to add?
Thanks so much again!
Gina
Hi Gina! Yum to adding dried tomatoes here. Add them after you do one set of stretches and folds. More tips on adding ingredients can be found on this FAQ page.
I’ve tried making sourdough before but this is the fool proof way! I have been adapting my bulk fermentation time based on gut feeling / temperature / humidity and it’s been working great so far! Thanks for this great resource!
Wonderful to hear this Jane! Thanks for writing!
I’m new to sourdough and have made all 5 loaves I’ve made using this recipe. I don’t see any reason to try anything else, it’s great! Thank you so much. I also love the focaccia… I added fresh rosemary and kalamata olives last time. Yum!
So wonderful to hear this, Lauren! Thanks so much for writing 🍞🍞🍞🍞🍞
Thank you for the excellent, detailed recipe. I had never made bread before, but now regularly make sourdough, and far prefer it to even the expensive artisianal store-bought loaves.
Wonderful to hear this, Lisa!
You bread is amazing! The way you explain and photos just exactly what I been looking for! I tried your recipe today it came out perfect from the first time! Thank you for your recipes!
Wonderful to hear this, Angelica! Thanks so much for writing 🙂
Hi Alexandra,
After trying MANY sourdough recipes and techniques, I found yours to be the best by far. Even in a family of cooks, you’ve made me the baking hero! After successfully following your instructions (many times), I noticed an inconsistency I want to ask you about. For the bulk fermentation, you repeatedly say to let it rise 50%. But in your timelapse video, you show your dough doubling (which is100%). I use the same flat-sided vessel and typically allow my dough to rise from 1L to 2L as in the video. I remember that before I started using the flat-sided vessel, my dough was easier to shape after this step. Am I over fermenting?
Hi Walter! So nice to hear this! Thanks so much for writing.
I need to add some notes to that youtube video, because only very recently did I switch the instructions to say 50% increase. This is something I have been doing more recently, and it has been working really well for me. I can get away with my dough doubling, but in troubleshooting with many people over the years, one of the biggest mistakes I realized people were making is overfermenting. And for some people, letting the dough double was in fact over fermenting the dough.
So yes, I need to add some notes to clarify. Again, doubling can be fine for some people, but I find so many people have better success if they let the dough only increase by 50% in volume.
So to answer your question: it is possible that you are in fact over fermenting your dough a bit. Next time you make it, try letting the dough rise until it increases by 50% and see if it makes a difference. Please report back if you do! I’d love to hear about your results.
Hope that helps!
Hi again, regrading my fermentation issue, you were correct. Only letting my dough rise 50% vs 100% yielded much better results. I held off on writing back to you until I’d baked three batches of bread (3 loaves each time). With a 50% rise, the dough is much easier to shape and it has a better spring while baking. Thanks again for an awesome recipe!
Oh wonderful! So nice to hear this, Walter. I really appreciate you reporting back. Happy baking!
Hi! Do I need to oil the Dutch oven before I place the dough in it? I’m so excited to be making my first Sourdough loaf!
I never do – the parchment takes the place of any pan prep. Also, if you oil it, there will be a lot of smoke as it burns off at such a high heat in this preheated scenario.
Thanks for weighing in here, Marty! Agreed. Parchment makes the transfer to the oven super easy. And I would advise against using oil for the reason Marty gives as well: smoke. Good luck!
I’ve made this recipe so many times and my bread always comes out great, I definitely like at least 24 cold rise, I haven’t done the 48 but might try soon. I tried so many other recipes and just were either too complicated or for whatever reason my bread never turned out the same the second time around. This one never fails! Only thing I’d like more sour taste lol do you think leaving for the 48 hours would give it more of that sour taste?
Hi Chelsea! So wonderful to hear this. Yes, leaving it for 48 hours should make the sour taste more pronounced.
I’ve used this recipe dozens of times, always delicious and beautiful to behold. Thank you!
QUESTION:
Is it possible to wait 60 hours in the refrigerator before baking. Over 100° here in So Cal with horrendous wild fires. I don’t want to bake in the heat of the afternoon. Thanks in advance!
Hi Kim! I’m not sure I’ve left it for quite that many hours. Definitely 48 hours, but not much more. It may be fine, but I don’t want to make any promises. I think it is worth the risk trying, however, is you are hesitant to bake due to the fires. Stay safe! So scary reading about these fires.
Thank you for sharing this amazing recipe. I’ve baked this many times and its always turned out perfect! I love it
Wonderful to hear this, Lisa! Thanks for writing 💕
Hi Ali! I tested my starter with the float test and it floated but then tiny bits went to the bottom, is it ready for baking?
It should be fine, Anna! How many hours did it take before it doubled in volume after you fed it? If you’re looking to strengthen your starter, check out this post.
I have struggled to get a lofty loaf until I found your recipe and instructions! I’m forever grateful!
If I wanted to make a single small loaf would I simply halve all the ingredients?
Thanks so much!
So nice to hear this, Leah!
Yes, you could do that. I also really love the size of the loaf in this recipe. These are the proportions:
100 g starter
300 g water
10 g salt
400 g flour
I find it a little easier to shape because it’s slightly less dough, and I love the smaller size of the finished boule, because I find we get to the end of it just as it’s starting to stale.
Hope that helps!
I haven’t made this yet as I’m still waiting on my starter to be ready, but this is one of the clearest recipes I’ve read for sourdough. I really appreciate you demystifying the process, where so many other recipes seem like they’re trying to be deliberately intimidating.
My one question was about autolysing. I know you say that you don’t use an autolyse, but I’ve had significantly more success in the past with other breads (e.g. baguettes) when I used an autolyse vs when I didn’t. I have plenty of time at home on my hands, so I thought I might as well incorporate a short one (30ish minutes) into this recipe. Should I reduce the hydration of the dough if I do this, or would I keep it the same?
Thank you!
Hi Aidan! So nice to hear this. I don’t think you need to change the hydration of the dough if you do an autolyse. Please report back if you give it a go! I’d love to know how it works out!
YES! After 3 tries, I finally got a beautiful loaf. So proud of myself. But, honestly, this is too large a load for my husband and I to eat for the week. Do you have the ingredients for a smaller load to bake in a smaller dutch oven?
Yay! So nice to hear this, Phyllis! It is definitely a large loaf. I like the proportions on this post a little bit better for the same reason. In short it’s:
100 g starter
300 g water
10 g salt
400 g flour
I still use my 5-qt Dutch oven to bake it. You could also simply halve the recipe here to make a much smaller loaf.
Hi Ali: Love this recipe – the way you talk about and describe the sourdough process (& video) has been a game changer, but I still find I always end up with very wet dough. I got the straight sided container, but whether I let it at least double, or double, or nearly double during bulk ferment, I can never lift it clean of my counter to work with it. It always sticks. I usually get good (sometimes great) bread, but it can be on the flat side, and a little over- tangy. I assume it’s over-fermented, but would love your thoughts!
Alice
Hi Alice! Thank you for your kind words 🙂 Means a lot.
OK, I think you should probably try cutting back some of the water. Remove 25-50 g of water and see how it works out. Another thought: cut the fermentation back even more: shape the dough when it increases in volume by 50%.
Finally: are you confident in the strength of your starter? Does it double in volume after a feeding within 4-6 hours?
Also, just want to make sure you know about this troubleshooting post.
This sounds amazing! I’m on the bulk stage now! Though I haven’t got my timing great, as my starters peak was in the afternoon, which means that the end of 8-10 hour first proof will be finished in the very early morning, doh! Do you think if I left the dough in a cooler room and left the first proof for 12 hours it would still give the same outcome as the 8-10 hours (I live in the UK as well, so not super warm).
Thank you!
Hi Charis!
If you have space in your fridge, I would stick the dough in your fridge before you go to be. Be less concerned about the timing and more concerned on the visual cues. You want the dough to increase in volume by roughly 50%. Doubling is fine, too, but I’ve been getting better results when I stop the bulk fermentation when the dough has increased by 50% as opposed to 100%.
Are you using a straight-sided vessel for the bulk? No worries if not … it just makes assessing the rise easier.
If are able to stick your dough in your fridge; then pick up where you left off in the morning: remove the dough from the fridge and let it rise at room temperature until the dough increases by 50% in volume. Then proceed with the recipe.
Let me know if this makes sense!
This makes perfect sense, I’ll give it a go! Thank you! 😁
As a furloughed chef, I decided to venture out into the sourdough world and found this recipe. ABSOLUTELY a great recipe for sourdough! I’ve made it several times over the past couple of month and even modifying it with techniques as in rising time, etc. the finished product is amazing with a nice crust and crumb. Accidentally I used another recipe yesterday and could tell it just wasn’t the same consistency as this recipe. I don’t often comment on recipes, but this is definitely a great one all away around! Thank you so much for this!
So nice to hear this, Stephen! Thanks so much for taking the time to write 🙂 🙂 🙂
I was new to sourdough bread. I have tried a few recipes. This has become my go to recipe. I have made this recipe about 6 times now. The loaf comes out amazing, tastes amazing. I keep making it and sharing it with my friends. I am making it again tonight. I have one question. Am I cooking it enough. I love everything about it, but I find it hard to slice. Any suggestions.
So great to hear this, Teresa! Regarding your question, you likely are cooking it enough if you are cooking it for 40-45 minutes. One way of knowing if you are cooking it sufficiently is to invest in an instant read thermometer — they are a little bit expensive, but they give you the peace of mind immediately that your bread is cooked: if it registers 207ºF or above, the bread is done.
Also do you have a good bread knife? This one is attractive and reasonably priced. This one is a little more expensive, but also nicely designed and sharp.
Hi, i am new in sourdough
I’ve had my starter for about a month. I tried to make your recipe twice. Both grew nicely and had the holes associated with sourdough. The crust was also crispy and brown.
However, the inside crumbs were always gummy In both cases. I tried to increasebaking time, also resting for 3 hours before i slice. Still turned out a bit gummy.
Internal temp was over 200F, so undercooked was not the problem i guess.
Oven spring and the open crumbs also worked out nice, so I also sort of cross out over or underproof fermentation
And i proofed it in the fridge for around 18-20 hours
The sour taste was there
Its just the gummyness that doesnt seem right
Can you please help me out here? 😊
Thank you
Hi! I think the next step might be to reduce the water content a bit. Do you live in a humid environment? Try cutting back the water by 25-50g and seeing if that makes a difference.
Also, be sure to check out this troubleshooting post if you haven’t already.
Loving this! Foolproof! I have been using the temps in a fan-forced oven, but it just occured to me that usually fan-forced is a lower temp. I have both options in my oven, do you prefer one over the other?
Hi Angela! I don’t have fan-forced so I can’t give an opinion there, but I would just suggest experimenting with non fan forced and seeing how you like it.
Hi- thanks for the wonderful and easy to follow recipe! Just made my first sourdough bread, followed your directions pretty exactly except for a couple of things- I completely forgot the salt(!) and by the time I realized I was into the second set of folds- I added bits of 3/4 teaspoon to the dough as I folded and turned- thought I had ruined it all for sure. I bulk fermented till it was a tad more than double even though I intended to stop it at 50% ,proofed in the fridge for 14 hours. It turned out perfectly! Beautiful, just a slight taste of salt, filled with small holes, great crust and crunch! I am so happy and the recipe is so forgiving !! I will continue to perfect my skills . thanks again!
Wonderful to hear this, Jody! And nice work getting the salt in there after the fact … not easy to do.
I made it with whole flour and same amounts of water, seems that it is necessary to change (increase) the amount of water, because at the end the ball is a little bit dry and hard (not soft), the final result is that the bread finish more compact and feels like heavy. The taste is ok, but shouldbe better more fluffy !!!!!!
Hi Gabriel! This will happen when you use whole wheat flour. Next time, I would use no more than 100 g of whole wheat flour. Please read this troubleshooting post for a more thorough explanation.
I enjoy your recipe and I am doing my best to perfect it, I’m using King Arthur All purpose and I’m getting a less ‘Holey’ bread. Is it from not using a bread flour? I have had trouble finding the bread flour in store and finally just ordered directly from them online! Wish I could include a picture here to share. I live in the very dry New Mexico air but I’m using a Dutch oven to bake and waiting at least 18 hours after placing in the fridge following the bulk fermentation.
Also your sourdough pizza recipe I have been making weekly since May and all three of my kiddos gobble it up like candy 5* for sure!!
Hi Rebecca! Yes, bread flour will help with getting more of an open crumb, but other factors come to play as well.
A few quick thoughts:
1. End the bulk fermentation when the dough has increased in volume by 50% as opposed to 100%.
2. Be gentle when you shape — you want to create tension, but you also don’t want to get rid of all of those air bubbles you create during the bulk fermentation.
Great to hear re pizza!
Finally, in case you haven’t read this post yet, here is an extensive troubleshooting post.
Best sourdough I’ve made. And less fussy than other recipes.
Wonderful to hear this, Anastasia!
I have used your beginner’s recipe three times now and each loaf turns out better than the one before! Sourdough bread baking is truly a journey but an exciting one. Thank you for sharing your knowledge & expertise.
Wonderful to hear each loaf gets better … and each will continue to get better. So much fun. Thanks for writing.
Thank you very much for this recipe and instructional video. With your help I finally managed to bake a successful sourdough loaf.
Yay! So nice to hear this, Dandre!
I searched far and wide online to find a sourdough bread recipe that didn’t terrify me and found this one. My first attempt at making sourdough was an absolute success and to quote my husband, “The best bread you’ve ever made.” I was afraid that all the work I put into making my starter (I used the King Arthur recipe) and making the bread would end up as a disaster, but thanks to your well written recipe and video, I now have the confidence to make more! Thank you so much!
So nice to hear this, Francoise! Thanks so much for writing.