
Easy Sourdough Bread (Whole Wheat-ish)
This post may contain affiliate links. Please read my disclosure policy.
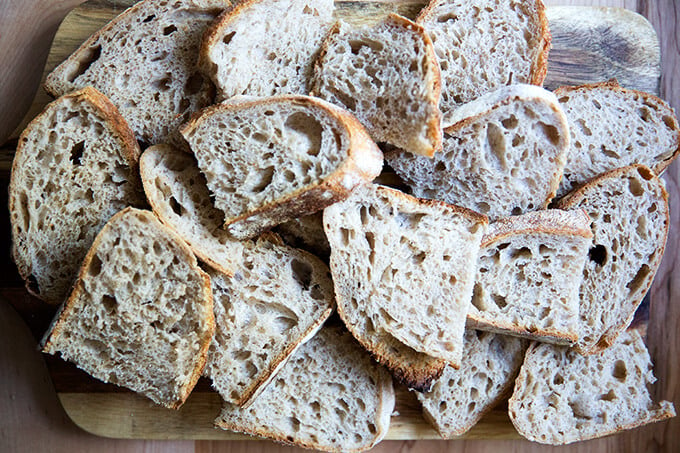
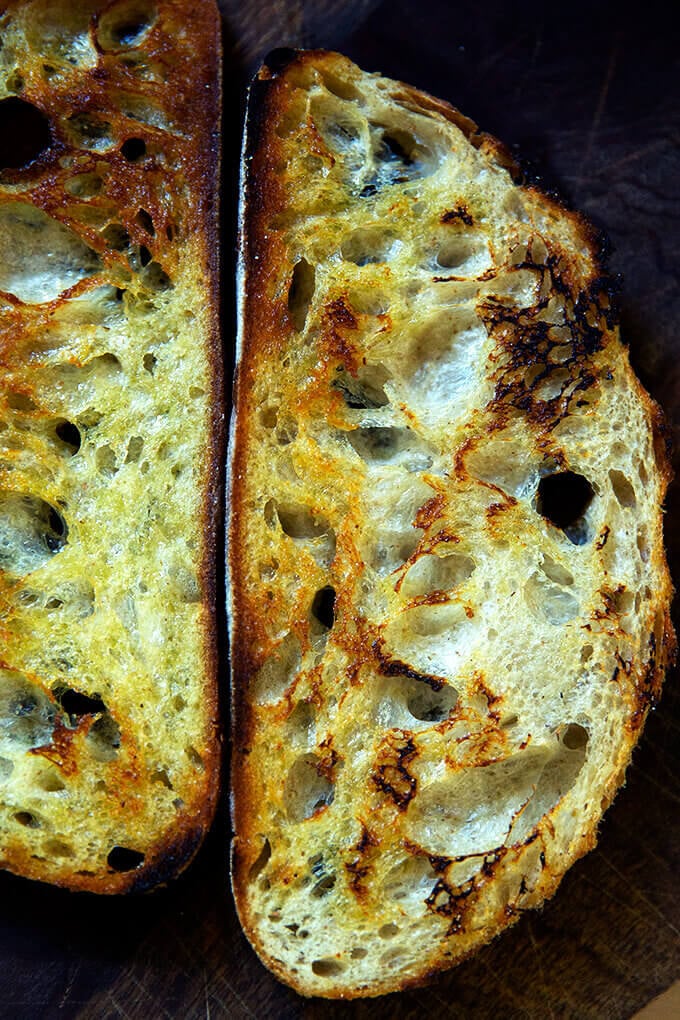
This is my favorite sourdough bread: It’s high hydration, whole wheat(ish), and just so darn tasty. As far as sourdough recipes go, this is about as simple as it gets. Below, you’ll find video guidance for every step of the process. Let’s do this! 🍞🍞🍞🍞
Sourdough is often described as a journey. The more I make it, the more this sentiment becomes a truth. For the past few years, I’ve been tinkering with various sourdough recipes, and though I can’t say I won’t stop tinkering, this is the current snapshot of my sourdough journey.
These are the characteristics I like in a sourdough boule:
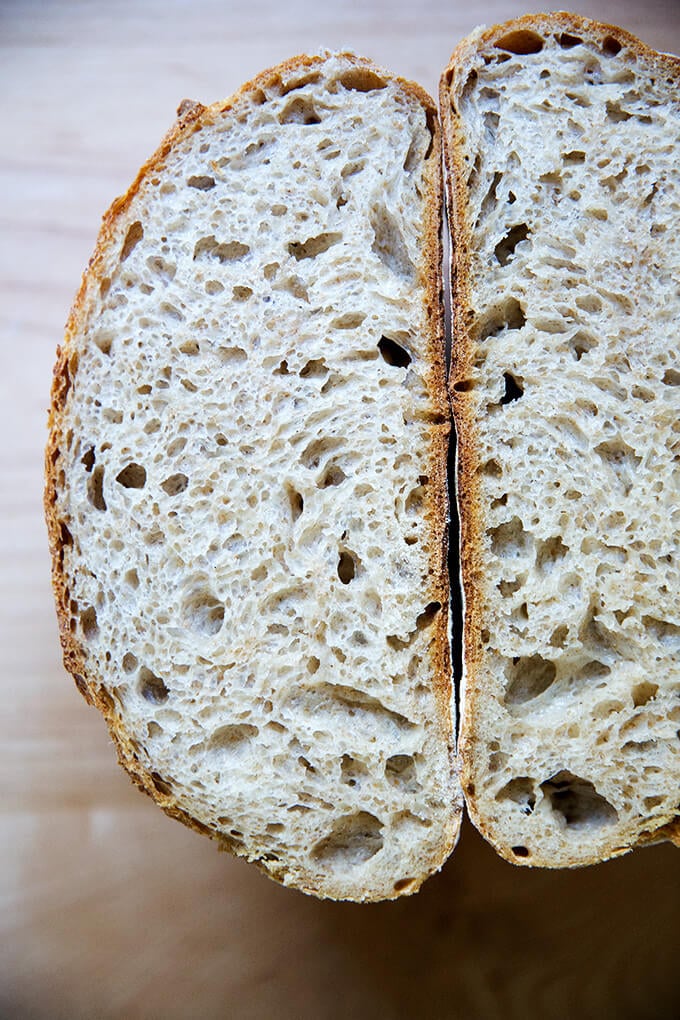
- high hydration (at least 75%)
- whole wheat-ish
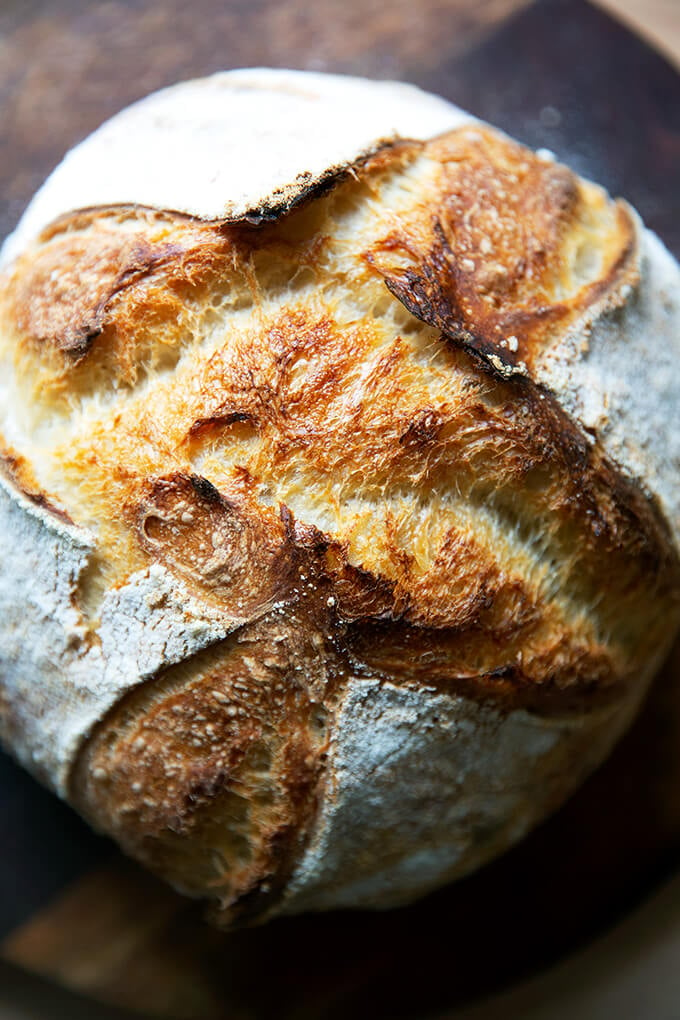
- crusty but not super crusty
- nicely salted
- tangy though not super sour
I’ve outlined the process below to create this type of loaf, which as far as sourdough recipes go, is on the simple side — there’s no kneading, no autolyse-ing, no pre-fermenting, no levain-ing, no fancy scoring.
It’s a little bit smaller than most sourdough boules, too, reasons for which I explain below. And as with all sourdough baking (and bread baking in general), it does take time, though the time is mostly hands off.
This post is organized as follows:
- Two Sourdough Fermentation FAQs
- Two Tips for Assessing Fermentation
- Whole Wheat Flour
- Roller-Milled vs. Stone-Milled Flour
- 75% Hydration
- Mixing Sourdough Bread
- Bulk Fermentation
- Shaping + Bench Rest
- Proofing Sourdough
- Scoring and Baking Sourdough
- The Best Way to Store Bread
2 Sourdough Fermentation FAQs
Two of the most frequently asked questions I receive about sourdough bread baking are:
- How do I know when the dough has risen sufficiently and is therefore ready to be shaped?
- How do I know if it has proofed sufficiently and is therefore ready to be baked?
If you are unfamiliar with sourdough baking, these two questions relate to two distinct phases of fermentation:
- The first question relates to the bulk fermentation (the first rise), which takes place after the dough is mixed.
- The second question relates to proofing (the second rise), after the dough is shaped.
One thing I have learned through troubleshooting with various people is that it’s very hard to put a timeline on these two phases. Sourdough is much more sensitive than yeast-leavened breads to the environment in which it is being baked.
The bulk fermentation for me in my cold Upstate New York kitchen often takes 12 hours regardless of the time of year. For someone baking in humid Hawaii, it may take 6 hours (or less! or more!). Similarly, the proofing phase may vary by many hours depending on the environment. Additionally, there are countless variables that affect fermentation: type of flour, water, salt quantity, strength of the starter, to name a few.
Yes, there are textural/visual cues to help discern when each phase of fermentation is complete, but it still can be hard to judge.
If you struggle with these assessments, I have two tips for you:
2 Tips for Assessing Sourdough Fermentation
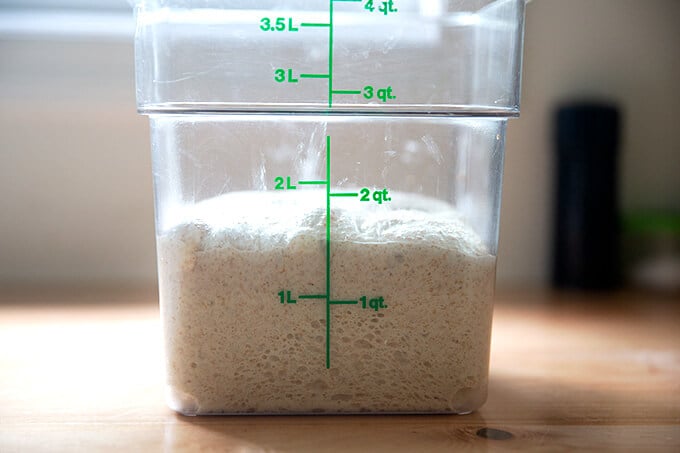
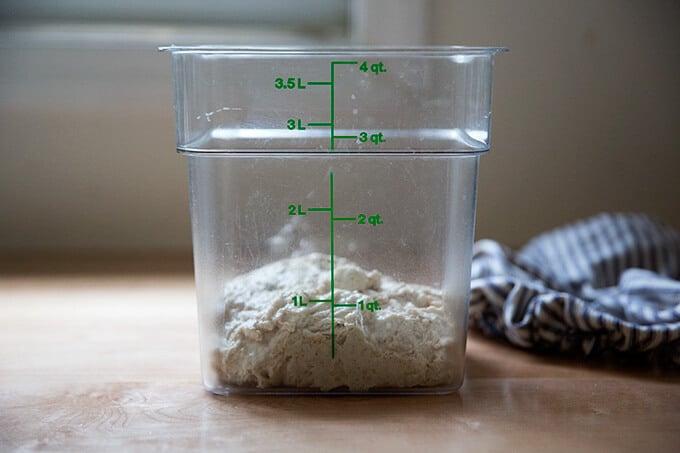
Tip #1: Buy a clear, straight-sided vessel.
After my digital scale, my clear, straight-sided 4-qt Cambro (**this one is BPA-free!**) has become my most important tool when it comes to sourdough bread baking. Why? For two reasons:
- Because it’s clear, it allows me to see when the dough is filled with bubbles and activity throughout — top, bottom, sides, etc.
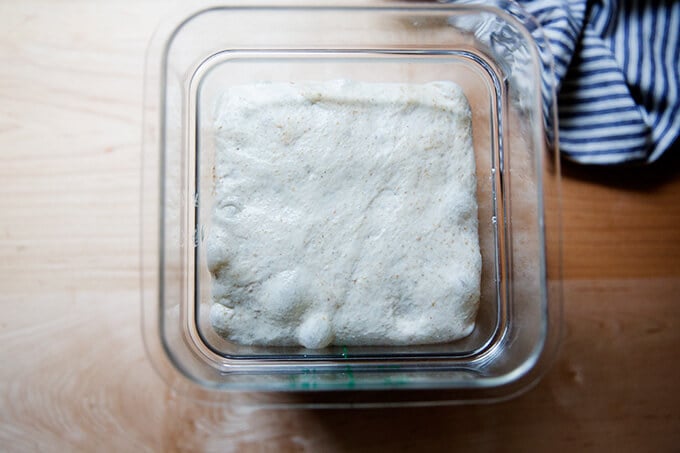
- Because it’s straight sided, I know exactly when the dough has risen sufficiently (roughly 50% increase in volume) and is therefore ready to be shaped. When dough rises in a bowl, it’s very hard to gauge how much the dough has grown.
If I could single out the biggest lesson I’ve learned in my sourdough baking journey, it’s this: Do not allow sourdough rise beyond double during the bulk fermentation.
Why? When sourdoughs rise for too long, the dough weakens. A weak, fragile dough is hard to handle and difficult to shape into a tight round, which in turn makes for a dense loaf. Most recently I shoot to shape the dough when it has increased by 50% in volume.
Tip #2. Use Your Refrigerator & Be Flexible
Because judging bulk fermentation and proofing can be tricky, you can use your refrigerator during both phases.
Using your fridge for the bulk fermentation:
If, for instance, you see your dough rising nicely but all of a sudden it’s 10 pm and you’re ready for bed, and you know if you let the dough continue to rise, it will be way beyond double in the morning, stick the vessel in the fridge. The following morning, take it out and let the dough rise at room temperature until it has nearly doubled or, as I advise more and more, increased by 50% in volume.
With sourdough baking, you have to be patient, and you have to be flexible with the timing.
Using your fridge for proofing:
Using my fridge for the proofing phase has been the biggest change in my sourdough process of late. Previously, after shaping the boule and placing it in a towel-lined bowl, I would transfer the dough to the fridge for 1 hour, then bake it. These days, I like to stick the shaped boule in the fridge for at least 12 hours, but ideally 18-24 hours. Why?
- The extended cold proof creates a lighter, airier crumb.
- A cold round of dough is so much easier to handle from scoring it to transferring it to the Dutch oven.
Whole Wheat Flour FAQ

In my email course, Foolproof Bread Baking, I receive a lot of questions about how to incorporate more whole grain flours into bread.
This is a tricky one to answer for me for two reasons:
- I like white bread. A good loaf of bread for me has so much to do with texture. I love a pillowy, oily focaccia; a soft, squishy brioche bun; a ballooned, crisp-tender Neapolitan pizza. As soon as whole grain flour is entered into the mix, the texture changes, becoming heavier, denser.
- Commercial whole wheat flour isn’t necessarily healthier than commercial white flour. Wait, what? Read on.
Roller-milled Flour vs. Stone-milled Flour
Without getting too far into the weeds, most of the commercial flour on the market is made from wheat that has been roller milled, meaning a roller mill has separated the wheat kernel into three parts: the endosperm, germ, and bran. White flour is made from the endosperm.
Whole wheat flour, similarly, is made from rolled-milled wheat: again, first the kernel is separated into three parts: the endosperm, germ, and bran; BUT then the germ and the bran are added back in various proportions. Much research shows that as soon as the wheat kernel is separated into the various parts, much of the nutritional value is lost — even when the bran and germ are added in after the fact.
So what’s the solution?
Stone-Milled Flour
Stone-milled flour, contrary to roller-milled flour, is flour made from wheat that passes through a stone mill, the process of which keeps the endosperm, bran, and germ together. Much research shows that keeping the components together preserves the nutritional value.
The rub with stone-milled flour? Stone-milled flour is more perishable due to the presence of both the bran and the germ, but the germ in particular, which is packed with vitamins, minerals, and fats, which can go rancid quickly.
The boon? Because the bran and germ are present in the flour, it’s also more flavorful.
Anything else to consider? Baking with stone-milled flours requires a little more finesse. Even a small amount of bran and germ in the mix makes for a denser loaf. Many millers offer high-extraction stone-milled flours — meaning stone-milled flours that have been sifted to remove some of the bran and endosperm. But even when you bake with high-extraction, stone-milled flour, the finished loaf, when made from 100% of this type of flour, will be very dense.
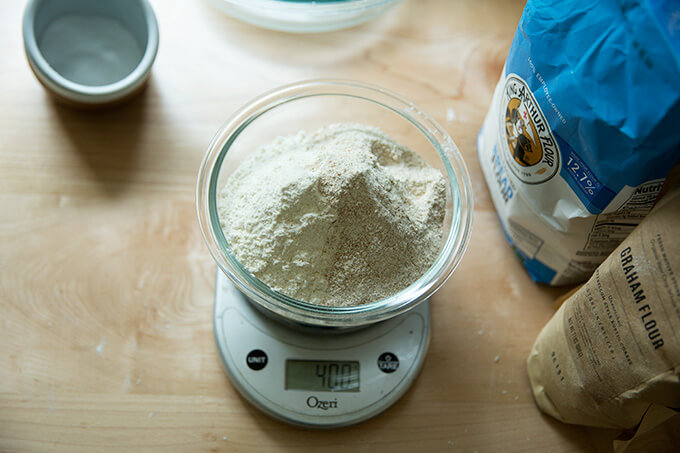
For this reason, I use at the most 25% stone-milled flour (100 g for this recipe), but preferably in terms of texture, 12.5% stone-milled flour (50 g for this recipe). 12.5% may seem like a tiny amount, but I am constantly surprised by how much flavor, texture, and color this small proportion of stone-milled flour offers to a loaf of bread.
In fact, I now prefer a partially whole wheat loaf to an all white loaf. The freshly milled, stone-milled flours offer so much flavor.
Where to Buy Stone-Milled Flour?
In the past few years, it has become easier to find stone-milled flour, and if you are up for it, you should seek out locally, stone-milled flour. Why? Because if you’re buying locally milled flour, you likely can find out how recently it was milled. Because stone-milled flour perishes more quickly than roller-milled flour, it’s best if you can find a local source, which will ensure it will be fresh. Note: Store stone-milled flour in the freezer if you don’t bake regularly.
Final note: I no longer buy commercial whole wheat flours. I buy commercial white flours: King Arthur Flour’s all-purpose flour and bread flour are staples. I find locally milled stone-milled flours at a local co-op, Honest Weight Food Co-op, and I also order online from various sources. Here are a few I love:
Finally: Here’s a great resource if you’re interested in learning more about wheat and flour: The Bread Lab. Also, Dan Barber’s The Third Plate was eye opening.
75% Hydration
Standard sourdough recipes often call for 500g of flour per loaf. As noted above, the recipe below makes a loaf that’s a little bit smaller for two reasons:
- I’m often asked if the bread recipes here on the blog as well as in my book can be halved. The answer is yes, but in an effort to make a loaf that may not feel quite so overwhelming for people, I’ve reduced the flour to 400g.
- I wanted to include quantities that make hydration easier to understand. Hydration is something I don’t discuss too often because I find it can turn people off (me included). In short, hydration is: the ratio of water relative to flour in a bread dough. The proportions in this recipe — 300g water and 400g flour — make it a little easier to see it’s a 75% hydration dough: 300/400=0.75.* With this baseline, you can increase the amount of water to make it higher hydration or decrease the amount of water to make it lower hydration depending on your preference.
*Note: This is a crude calculation. If you want to be super accurate when calculating hydration, you include the weight of the starter in the equation, too, which will throw off the percentage slightly.
Salt
I love salt. The standard percentage of salt in a bread recipe is 2% by weight of the flour. For 400g flour, this means 8g salt. I use 10g. The amount of salt, fortunately, is a variable that can easily be tailored to your liking. If 10g of salt is too much for you or if you know from the start you are sensitive to salt, start with 8g, then adjust accordingly. Also, higher amounts of salt will slow down the rise a bit as well.
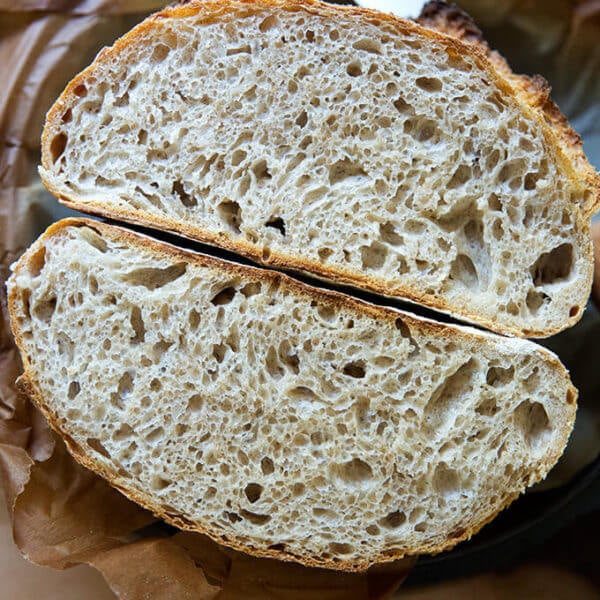
5 Phases: Simple Sourdough Bread
This videos and photos below shows how to make from start to finish the high-hydration, whole wheat(-ish) sourdough bread recipe included at the end of the post.
Phase 1: Mix the Dough
Step 1: Gather your ingredients — flour, salt, water, a sourdough starter — and equipment, namely a digital scale. I recommend buying a starter (reasons for which I explain here). But if you’re up for it, you can make a sourdough starter from scratch in just about a week. I only recommend doing so if it currently is summer (or a very warm fall) where you are.
Most important, you need a fed, active starter.
To ensure it is ready, drop a spoonful of it in a glass of water. If it floats, it’s ready:
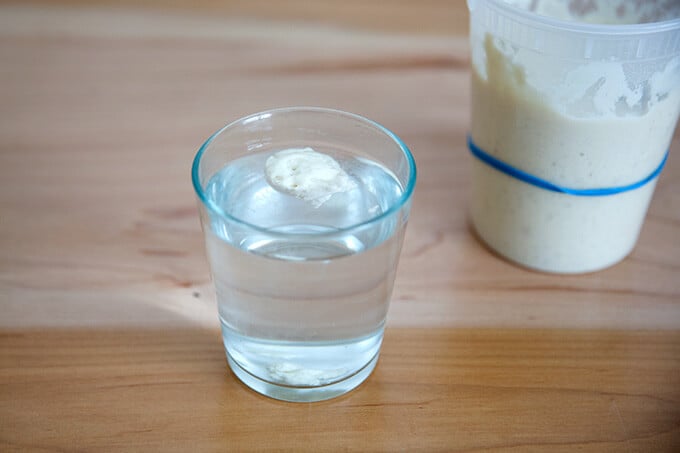
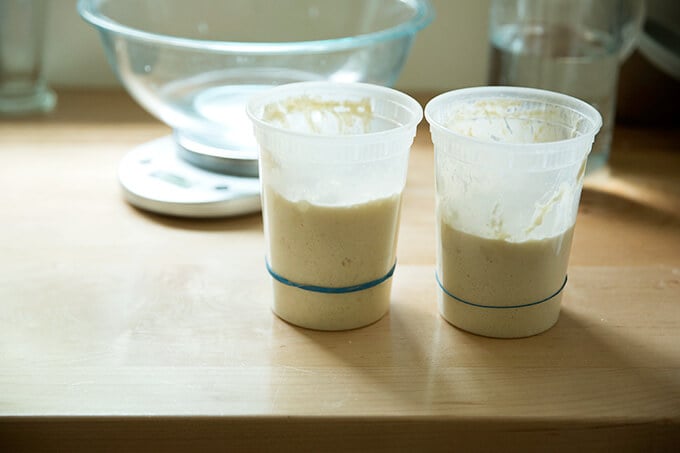
Start by weighing 300g water, 100g starter, and 10g salt.
You’ll need 400g flour. You can use all bread flour of a mix of bread flour and whole wheat flour. My preferences is 350g bread flour (King Arthur Flour) and 50g stone-milled, freshly milled flour (I use a mix of Anson Mills rye and graham).
Mix to form a sticky dough ball.
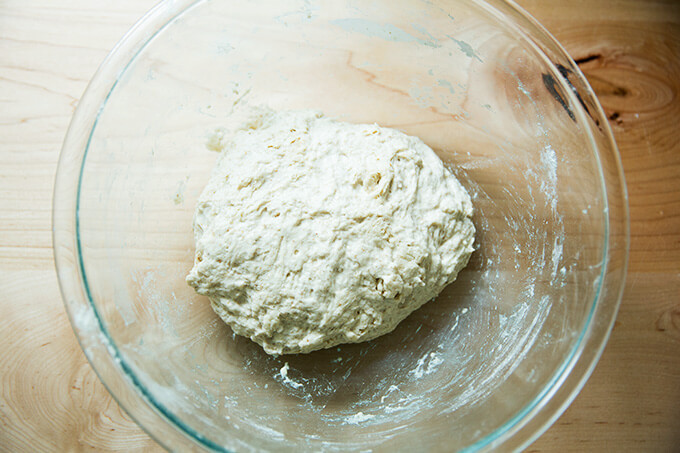
Then transfer to a straight-sided vessel for the bulk fermentation (the first rise).
Phase 2: Bulk Fermentation
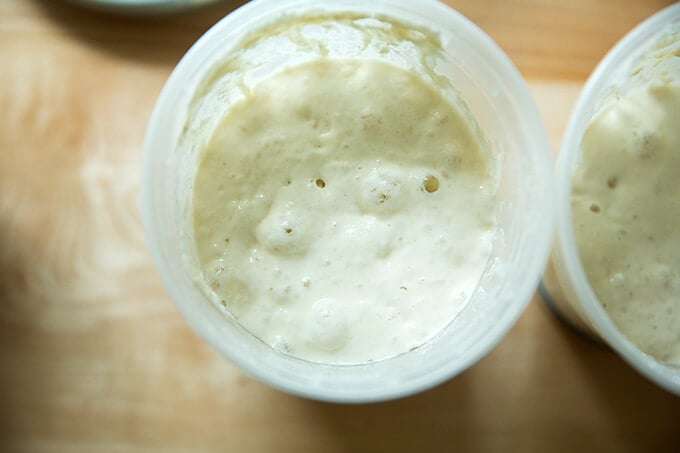
After 30 minutes, stretch and fold the dough:
You’ll repeat this stretching and folding 3x at 30-minute intervals; then you’ll leave the dough to rise until it increases in volume by 50-75%.
Phase 3: Shape + Bench Rest
Transfer dough to a clean work surface. I prefer to use no flour and minimal handling to shape it into a ball.
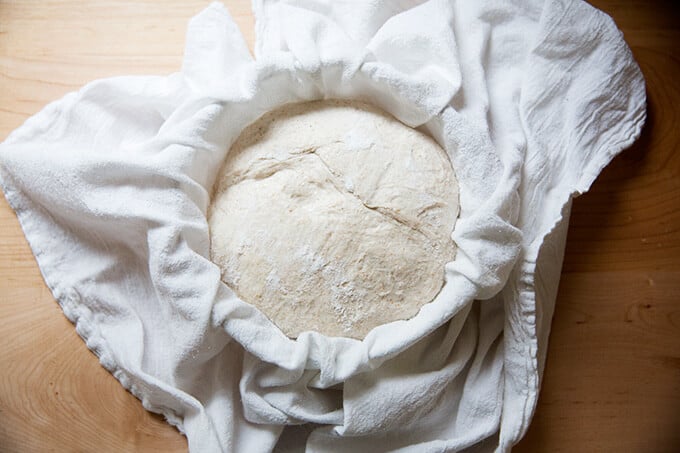
After the initial shape, let the dough rest for 20-40 minutes; then shape again and transfer to a flour sack-lined bowl.
Phase 4: Proof
Transfer bowl to fridge to proof (second rise) for 18 to 24 hours

Phase 5: Score + Bake
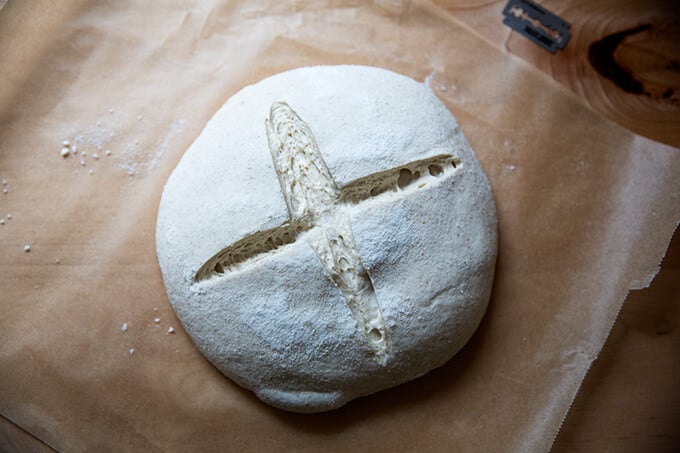
After 18 to 24 hours, transfer dough to a sheet of parchment paper. This video shows how:
Score as you wish; simple is fine.
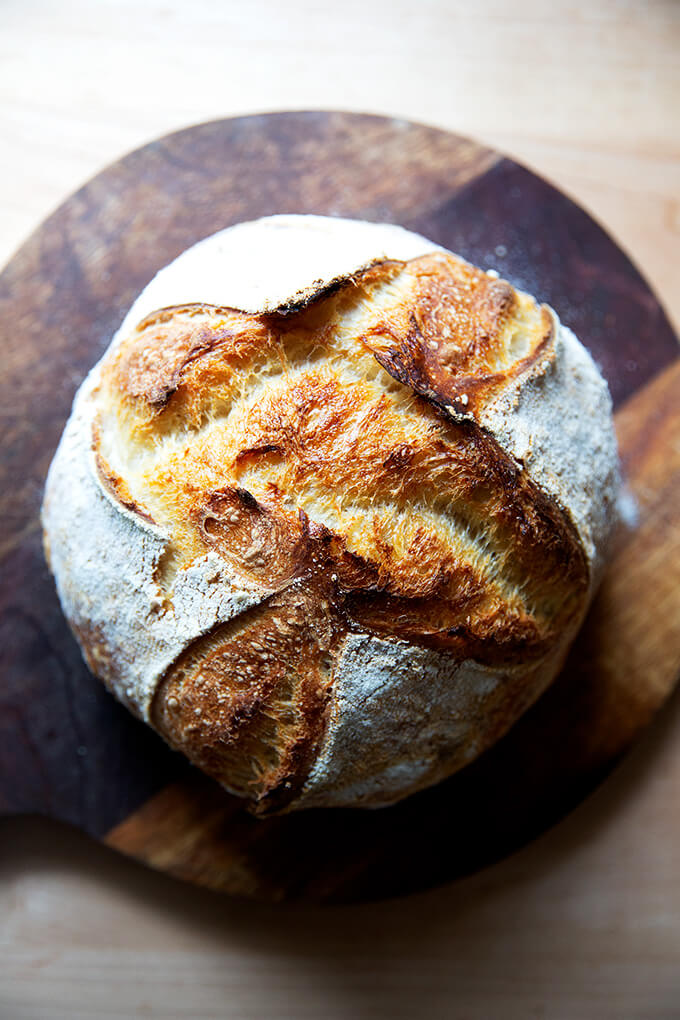
Transfer to a Dutch oven and bake at 450ºF covered for 30 minutes, then uncovered for 10 minutes at 400ºF.
The Best Way to Store Bread
How do I store bread? is one of the most frequently asked questions I receive.
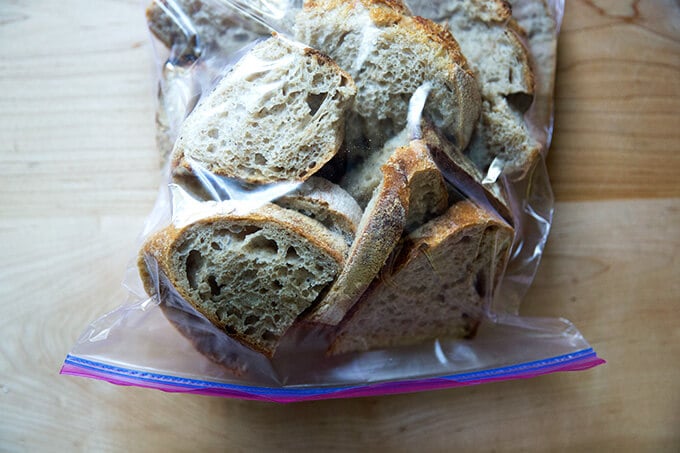
If you want to store the bread at room temperature for 3 to 4 days, I think the best method is in a ziplock bag. I’ve tried other reusable/environmentally friendly options, but nothing seems to keep bread freshest — the crumb the softest — better than a ziplock bag.
If you intend to keep the bread for longer, I would stick the ziplock bag in the freezer, and pull out slices or hunks as you wish. I often slice bread as soon as it cools completely, transfer the slices to a ziplock bag, then freeze. This way, I know the bread was frozen at its freshest.
A ziplock bag will not prevent the crust of bread from turning soft, which is why I suggest always reheating day-old bread. I use a toaster at breakfast for slices of bread, and I reheat half or quarter loaves in the oven at 350ºF for 15 to 20 minutes when serving for dinner.
Bread revives so beautifully in the oven or toaster.
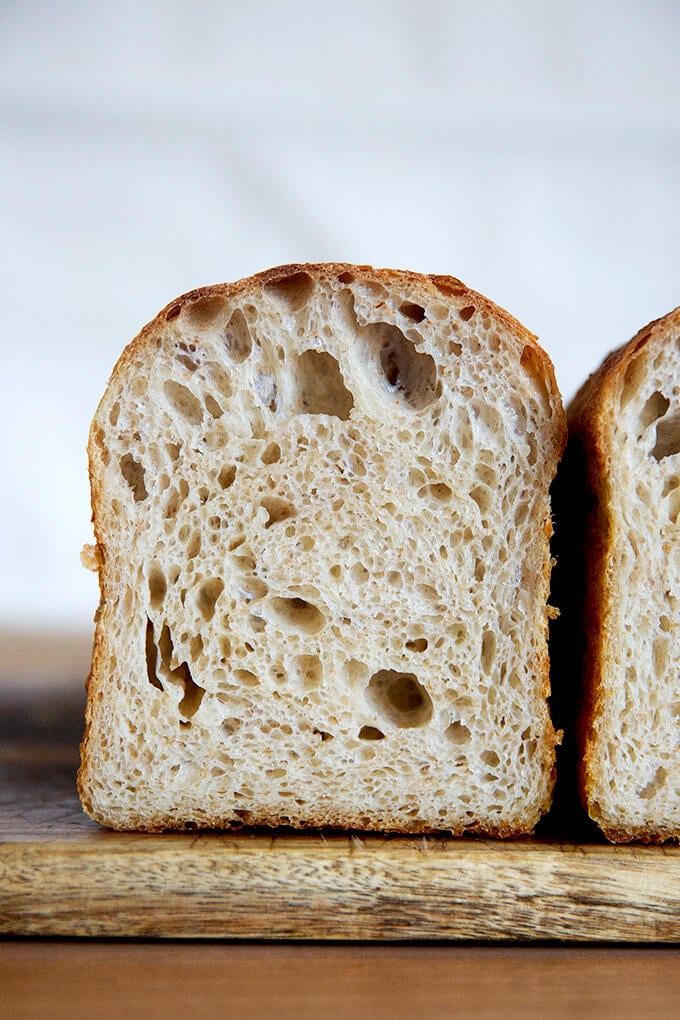
I baked this loaf in a tall-sided pullman loaf. Love the shape! I proofed this in the fridge for about 12 hours; then let rise at room temperature for roughly 5-6 hours before baking at 400ºF for about 40 minutes.
Easy Sourdough Bread (Whole Wheat-ish)
- Total Time: 48 hours 45 minutes
- Yield: 1 loaf
Description
Special equipment: Straight-sided vessel for the bulk fermentation, Dutch oven, flour-sack towel
Here’s my list of essentials for sourdough bread baking.
Digital Scale: Do not attempt this recipe without a scale. This one costs $9. Troubleshooting what goes wrong with sourdough bread is impossible if you’ve measured with cups. They’re simply not accurate.
Troubleshooting: If you have issues with your dough being too sticky, please read this post: Why is my sourdough so sticky? The 4 common mistakes.
Flour:
- I prefer making this bread with 350g bread flour and 50g of freshly milled, stone-milled flour, which provides both flavor and color. (Read the post above for more details and why I suggest stone-milled flour as opposed to commercial whole wheat flour.) I’ve been using a mix of Anson Mills graham flour and rye flour, but there are many great stone-milled flours out there, and you may have a local source, which is even better.
- 50g may seem like a tiny amount of stone-milled flour for this recipe, but I am constantly amazed by how much flavor this small amount of freshly milled flour adds. If you are new to sourdough baking, I recommend starting with 100% bread flour (King Arthur Flour is my preference) because it’s so forgiving and easy to work with. Once you get the hang of it, start incorporating stone-milled flour a little bit at a time. I don’t like using more than 100g (25%) of stone-milled flour in this recipe.
- If you cannot find bread flour — I know supplies are limited at the moment — you can use all-purpose flour. If you live in a humid climate, consider reducing the water by 20 g. You can add the 20 g of water in slowly while you mix until the dough resembles that in the video/photos.
Salt:
I like breads to be a little bit saltier than standard. If you are sensitive to salt, start with 8g. Next time, adjust salt as you wish.
Ingredients
*Please read notes above before proceeding. Watching the video is helpful, too.*
- 400 g bread flour, see notes above
- 8g to 10g kosher salt or sea salt, see notes above
- 300 g water
- 100 g active sourdough starter
- rice flour, for dusting
Instructions
- Mix the dough. In a large bowl, combine the water, starter, and salt. Stir with a rubber spatula to loosely combine. Add the flour, and stir with a spatula to combine — it will be a wet, sticky dough ball. Transfer to a straight-sided vessel and cover with a tea towel or bowl cover for 30 minutes.
- Stretch and fold. After 30 minutes, grab a corner of the dough and pull it up and into the center. Repeat until you’ve performed this series of folds 4 to 5 times with the dough. Let dough rest for another 30 minutes and repeat the stretching and folding action. If you have the time: do this twice more for a total of 4 times in 2 hours. [Video guidance here.] Note: Even if you can only perform one series of stretches and folds, your dough will benefit. So don’t worry if you have to run off shortly after you mix the dough.
- Bulk fermentation: Cover the vessel with a tea towel or bowl cover and let rise at room temperature (70ºF/21ºC) for 4 to 18 hours (times will vary based on the time of year, the humidity, and the temperature of your kitchen). The bulk fermentation will end when the dough has nearly doubled in volume and you can see bubbles throughout the dough and on the surface. (Note: Do not use your oven with the light on for the bulk fermentation — it is too warm for the dough. To determine when the bulk fermentation is done, it is best to rely on visual cues (doubling in volume) as opposed to time. A straight-sided vessel makes monitoring the bulk fermentation especially easy because it allows you to see when your dough has truly doubled.)
- Shape: Gently transfer the dough to clean work surface. I prefer to use no flour and a bench scraper at this step, but if you find an un-floured work surface to be difficult, feel free to lightly flour it. [Video guidance is especially helpful for this step.] Fold the dough, envelope style: top third over to the center; bottom third up and over to the center. Then repeat from right to left. Turn the dough over and use your bench scraper to push the dough up, then back towards you to create a tight ball. Repeat this pushing and pulling till you feel you have some tension in your ball. Place the dough ball top side down and let rest 30 to 40 minutes. (FYI: This is called the bench rest.)
- Proof. Line a shallow 2-qt bowl (or something similar) with a tea towel or flour sack towel. Flour sack towels are amazing because the dough doesn’t stick to them, and therefore you need very little rice flour, but if you only have a tea towel, you will be fine. If you are using a tea towel, sprinkle it generously with rice flour. If you are using a flour sack towel, you can use a lighter hand with the rice flour. After the 30-to 40-minute bench rest, repeat the envelope-style folding and the bench scraper pushing and pulling till you have a tight ball. [Video guidance here.] Place the ball top side down in your prepared towel-lined bowl. Cover bowl with overhanging towel. Transfer bowl to the fridge for 12 to 24 hours. (Note: When you remove your dough from the fridge, visually it will likely look unchanged. This is OK. You do not need to let it then proof at room temperature before baking.)
- Bake. Heat oven to 500ºF. Remove your sourdough from the fridge. Open the towel. Place a sheet of parchment over the bowl. Place a plate over the parchment. With a hand firmly on the plate and one on the bowl, turn the dough out onto the parchment-paper lined plate. [Video guidance here.] Carefully remove the bowl and towel. Carefully remove the plate. Brush off any excess rice flour. Use a razor blade to score the dough as you wish. I always do a simple X. Grab the ends of the parchment paper and transfer to the Dutch oven. [Video guidance here.] Cover it. Lower oven temperature to 450ºF, bake covered for 30 minutes. Uncover. Lower temperature to 400ºF. Bake for 10 minutes more or until the loaf has darkened to your liking. Transfer loaf to a cooling rack.
- Cool. Let loaf cool for at least 30 minutes before cutting.
- Prep Time: 48 hours
- Cook Time: 45 minutes
- Category: Bread
- Method: Sourdough
- Cuisine: Global
This post may contain affiliate links. Please read my disclosure policy.


988 Comments on “Easy Sourdough Bread (Whole Wheat-ish)”
Unlike many others, the dough consistency was perfect for me, not too wet at all! And that’s with my 100% hydration starter. I live in a dry and cool climate with lots of temperature fluctuations.
On my first attempt, I left the dough in the oven overnight with just the lights on during the bulk fermentation. When I opened the oven in the morning and felt how hot it was I knew I’d be in trouble and sure enough, when I dumped out the dough it was a puddle.
This second time around I left it on the counter at room temperature overnight. In the morning, I couldn’t tell if it had risen enough (I don’t have a straight-sided vessel yet) but I was nervous about leaving it too long again so I went ahead and shaped it. It’s in the fridge now so we’ll see how it turns out!
The biggest problem I’m having at the moment is with my starter. When I feed it, it takes about 7-8 hours to reach its maximum height, and it doesn’t double – I’d say it becomes about 30% higher. But it passes the float test when I go to make my dough. If my starter doesn’t double, is it reasonable to expect that my dough won’t reach double during fermentation?
Is there anything I can do when feeding my starter to get it to double? I started it a couple months about with AP flour and have since switched to feeding it with whole wheat flour. I feed it once every 24 hours.
Hi Alexandra! Great to hear the dough is the right consistency for you.
To strengthen your starter, this is the advice I always give: be aggressive with how much you are discarding: throw away most of it, leaving behind just 2 tablespoons or so. Feed it with equal parts by weight flour and water. Start with 40 g of each or so. Use water that you’ve left out overnight to ensure any chlorine has evaporated. (This isn’t always necessary, but it might make a difference.) If you can find some organic flour — my store carries small bags of KAF organic flour … they’re a little more expensive ($3.49 for 2 lbs) but I use it exclusively for feeding my starter. Organic flour or a little bit of rye flour or some stone milled flour (fresh or locally milled if possible) can make a difference. Your whole wheat flour may be fine, but stone-milled/freshly milled is better. What kind of whole wheat flour are you using?
Keep me posted on 1.) how your current loaf turns out and 2.) how this more aggressive feeding strategy works out.
Thanks so much for the tips on the starter! I did as you said and got it doubling in size after a few days. I’ve just been using a basic whole wheat bread flour (Robin Hood brand, I’m in Canada, not sure if you have this brand in the states). I tried looking for an organic flour but haven’t had any luck finding one yet. I’ll keep an eye out though!
The loaves have definitely been improving but I’ve had a few issues –
1. During the fermentation stage, the dough doesn’t double (even with a starter that doubles!). To experiment, I decided to over ferment it just to figure out a timeline. I watched it over the course of the day to make sure I wasn’t missing the doubling point overnight, and after 12 hours it had risen by about 30% (I got a straight sided vessel to make sure I could measure this accurately). When I dumped it our it turned into a puddle so it had definitely reached its max height and gone past that.
I made a couple loaves after this, waiting for it to get about 30% larger before shaping it and proofing it in the fridge for 14-16 hours. Both of these loaves rose beautifully while baking, so I think the failure to double during fermentation might be okay? However, both times I cut into them (after letting them cool completely) they had a very uneven crumb with lots of huge holes, and the texture on the inside was still moist as though underdone. I extended the baking time (500F for 40 minutes covered, and then down to 450F for 15 minutes uncovered) and still have this issue.
Any ideas on what I’m doing wrong? I’m taking a little two week break as I’ve started to become a little bit obsessed haha!
Thanks so much for your help, I’ve read a lot of other comments to try to troubleshoot. You’re so kind to take the time to respond to everyone!
Hi Alexandra! First, of course! I’m happy to help when I can 😍😍😍. This is all very interesting to me. A few thoughts/questions for you the next time you give this recipe a go:
1. Are you using 100% whole wheat bread flour in this recipe? If so, I would try to use a mix. If you can find bread flour that is not whole wheat, I think that will make a difference for you. Use 50 grams of your whole wheat bread flour and 350 g of bread flour.
2. Feed your starter a couple of times before you use it, to really “wake” it up.
3. After the fridge proof, maybe consider letting it sit at room temperature for a few hours. I don’t typically recommend this because I find it difficult to slash, but it might help your loaves bake more evenly and thoroughly if they are more at room temperature. Just a thought.
Keep me posted!
Hmmm, not as simple as I had hoped. We try to keep the glycemic index low so we use 100% red and white hard winter wheat for starter and bread. We have tried numerous methods and found our kids do not always have the patience to wait. I finally decided to try something simple. Mill the flour; using 600 grams flour and 475 grams water, 300 grams starter and 12 grams salt. Used the old fashioned hand kneading for about 5 minutes. Put into bowl and cover for 2 hours in a warm kitchen (78 F) or longer in a cooler kitchen until the dough nearly doubles. We found that a deep stainless steel skillet with lid works better than heavy cast iron dutch oven, but takes longer to bake. Add flour to bottom of skillet to prevent sticking. Preheat to 450 F, add dough, and cover for 35 minutes then remove cover reduce heat to 375 and cook until internal temperature is about 190 to 200 F. We prefer the taste and texture over lengthy methods. We do not do any stretching or folding. Just old fashioned hard work kneading in the beginning. We have learned that a very strong starter and very finely milled wheat helps the rise (more air). The starter we are using is 5 months old and made from milled white and red wheat grain. It is kept in the refrigerator until needed for bread. As little as 50 grams of cold starter with 150 grams fresh milled wheat and 140 to 150 grams of water and after a few hours the starter is good to go. As you know, a warmer kitchen produces a faster rising starter and dough. In cold kitchen, if you have a microwave with light or oven with light, this speeds up the starter rise. Our microwave broke long ago and we only use it as a warm place when needed.
Wow, thanks for all of this Mark! I am so impressed by your use of freshly milled wheat here. This will be really helpful for others looking to do the same. Thank you for sharing all of the details!
In some of your recipes you have links to your preferred cookware and equipment, but there are no (at least that I could find) recommendations on the type and size of Dutch Oven your are using. On Amazon they range in size from 3-7 quarts. Would you share your recommendations?
Hi Jim! This is the Dutch oven I use: 5-Qt Lodge Double Dutch Oven
Hi Alexandra! I was wondering, if I wanted to use a levain for this recipe, what would the proportions/formula be?
Thank you!
Hi Joanna! This is what I do:
To make the leaven, mix together:
1 tablespoon (20 g) sourdough starter
50 g flour
50 g water
Do this in the evening before bed. Cover it with a tea towel. Let sit overnight at room temperature.
The next morning, pour 300 g water into a bowl. Add the leaven. (If you want to be more precise, you can weigh out 100 g of the leaven; then add what remains of the leaven to your stash of starter.) Add l0 g salt and stir with a spatula to combine. Add 400 g flour. (You can use a mix of white and whole wheat flour here or all white, etc.) Mix to combine.
From here, proceed with the recipe as written, doing turns every 30 minutes for the first 2 hours if possible. Once the dough has doubled, again, proceed with the shaping and refrigerated proofing step (for at least 12 hours but up to 48 hours).
Thank you so much! 🙂 you’re an angel!
My pleasure 😍😍😍😍
Also, is it possible to use 50 g of starter instead of 100g? I live in a hot and humid country 🙂
Many thanks!
Yes, absolutely!
Alexandra I love your blog and now rely entirely on it for my sourdough bread! I have one question. I bought a straight edged container so I can tell when it doubles. I bought a plastic lid to go with it but I’m not sure if I should use it. Should I cover with something that breathes or go ahead and use the air tight plastic lid?
Oh heather, so nice to hear this this 😍😍😍 Thank you! I think you can use the lid, but I would keep it slightly ajar — maybe don’t press it down entirely so that some air can get in and escape. If the lid doesn’t allow you to do that, I would cover with a tea towel. Some people prefer damp tea towels, which might help the dough from preventing a crust when it rises, but I never have an issue with my dry, cloth bowl covers.
thank you so much for taking the time to reply! And, that’s what I’ve been doing! Keeping the lid slightly ajar. Haha so happy to know my gut instinct was right. ….for once. 😉
Yay 🎉🎉🎉
My levain formed a hard crust in the refrigerator. Do you know why that might be?
Hi Stephanie! When you say your “levain” are you referring to your starter or did you make a pre-ferment with some of your starter plus more water and flour?
Hello! Just made this recipe and for the first time my sourdough came out tasting like sourdough – chewy, flavoursome, nice air bubbles, loose crumb, gorgeous crust. All my other sourdough loaves have had a tight crumb and lacked flavour and that chewy sourdough texture. Thank you!! The only thing was it was quite flat. I did the second proof in quite a large bowl and it was a relatively small loaf – could this be the reason?
Wonderful to hear this, Alice! It’s possible that your bowl had something to do with it. I use a 1.5 L bowl. But there are other factors that can affect the shape, too. Do you feel you are able to get good tension when you shape your boule?
Thanks for all the help on making sourdough!! One question: can I double the recipe and leave it in the same container until the second proofing?
Sure thing! And yes, absolutely.
Hello
Is it possible to make this in a bread machine? If so what settings would you advise?
Thank you
Hi Jenny! I’m not sure! I’m sorry. I’ve never used a bread machine, so I don’t really even know where to begin there.
I’m trying again, because I overslept during bulk fermentation, so it went on for 20 hours. I’ve done this before without incident, and the dough was okay coming out of the bowl, but during the final shaping, it just went completely slack. I tried to re-form it even after putting the wet dough in the banneton, but it just got worse. I added some flour to get the dough a little more handle-able, and am hoping it’ll firm a little in the fridge for the overnight proof.
When I looked at the dough after the long bulk ferment, it didn’t look bad, just rose a lot & had one huge bubble. Any tips would help.
Hi Carol! I think you just need to reduce the bulk fermentation. Unfortunately, there is no salvaging over-fermented dough, and it sounds as though that’s what happened — when dough is completely slack, it’s a sign of over-fermentation.
Next time, I would either mix your dough in the morning so you can keep an eye on it. What temperature is your kitchen?
My kitchen is 70 during the day but the overnight was closer to 65. I’m trying again but I noticed during the shaping that the dough’s still quite slack, and I made sure not to bulk ferment too long this time. Dough was almost doubled this time, with bubbles. Last time, dough quadrupled, way too long. I even checked along the way. I’ll bake tomorrow and we’ll see how it went.
First dough baked flat and came out very pale with lots of holes. Thanks for responding. I’m full of self doubt now, afraid to even leave any dough out overnight, but pushing through. This is the only way I learn.
It’s not your recipe, which is perfect. It’s me figuring things out! I’m still a novice (since late March).
Hi Carol! Don’t have self doubt! It sounds as though you are totally on the right track. Catching the dough right before it doubles is perfect. Keep me posted on how it bakes!
Hi Alexandra,
I’m very excited to try this bread! I made your focaccia recipe the other day and it was delicious.
I do have a couple of questions though:
1) Someone else in the comments mentioned starting a levain the night before instead of just starter on the day of, what are the benefits of doing it that way? does it change the taste/texture?
2) I saw you recommended starting with 50g starter for a more sour taste, are there any other adjustments that need to be made to the recipe when doing this?
3) My dough was VERY sticky after bulk fermentation, I tried using a little flour, but it kept sticking to my hands, the counter, and my benchscraper, even after the bench rise so I was unable to create any tension. I will bake it off tomorrow and see how it goes, but advice for this? Just reducing the water a little maybe? I have a straight sided container for the bulk fermentation, so I don’t think it went over, but I haven’t had this issue with other sourdough recipes. I used slightly more whole wheat flour (combo of warthog and rye), but I would have thought that would make the dough drier if anything.
Your site and comment answers have been very helpful and great reading, thanks!
Hi Jess! To answer your questions:
1) Someone else in the comments mentioned starting a levain the night before instead of just starter on the day of, what are the benefits of doing it that way? does it change the taste/texture? I find this makes for a slightly less sour tasting loaf. I also find it makes the texture of the dough very light. It’s a really nice method if you want to make naturally leavened bread without a super sour taste.
2) I saw you recommended starting with 50g starter for a more sour taste, are there any other adjustments that need to be made to the recipe when doing this? Nope! Except that the bulk fermentation may take longer, so, as always, rely on visual cues when determining when it is done.
3) My dough was VERY sticky after bulk fermentation, I tried using a little flour, but it kept sticking to my hands, the counter, and my benchscraper, even after the bench rise so I was unable to create any tension. I will bake it off tomorrow and see how it goes, but advice for this? Just reducing the water a little maybe? I have a straight sided container for the bulk fermentation, so I don’t think it went over, but I haven’t had this issue with other sourdough recipes. I used slightly more whole wheat flour (combo of warthog and rye), but I would have thought that would make the dough drier if anything. This is either a sigh of over-fermentation or too-high hydration. How long was your bulk fermentation? And at what temperature? How much whole wheat flour did you use? Rye and other whole wheat flours will definitely make the dough structure weaker, so the stickiness makes sense. You may need to reduce the water and/or reduce the bulk fermentation length. During the bulk fermentation, did the dough feel strong and elastic when you were forming the stretches and folds?
Hi Ali, I have exactly the same problem as Jess.
I’m following all the recipes I’ve watched/read but no matter what I do, I end up with a sticky dough that just will not shape! (I came across your site when I was trying to work out what to do with basically a flat pancake of bread dough…turned it to a focaccia and it was fantastic!) I’ve tried making my starter thicker by adding less water; I’ve tried adding less water overall; I’ve swapped 50g Rye for 50g stonemilled wholemeal; done a shorter bulk fermentation; a longer bulk fermentation and prayed! I have a cold flat (am in Scotland) so have tried bulk fermenting it at room temperature and in the microwave with just the light on. I’ve tried it on a wooden worktop, an acrylic worktop, with flour, without flour…etc, etc.
Today I’m going to try your recipe but any advice would be extremely welcome. Was just about to give up the whole bread-making thing when I tried you peasant bread and it is awesome!! Am hoping to have as much success with your sourdough recipe.
Many thanks, Marion.
Thank you for your attention to detail both in the video and text.
My loaf was amazing!
I’ve tried so many recipes and finally one I am totally happy with and that actually delivered on all its promises.
Wonderful to hear this, Lucy!
Wow. I baked a loaf of sourdough, y’all!!!! Thank you, Ali, for writing such a detailed and well documented recipe. The only bread I had made was in a bread machine and yet I made yours!
I am leaving notes in case it helps anyone else.
The starter – it took me nearly 2 weeks to get a viable starter. I suspect I’d have gotten there earlier if I knew about your blog. Removing a huge chunk with each feeding turned out to be critical advice lacking in my first starter term recipe.
The first attempt – I followed you to the letter down to the last gram. I wound up with a runny mess and discarded it after the bulk fermentation. Even I, a below novice baker, knew that was never gonna fly. After reading a few dozen of your commenters ( clue, read the directions a few times and read lots of the comments!!) I decided the problem was likely too much water.
I used 350 g of AP/50g stone ground wheat and 300g of water. I live in Los Angeles, but that day was super humid, like above 70%. I read Bryan’s comment, left on May 18, where he cut his water to 200g.
Next batch I used 350gAP/50gSGW/200g water and stirred the batter. It was really shaggy and dry, so I added 20g water, then another 20g. At that point it was a “wet and sticky ball” so I stopped.
Everything else was by your book. I even scored a bench scrapper and attempted your poetic fold then scrap and turn motions. Yeah… that’s gonna take a little practice, but I was surprised that it wasn’t as hard as I feared.
Results: it is a bit denser than commercial sourdough but delicious!
Question: what creates density?
Request: if you haven’t already, can you write about WHY each step works? For example, what with the whole folding thing? What does that do to the dough?
Super stoked. Thanks for a great recipe!
Kendyl thanks for writing! So, in the end, were these the proportions?:
350 g AP flour
50 g SGW flour
240 g water
100 g starter
If so, the easiest way to make it less dense, is to use 100% AP flour. The next step would be to add … more water 😩😩😩
If this worries you, I would start incrementally. Next time try 260 g water and see how it turns out.
How long is your bulk fermentation going?
In making this loaf and watching the videos (very helpful) I did not read carefully and left off the final 30-40 minutes rest. Instead I immediately put the formed ball in the proofing bowl and refrigerated. It’s now been 12 hours and I’ve realized my mistake. Any fixes before baking.
It will be totally fine! That step, called the “bench rest” is merely to help with shaping. A “pre-shape” followed by a rest followed by a final shape can create a better shaped loaf in the end, but it is not critical.
Hi Alexandra,
I live in hot and dry weather in Arizona, what can you suggest for a sourdough recipe? I have a hard time trying to get a nice sourdough bread it’s not my 8th loaf and I’m still not getting the right bulking and proofing I always end up over proofing and my bread end up not getting a good oven spring. My kitchen temp is 80 deg, please I need your help, what can you suggest fro a recipe how much flour and water and starter, and also bulking and proofing time since I live in hot and dry weather. Thank you and I really appreciate your response. 😊
Hi Hazel! First off: let’s talk about your starter. Is it homemade? How strong is it? Does it double in volume within 6-8 hours after you feed it?
So I have a baseline, have you tried this recipe?
So what do I do if it’s a weak starter? It bubbles but never doubles in size…
Hi Asya!
This is the advice I always give people: when feeding your starter, be aggressive with how much you are discarding: throw away most of it, leaving behind just 2 tablespoons or so. Feed it with equal parts by weight flour and water. Start with 40 g of each or so. Use water that you’ve left out overnight to ensure any chlorine has evaporated. (This isn’t always necessary, but it might help.) If you can find some organic flour — my store carries small bags of KAF organic flour … they’re a little more expensive ($3.49 for 2 lbs) but I use it exclusively for feeding my starter. Organic flour or some stone milled flour (fresh or locally milled if possible) make a huge difference.
This recipe worked out amazingly well! I live in hot and humid Hong Kong so adjusted my water quantity to 280 as per Alexandra’s recommendation.
Wonderful to hear this, Corine!
Hi again 🙂 Can I use 50g light rye for this recipe instead of Whole Wheat? 🙂
Yes, definitely!
Finally got a beautiful and delicious bread with your help! Thank you for all your videos and tips!! Using the fridge made it so much easier!
Wonderful to hear this, Kimberly!
Thank you so much for the detail in your instructions as well as the videos – super helpful!
One question regarding the bulk fermentation. You state to not let the dough more than double – but in your pictures, it looks (to me) as though that has happened. The dough, when first put in the straight-sided container, is just below 1 quart, so I’ve been stopping my dough when it hits the 2 quart line. (even maybe just under it as I’m paranoid about letting it rise too much) However in your picture it looks like it is at 2 liters. Is that accurate? My loaves haven’t risen quite as much in the baking, so I’m wondering if it’s because I’ve been stopping the rise too soon?
You’re right … my dough probably is a little bit more than doubled in this photo, and often my dough will go a little bit over double because I tend to let it rise overnight. The reason I advise not letting the dough go beyond double is because it quickly becomes a fine line from being OK to being over-fermented and unsalvageable. Now that you’ve made the recipe, I think you could try pushing the bulk fermentation a little bit longer and see how it works for you. I have had dough that has tripled in volume overnight and still been fine, but I’ve also had dough that has tripled in volume and not been fine. Experiment with a longer bulk fermentation and then report back! I’d love to hear if you get more loft in your loaves.
Also: do you feel you have a strong starter?
Thank you for the response!
And, yes. When I’m ready to bake, I take my starter out of the refrigerator and generally do 2-3 feedings (over 2 days) before I bake. I feed it T85 flour and it LOVES it. Triples in size after feeding and floats.
I also live in LA and I read some of the comments above about baking in a humid environment, so I may also try reducing the water in my next bake.
Amazing! OK, sounds good. Keep me posted re water and your next bake!
Hi Alexandra,
I’ve made your simple sourdough a few times and it’s been amazing! With that recipe I’ve been using 100g starter with 500g flour and 375g water. With this one it still has the same amount of starter with less flour and water. Is there much of a difference with the different ratios? Thank you!
Hi Carmen! This is slightly higher hydration due to the higher proportion of starter, so you may find the crumb of this bread to be a little moister. It’s subtle, but I do actually prefer it to the other recipe (which I also love!). I find the flavor of freshly milled rye and whole wheat flour here to be so nice, too.
Thank you! I might give this one a go next time!
I am a complete novice, now on my fifth loaf using this recipe. I’ve had mixed success but I feel I’m learning a lot so that’s fine.
My first two loaves were OK – nothing to brag about but a pretty good outcome. However Subject 3 and Subject 4 were dismal failures.
I wasn’t prepared for how wet and sticky the dough has been. I know that air humidity is a factor so I figured I’d be flexible and add flour if I needed. (I’m using baking flour.)
What happens is that my dough looks pretty much like yours in the video when I start the bulk ferment. But as I proceed through the folding stage it gets stickier and sticker and in a way, seems thinner. It goes from being stretchy to being too elongated and loses it’s elastic quality. But it rises during bulk fermentation and is full of bubbles.
Subject 3 ended up almost a puddle when I tried to shape it. In fact, it was so slack I was barely able to shovel it into the bowl for proofing in two separate blobs. When baked – because no matter what, that thing is going in the oven! – it barely sprang up and was quite sad. And it had been so puddly you couldn’t even see a seam where the two blobs had united. The crumb was miserably dense. It was inedible.
Subject 4 was similar but I decided to see what would happen if I added flour during folding. This made it easier to fold. I ended up adding nearly a cup of flour over the 4 foldings! That seems like a lot to me. Is that within normal expectations about how great an effect humidity can have? Anyway, it was too slack for shaping. It baked up a bit sad but was edible.
So I read here in the comments about overdoing the bulk fermentation and I think that’s definitely been a factor. I was surprised about that too, since I’m in Sydney and it’s winter here – it’s only been about 16 degrees (celsius) and I was worried the dough wouldn’t rise.
Right now I have Subject 5 in bulk fermentation. This time I cut the water in the recipe by 20g. And as the dough became sticky during the folding, I have folded in about two thirds of a cup extra flour. Next time I’ll have to weigh the extra. I’m also being watchful to catch it before it over-ferments. I can tell this one has a chance because it already looks different – the top is slightly domed in the container, rather than completely flat. And in some sense it just looks more like a dough.
I really would like to be reassured that the amount of water reduction I’ve done and the amount of extra flour I’ve added is “normal” – given my local conditions. It seems like a lot and people always say that baking is all about precision in measuring! Can humidity have that big an effect?
And I suppose it’s worth asking if there’s anything else I should try. I realise that it’s hard to guess what to advise when you’ve only got my description to go by. I’m hoping you won’t tell me my starter must be the problem … it’s such a gutsy little thing and full of life. And I made it from scratch!
But overall, although I had one inedible failure, all of these loaves tasted fantastic and I’m learning a lot from your recipes and guidance and also the comments and replies. I’m really glad I found your site.
Hello Amber! I think you need to cut the water back even more. Try starting with 225 g water or 250 g water, and see how that goes… I think cutting back the water is easier than adding flour as needed. And yes, when dough goes completely slack, it’s a sign of over-fermentation and unfortunately, it is unsalvageable.
As you say, it is hard to advise exactly how to fix the issues, but humidity, flour type, bulk fermentation length, starter strength all play a role in how the dough behaves.
For you, I think the biggest thing will be reducing the amount of water; then monitoring the bulk fermentation closely to ensure it doesn’t over ferment.
How are you feeding your starter? Equal parts by weight flour and water?
Hi Alexandra,
Thank you so much for answering such a long comment! I’m so sorry, I really didn’t realise until I had posted it how much I had written. You are so generous to respond and I’m very appreciative.
Subject 5 was a complete success. Slight snag – I got called into a meeting and wasn’t able to pull it from the oven on time so it’s a bit burnt. But I’m still calling it a success.
I have followed your advice and just now put Subject 6 together. I’ll be doing my first folding after I finish writing.
I did 250g water. However even in the brief couple of minutes I mixed the dough I could see that it was becoming too sticky again. So I also added 50g flour – mostly because I would rather find myself needing to add flour than to try to moisten an overly dry dough.
I’m glad you asked about my starter! Because today I had a lightbulb moment – I think my starter is quite runny and therefore adding too much water to my dough! I have been feeding it equal parts water and flour and of course I feel very stupid now because it seems obvious that it’s a source of too much liquid.
I can’t tell you how much I have learned from your site and your kind advice to me and to others here. We can safely say you taught me everything I know because I haven’t needed to look anywhere else for guidance! lol
Not stupid at all! There are so many seemingly little details with sourdough that somehow make a big difference in the end. Honestly, next time, maybe try 225 g water — you’ll find your sweet spot! Adding flour is fine, but it would just be nice for you to have a baseline water level that isn’t so problematic!
Thanks Alexandra. I hear you about the reducing the water and that’s my next step. I’ve revisited my starter and stiffened it up a lot.
Adding flour during folding was a newbie crutch to help me save my dough during folding but now that I’ve got a better handle on why the dough was so wet I can stop that and focus on not creating the problem in the first place! It’s amazing how much there is to learn about something that’s basically flour, yeast, water and salt. There’s a kind of satisfying beauty in the complexity that comes out of what seems so simple.
I totally agree Amber … there is something fun and beautiful about the simple-complex process 💕
Hi, I posted a long comment about all the problems I’ve been having without realising that Amber was having almost exactly the same problems and you’ve answered her. I’m going to try all of these suggestions from you both and try again later when my starter has peaked.
Many thanks to both of you. Marion x
Ok, sounds good, Marion! I’m sorry to hear about your sourdough woes. I asked some questions about your starter on the How to Activate, Feed and Maintain a Sourdough Starter post. We can troubleshoot some more over there if you’d like. Keep me posted!
Thanks Alexandra, but I can’t find my original comment there! :-/
Hi! Try this link: https://alexandracooks.com/2019/11/07/how-to-activate-feed-and-maintain-a-sourdough-starter/comment-page-1/#comment-772640
Hi, thanks for the fulsome recipe – all the tips are really helpful! Is it possible to extend the second rise in the fridge beyond 24 hours?
Yes! I have left it in longer than 48 hours, but I think the sweet spot is between 24-48 hours.
Thanks so much – I left it for 36 hours and it came out well. I’ve just got some local stone-ground spelt flour that I can’t wait to try in this loaf.
Wonderful to hear this, Kelly!
Hi Ali,
Thank you so much for your detailed instructions, I feel more confident at sourdough bread baking. I will continue to practice!
I have a few questions…
1. During bulk fermentation is it best to cover the vessel with a tea towel or should I use the cover that came with my plastic container?
2. I’ve seen videos of sourdough baking where a pan of water is placed in the oven to create steam or they spray water on the bread before they cover the dutch oven. What is the purpose of the steam?
3. For my starter I mixed 1/2 AP flour and 1/2 whole wheat, is it best just to use AP?
4. Are there any changes in the measurements of the ingredients if I want to just use AP flour to make a sourdough bread?
In advance thank you so much for your wisdom and kindness to teach us how to bake this amazing bread! <3
Thank you for your kind words, Susie 💕💕💕
Questions answered below:
1. During bulk fermentation is it best to cover the vessel with a tea towel or should I use the cover that came with my plastic container? I think a tea towel, which is breathable, is best.
2. I’ve seen videos of sourdough baking where a pan of water is placed in the oven to create steam or they spray water on the bread before they cover the dutch oven. What is the purpose of the steam? Steam is important early on in the baking process to create oven-spring period so that the surface of the loaf remains moist and expands easily. I personally don’t find the results warrant the effort, but if you are unhappy with your crust, you can give it a shot.
3. For my starter I mixed 1/2 AP flour and 1/2 whole wheat, is it best just to use AP? Nope! You can use a mix of flours. Just know that using a starter with a bit of whole wheat flour or rye flour will lend more wheat-y, earthy flavors to the dough, which you might love! As you know, I love the flavor and texture a little bit of whole wheat/stone milled wheat flour lends to a dough, and I don’t think using a partially wheat starter would make the flavor too overwhelming or would make the texture of the loaf too dense.
4. Are there any changes in the measurements of the ingredients if I want to just use AP flour to make a sourdough bread? You may need to reduce the amount of water. If you live in a humid environment, I might suggest trying 275 g water to start. You can always add water into the dough a little bit at a time while you are mixing if it seems dry.
Hi Alexandra,
I finally got up the nerve to make this recipe, and I was so pleasantly surprised when I opened the dutch oven to see that I’d actually made bread!
First, I just want to thank you – after reading several different recipes for sourdough bread, I found yours to be the simplest to understand and follow, and the videos are so incredibly helpful. The comments and responses are so helpful too! I’ve also been lucky enough to have or purchase all of the equipemtn and supplies that you suggest and they truly do work! So many thanks for all of these wonderful resources!
My only issues with my first loaf are that it was a bit “wet” inside though with a decent crumb and the crust wasn’t very crisp, more chewy.
Hers’ what I’m using – my starter is 2/3 KAF AP flour and 1/3 stone ground whole wheat. With your help, I’ve gotten it to a really good place – doubling in size in 6 hours and passing the float test. For the recipe, I used the ratios you suggested, but instead of rye/graham, I used whole wheat (because it’s the only whole grain flour I have).
Wondering if a longer bulk fermentation might help make my dough a bit lighter – my dough had just about doubled when I stuck it in the fridge overnight, but the next morning when I went to shape it, it definitely didn’t look as airy as yours. Also, if refrigerated, do you recommend bringing to room temp before shaping? I was wondering if maybe I should have let the dough come to room temp before shaping and let it rise a bit more?
Second, my oven tends to cool down really quickly whenever I open the door and it took me some time to place my bread in the dutch oven and close it up (and then to open up the dutch oven after the first 30 mins). To make the crust crispier, wondering if I should add more time to both the covered and uncovered parts of the bake? Or just the last 10 minutes?
Thank you!
Hi Christina! Thank you for the kind words. Glad your sourdough journey is off to a good start. I’ve responded to your questions below:
My only issues with my first loaf are that it was a bit “wet” inside though with a decent crumb and the crust wasn’t very crisp, more chewy. It’s possible you need to reduce the water a tad, or bake it longer. Do you live in a humid environment? You could try starting with 275 g water. What is the material of your Dutch oven?
Wondering if a longer bulk fermentation might help make my dough a bit lighter – my dough had just about doubled when I stuck it in the fridge overnight, but the next morning when I went to shape it, it definitely didn’t look as airy as yours. Possibly. How long was your bulk fermentation before you refrigerated it?
Also, if refrigerated, do you recommend bringing to room temp before shaping? I was wondering if maybe I should have let the dough come to room temp before shaping and let it rise a bit more? Hard to say … I would have thought it would have been fine to shape it immediately if the dough had doubled, but when I think about times I’ve used the fridge for the bulk fermentation, I definitely have let it rise at room temperature a bit only because it hadn’t quite doubled.
Second, my oven tends to cool down really quickly whenever I open the door and it took me some time to place my bread in the dutch oven and close it up (and then to open up the dutch oven after the first 30 mins). To make the crust crispier, wondering if I should add more time to both the covered and uncovered parts of the bake? Or just the last 10 minutes? Absolutely! You can definitely add more time to both the closed and open parts of the cooking process. You also can cook the loaf directly on the oven racks at the very end for 5-10 minutes or until you get the color you are looking for.
When you shaped the dough, did you feel it had good strength and elasticity? Or did it feel very slack?
Thank you so much for your reply! In response to your questions:
My dutch oven is the one you recommend – I loved the idea of having a separate one for bread instead of darkening the inside of my beloved Le Creuset. From the start, my dough was sticky, but very elastic – almost hard to do the stretch and folds; it bounced back quite a bit.
My bulk fermentation was around 12 hours. I then put it in the fridge for the night and pulled it out and let it go another hour. Measuring to the top of the dome of the dough, it had doubled, but it did not look quite as bubbly as yours on top.
When I shaped the dough, it was still elastic. I had trouble making it into a ball, but I think it was pretty close after the second round of shaping. The bread came out in a boule shape. Where I had slashed it, it didn’t “open up” like yours, but had a little sprout of risen dough in the center. Maybe I didn’t slash quite deeply enough?
Thanks for all your help! I’m going to try again and play around with the variables a bit and see how it goes!
Best,
Christina
OK, great to hear all of this, Christina! I was worried your dough had maybe over fermented but I don’t think it did. Keep me posted on your trials and let me know if you have any more questions.
Hi Alex,
I have made this loaf almost 10 times and it’s been great every time.
I’m experimenting with a cinnamon raisin loaf right now by adding 125g of raisins and 8g of cinnamon during the folding step.
Any advice when adding these ingredients?
Wonderful to hear this, Nick!
One thought for next time: you probably could whisk the cinnamon in with the flour, which might make it incorporate more evenly, though I imagine that with a few stretches and folds, the cinnamon will disperse pretty well.
I don’t really have any other advice. I think once you add the cinnamon and raisins, you should follow that by three sets of stretches and folds to allow the ingredients to incorporate evenly. Have you added them yet? If so, let me know how the stretching and folding process is going.
Many raisin bread recipes recommend adding the cinnamon after the last proof, just before putting it in the fridge. They say the cinnamon can affect the yeast. -Jim
Interesting! I have not heard this. Thanks for the tip.
I’ve had great success storing bread in a plastic vacuum sealed container from foodsafe. Not a bag, which would crush it.
Great tip Todd! Thanks!
Hi Alexandra, what is the size of your dutch oven? This recipe looks wonderful and cant wait to try.
Hi AnG! It’s 5-qts. This is the one: Lodge Dutch Oven.
This is an excellent recipe. I had been making bread riffing off the Tartine recipe but decided to try this one because I just want to make one uncomplicated sourdough boule (as if there is such a thing). I’ve made this twice, once using a levain and an 80/20 mix of bread and wheat flour. The second time I made the recipe I made it as written (no levain). Both loaves were outstanding although I think I prefer the levain method. I use KA flour bread flour and my wheat flour comes from a local heritage grain mill. My husband declared this the best sourdough I’ve ever made. Really pleased with how it turned out!
Wonderful to hear this, Jennifer! I love using a levain, too… I find it always makes for an especially light crumb. Thanks for writing!
Great recipe — rich taste and fabulous texture. The best sourdough I’ve made so far. And easy to make on top of that.
Wonderful to hear this, Rena!
Like most beginners, I’ve relied on YouTube to supplement my Covid-19 baking skills. I like your video for its simplicity and lack of hype. Anyway, I’ve found baking my loaves to be anything but consistent. Results vary dramatically from batch to batch, depending on temperature, humidity and the rotation of the stars. In my last batch, I reduced the amount of whole wheat by 25 grams and used bread flour. I also used a straight walled vessel for proofing, which helps a lot in being able to visualize the dough’s progress, so I highly recommend this approach. I use 2 rubber bands to mark the rise and fall. This batch is my most successful, with good oven rise (typically my issue) and a nice even consistency. I did not preheat the dutch oven, so found that I needed to bake uncovered about 5 minutes longer. Thanks for your efforts in making these very helpful videos. -Jim
So nice to hear all of this, Jim! And I hear you: weather, time of year, humidity, type of flour, starter strength on any given day all play a roll. So glad this method worked out well. Thanks for writing!