
Lemony Buttermilk Currant Scones
This post may contain affiliate links. Please read my disclosure policy.
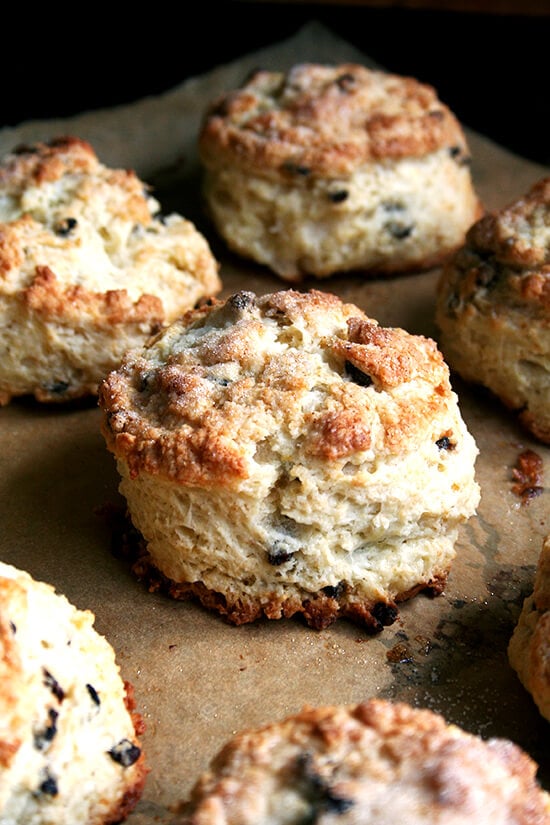
Flaky, buttery, lemony, and nicely sweet, these currant scones are perfection. If you need a reason to break out the good Irish butter, look no further!

I’m preparing for Thanksgiving and for my sole visitor, my father, who loves a proper English scone.
Unfortunately, I am fairly certain these currant scones are not proper by any British standards. And I know that after one bite, my father will in fact tell me that what I have served him is not a proper British scon. And I have no doubt he’ll then proceed to devour two or three, slathering each with butter and jam, uttering mumbles of approval all along the way.
I can’t wait.
About these scones: when I find a recipe I like, I tend to stick with it. Tartine’s buttermilk scone recipe is the one I use year-round, studded with berries in the summer and currants in the winter. The dough freezes beautifully, too, so I often freeze unbaked scones for a future morning.
What to serve with currant scones?
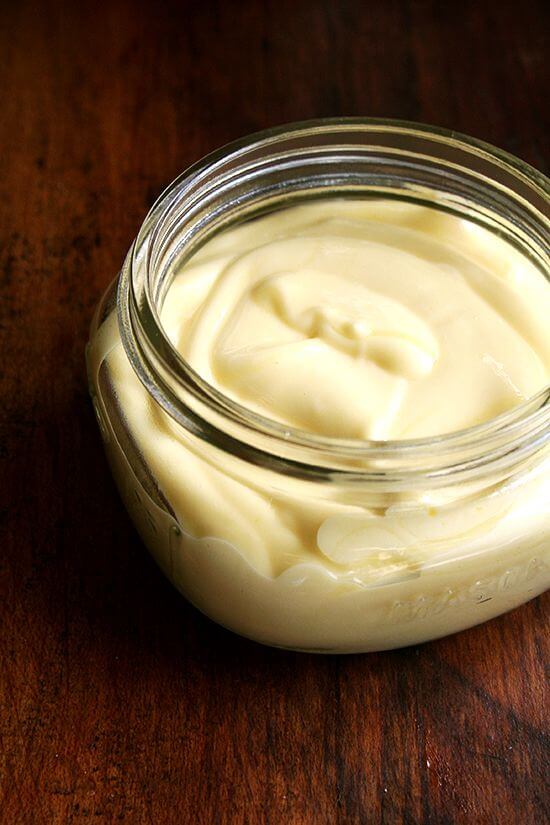
Good Irish butter is an obvious choice, but I’ve been loving them with Tartine’s lemon cream, which is luscious and bright and a perfect complement to the slightly sweet scones. The recipe is linked in the recipe box below.
Note: these scones certainly don’t need anything as spectacular as homemade lemon cream — they honestly don’t even need a dab of butter — but if you’re feeling the gilding-the-lily spirit that is the holiday season, then go for it.
Incidentally, I have been watching Call the Midwife — amazing! — and have been craving proper English scons since hearing the midwives giggle about them in the last episode. I might have to give a proper recipe a try. British Readers, thank you for alerting my attention to CTM. It is as wonderful as you said. Just when I thought I couldn’t love a character more than DCS Foyle, Chummy walked into my life.


Lemon cream ingredients:


Lemony Buttermilk Currant Scones
- Total Time: 1 hour
- Yield: 6 to 8
Description
Adapted from Tartine’s most delicious recipe.
Find the Lemon Cream recipe here.
UPDATE: I recently re-wrote the recipe as a half recipe, because I found myself always making the half recipe, which yields a more manageable amount (6 to 8 as opposed to 16-18).
As always, for best results, use a digital scale to measure.
Sugar: You can sprinkle the scones with granulated sugar before baking, but turbinado sugar makes for an especially tasty and pretty crust.
Salt: If you are using Morton Kosher salt or fine sea salt, use half as much by volume or the same amount by weight.
To freeze: After you place the scones on a sheet pan, transfer them to the freezer. Freeze until solid; then transfer the scones to an airtight container or bag. When you are ready to bake, there’s no need to thaw them. Bake as directed below straight from the freezer. (Brust with butter and sprinkle with sugar before baking.) The scones shouldn’t take much longer to bake from frozen, but keep an eye on them at the 20-minute mark.
To make your own buttermilk:
- Place 1 tablespoon of vinegar or lemon juice in a liquid measuring cup.
- Fill cup with milk (2% or whole is best) until it reaches the 1-cup line.
- Let stand for five minutes. Use as directed.
Ingredients
- 1/3 cup (50 g) Zante currants
- 1/4 cup (55 g) sugar
- zest of one lemon
- 2 1/3 cups (304 g) all-purpose flour
- 1.5 teaspoons (5 g) baking powder
- 0.5 teaspoon (3 g) baking soda
- 1.5 teaspoons (6 g) kosher salt, see notes above
- 1/2 cup plus 1 tablespoon (130 g) cold, unsalted butter (or salted… I always use salted)
- 3/4 to 1 cup (180 to 240 g) buttermilk
- 1 to 1.5 tablespoons melted butter
- sugar for sprinkling: turbinado makes for an especially pretty and tasty crust, see notes above
Instructions
- Preheat the oven to 400ºF. Line a rimmed baking sheet with parchment paper.
- If your currants are very dry, place them in a small bowl, cover them with warm water, and set aside for about 10 minutes until the currants are plumped. Drain well. If your currants are moist out of the container, you can skip this step — I’ve been using Sun-Maid Zante Currants, which are very moist, so I’ve been skipping this step.
- In a large bowl, place the sugar. Zest the lemon into the sugar, then use your hands to rub the zest into the sugar — this releases the oils in the zest and heightens the lemon flavor in the finished scones.
- Add the flour, baking powder, baking soda, and salt, and whisk to combine. Add the currants and whisk again.
- Grate the butter using a box grater, then scatter it over the dry ingredients. Toss gently with your hands to disperse the butter evenly throughout the dry ingredients. Alternatively, cut the butter into 1/2 slices, then use a pastry blender or the back of a fork to cut the butter into the dry ingredients.
- Add the buttermilk, starting with 3/4 cup (180 grams) and mix gently with a wooden spoon or spatula until the dough holds together. If the mixture seems dry, add more buttermilk by the tablespoon until the dough comes together (I consistently need 3/4 cup + 1-2 tablespoons of buttermilk total but I have used a full cup of buttermilk with success, too). If necessary, knead the dough gently with your hands to help it come together.
- Dust your work surface with flour and turn the dough out onto it. Using your hands, pat the dough into roughly a 7-inch circle about 1½ inches thick. (Note: At this point, you can transfer the scone dough to the fridge in an airtight bag until you are ready to bake (for as long as 24 hours)). Brush the top with melted butter. Sprinkle with sugar. Cut the circle into 6 to 8 triangles, then transfer them to the prepared sheet pan. If time permits, chill the scones for 20 minutes. You also can freeze the scones at this point — see notes above.
- I like to place the pan on another rimmed baking sheet because often the bottom of my scones burn, but if you don’t have issues with your baking sheets, just use one sheet. Transfer to the oven and bake until the tops of the scones are lightly browned, about 20 minutes.
- Remove from the oven, let cool briefly, then serve with butter, lemon cream, clotted cream, jam or nothing at all.
- Prep Time: 25 minutes
- Cook Time: 20 minutes
- Category: Breakfast
- Method: Oven
- Cuisine: American
This post may contain affiliate links. Please read my disclosure policy.


95 Comments on “Lemony Buttermilk Currant Scones”
Hi Ali! I realized that my initial comment may have been in reply to another reader, so starting a fresh comment here in case the reader is receiving notifications of our scone troubleshooting 🙃. I have bread flour in the house actually, so I will try these again with that in a few days and report back! And, I’m just using a standard aluminum baking sheet.
Ok, great to hear! A few thoughts off the top of my head. You might want to increase your oven temperature a bit. There is the risk of the bottoms of the scones burning too much, but if you have two sheet pans you could stack on top of one another, this could help.
Let me know how your next trials go 🙂
Hi Ali! Hope camping went well! I made the scones again with your suggestions – I used bread flour and increased the oven temp by 25 degrees. I am delighted to say I had a MUCH better result! The best scones I’ve made by a mile. Thank you for the troubleshooting help 🥰
Yay! Wonderful to hear this, Amanda 🙂 🙂 🙂 Thanks for reporting back. Camping was great 💕
This recipe is so forgiving! I don’t know if the problem was my flour (Bob’s red mill AP, usually reliable and recently bough, measured by weight), but you should have seen me panic-adding flour because of how sticky the dough was! It wasn’t coming together at all, and I’m used to working with high hydration yeast doughs and don’t mind considerable stickiness, but this looked nothing like your video. I ended up adding quite a bit more flour, desperate to whip it into shape before the butter melted in my warm kitchen, and thought for sure it’d come out disappointing.
Not so! The scones are tender, butter, and flaky. I can’t believe it. Flour abuse aside, I followed the recipe as-is, except for subbing dried cherries for currants and orange zest for lemon zest, just because that’s what I had on hand. Next time I make these I’ll be able to relax, haha. Thank you for the delicious and forgiving recipe!
So nice to read all of this, Danielle! I mean, I’m not happy you had to panic about the flour, but I’m happy it all worked out in the end. I should probably revisit this recipe because I wonder if something might be wrong with the quantities … I will update the post and report back here if I discover anything. Anyway, so glad it all worked out in the end! Thanks for writing 🙂
I’m curious, how is the lemon cream different from lemon curd? I make lemon curd all the time and whisk the butter gradually after the mixture has thickened. Why the blender? Thanks!
I think they’re the same thing, Sydney! I don’t think the blender is necessary. The recipe I was following called for an immersion blender, and that didn’t work well for me, so I switched to the blender, but I think whisking by hand is totally fine.
I made this lemon cream as filling for a tart for my daughters birthday. Turned out beautifully, tasted divine but, not quite as set as I would have liked. I cooked to 180 degrees per the recipe and it seemed pretty thick- hand whisked in the butter and chilled after. Will make it again. To see if I can get it thicker. I also made the food 52 crust you suggested – turned out great!!!
Great to hear, Annie! Regarding the texture, was it not as thick as you wanted it to be in the end?
Hi Ali! How do you get the scones to stay upright? Mine always tilt over?
Hi! And I’m not sure… is possible that your scone dough was thicker in height? I think when they’re too tall, they’re more likely to tilt over. Mine do tilt somewhat.
Made the Buttermilk Current Scones but since I didn’t have currents I used golden raisins instead. They were delicious. As usual you made the recipe so easy to use. Thanks, Ali.
Great to hear, Carol! Thanks so much for writing 🙂 🙂 🙂
I have been searching for a plain currant scone recipe for years, and I finally found this one—and it’s PERFECT!! I omitted the lemon zest and they came out beautifully! Alexandra, I don’t know how you do it, but I’m 4 for 4 with your recipes! So glad I found your site!
Awww, you’re too kind. Thank you. So great to read this 🙂 🙂 🙂
I made these yesterday, so light and lovely. Super easy to make, recommend!!
Great to hear, Terrill!
OMG! These are absolutely positively outrageously delicious. I used Kerry gold butter which I think made my dough sticky. I added more flour. Dough still sticky so I froze so I could cut. I cut and froze overnight. Baked for 30 mins as still raw at 20. I was sure they were ruined but they were delish.
This is my go to scone recipe. Thank you for sharing.
Great to read all of this, Lynne! (Except of course for the troubles with the stickiness but I’m just glad it all worked out.) Thanks for writing!! I’ve been living on these all week 🙂
First off THANK YOU for ALL your scrumptious recipes young lady! I’m just starting to devour your “recipe library” & I couldn’t be HAPPIER with my results so far. I found you on YouTube & immediately subbed because I didn’t want to miss a thing. Then I found your Blog & I was done for lol! In all seriousness I can’t think of a MORE CONSIDERATE Human being. I was 100% ecstatic to discover you included the recipe for that yummy lemon cream you enjoy on your scones. The moment I read “Iemon cream” I knew I would be making it, but when I noticed that I wasn’t going to have to search elsewhere for it I was over the moon. THANK YOU for thinking of the things many forget or simply do not include.
I’m super excited to create these scones & I look forward to tagging you& ever more, eating said scones!!Can I also mention I’ve never made multiple recipes from a singje creator so quickly. I’ve several I use from preppy kitchen but it took me YEARS of me finagling his recipe to make it mine, j don’t feel the need to change anything in your recipes. Finding a creator that has such attention to detail isn’t always easy. I feel I was extremely lucky to have found your YouTube ☺️🥳I’m going to shut up now otherwise this novel will be 400pgs lol!
Oh my goodness, Marci… 🥰🥰🥰🥰 Thank you so much for your kind words. Truly means so much. I hope you find many more recipes you love. I have not been the most active on YouTube recently, but I hope to post more soon. Thank you again for taking the time to write 🙂 🙂 🙂
Hi Ali, Just making these for the 2nd time. 1/2fresh milled soft wheat and 1/2 organic all purpose flour. Put the dry ingredient mixture into the freezer while grating the frozen butter substitute. Instead of flour to handle and form the dough, used avocado oil on hands and on work place counter. Awesome…. Sprinkle of sugar and they turned out great….. thanks for the great recipe. The frozen grated “butter” is an easy gamechanger! Happy thots in recipe land and may this find you and yours well! Big cheers!!!
Great to read all of this, Tracy! Thanks so much for writing and sharing all of your notes. I’m so intrigued by the avocado oil!
Wow! So good and easy to make! Everyone loved the simplicity of the scone – not too sweet, great texture, everything a good scone should be! I bake a lot of sourdough bread and baked deliciousness- could this be adapted to using some discard?
Thank you for all you do! Can’t wait for your new Pizza book to arrive!!!
Awww thank you, Annie! That means the world.
Yes, I think you could definitely use some discard. I’d probably start with 50 grams? Then use 25 grams less flour and buttermilk to start but add more flour or buttermilk to feel if needed?
Funny shape triangles! Ha ha ha
Absolutely fantastic – I made exactly as written. Used scale to weigh ingredients (which makes quite a difference in amount of Kosher salt). Will be my go to recipe from now on. Planning to make again today and substitute fresh blueberries for currants (tie in with book club book). Would you add any vanilla? Thank you.
Great to read all of this and apologies for the delay here! I love blueberries in this recipe, and I do have that recipe written out should you need it: https://alexandracooks.com/2011/03/31/buttermilk-scones-tartine-has-done-it-again/
I don’t add vanilla, but I LOVE vanilla, and I think it would be great here.
Loved these, made twice already second time i reduced the salt a little bit ( I use diamond crystal) and increased lemon zest and that was my fav.
Great to hear, Manju! Thanks for writing 🙂