
Gluten-Free Peasant Bread Recipe
This post may contain affiliate links. Please read my disclosure policy.
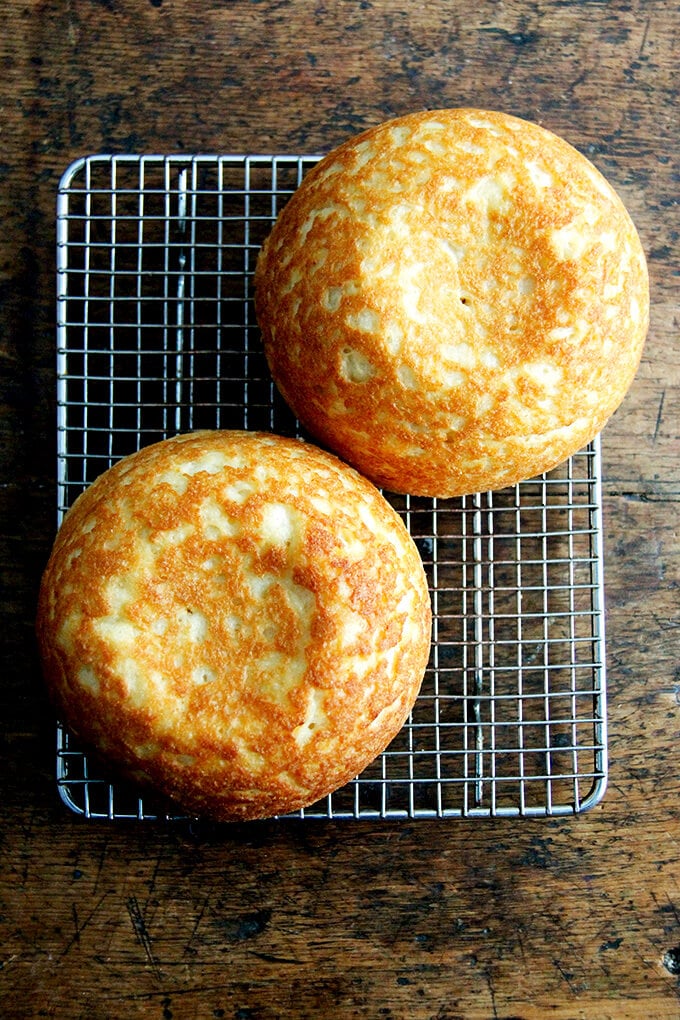
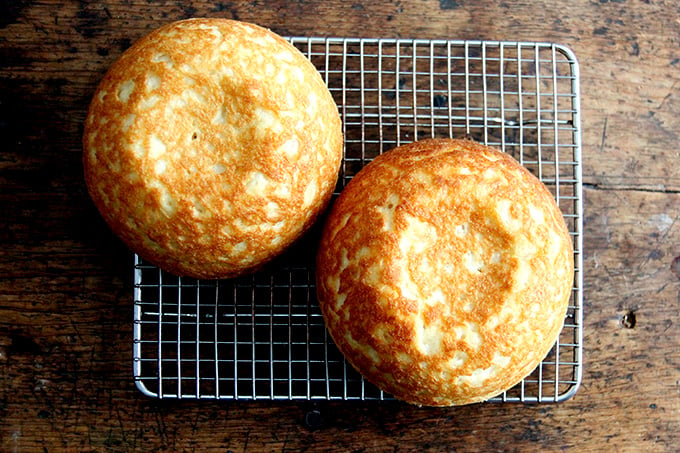
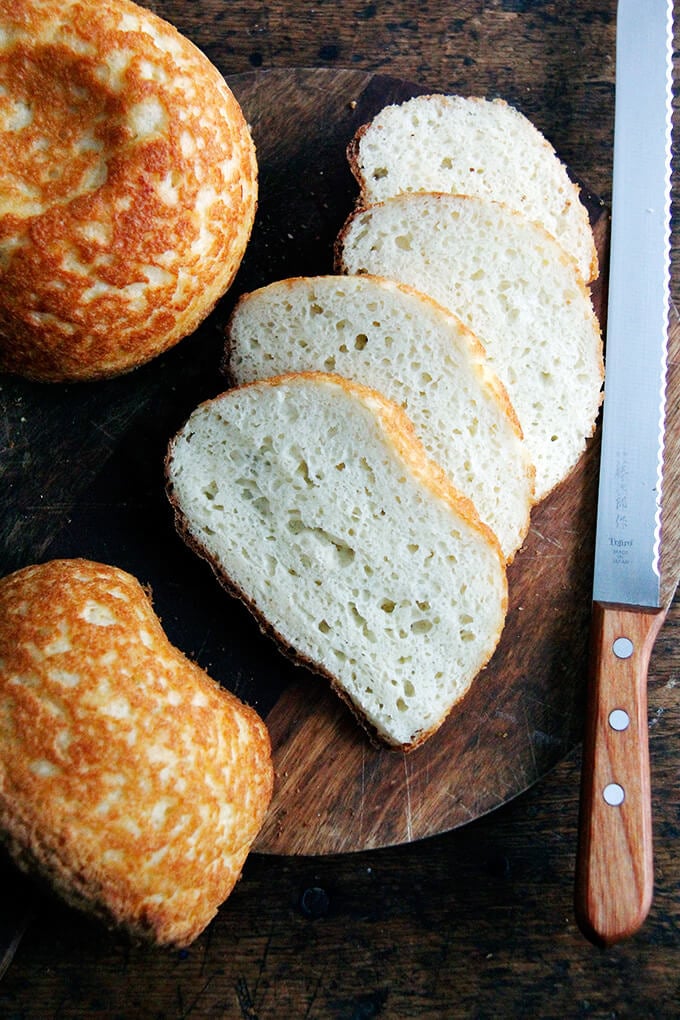
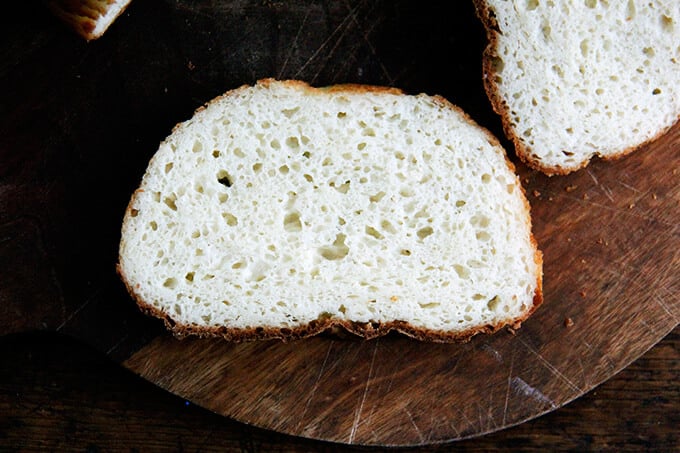
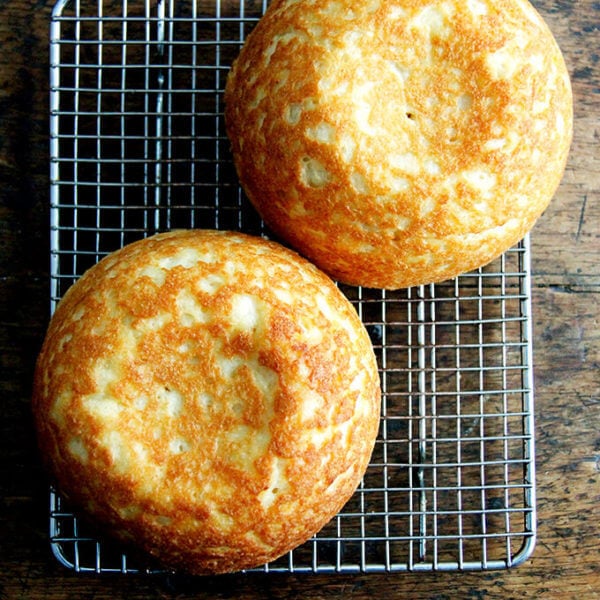
This gluten-free peasant bread has such a nice texture — soft and spongy, light and moist — and moreover, when sliced, the pieces hold their shape. Bread lovers, even those not adhering to a gluten-free diet, rave about the texture and flavor of this bread. This recipe comes from my cookbook, Bread Toast Crumbs!
For the past year, the most frequent question asked on this blog is this: Can the peasant bread be made gluten-free?
Everyone knows someone — a friend, an uncle, a cousin — recently diagnosed with Celiac disease who has had to forget bread as he/she once knew it.
You might have this friend, this uncle, this cousin. I do. And you might want to treat him/her to a loaf of freshly baked bread but you don’t know where to begin.
This is the position my mother found herself in a month ago while preparing for the arrival of her brother-in-law, who had recently adopted a gluten-free diet. Panicked by the thought of serving dinner without warm, fresh bread on the table, she called asking if I had ever successfully made the peasant bread gluten free. I answered as I have to everyone who has asked thus far: no, not yet.
It seemed like a good time to take an earnest stab at making a gluten-free peasant bread. Unfortunately, a respectable loaf did not materialize before my uncle’s arrival, but one has since.
Gluten-Free Bread Baking Tips
- For every cup of flour (128g), use about a teaspoon of xanthum gum.
- For every 2 cups of flour (128g), use 1 egg.
- Use a little more yeast proportionally to help lighten the bread’s texture.
- Use a high-quality gluten-free mix, such as C4C or King Arthur Flour. If your gluten-free flour mix contains xanthum gum, no need to add additional.
Gluten-Free Peasant Bread Recipe
- Total Time: 2 hours
- Yield: 2 loaves
Description
From my cookbook, Bread Toast Crumbs.
For best results, use a digital scale. It makes all the difference with bread baking.
Note: If you are using a different brand of gluten-free flour, you may not need all of the liquid. Because all gluten-free flours and mixes absorb water at a different rate, you may find your dough to be much more liquidy than mine — this is due to the flour. This is what I suggest: add the liquid a little bit at the time, mixing with a spatula to combine. Reference the video to see what the dough should look like as far as texture goes.
Loaf Pan: I have not tried this yet, but someone emailed me recently letting me know she bakes the entire batter in a 9×5-inch loaf pan, so if you don’t have the 1-quart Pyrex bowls, know that a 9×5-inch loaf pan is an option.
Ingredients
- 4 cups (500 g) gluten-free flour—my favorite is Cup4Cup, see notes above if using a different type of gluten-free flour
- 2 teaspoons (10 g) kosher salt
- 2 1/4 teaspoons (8 g) instant yeast
- 2 cups (455 g) lukewarm water
- 2 tablespoons (42 g) honey
- 2 eggs lightly beaten
- 2 tablespoons (28 g) olive oil or grapeseed or other neutral oil
- 1 teaspoon (4 g) white wine or cider vinegar
- softened unsalted butter for greasing
Instructions
- In a large bowl, whisk together the flour, salt, and instant yeast. In a medium bowl, pour the water over the honey and stir to dissolve. Add the eggs, oil, and vinegar. Add the wet ingredients to the dry and mix with a spatula to form a batter. (See notes above if you are using a different brand of gf flour.)
- Grease two 1-quart oven-safe bowls (or a 9×5-inch loaf pan, see notes above) with the softened butter—be generous. Divide the dough evenly between the prepared bowls. With wet hands, smooth the surface of the dough. Let the dough rise in a warm or draft-free spot for 30 to 45 minutes, until the top of the dough just crowns the rims of the bowls — this may take longer… just be patient and wait till the dough crowns the rim: it might take as long as 2 hours if your kitchen is cool. Halfway through the rising, set a rack in the middle of the oven and preheat it to 425 degrees F.
- Transfer the bowls to the oven, and bake for 15 minutes. Reduce the heat to 375 degrees F and bake for 17 to 20 minutes more, until golden all around. Remove the bowls from the oven and turn the loaves out onto the cooling racks. Let the loaves cool for at least 20 minutes before cutting.
- Prep Time: 15 minutes
- Cook Time: 40 minutes
- Category: Bread
- Method: Bake
- Cuisine: Gluten-Free
This post may contain affiliate links. Please read my disclosure policy.


528 Comments on “Gluten-Free Peasant Bread Recipe”
Ali, thank you for this receipe! I started making your traditional flour peasant bread years ago and everyone raves about it. Its now a staple in their kitchens as well. Ihave made the GF version for my gluten free husband and extended family many times and this year, they specifically requested that be what I bring to Thanksgiving dinner. My mother in law has severe Celiac Disease, and she asked if I could make rolls. I didn’t see that on your website, but I’m going to take a stab at it. I was wondering if you have tried it. If so, any success or tips?
Thanks again!
Hi Melissa! So nice to read all of this 🙂 If you want to make rolls, I would suggest using a muffin tin …. as you know, the “dough” is more like a batter, and I think it will be very hard to shape.
Hello: I want to know if you have made this gluten free bread with King Arthur GF flour, and, if so, how does it compare to the Cut4Cup flour? Thanks!
I have made it with KAF gf flour and as I remember, the dough was much wetter. It came out fine, but I do prefer Cup4Cup.
Cup4Cup it is! Thanks.4
Thank you so much!! This bread is amazing. So soft with a beautiful crust. And so so easy!! What’s the best way to store the bread to keep fresh longer?
Great to hear! I store it in an airtight ziplock bag at room temperature.
Can this bread be frozen to store it?
Yes!
Would white vinegar work the same as cider vinegar? If not – what role does it play? Is there another option?
Any vinegar is fine!
Made your gluten free no-knead peasant loaf last night and it is great!.
My digital scale quit in the middle, so used the regular measurements. Baked it in a 9×5 loaf pan for 38 minutes.
We love the flavor, and the texture is perfection; it is not too crumbly. By far the best gluten free bread recipe I have ever tried. Thank you!
Wonderful to hear, Sarah! Thanks for writing 🙂 🙂 🙂
I’m new at making gluten free bread. I tried a few other recipes in the past and it was so much work and results weren’t always the best. I tried this recipe and couldn’t believe how easy it was. Bread turned out great. It was like I was baking gf bread for years. Bread was easy to slice and reminded me of gluten bread. This will be my go to recipe and I wrote it in my recipe book. (Where only the best recipes go).
Great to hear, Cathy! Thanks so much for writing and sharing this 🙂 🙂 🙂
I have an unusual palate in that I don’t care for sweet flavors at all, including fruit.
I would prefer to take the honey out altogether or reduce it drastically. Is the honey for flavor, for yeast to grow, or both?
It’s for a little bit of everything — yeast growth, flavor, and browning. BUT, you absolutely can leave out the honey. The rise might take a little longer, so just be patient 🙂
I hate how late in my gluten free journey i discovered this recipe… all the time and ingredients waister before…. this came out freaking perfect and delicious and i loveeee it
Great to hear! Thanks for writing 🙂 🙂 🙂
Been gluten free for about 10 years now and I’ve tried ever so many bread recipes that are total failures. This one is the lightest, most gluten-bread-like one over ever tried! I halved the recipe yesterday and made only one bowl. It was just lovely! And usually the day after I make a GF bread, it turns rock hard. Not so with this one! I stored it overnight in a plastic airtight canister and it was a little drier on the sliced edge but after I sliced another piece, it was just as great as yesterday! Thank you so much for sharing!!
Great to read all of this, Laurie! Thanks so much for writing and sharing your experience 🙂 🙂 🙂
Wow!! I really lucked out when I found your recipe–I just recently decided to start making my own bread since buying GF loves is so expensive. This is the first recipe I’ve tried, and it easily beats the store-bought ones I’ve been getting! On top of that, it’s such a quick and easy recipe; making one every week won’t be any bother at all.
Just to share, I used the 9×5 loaf pan, and it worked great. It took about an hour to rise in my chilly Vermont kitchen and a little extra bake time.
Great to hear, Allesandra! Thanks for writing and sharing your notes — so helpful for others!
Can you over proof this bread? I am making both GF and regular peasant breads and didn’t realize until too late the rising times are different. I want them to all bake at the same time but it means an extra 1/2 hour proofing for the GF loaf.
That will be fine! Just go for it.
My husband is recently needing to be GF & baking has always been a passion of mine. I searched for recipes and this was my favorite so far! I did bake the entire dough in 1 loaf pan and it was perfect!! Great for toast too!!
Great to hear, Marisa! Thanks so much for writing 🙂 🙂 🙂
Thjis bread is great, I make it all the time. I was wondering if anyone has tried to make it a bit “healthier?” added any nuts, seeds etc?
I make this w KAF in a loaf pan and it works every time. Make it once a week, and I have my breakfast all set1. Thanks Alexandra 🙂
Great to hear, Antonia! Thanks for writing. I think adding nuts and seeds would be great here: I love a mix of sesame, pumpkin seeds and sunflower seeds.
There is something odd about the liquid measurement. I have just made this with 2 cups water (455g) i.e. nearly a pint and the batter is far too runny. In your video there is clearly far less water in the jug – nowhere near 2 cups. Why has no-one else found this a problem?!
Hi! Which gluten-free flour are you using? They all absorb water a little differently, and depending on the kind you are using, this amount of water could lead to a very wet batter. That said, these flours tend to hydrate more slowly, too, so you may find that as the dough rises, it will be fine. Next time, hold back some of the water from the start — it may take some trial and error to get the ratio right given the flour you are using.
I have made the Peasant Bread many times but I never tried it Gluten-free. I have tried many Gluten-free flour recipes and I have have found none as easy and good as this recipe and so simple and so much like regular Peasant Bread! I’m hooked. Just made more tonight with jalapeños. So good.
Great to hear, Jenifer! Thanks so much for writing 🙂 🙂 🙂
Have made Peasant Bread many times. A friend of mine cannot do gluten free flour due to rice flours and some of the other flours that are added.
Can you make this recipe using spelt flour. And what would be the ingredient measurements if you substituted spelt.
Thx.
Hi! Yes, you can, but because spelt flour isn’t gluten-free, I’d follow the peasant bread recipe and use spelt flour in place of the all-purpose or bread flour. Just know that the texture will be a little denser but it will still be tasty: https://alexandracooks.com/2012/11/07/my-mothers-peasant-bread-the-best-easiest-bread-you-will-ever-make/