
Foolproof Homemade Bagels Recipe
This post may contain affiliate links. Please read my disclosure policy.
It is 100% possible to make excellent bagels at home without any unusual equipment or ingredients! Follow the step-by-step guide below; wake up to homemade bagels tomorrow 🥯🥯🥯🥯
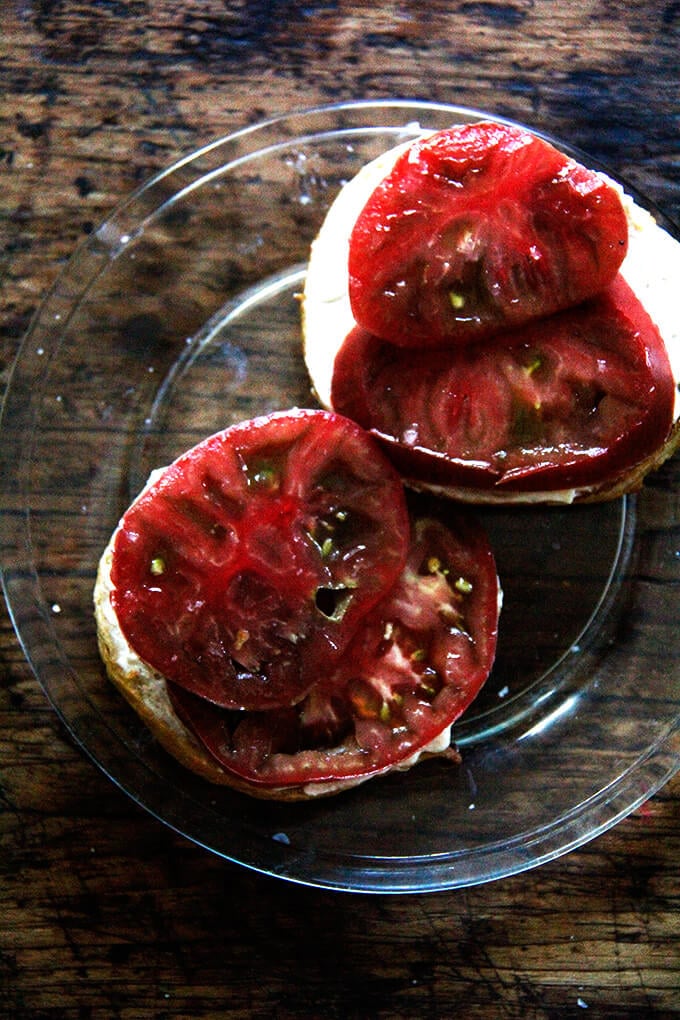
My bagel-making experiments began earlier this summer in, of all places, the modestly equipped kitchen of a rental cabin at Lake George. We had just tasted the first good summer tomatoes, found at a farm stand in Bolton Landing, and all at once, all I wanted to eat was a good, toasted bagel, smeared with cream cheese, topped with a beefy tomato slice, sprinkled with sea salt.
I’ve longed to find/adapt/create an easy or easy-ish bagel recipe, but past summers have escaped without more than the odd experiment. It was time to take a deep or deep-ish dive.
Having had success using the peasant bread dough to make many various bread forms, I hoped it might take to the bagel format, too, but I quickly learned it would not: the peasant bread dough is way too wet (high hydration*) and my first experiments yielded flat, dense disks, edible but not acceptable.
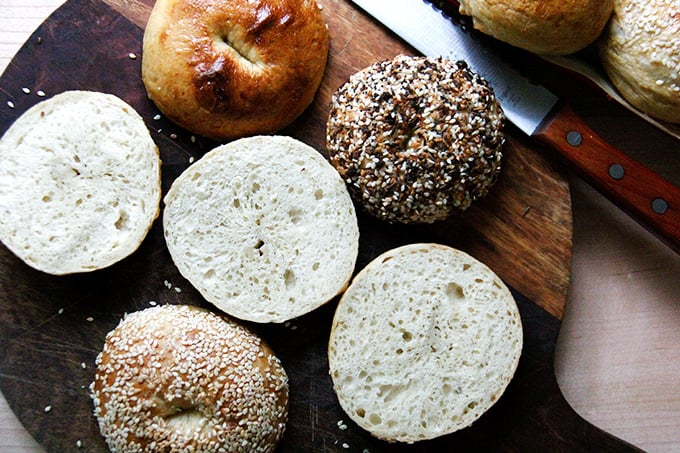
I’ll spare you all the details, but after many experiments, I’ve learned that the process of making bagels is a real departure from the one I’m so used to. Bagels require kneading, shaping, boiling, and egg washing. But they can, I think, be easy-ish. I find these to be just that, kind of fun to make, very tasty, and perfect for my ideal breakfast this time of year. Good enough for me. I hope you approve.
How to Make Homemade Bagels
• To get that characteristic chewiness—in other words, to ensure bagels don’t simply taste like bread shaped like bagels—the dough needs to be kneaded. After reading a Stella Park’s article, I decided to do this in the food processor, which takes 90 seconds.
• As always, a digitial scale is essential for consistent results, but it’s even more essential here—lower hydration* doughs are less forgiving. I never weigh the water for peasant bread recipes, but I do here, and I also weigh the salt, which, in this humidity, has been feeling lighter in the measuring spoons than usual.
• To prevent the shaped dough rings from turning into pancakes upon being boiled, the dough hydration* needs to be relatively low. In other words, the dough should be relatively stiff.
• If you have the time, an overnight rise in the fridge is best.
• To get that nice, golden sheen during the baking, an egg wash is essential. Commercial bakers often boil their bagels in a lye solution, which promotes browning and gives the bagel crust a crispness. As lye is something I am unwilling to experiment with—remember, I’ve embarked on a deep-ish dive—an egg wash is a fine substitute. It does not help with crispness, but it gives the bagels the look.
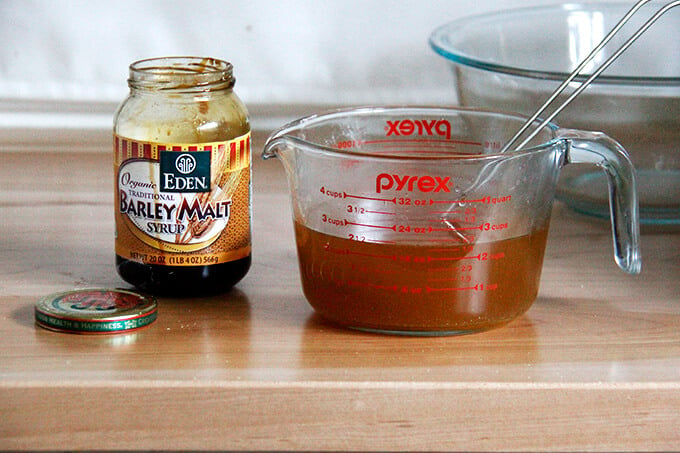
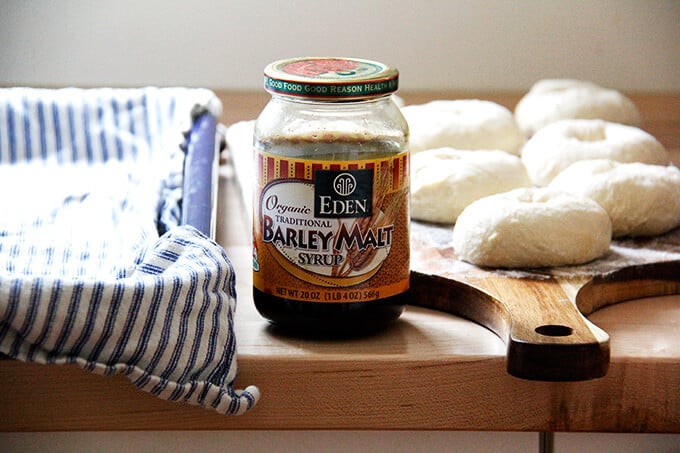
• An optional but nice ingredients to use in your homemade bagels is barley malt syrup, which can be ordered online or found in specialty shops or, as one commenter shared, in beer making supply stores. Stella Parks says that in addition to providing flavor, barley malt syrup promotes “a more delicate texture in the crust, one that’s chewy and crisp rather than crunchy and hard.” I’ve had a jar on hand since reading her article, and I’ve been happy with the texture of my homemade bagels as a result, but know that you can create very good bagels at home without it. I recently learned that the chef, David Wurth, of Cross Roads in Hillsdale, who makes exceptional bagels, uses maple syrup in his boiling solution, so if you don’t feel like hunting down barley malt syrup, you don’t have to.
PS: Foolproof Homemade Bialys: A Step by Step Guide
* Hydration is not something I ever talk about here or in my book, because typically I find the concept confuses and intimidates people rather than helps. Hydration is the percentage of liquid in a dough. I mention it today only because I think the most significant difference—more than kneading, boiling, shaping—between bagels and the peasant bread (and so many breads I love) is the hydration. Bagels are low hydration; peasant bread is high. Bagels are not light and airy; they are chewy and dense. These bagels are 69% hydration (calculated by dividing the weight of the water by the weight of the flour), whereas the peasant bread dough is about 94% hydration.
How to Make Homemade Bagels: A Step-by-Step Guide
Gather your ingredients and equipment. A digital scale and a food processor or stand mixer make this recipe nearly foolproof:

Whisk together the water and barley malt syrup:
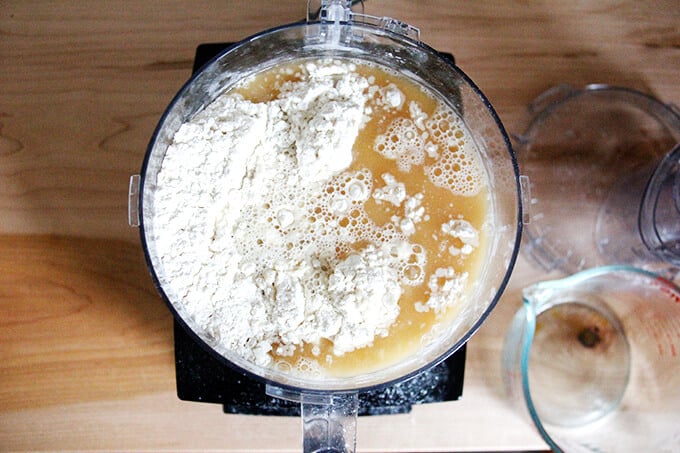
Add the liquid ingredients to the flour, salt, and instant yeast, and knead for 90 seconds:
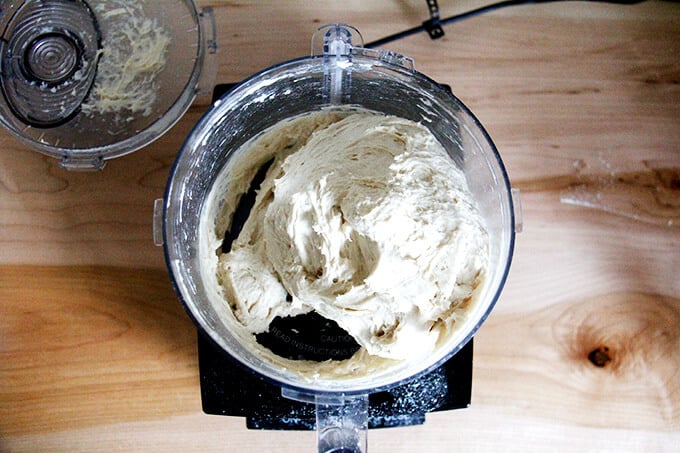
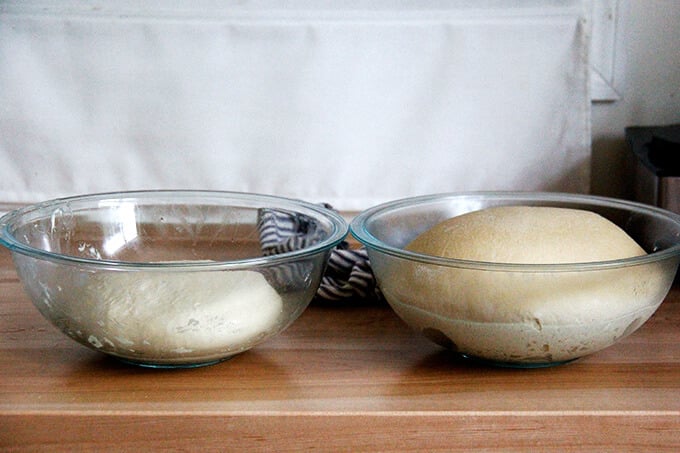
Use greased hands to transfer it to a bowl. Coat it with a little bit of olive or grapeseed oil. On the left: just-mixed dough. On the right: dough after a night in the fridge.
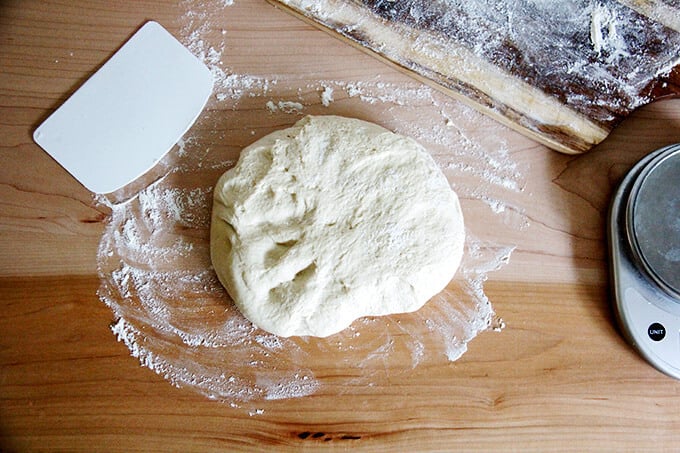
After 12 hours (or more or less) in the fridge, turn the dough out onto a lightly floured work surface.
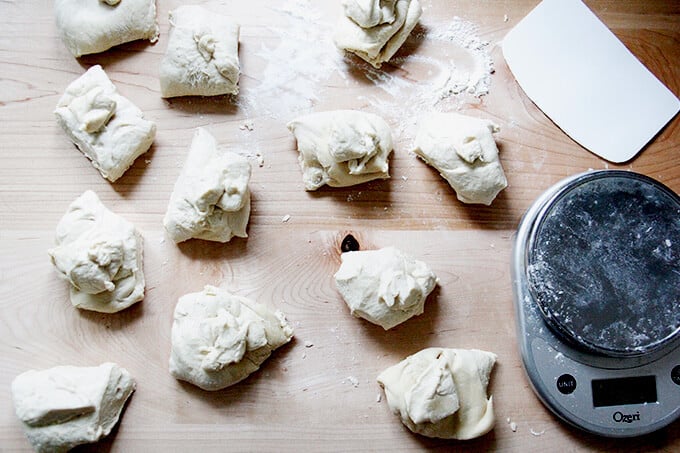
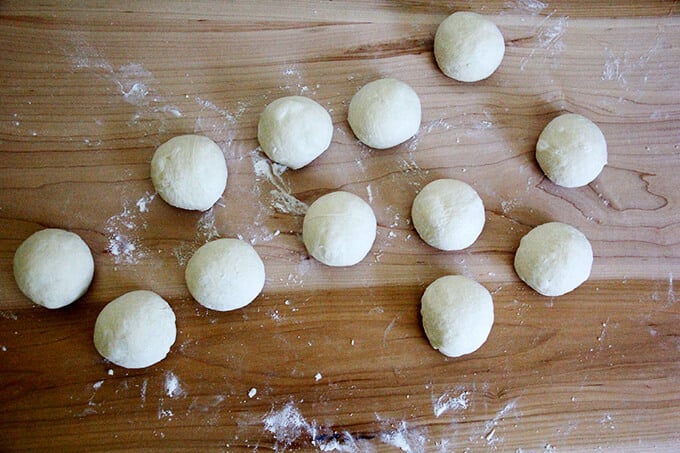
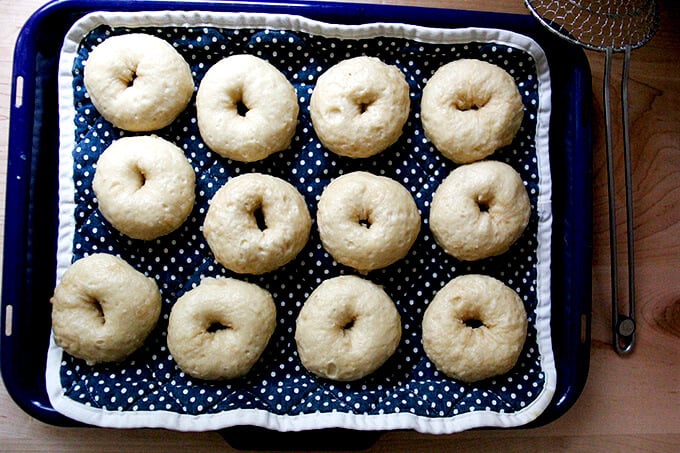
Portion the dough into 12 pieces:
Ball them up:
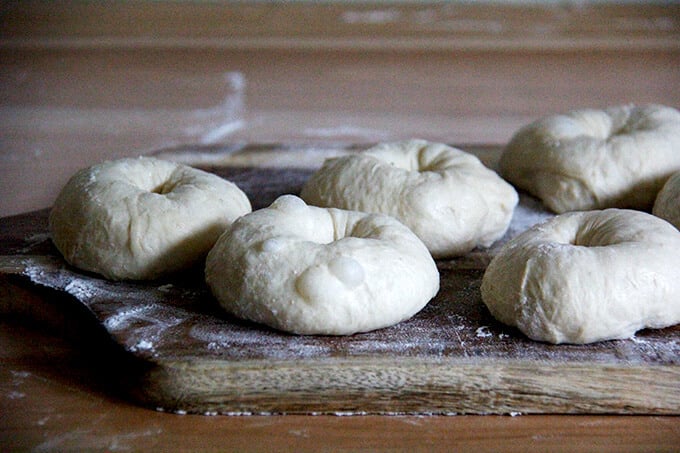
Shape them into rings, by using your thumb to poke a hole in the center of the round, then both hands to stretch the dough out and under—don’t be afraid to be aggressive.
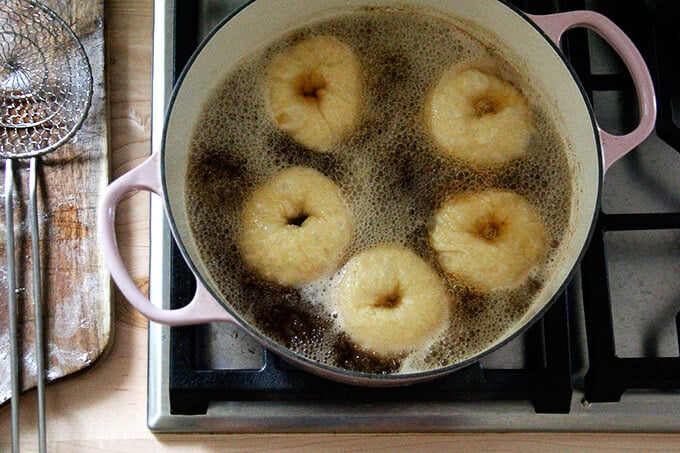
Prepare the water bath by boiling water with barley malt syrup or maple syrup.
Get ready to boil:
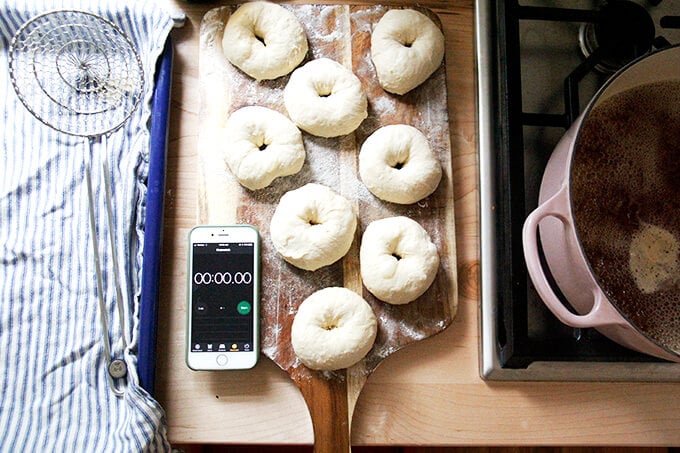
Boil 30 seconds a side:
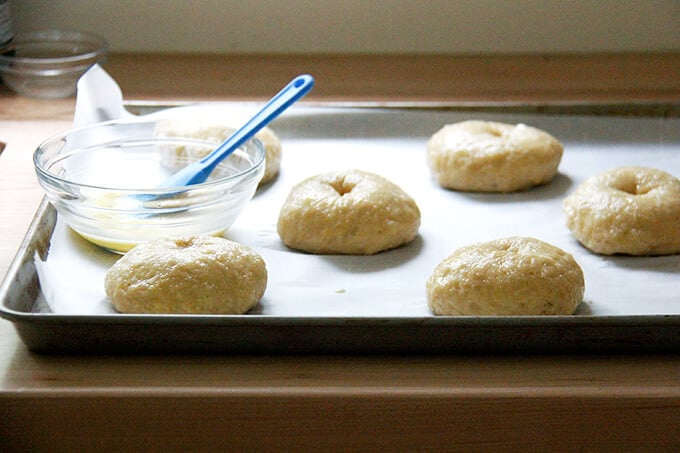
Transfer boiled bagels to a tea towel-lined sheet pan.
Brush bagels with an egg wash:
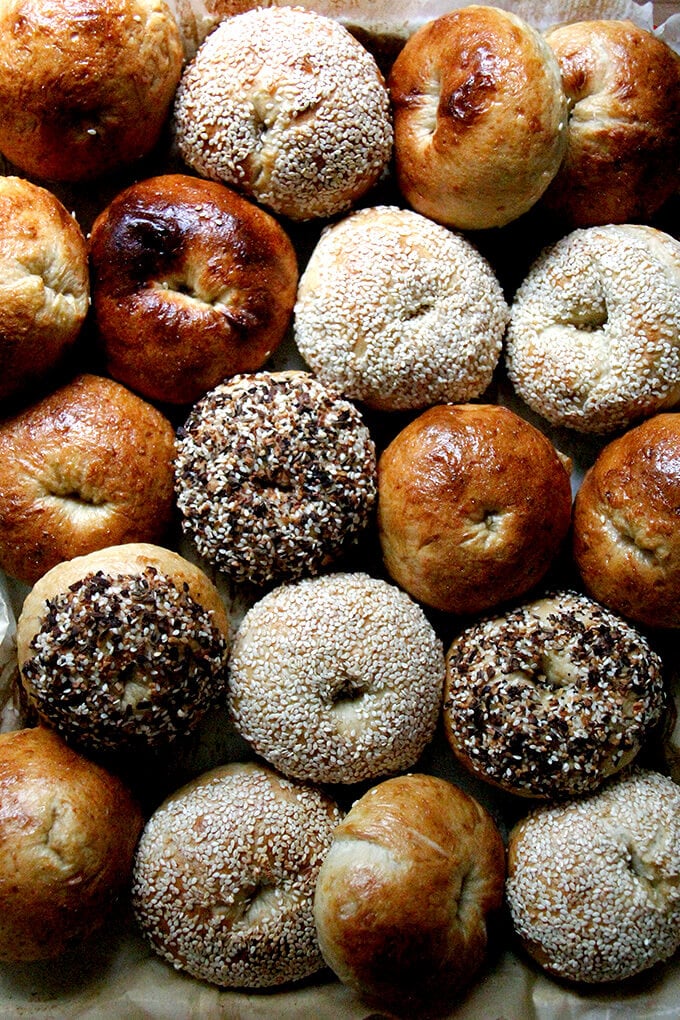
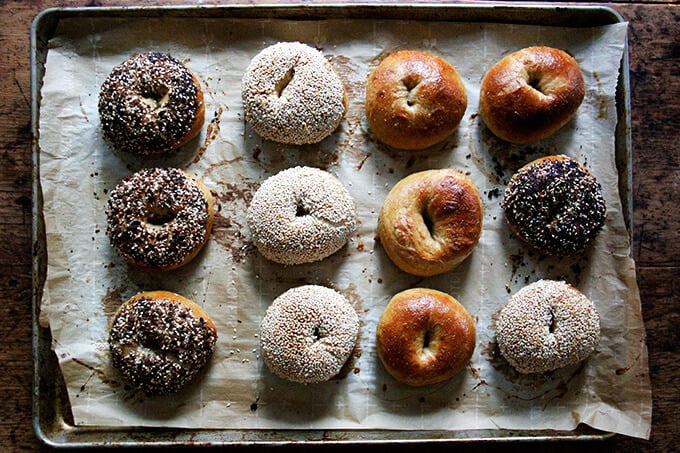
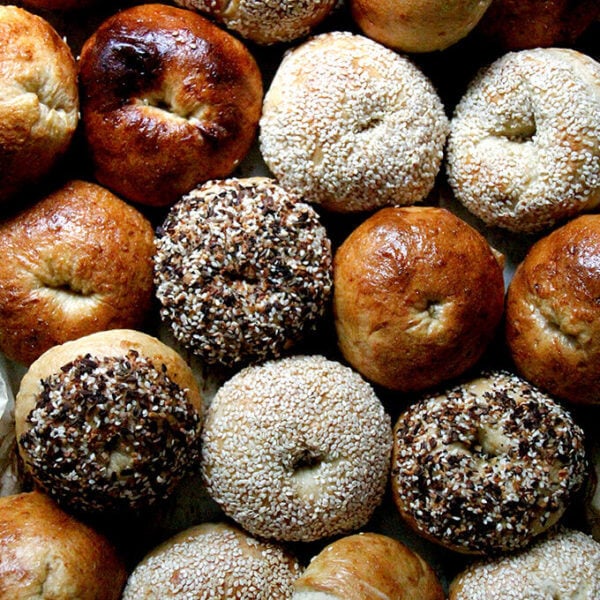
Dip in desired seasonings:
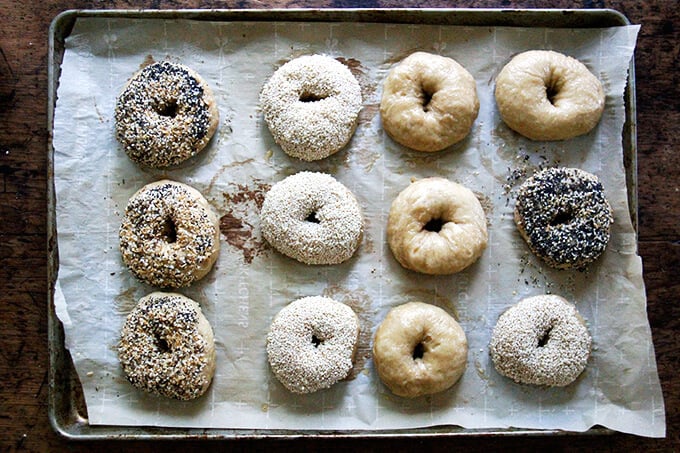
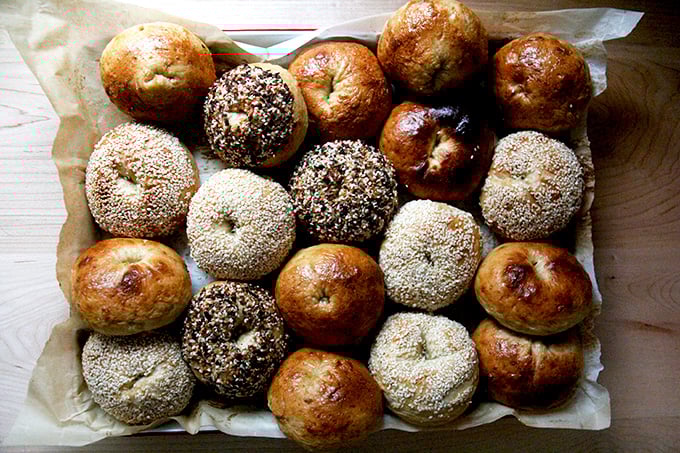
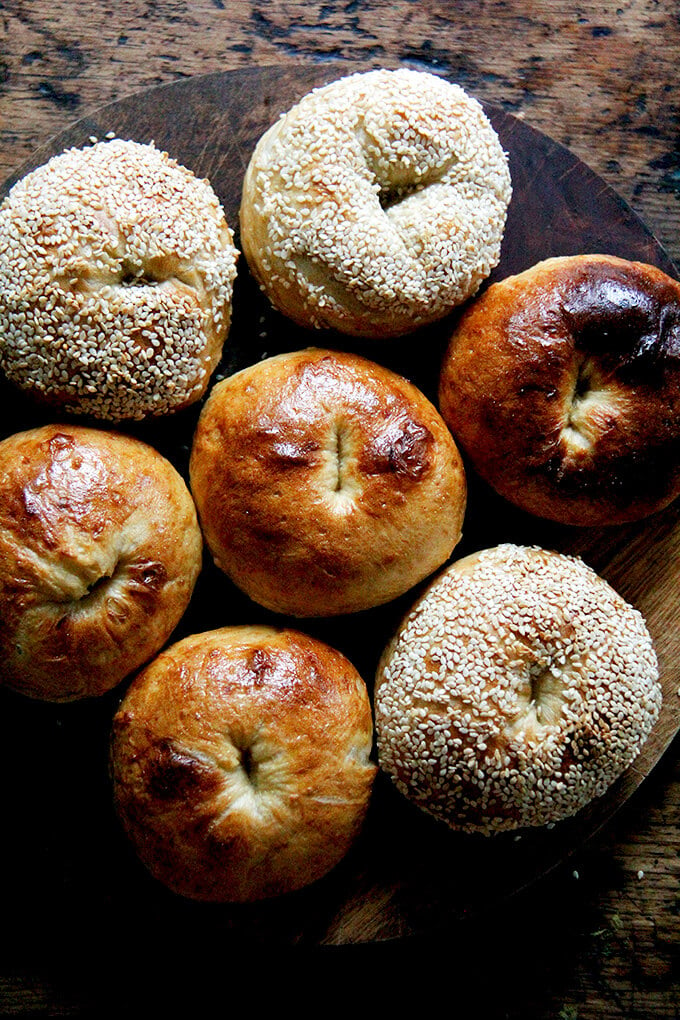
Bake until golden.
Invite some friends over for brunch. Find yourself some good tomatoes; enter summer-morning breakfast nirvana.
Foolproof Homemade Bagels Recipe
- Total Time: 12-14 hours
- Yield: 8-12 bagels
Description
Equipment Notes:
As noted above, I find a scale to be imperative here: I use it to weigh not only the flour but also the water, salt, and yeast.
A large sheet pan is so handy — it fits all 12 bagels at once. If you don’t have a large one, use two standard sheet pans, and bake 6 on each.
You’ll need a spider or a slotted spoon to remove the bagels from the boiling water to a sheet pan.
A food processor or stand mixer will allow you to knead the dough quickly and powerfully. I love my 14-cup Cuisinart.
Note: Watch your food processor closely! If you make the larger amount (12 bagels), it’s a lot of dough for even a large food processor. You’ll only run the machine for 90 seconds, but it will work hard during those 90 seconds and may jump around a bit — at any sign of the blade jamming, stop the machine and remove the dough. Also, after you add the liquids to the food processor, begin the kneading immediately to prevent the liquid from escaping through the center hole.
If you don’t have a food processor or a stand mixer, knead the dough by hand briefly, using as little additional flour as possible.
Ingredient Notes:
Many bread authorities swear by using high-gluten flour. This is something I have yet to try, but I imagine it would only improve the chewiness. But if you don’t feel like picking up another product, don’t hesitate to use all-purpose flour, which is what I typically use in all of the breads I bake.
Barley malt syrup is hard to find. Shops like Whole Foods Market typically sell it. I order it online. Also, as one commenter noted, beer making supply stores carry barley malt syrup.
For homemade everything bagel seasoning, combine:
- 1/4 cup sesame seeds
- 1/4 cup poppy seeds
- 3 tablespoons dried onion flakes
- 3 tablespoons dried garlic flakes
- 2 tablespoons flaky sea salt
Ingredients
For 8 bagels:
- 4 cups (512 g) all-purpose flour, plus more for dusting
- 2 teaspoons (13 g) Diamond Crystal kosher salt
- 1 tsp (4 g) instant yeast
- 1 1/4 cups (350 g) lukewarm water
- 1 teaspoon barley malt syrup, maple syrup, or honey + more for boiling
- grapeseed or olive or other neutral oil
For 12 bagels:
- 6 cups (768 g) all-purpose flour
- 3 teaspoons (20 g) kosher salt, I use Diamond Crystal
- 1.5 tsp (6 g) instant yeast
- 2 cups + 2 tablespoon (530 g) lukewarm water
- 1 heaping teaspoon barley malt syrup, maple syrup, or honey + more for boiling
- grapeseed or olive or other neutral oil
For baking:
- 1 egg whisked with 1 tablespoon water
- various toppings: everything bagel seasoning, sesame seeds, dukkah, etc.
Instructions
- In the bowl of a food processor fitted with the blade attachment (or in a stand mixer fitted with the dough hook), pulse together the flour, salt and yeast (or, if using a stand mixer, stir on low). In a medium bowl, whisk together the water and the barley malt syrup. Add it to the food processor (or stand mixer) and immediately (see notes above for why) blend for 60-90 seconds, standing nearby the entire time — at any sign of the blade jamming, stop the machine. (If using a stand mixer, knead on medium speed for 90 seconds.)
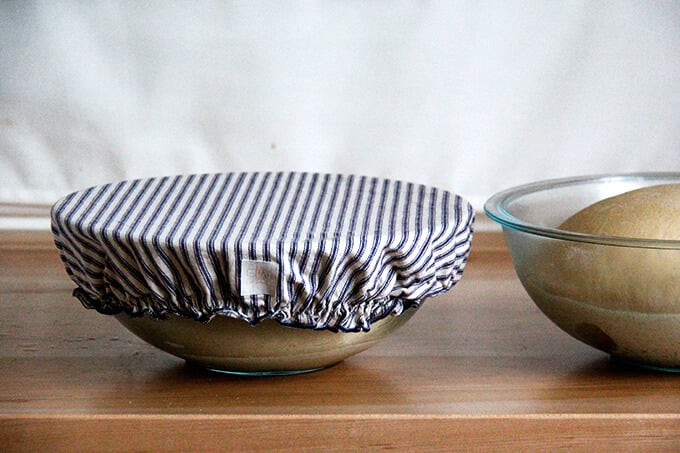
- With oiled hands, transfer the dough from the food processor to the bowl. The dough will feel warm and sticky. With oiled hands stretch the dough up, then down toward the center several times to form a ball. (See video for guidance.) Lightly rub some oil over the dough to coat — this will prevent a crust from forming on the dough. Cover with a tea towel, cloth bowl cover or plastic wrap. Transfer bowl to the fridge for 12 hours or longer.
- Place a large pot of water on to boil. When it simmers, add a big glug (about ¼ cup) barley malt syrup. Preheat an oven to 425ºF. Line two sheet pans or one large pan one with parchment paper (see notes above). Prepare the egg wash if you haven’t already. Place toppings of choice in shallow bowls.
- Remove bowl with dough from fridge. Turn dough out onto a lightly floured work surface. For perfectly even bagels, use your scale to portion the dough into 8 or 12 pieces, depending on the quantity of dough you made—if you weighed your ingredients, each dough ball should weigh about 105 to 110 g. Form each portion into a ball, using the pinky edges of your fingers to create tension. After all of the balls have been formed, dust your hands with flour and use your thumb to poke a hole into the center of each dough ball. Use your hands to stretch the dough into a donut-shape—don’t be afraid to really tug outward and under, almost as if you were going to turn the dough inside out but stop before you do. Note: If you don’t pull out and under, the bagels will puff into cone-liked shapes upon baking. Truly: Be aggressive with the shaping. Video guidance here.
- Line a sheet pan with a tea towel. Have a stopwatch (or your phone or a clock) nearby. Drop 4 of the dough rings into the boiling water at one time. Boil 30 seconds on each side. Use a spider or slotted spoon to transfer the boiled rings to the towel-lined pan. Repeat until all of the rings have been boiled.
- Brush each ring with the egg wash. If you are using any toppings, dip the egg-washed bagels into the topping-filled bowls, then transfer to the parchment-lined sheet pan. If you an extra large sheet pan (see notes), you can bake all 12 at once. If you have a smaller pan, bake 6 to 8 at one time.
- Transfer pan or pans to the oven and bake for 20 to 25 minutes or until bagels are evenly golden all around. If you are using two pans, rotate the pans halfway through. Let bagels cool on sheet pans.
- Prep Time: 20 minutes
- Cook Time: 30 minutes
- Category: Bread
- Method: Boil & Bake
- Cuisine: American
This post may contain affiliate links. Please read my disclosure policy.


172 Comments on “Foolproof Homemade Bagels Recipe”
I’ve made these twice now with excellent results. I can’t believe how easy it is to make bagels at home! I use bread flour because I like a chewy bagel, it makes for a slightly stiffer dough but still easy to work with. I let the dough proof at room temp for about an hour after removing from the fridge. Instead of dipping the bagels in toppings I sprinkle the them on. But toppings aren’t needed since the bagels are very flavorful “naked”! Thanks for another great recipe.
Great to hear, Kate! Thanks so much for writing and sharing your notes. I totally agree: bread flour is best here for the chewiness factor 🙂 🙂 🙂
This recipe is amazing! You never fail to disappoint. This was shockingly easy to make, and your video helped so much to see how you did some of the steps, like shaping the bagel. I brought bagels to my family and they thought they were one of the best things I’ve ever made. So thank you for all you do and sharing these amazing recipes on your site!
Oh yay! So nice to read this, Jodi 🙂 🙂 🙂 Thank you for writing and thank you for your kind words, too.
I love the recipe but would like to see the correction for grams of water in the smaller batch recipe.
Hi 👋🏻 I looove your recipes so much. I really want to make this and have attempted the 8 bagel recipe twice, however it is too much water. Amy suggestions?
Hi! I would just cut it back even more. If you use 330 grams of water, it will bring the hydration down to 65%. Could you try that or lower it even more. Are you using a scale to measure? What type of flour?
Would you change baking time if you made mini bagels over full sized??
Yes, I’d reduce it slightly. Just keep an eye on it. Remove them 2-5 minutes before suggested cooking time, (I would guess).
We moved out of NY and miss having bagels. I tried this recipe and it was relatively simple to make, but I feel my bagels didn’t puff up as much as yours. Do you think I stretched them out too much since the holes in my bagels are bigger than yours? How can I send or post a pic to show you?
Hi! So sorry for the delay here. Questions: are you using a scale to measure? What type of flour are you using? It’s possible you stretched them out too much.
Hi Alexandra, I have the dough for the bagel sitting in my fridge now. Can I confirm that after you take it out of the fridge, you do not need to let it proof at room temp again (like your foccacia recipe) before dividing and shaping?
Correct!
Hi Alexandra, I made this recipe and the bagels turned out really well, thank you!
However, the bagels to my finicky tastebuds tasted slightly “bready” – could I add 2g of yeast to correct? I’m using the 500g recipe.
I’ve noticed your recipe is quite different to the other recipes in terms of proofing – some will let the sponge+dough sit at room temperature until doubled, then stick it in the fridge for 1-2 days, others will shape bagels and proof the shaped bagels in the fridge.
Does the proofing contribute to the “bready” taste at all or can additional yeast and additional cold fermentation in the fridge correct for that?
Hi Wilson! I’m not sure how to advise. You could definitely try a room temperature rise followed by a fridge rise followed by the room temperature shaping/proofing. The extended fermentation time will likely improve the flavor and texture. I don’t think additional yeast will help… are you wanting a lighter texture?
Hi Alexandra
Yes, a lighter texture rather than dense. I wasn’t sure how proofing at room temp, then sticking it in the fridge, then proofing again before shaping and boiling will affect taste/texture. I’m also afraid of overproofing (which happened when i used another receipe) which resulted in flat bagels.
Thank you very much for replying. It is much appreciated.
I think you’ll get great results with a room temperature proof followed by a fridge proof — be sure the dough is in an airtight container in the fridge to ensure the dough doesn’t dry out. I find that you really don’t need to do much of a room temperature proof once the bagels have been shaped — as you note, you run the risk of overproofing and deflated bagels as a result.
This recipe couldn’t have been easier. Literally foolproof. Just about to come out of the oven and my house smells just like a bagel shop!
I really didn’t need to know it was this easy…. Thank you for my new hyperfixation 😂😂😂
Oh yay 🙂 🙂 🙂 It’s so nice to read all of this. Thanks for writing!
Hi Alexandra, I have made these bagels twice. The first time I had to add extra flour because the dough was too wet. The next time I compared the quantity to weight of water and found a discrepancy. Using my scale 2 cups of water is 432g not 530g. I noticed someone else had this issue. Once I made the adjustment for the 12 bagel recipe everything worked out.
The bagels came out delicious, thanks very much.