
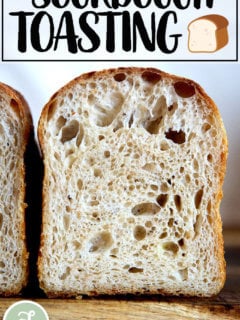
Easy Sourdough Sandwich Bread
This post may contain affiliate links. Please read my disclosure policy.
As I mentioned a few weeks, a number of requests about how to make my mother’s peasant bread with a sourdough starter encouraged me to dip my toe into the wonderful world of naturally leavened breads. You can read more about that experiment here, which led to this simple sourdough focaccia recipe, an adaptation of my favorite yeasted, refrigerator focaccia.
It also led to this sourdough toasting bread, which is essentially the same formula, just baked in a different vessel and without the slick of oil and sprinkling of sea salt on top. I’ve been making this bread even more often than the focaccia these days because I love the shape: it’s so nice for morning toast and for sandwiches.
PS: How to Build a Sourdough Strater from Scratch
PPS: How to Activate, Feed, and Maintain A Sourdough Starter
Simple Sourdough Toasting Bread: What You Need
- A sourdough starter. I recommend buying one (read why here). But if you’re up for it, you can make one from scratch in just about a week.
- Time. As with the focaccia, this bread rises first for about 6 to 18 hours (depending on the time of year and strength of your starter), then again for another 4 to 6.
- A large loaf pan. I’ve been using this 10 x 5-inch loaf pan. If you only have two smaller loaf pans, such as 8.5 x 4.5-inch pans, you’ll need to split the dough in half after the first rise.
That’s it! Ready? Here’s the play-by-play:
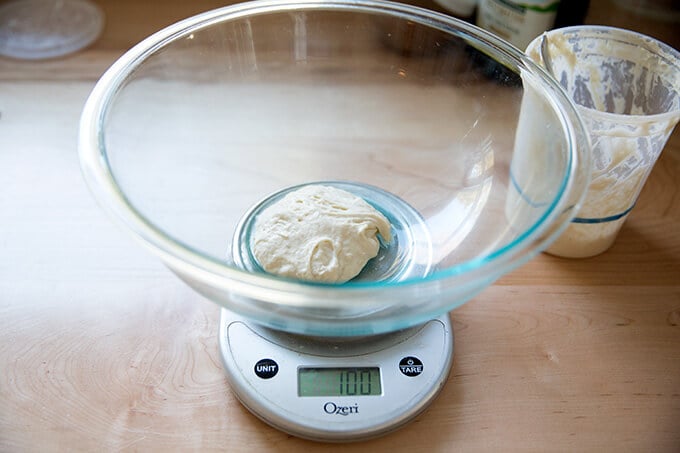
As always, when mixing sourdough doughs, it’s best to weigh everything with a digital scale. Start with 100 g starter. (If this looks familiar, it is: this is the same basic process for the sourdough focaccia.)
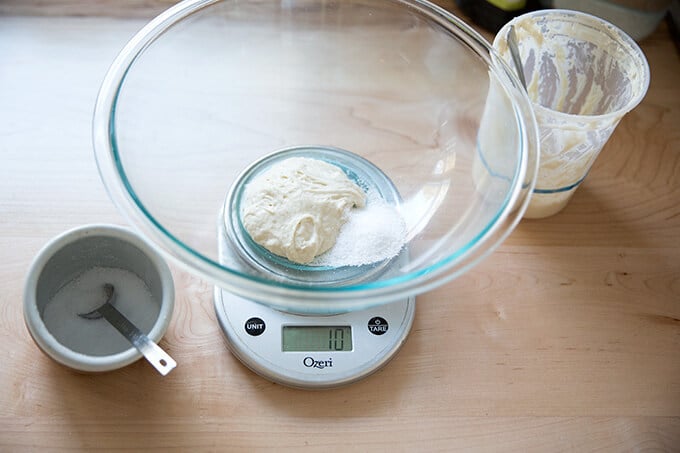
Add 10 g kosher (or other) salt.
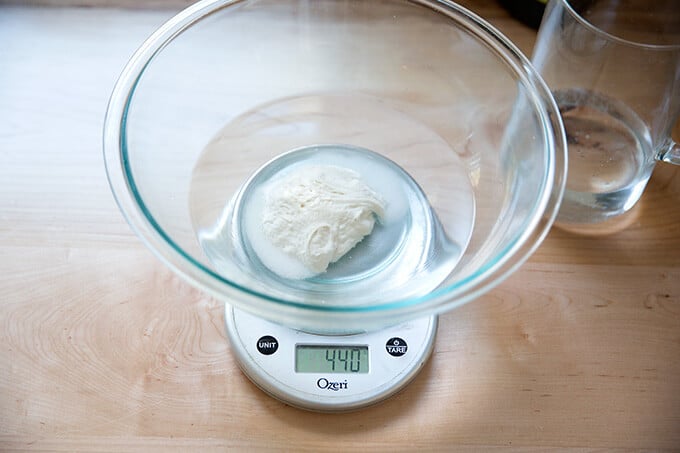
Add 430 g water. (Or less, see recipe for notes.)
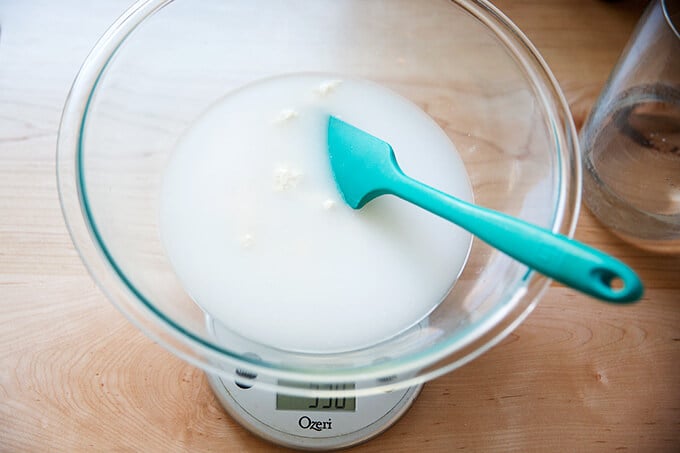
Stir to combine.
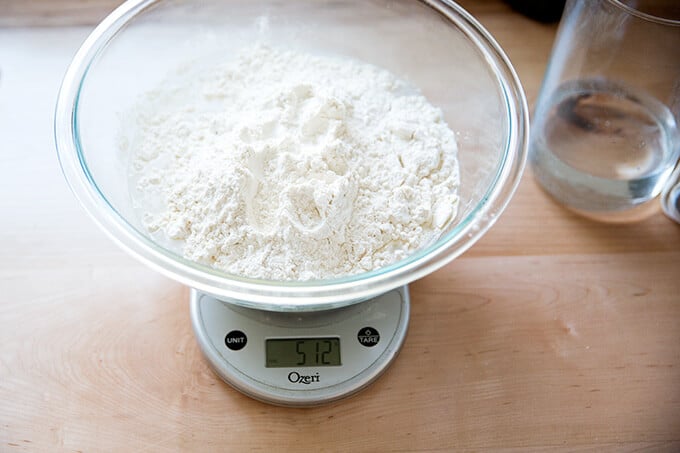
Add 512 g bread flour.
Stir to form a sticky dough ball.
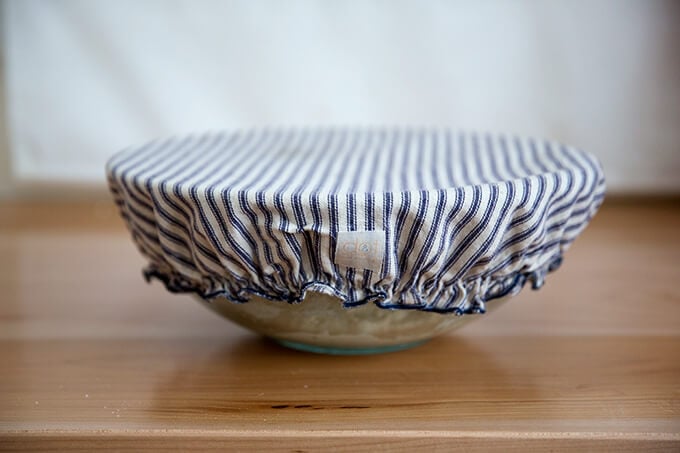
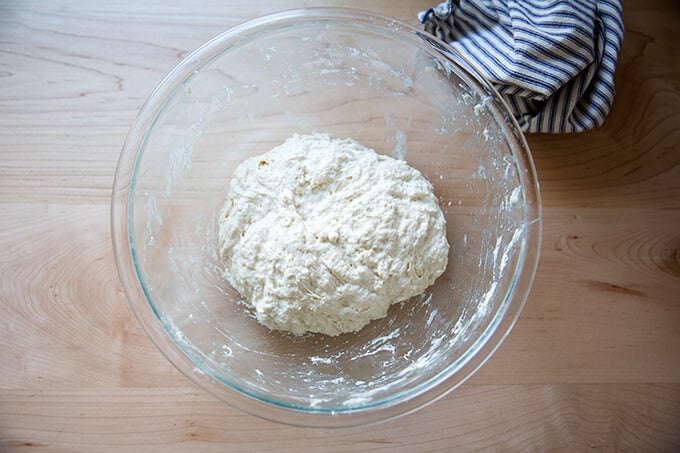
Cover with a towel or bowl cover, and let rest for 30 minutes. Then, perform a series of stretches and folds. See video for guidance. Repeat this 3 more times for a total of 4 sets of stretches and folds during the first two hours. Then, let rise for 6 to 18 hours* (see recipe notes) at room temperature:
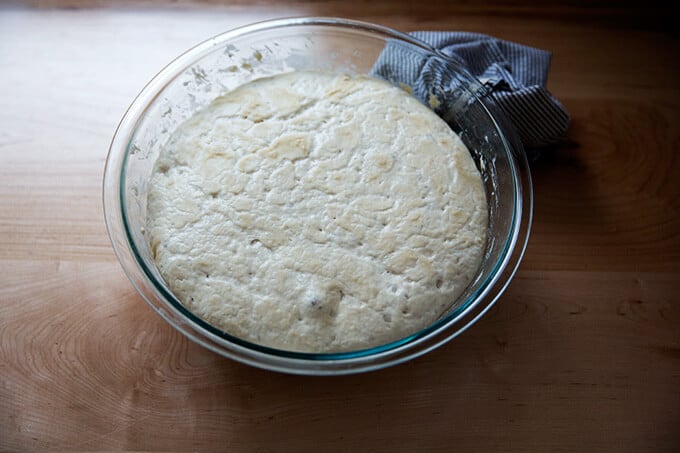
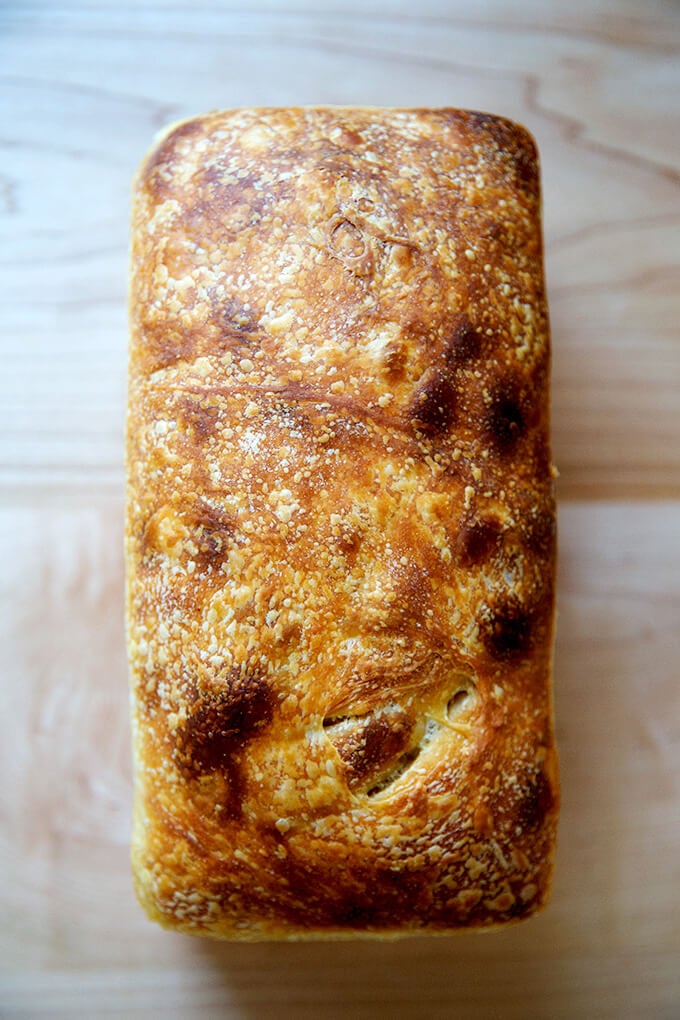
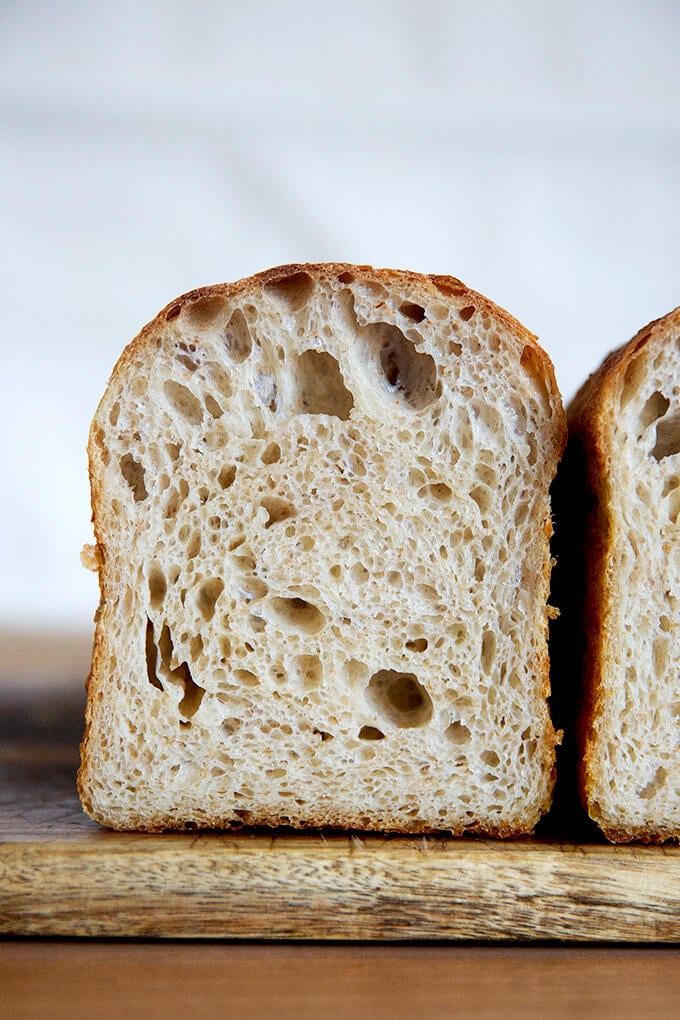
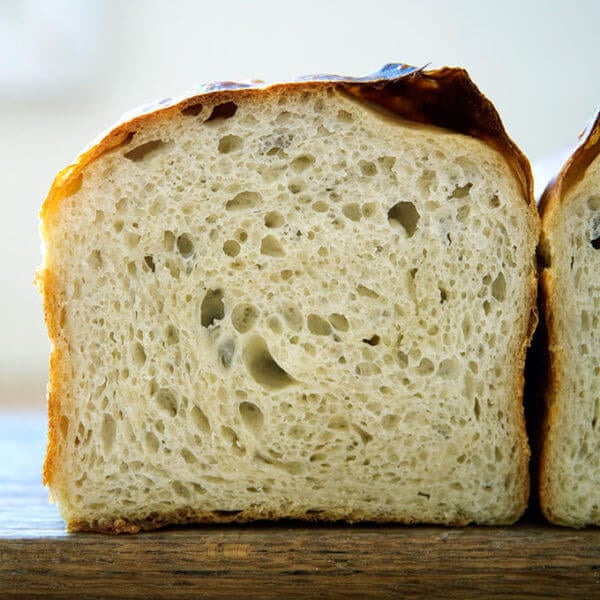
After 6 – 18 hours, it will look something like this:
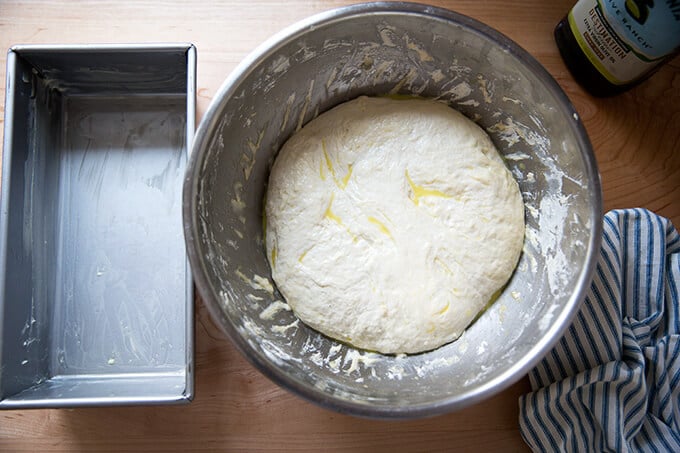
Drizzle the surface of the dough with a little bit of olive oil; then fold the dough inwards from the sides to deflate.
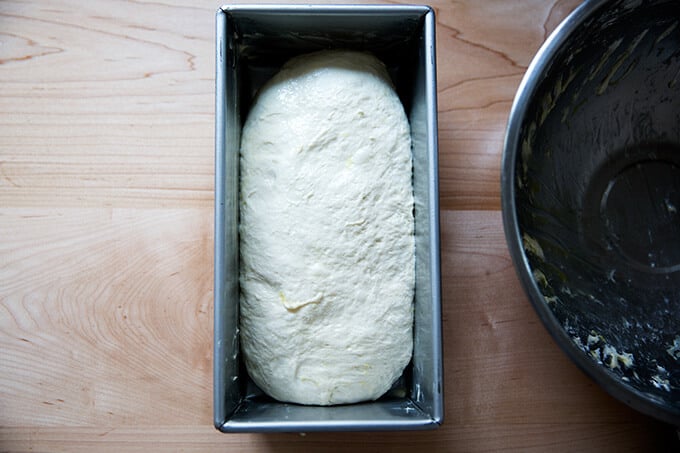
Transfer dough to loaf pan.
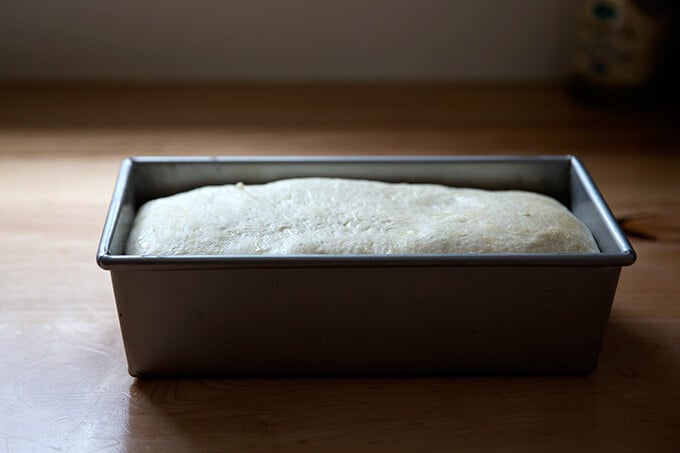
Let rise till dough just begins to crown the rim of the pan, about 6 hours.
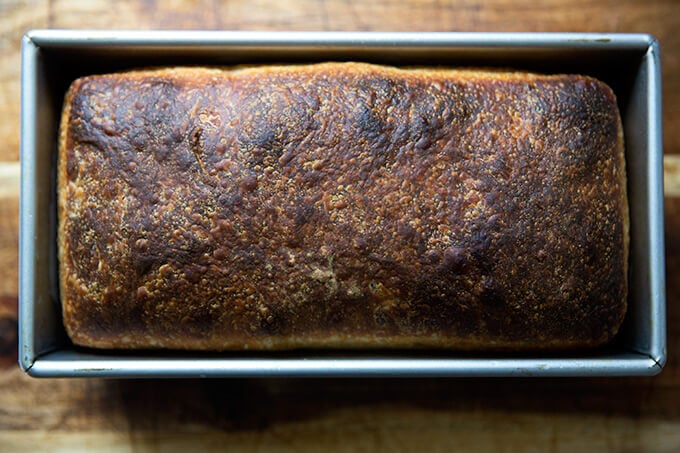
Bake for about 45 minutes.
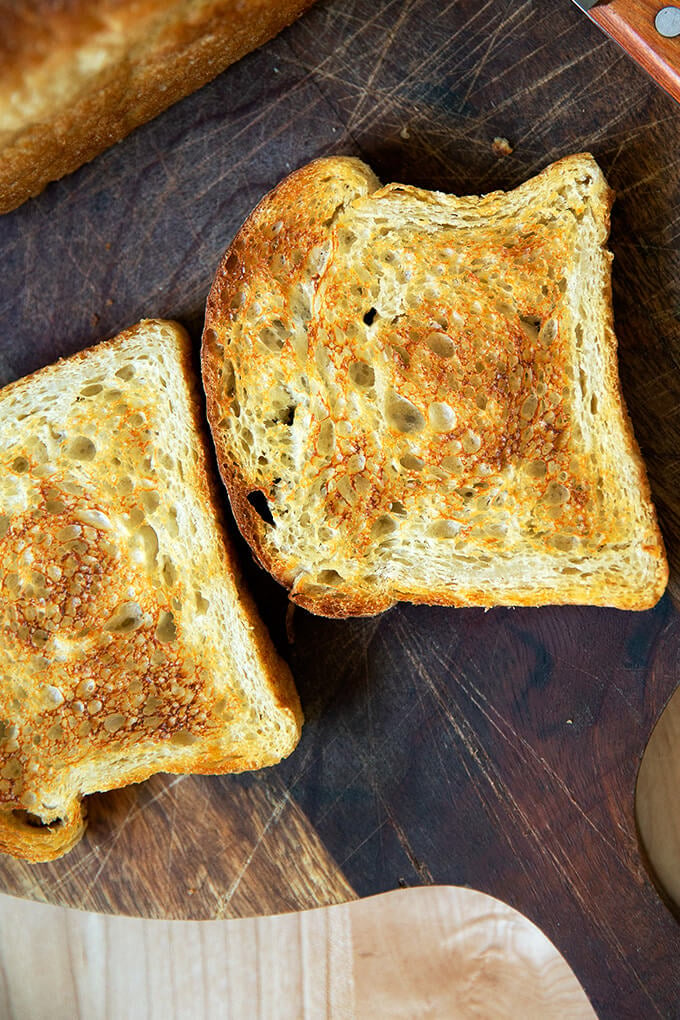

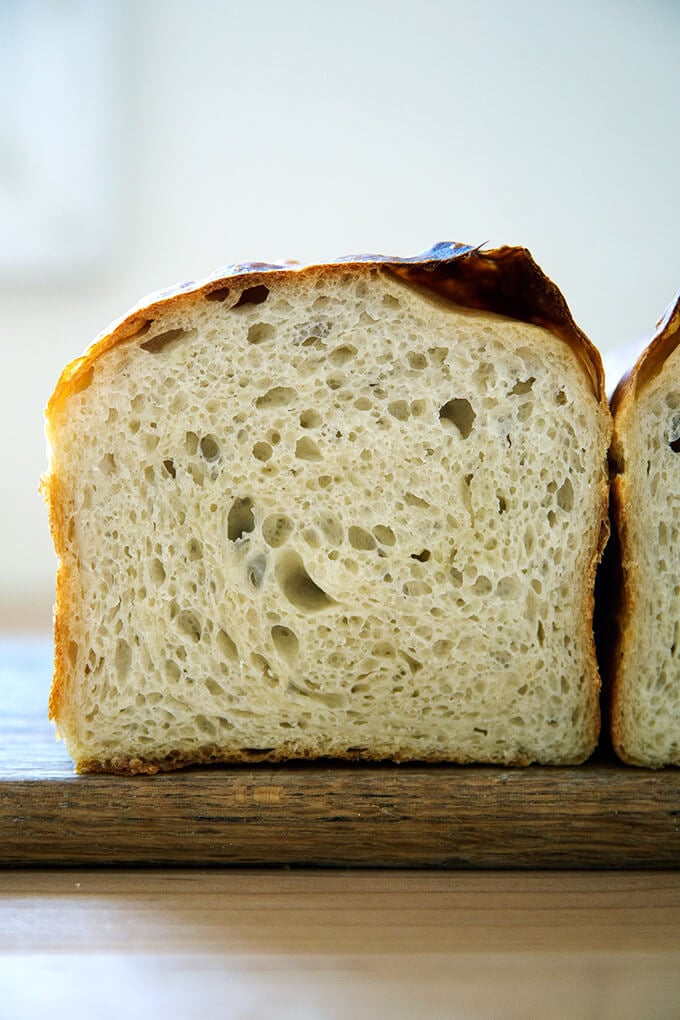
I baked this loaf in a tall-sided pullman loaf. Love the shape!
Easy Sourdough Sandwich Bread
- Total Time: 24 hours 40 minutes
- Yield: 1 loaf
Description
** UPDATE: VIDEO GUIDANCE IS HERE **
The makeup of this dough is the same as this sourdough focaccia. Here, the dough is baked in a loaf pan, and there is no sea salt on top.
This recipe yields one large loaf. You’ll need a 10 x 5-inch loaf pan, such as this one. If you only have two smaller loaf pans, such as 8.5 x 4.5-inch pans, you should probably split the dough in half after the first rise.
Plan ahead: This dough rises first for 6 to 18 hours (or less if it is super hot out or if you live in a humid area) or until the dough doubles in volume; then again for about 4 to 6 hour or until the dough crowns the rim of the baking vessel.
Troubleshooting: If you have issues with your dough being too sticky, please read this post: Why is my sourdough so sticky? The 4 common mistakes.
If you’re just getting started with sourdough, check out this post first. You’ll find tips there on procuring a starter as well as how to feed it and maintain it. If you’re up for making your starter from scratch, you can do so in just about 1 week.
Water: Chlorine in water can adversely affect sourdough. Leaving water at room temperature for 24 hours will allow most of the chlorine to escape. When I am in the habit of making sourdough bread, I fill a large pitcher with water and leave it out at room temperature. I use this for my sourdough breads and starter. Truth be told, I’ve used water straight from the tap and have not noticed a difference.
Water quantity: Also, depending on where you live and the time of year, you may need to cut the water back. If you live in a humid environment, for instance, I would suggest starting with 400 g or 420 g water. If you are not using bread flour, you also may need to cut the water back a bit. So much success with sourdough relies on getting the water quantity right.
Starter: I use a 100% hydration starter, meaning it is equal parts by weight flour and water. If you need guidance on how to maintain a starter, see this post.
Ingredients
- 100 g (about 1/2 cup) active starter, see notes above
- 10 g (about 2.5 teaspoons) kosher salt
- 430 g water, (or less, see notes above) room temperature
- 512 g (4 cups) bread flour, such as King Arthur Flour
- a few tablespoons extra-virgin olive oil
- room temperature butter, for greasing
Instructions
- Mix the dough: Place the starter, salt, and water in a large bowl. Stir with a spatula to combine — it doesn’t have to be uniformly mixed. Add the flour. Mix again until the flour is completely incorporated. If you have a straight-sided vessel, transfer the dough to it — it really helps monitor the rise and allows you to see the true growth in volume of the dough.
- Perform one (or more) “folds”: 30 minutes after you mix the dough, reach into the bowl and pull the dough up and into the center. Turn the bowl quarter turns and continue this pulling 8 to 10 times. See video for guidance. If time permits, repeat this “folding” step every 30 minutes for the first two hours. (Note: even if you perform just 1 fold, your dough will be in good shape.)
- Drizzle with a splash of olive oil and rub to coat. Cover bowl with a tea towel or bowl cover and set aside to rise at room temperature (70ºF/21ºC) for 4 to 18 hours — if it is super hot out or if you live in a humid environment, it may only take 4-6 hours. When the dough has nearly doubled in volume (or UPDATE: increased in volume by 50%, which is when I now end the bulk fermentation), it is ready. (Note: Do not use an oven with the light on for the bulk fermentation — it will be too warm. It is best to rely on visual cues (increasing in volume by 50% or doubling if you’ve had success with doubling) as opposed to time to determine when the bulk fermentation is done. A straight-sided vessel makes monitoring the bulk fermentation especially easy.)
- When the dough has nearly doubled, grease a 10 x 5-inch loaf pan with butter (or nonstick spray). Drizzle dough with a few tablespoons of olive oil. Rub your hands with a little bit of oil to coat. Use your hand to release the dough from the sides of the vessel, being careful not to completely deflate the dough. Video guidance here. Turn dough out onto a work surface. Quickly, shape the dough into a rectangle — I fold the dough envelope-style first; then I use a bench scraper to shape the dough into a rough rectangle. Transfer dough, seam-side down to prepared loaf pan and gently stretch into an oblong shape. (At this point, you can transfer the pan to the fridge if it makes sense with your schedule: rub the dough with oil and cover with a cloth bowl cover or plastic wrap. Transfer to the fridge will the next day. Then proceed with the recipe.)
- Leave alone for 5 to 6 hours or until dough begins reaching the rim of the pan — this may take less time when it is very warm out. Do be patient with this second rise: to get good height, the dough should be near the rim of the pan before you transfer it to the oven.
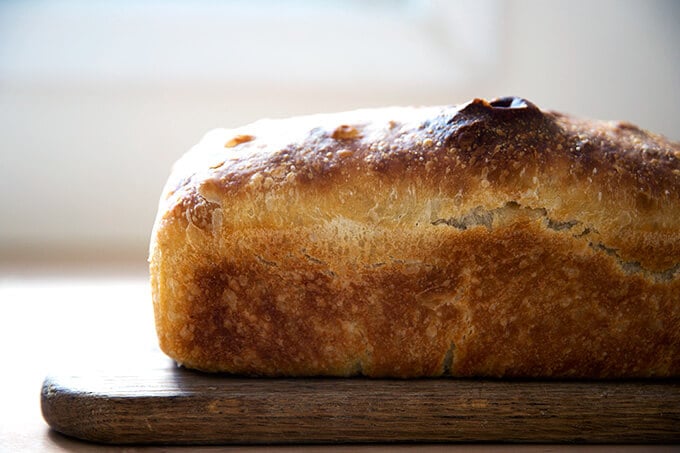
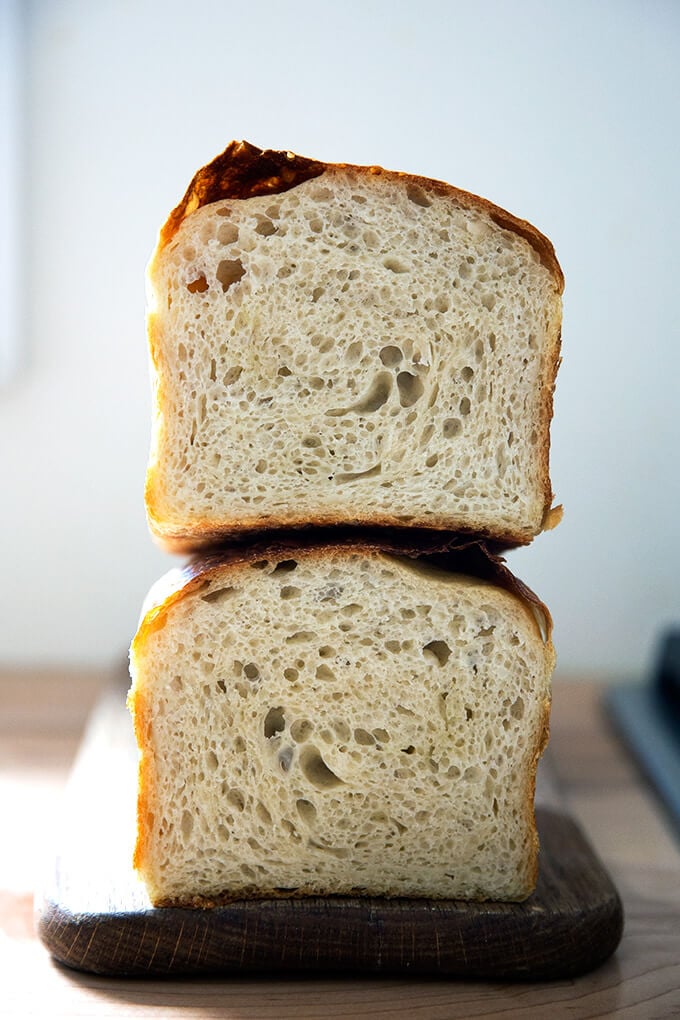
- Heat oven to 425ºF. Transfer pan to the oven and bake for about 20 minutes. Reduce heat to 375ºF. Bake for 20 to 25 minutes more or until golden all around. If you have an instant read thermometer, it should register 206-210ºF or so before removing. Remove pan from oven and turn bread out onto a cooling rack. Cool at least 30 minutes before slicing.
- Prep Time: 24 hours
- Cook Time: 40 minutes
- Category: Bread
- Method: Sourdough/Natural Leavening
- Cuisine: American
This post may contain affiliate links. Please read my disclosure policy.


898 Comments on “Easy Sourdough Sandwich Bread”
I made this with all purpose and 380g water- perfection! Thank you!! I want to try this replacing some of the all purpose with rye flour. Any advice?
Wonderful to hear this, Ivona! I would suggest starting slowly: try substituting 50 g of the white flour with 50 g of rye flour to start … it feels like a tiny amount, but a small amount of rye flour goes a long way. Depending on the results, add more (or less!) incrementally again until you find a ratio you like.
I have made this bread twice and even though I use the thermometer to test the baking, the bottom of the bread is always almost wet and it sweats over the cooling rack. It also seems a little wet in the interior. I am not sure what to do to fix this.
Hi Holly! I would reduce the amount of water you are using. Do you live in a humid environment? What type of flour are you using?
I had the same problem….the top of the loaf was nice and browned but the bottom half was white and still doughy….I took it out of the pan and set the loaf on a pre-heated cooking sheet for an extra 5 minutes…it did get a bit more cooked and browned. I used bread flour…next time I will try less water and/or AP flour. I am still a newbie baker but think I actually prefer AP flour over bread flour.
Hi Marilyn! Yes, I think cutting back on the water will help. Keep me posted if you give it another go!
We loved this recipe! I made it as my first attempt at a sourdough sandwich loaf (have only made a handful of sourdough breads before) and it turned out brilliant! I used 100g of wholewheat flour and remainder of flour high protein bakers flour and all the rest of the ingredients the same. Flavour and texture is just what I was after. It will now be a once a week staple for sandwiches in our home. Thanks for sharing.
Wonderful to hear this, Beau! I love adding some whole wheat into this one as well.
I have started my sourdough baking 3 months back….and I am a baking newbie too as such.Made your recipe….it came out well though I used whole wheat flur/AP in 50:50 ratio.But my bread became dry within a few hours,can you tell me how I can remedy this.I live in very hot and humid place.
Hi Valli! Can you clarify your question: “my bread became dry within a few hours”. Did it become dry after you baked it?
I’m a sourdough newbie. A friend gave me some of her starter last week. I made this bread over the weekend and it was gone in less then 24 hours… my family loved it!!! So I made 2 more Monday/Tuesday, lol. I have a few questions… how do you store the read after baking? Container? Bag? Also, I’ve watched the video a few times. My dough is sticky compared to yours, when I lift and fold it sticks to my hand, and when I fold it to put in the pan it sticks to the counter. It also appears much softer then yours when cooked (not as dense/smashes a bit when cutting). Sorry for all the questions 😬 thank you for the wonderful recipe
Wonderful to hear this, Rian! Questions answered below!
how do you store the read after baking? Container? Bag?
If you want to store the bread at room temperature for 3 to 4 days, I think the best method is in a ziplock bag. I’ve tried other eco-friendly options, but nothing seems to keep bread freshest — the crumb the softest — better than a ziplock bag. You can re-use the bags again and again. If you have a large air-tight container like a tupperware, that can work, too.
If you intend to keep the bread for longer, I would freeze it. I often slice bread as soon as it cools completely, transfer the slices to a ziplock bag, then freeze. This way, I know the bread was frozen at its freshest.
A ziplock bag will not prevent the crust of bread from turning soft, which is why I suggest always reheating day-old bread. I use a toaster at breakfast for slices of bread, and I reheat half or quarter loaves in the oven at 350ºF for 15 to 20 minutes when serving for dinner.
Also, I’ve watched the video a few times. My dough is sticky compared to yours, when I lift and fold it sticks to my hand, and when I fold it to put in the pan it sticks to the counter. It also appears much softer then yours when cooked (not as dense/smashes a bit when cutting).
What type of flour are you using? And do you live in a humid environment? I have a feeling you might be able to reduce the amount of water you are using.
Thank you for replying… I’m using bleached all-purpose flour. I was thinking a little less water too, my start is 100% hydration. It’s not to humid, I live in WA. My first loaf didn’t last long enough, but my last 2 have lasted a few more days and it seems that with a day to sit it’s not as moist/soft/flimsy as the day it’s cooked. I will try less water, and maybe let it sit for a day before eating it. Thank you again!!!
Sounds good, Rian! Keep me posted on your trials. Also, if you can find unbleached flour, that might make a difference, too.
I have tried several sourdough recipes and this is by far my favorite. Your instructions are perfect! Thank you! I have made this every week for the past couple of months. Thank you!
Wonderful to hear this, Connie! Thanks for writing 😍😍🍞🍞
Hi Ali, thanks for your reply.Temperature here is 29C and I kept it for fermentation for 5hours.Took out from the fridge at 9am and now it is 7pm,it hasn’t reached the rim, what should I do, should I bake? Thanks
Hi Renu! Did the dough grow at all in the pan? I’m a little bit worried about it. Sorry for the delay here … I’m assuming you baked it? What size pan are you using? If the dough didn’t grown much between 9am and 7pm, something went wrong. It’s likely the dough over fermented during the bulk fermentation.
Hi Ali, thanks,yes I did bake it ,it had risen 3/4 in the tin but it remained uncooked from inside and top was hard,texture was dense, today again I am going to try.in my oven maximum temperature is 250 C, I had kept it at 2ooC for 20 minutes and then at 180C for 30 minutes.Please guide me about the temperature.Whenever I try sourdough bread it remains uncooked from inside but yeasted bread comes out fine.Thanks
Hi Renu! I don’t think your oven is the issue. If yeasted breads come out fine, so should sourdough breads. It sounds as though your dough has over fermented or is just not fermenting properly. Can you remind me: do you have a good, strong starter?
I just made this after increasing the amounts 25% to fit an 11×7 deep dish pan, since the places I checked only had small (9×3) pans around here.
I did find the dough a little better even after reducing the water, but after adding more flour, it landed right where I wanted it to.
I was surprised with how heavy it was coming out of the pan…but maybe that’s just the fact that I’m used to handling commercial loaves, and this is so much more moist than those.
Thanks for the recipe; I’ll be using it again!
Wonderful to hear this Chuck! And know, too, that you can reduce the water even more … sourdough is all about tinkering with recipes to make it work for your environment and flour type.
Hi, thank you for the recipe. Do you bake the bread in a fan assisted Oven?
Hi! I don’t use a fan oven.
I tried the focaccia and fell in love, so now I want to try the sandwich loaf. My concern is the top of the bread. Your images look like the top is very dark. Can I avoid that by tenting the loaf pan with foil, or do you have another suggestion? I would rather not have the dark top.
Thank you!
Hi Judy! I think the photos are making it look darker than it is … skip ahead in the video to the 4:10 mark … you’ll see the loaf when it comes out of the oven. It is a bit darker but not super dark. But yes, you could use foil or you could change the timing a bit: bake it at 10 minutes at 425ºF; then reduce heat to 350ºF and bake for 30-35 minutes. Do you have an instant read thermometer?
Yes, I have a thermometer. Thank you!
Great!
Ali, I’ve started to dabble into baking with sourdough and this excellent recipe has me inspired! I baked the loaf 6-22-20, a very hot and humid day. I watched the visual cues closely and was able to bake my 9×5 one loaf in a single day. Started feeding my starter at 7am and the loaf was out of the oven around 7pm! About 4.5 hours for bulk and 2 hours for rising in the pan. I did use bread flour but am curious how much I could swap out for white whole wheat. For the loaf I made I did drop the water back to 420 per your instructions.
Loved the buttered crust!!!
Oh yay! Wonderful to hear this, Alice! Regarding swapping some bread flour for white whole wheat, I would suggest starting small: do 1 cup to start, so do 128 g white whole wheat and 384 g bread flour. Depending on how it turns out, adjust the ratio accordingly. Keep me posted on your trials! And nice work on relying on the visual cues … my sourdoughs have been rising SO quickly in this heat.
I’ve made this about 10 times now… It is my favorite bread recipe! I live in a humid environment and it still comes out perfectly with bread flour. Thank you so much!
Wonderful to hear this, Celine!
What time of day do you start this bread? I’ve been trying to make sourdough since my husband needs it for easier digestion and it seems if I leave it overnight it must rise for too long because then it doesn’t want to rise the second time. Rise time is so unpredictable there may not be enough hours in the day to let it rise twice during the daytime. I’ve made my share of hockey pucks (but I don’t have a shortage of breadcrumbs – haha). Any suggestions? I need to get this right for sandwiches so I can move onto sourdough hotdog and hamburger buns. Thanks!
When I have to leave it overnight I leave it in the fridge and that seems to work better – better that you have to take it out and leave it a bit longer than over proofing!
New to sourdough baking I tried a number of recipes and Alexandra’s technique is straightforward, not fussy, no special equipment needed and, best of all, makes a delicious loaf that we enjoy toasted. Although not as picture perfect as a browned boule, the loaf rises beautifully in the pan and has an airy crumb. A special thank you for your quiet videos.
So nice to hear this, Ellen! Thanks so much for taking the time to write 💕
I just curious if anyone has attempted this using a food processor. I’ve had great success in the past but haven’t tried it since I went “sour”. I just pulled my starter out and will be making this in a couple of days. All my past loaves have been dutch oven versions. Looking forward to this loaf.
If I wanted to make this in a 9×5″ pan, how much would I need to reduce this recipe? I’m planning on getting a larger pan, but don’t have it yet. Thank you so much for your help!
Becky
Hi Becky! Hard to say, but I think the easier thing to do would be to just make it; then when it’s time to transfer the dough to the pan, put 3/4 (or maybe a little bit more) of the dough in the loaf pan and put the remainder in a smaller vessel — do you have any ramekins or other small oven-safe vessels? Divide the dough that doesn’t fit in the loaf pan among the smaller pans.
I just want to let you know that this is the fourth sourdough sandwich bread recipe I’ve tried…and after my search for my favorite, this one is it!!! It’s absolutely delicious and easy to follow! I wasn’t expecting it to be as soft as it was due to the fact that it hardly has added fats…a testament to the fact that I’m still learning how this all works. Also, thank you so much for your other tidbits of knowledge (I was getting frustrated with overproofing dough in other recipes because I was told to follow times instead of increases in volume).
An unimportant question though.. My loaf split during rise in the oven as though it was begging to be scored. I used ap flour and did bulk rise in the fridge. Just wondering what could’ve caused this difference? I’m struggling to learn more about bread baking and although I can easily score next time, I’m wondering why I would have to and you wouldn’t.
Thanks so much again!
Hi Sara! So nice to hear all of this. Glad you are having success with sourdough!
OK, so it’s likely that because this is such a wet (high hydration) dough, the water in the dough created enough steam in the dough to cause it to burst.
My advice would be to experiment: next time, you can try giving scoring the dough a go — I find scoring room temperature dough to be very tricky, so just be sure to use a sharp implement, and cut swiftly and confidently to avoid snagging the dough or deflating it too much. If you are happy with the result; then score the dough again moving forward.
If you are not happy, go back to not scoring the dough.
Keep me posted!
Hi,can I use whole wheat flour instead of bread flour?if yes same amount of water should I take.
Thanks
Hi Renu! I wouldn’t use more than 50% whole wheat flour, and ideally, I would suggest starting with 25% whole wheat flour. If you start with 25% ww flour, you shouldn’t need to make any changes regarding water. Once you make it once with 25% ww flour, adjust the recipe the next time with more or less ww flour depending on the results.
Thanks Ali
Today I tried it with AP flour and water 400gm,it was going fine till the first rise, when it doubles, I removed it on the counter and I could not shape it,it was too soft to shape it.Now I have just lifted it up and out in the pan and in the fridge.No time to keep it out .where I went wrong .
Thanks
Hi Renu! It sounds as though the dough may have over fermented, but it may be fine. When you take the pan out of the fridge today, just be patient with the rise. Wait till the dough crowns the rim of the pan before baking it. If the dough did in fact over ferment, then it is unsalvageable, but if it didn’t, it will be fine.
How many hours was the bulk fermentation? And what temperature is your kitchen?
Hi, adore your recipes ..so thank you !
With this one, would it be possible to do the bulk ferment and folds, and then overnight let it rise in the well greased baking pan that you plan to cook it in? Like you do with the peasant bread? Just makes the process that little bit less faffy! And stop the concern of deflating the dough too much? ..would that be an idea? Or is there something to be gained from the bowl overnight process?
Thank you 🙂
Hi Carla! Thank you for the kind words 😍😍😍
I think this is a great idea, and so often the simpler method works best. Are you still planning on allowing the dough to double in volume during the bulk fermentation? Or were you going to shorten this phase?
I wanted to point something out that I noticed will make a difference in the way our loaves are coming out compared to yours. It appears that in the video you are not using a liquid starter which is what most people are familiar with. It might benefit us to know your starter feed ratios so we can better replicate this loaf. Because of how thick your starter is it probably is contributing less water and making your dough much more manageable compared to the many comments of people saying their dough is very sticky and liquid.
Hi Marshay, good point! I just added notes above the recipe. I use a 100% hydration starter, meaning I feed it equal parts by weight flour and water. I need to update the other sourdough recipes on my blog with this info as well. Thanks for writing!
I made it and at very first time came out perfect. I referred your recipe to my friend as hers’ came out perfect too. I have tried few of your bread recipes and all came out perfect. Thank you for sharing your recipes with us.
Wonderful to hear this, Preeti! Thanks so much for writing. Yay for bread baking 🍞🍞🍞🍞🍞
This was my first ever sourdough loaf. My starter is about a month old. Rises great for first rise but didn’t rise that well in the loaf pan, even with extended time to 8 hours. It also was pretty sticky when I transferred to the pan. It came out tasting great but is very dense. I was planning on cutting back on the water next time, but do you think my starter is also too young? Any pointers would be great, thanks.
Hi Alyssa!
It’s so hard to say. When you were shaping the dough after the bulk fermentation, did the dough feel really slack and without strength? Or was it just sticky? If it was slack, it’s possible that it over fermented.
Definitely try cutting back the water … that should help.
Regarding your starter, does it double in volume within 4-6 hours of a feeding?
This is the advice I always give people: when feeding your starter, be aggressive with how much you are discarding: throw away most of it, leaving behind just 2 tablespoons or so. Feed it with equal parts by weight flour and water. Start with 40 g of each or so. Use water that you’ve left out overnight to ensure any chlorine has evaporated. (This isn’t always necessary, but it may help.) If you can find some organic flour — my store carries small bags of KAF organic flour … they’re a little more expensive ($3.49 for 2 lbs) but I use it exclusively for feeding my starter. Organic flour or some stone milled flour (fresh or locally milled if possible) make a huge difference.
Hi,
This recipe was amazing. However my dough was ready to overflow in less than 2 hours during the second rise.
In your video you refer to a 10x5x5 pan but the link for the pan is a 10x5x3. I made it in a 10x5x3. Could you clarify if your loaf pan is 5 inch high and if yes, which brand is it.
Thank you.
Hi Swati! Sorry to hear this … next time, I would just get it in the oven as soon as the dough crowns the rim of the pan. I think as it gets warmer out, dough starts rising like crazy.
My pan is in fact 10x5x3 inches.
I followed this recipe exactly, weighted everything, used bread flour and performed all of the folds. After an overnight rise, I could tell that the dough was just too wet as it was flat. I still kept at it. In the pan, it barely rose – mainly big bubbles coming up. I baked it and it still didn’t rise properly.
I wasted over a pound of bread flour – not easy to get during these times. Comparing this recipe to others, I see that there is just too much water. “Cutting back a bit” are not good enough instructions for this type of dough. Although bread baking is not as exact a science as other forms of baking, this recipe needs to be altered because the way the dough is mixed, as opposed to kneading, does not allow a person to figure out if there’s too much water. There are no guidelines such as for example, ‘the dough should clear the side of the mixing bowl, etc.’
As well, two 8.5×4.5 does not equate to one 10×5. If you do the math, the area of your pan is 10×5=50 square inches. The area of an 8.5″x4.5″ pan = 38.25, which is about 75%. Therefore, people using the smaller pan should use 75% by weight of the recipe.
Hi Nancy! Sorry for your trouble here.
If you are willing to give this another go, I would start by cutting water back from the start. Do you live in a humid environment? I would start by cutting back 50 g of flour.
This concerns me: “In the pan, it barely rose.” Did the dough more than double in volume overnight? It sounds as though it over-fermented. In these warmer months, it’s really important to keep an eye on the dough as it rises very quickly. If it more than doubles in volume, it risks over fermenting at which point the dough is not salvageable.
Finally: is your starter healthy and active? Does it double in volume within 4-6 hours of a feeding? Are you using it at its doubling point? Does it pass a float test?
My starter is healthy and passes the float test. I’ve made the America’s Test Kitchen Sourdough Bread with it and it rose as it should have. As soon as I mixed your recipe and set it in the bowl to rise, I noticed a small rivulet of water seeping from the side onto the top. It just has too high a ratio of water/flour and so there’s not enough flour to hold the structure. I was tempted to add more flour but again, with this kind of recipe, there are no cues. I need a more exacting recipe since bread flour is hard to come by during these times and I don’t want to waste more fiddling around with a ‘more or less’ experiment.
Got it Nancy! I wish you all the best on your sourdough journey!
Hi Alexandra,
I am trying out this recipe today and have kept by dough for first rise.
I want to know if I need to keep the dough in the fridge for the second rise ?
I did not see the refrigeration part in the recipe but noticed in comments that some folks have refrigerated the dough so wanted to make sure I didn’t miss anything.
Hi Geetika! You didn’t miss anything. You can use the refrigerator as a tool if necessary — it helps with the timeline because it slows down fermentation. Sometimes I stick my dough in the fridge during the bulk fermentation when I want to go to bed, and I’m worried the dough will over ferment. You can stick the dough in the fridge during the proofing phase, too, if you don’t have time to let the dough rise 5-6 hours before baking.
Thanks a lot Alexandra. This turned out to be a good bread but did not rise as much. Trying again today 🙂
How important is the float test before making the dough ?
Hi Geetika! A float test is a good test when assessing wether your starter is ready, but another test is how quickly it doubles in volume after you feed it. It should double in volume within 4-6 hours of feeding it. Is that happening for you?
Hey Alexandra,
thank you so much for replying. Yes, the starter doubled in size in 4 hours and was pretty active but did not pass the float test. I went ahead and baked and the bread turned out great. I might have over proved it the first time. Love this loaf and is going to be my weekly bake going forward 🙂
Wonderful to hear all of this, Geetika!
Hi, I gave this recipe a go after really enjoying the wheat-ish sourdough.
Love this just as much!
It has the flavour and goodness of sourdough with the convenience of a square.
We enjoy it fresh, but toasted with eggs and avacado is magnificent!
Wonderful to hear this, Lucy! I love the shape of this one, too 😍
Just wanted to say HUGE thank you for this recipe. I’ve tried multiple sourdough recipes in the past and yours is by far the simplest and delivers the most consistent results. My bread pan is smaller than yours, so I reduce the ingredients by 20% to prevent it from blobbing over the sides. I also like to make the dough and do a few folds in the evening, then stick it in the fridge and do the rising and baking the next day. Perfect every time.
Wonderful to hear this, Alma! Nice work scaling back the recipe, too, to make it work with the pan you have. Thanks for writing!
This is hands down the BEST recipe! The bread turned out super soft and fluffy in the center followed by a beautiful crunchy brown crust. Do yourself a favor and try it toasted with some homemade butter. A+
Wonderful to hear this, Tom! Thanks for writing 🍞🍞🍞🍞
Hello! I am new to sourdough baking and love your instructions. But I am confused about using a straight-sided vessel to be able to tell when the dough has doubled…but also doing the folds. Do you do the folds in the straight-sided container, or move the dough to a bowl to do the folds?And then move back into the straight container so you can see when it’s doubled? Thanks for any clarification.
Hi Marilyn! I mix the dough in a bowl; then transfer to the straight-sided container. It stays in that container for the the remainder of the bulk fermentation — while you do all of the stretches and folds and while it rises till it’s nearly doubled in volume.
I made this bread today and it came out delicious!! I used 50% AP and 50% whole wheat. The dough was pretty wet but I baked it anyway. It took closer to 60 min in total but came out so delicious! Sour, tender spongy crumb and crispy crust.
Wonderful to hear this! Thanks for writing!
Hi Ali, thanks for the recipe! I gave this a bake today but the crumb came out quite wet and doughy.. exterior was deliciously crispy from the olive oil though!
I think I may have let rise to more than double (wishing I marked the side of my container to know for sure!!) as it rose overnight and I missed the timing. It is winter here. When I transferred to my loaf pan to rise (the pan was already quite full before rise) there was no doming but just some big gas bubbles. When I baked it I used my thermometer and it reached 210F but there were still crumbs sticking to the probe.
What do you think went wrong? Over fermented? Too much water? Not enough oven time? Thanks!!
Hi Jenny! It’s possible your dough over fermented during the bulk fermentation. When you shaped it and transferred it to the loaf pan, did the dough have strength and elasticity? Or did it feel totally slack and without strength?
When you were doing the stretches and folds, were you able to create strength and elasticity in the dough?
It’s possible you do need to reduce the amount of water.
What size is your loaf pan?
Thanks for your reply! It was pretty slack and sloppy when I was shaping. Stretch and fold were fine, was very elastic. My loaf pan has the same dimensions as yours at the top but the base is a little smaller. How much do you recommend I reduce the water by?
Ok, yes, it sounds as though the dough over fermented if it was very slack and sloppy. Sticky is one thing; slack is another. I would keep an eye on the bulk fermentation next time and be sure to shape it before it doubles in volume.
Next time I would cut back 50 g of water. Keep me posted if you give it another go!
Just had a couple quick questions..
You didn’t use any yeast for this recipe??
And also, I store my starter in the fridge. Would you take it out, feed it normally, then leave it out until doubled in size, then prepare it for the recipe?
Hi Chris!
No yeast in this recipe.
Regarding feeding your starter, this is what I do: I discard most of it (I only keep about 100 g of starter on hand total), leaving behind just 2-4 tablespoons or so; then I feed it with 60 g each flour and water. When it doubles (about 4-6 hours later), it’s ready to be used in a recipe, and I scoop out the amount required. Then I replenish my starter with about 40 g each flour and water and return it to the fridge.
Is your starter very active? As in, does it double in volume within 4-6 hours of a feeding?
thanks!
yea, it is very active. normally i’ve just been feeding it once a week with 1 cup flour and 1/2 cup water, letting it rest for 2 hours and then putting back in the fridge.
and when i want to bake, i’ll feed it, let it sit at room temp for 12 hours, then do a final feed depending on the recipe and go from there. but i’ll try it this way and see how it goes!
OK, great, keep me posted! Also: are you using a scale when you are measuring your ingredients for sourdough loaves?
Haven’t used a scale. Just been using measuring cups, spoons, etc.
OK, great. Chris, you seem committed to sourdough, and bc of this, I can’t recommend investing in a digital scale enough — it will change your baking forever. This one is reasonably priced and works beautifully.
Hi Ali 😊 Thanks for another great recipe! I recently piggy-backed on an older comment because I had a similar question. You gave very good advice regarding timing and cold fermentation! If any readers want to make HALF of this recipe with all AP flour, I had great success with an 8 1/2 x 4 1/2 in loaf pan. This pan size will yield more “petite” slices, but still very appropriate for sandwiches. I also took the advice you gave other commenters regarding reduced water when using all AP flour. For half a recipe, I used 190 g water. My starter is 100 % hydration. The result was just what I was looking for. Thank you!
Oh Erin, so wonderful to hear this! Thanks so much for writing and sharing your notes — so helpful for others who are looking to make a smaller loaf.