
Easy Sourdough Sandwich Bread
This post may contain affiliate links. Please read my disclosure policy.
As I mentioned a few weeks, a number of requests about how to make my mother’s peasant bread with a sourdough starter encouraged me to dip my toe into the wonderful world of naturally leavened breads. You can read more about that experiment here, which led to this simple sourdough focaccia recipe, an adaptation of my favorite yeasted, refrigerator focaccia.
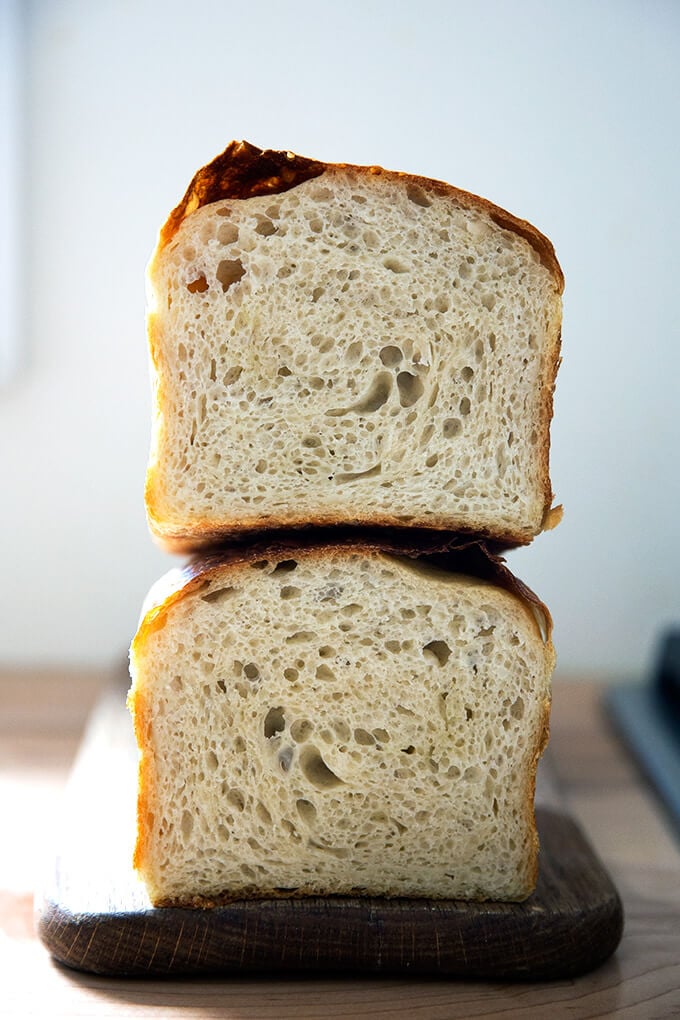
It also led to this sourdough toasting bread, which is essentially the same formula, just baked in a different vessel and without the slick of oil and sprinkling of sea salt on top. I’ve been making this bread even more often than the focaccia these days because I love the shape: it’s so nice for morning toast and for sandwiches.
PS: How to Build a Sourdough Strater from Scratch
PPS: How to Activate, Feed, and Maintain A Sourdough Starter
Simple Sourdough Toasting Bread: What You Need
- A sourdough starter. I recommend buying one (read why here). But if you’re up for it, you can make one from scratch in just about a week.
- Time. As with the focaccia, this bread rises first for about 6 to 18 hours (depending on the time of year and strength of your starter), then again for another 4 to 6.
- A large loaf pan. I’ve been using this 10 x 5-inch loaf pan. If you only have two smaller loaf pans, such as 8.5 x 4.5-inch pans, you’ll need to split the dough in half after the first rise.
That’s it! Ready? Here’s the play-by-play:
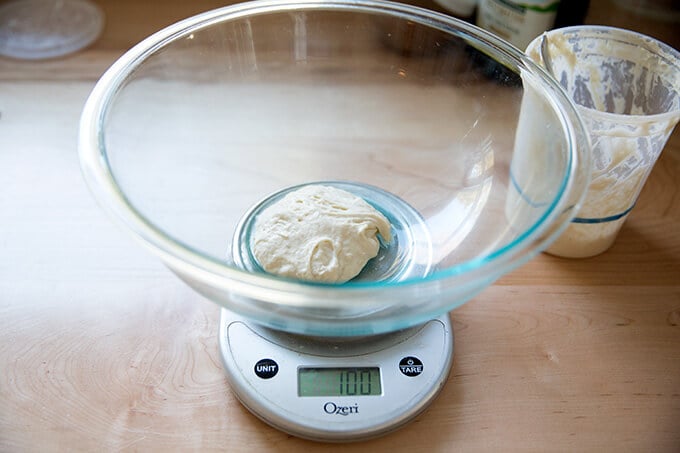
As always, when mixing sourdough doughs, it’s best to weigh everything with a digital scale. Start with 100 g starter. (If this looks familiar, it is: this is the same basic process for the sourdough focaccia.)
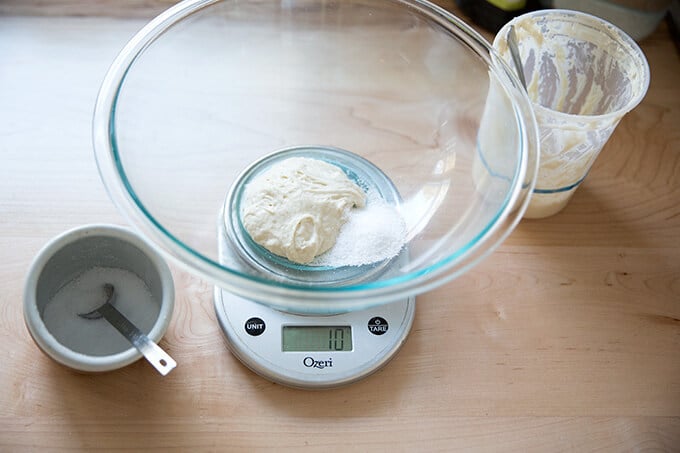
Add 10 g kosher (or other) salt.
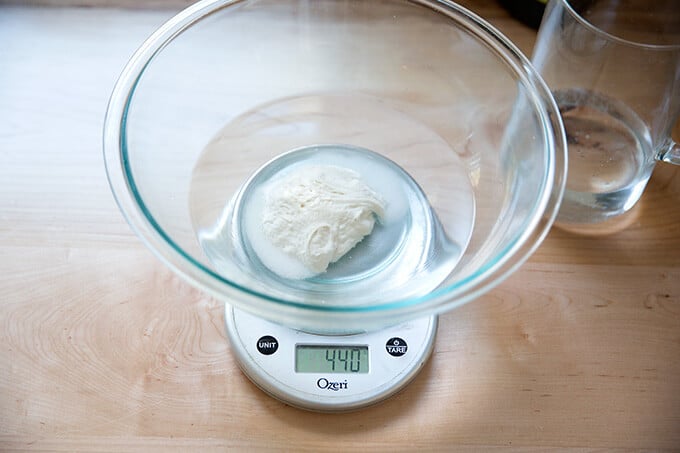
Add 430 g water. (Or less, see recipe for notes.)
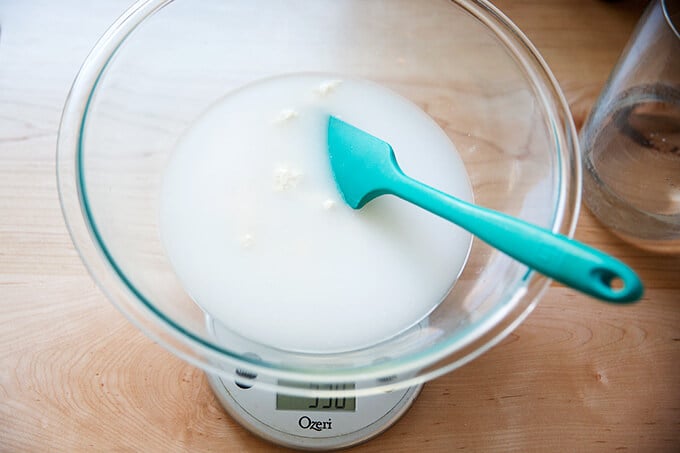
Stir to combine.
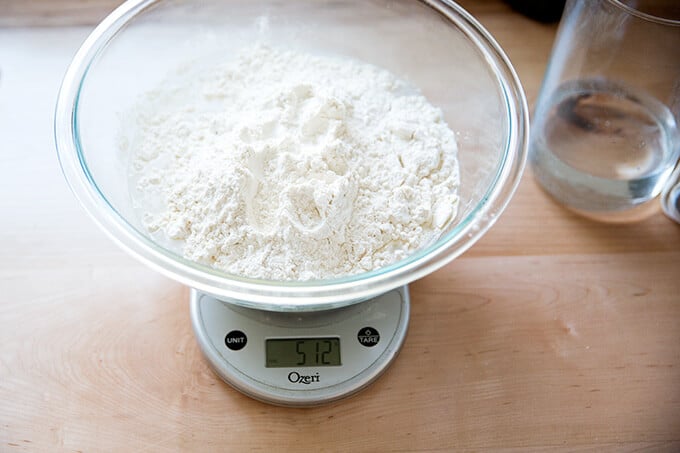
Add 512 g bread flour.
Stir to form a sticky dough ball.
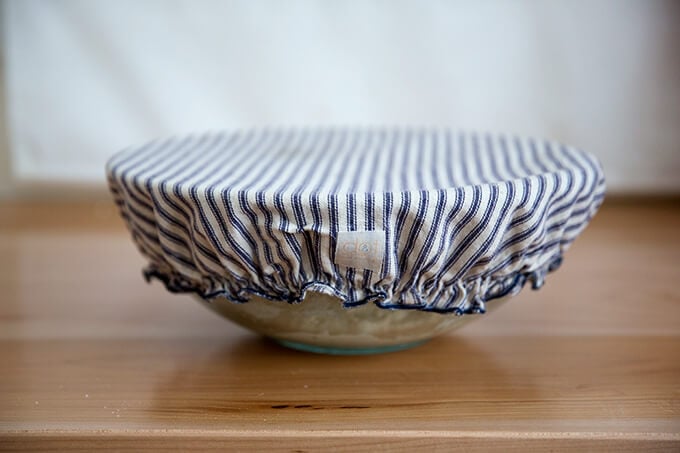
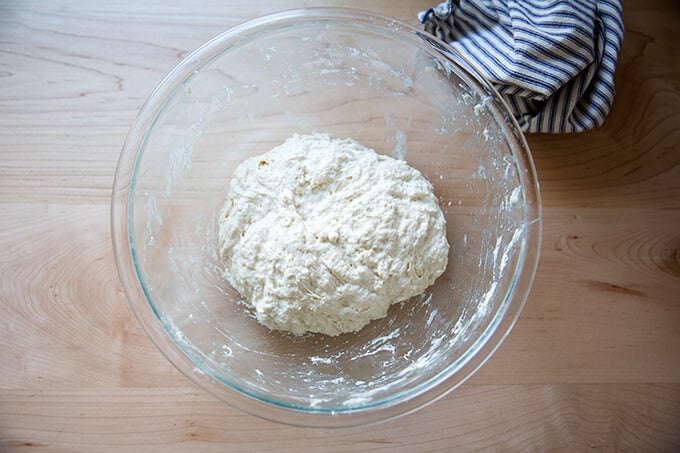
Cover with a towel or bowl cover, and let rest for 30 minutes. Then, perform a series of stretches and folds. See video for guidance. Repeat this 3 more times for a total of 4 sets of stretches and folds during the first two hours. Then, let rise for 6 to 18 hours* (see recipe notes) at room temperature:
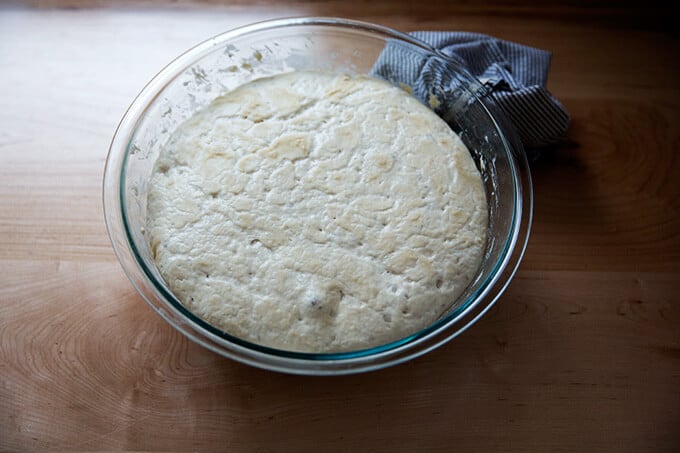
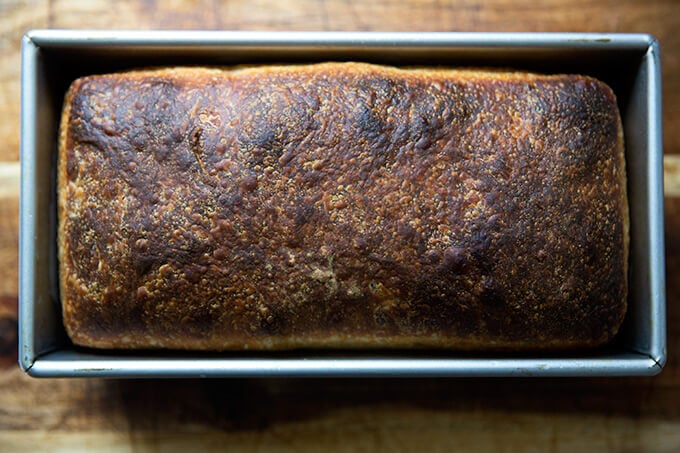
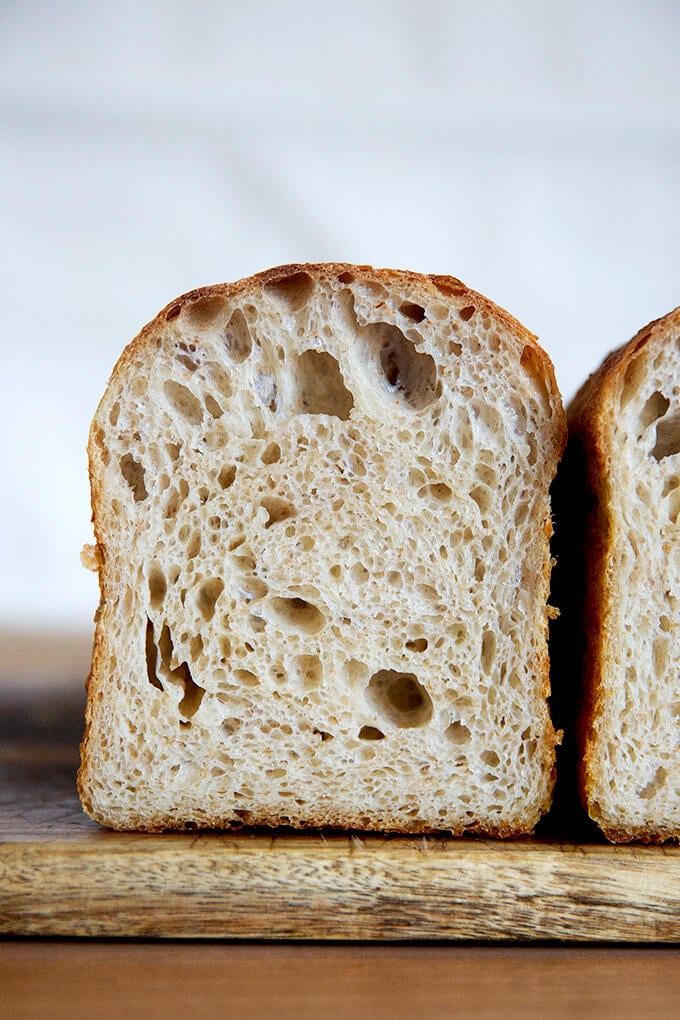
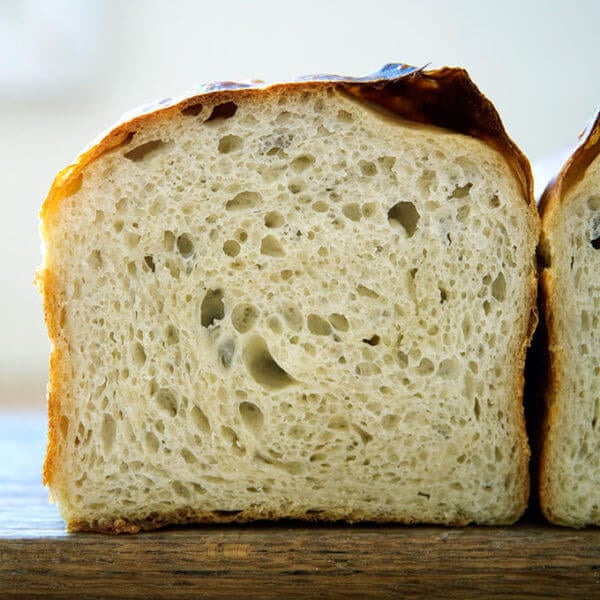
After 6 – 18 hours, it will look something like this:
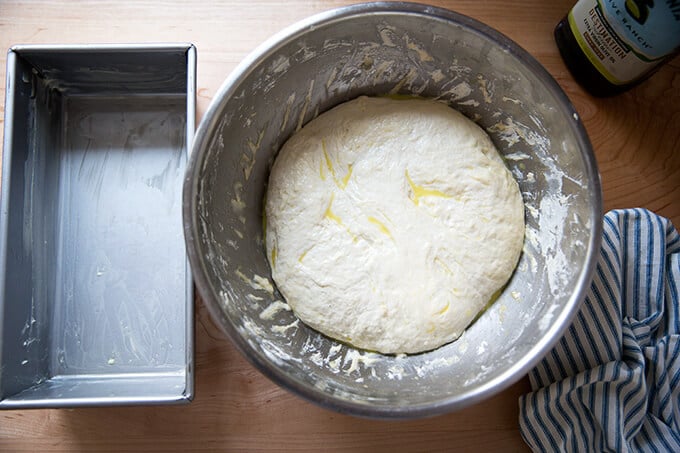
Drizzle the surface of the dough with a little bit of olive oil; then fold the dough inwards from the sides to deflate.
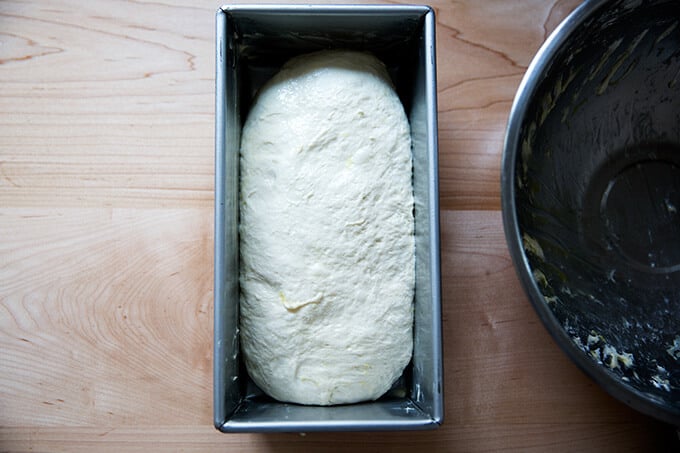
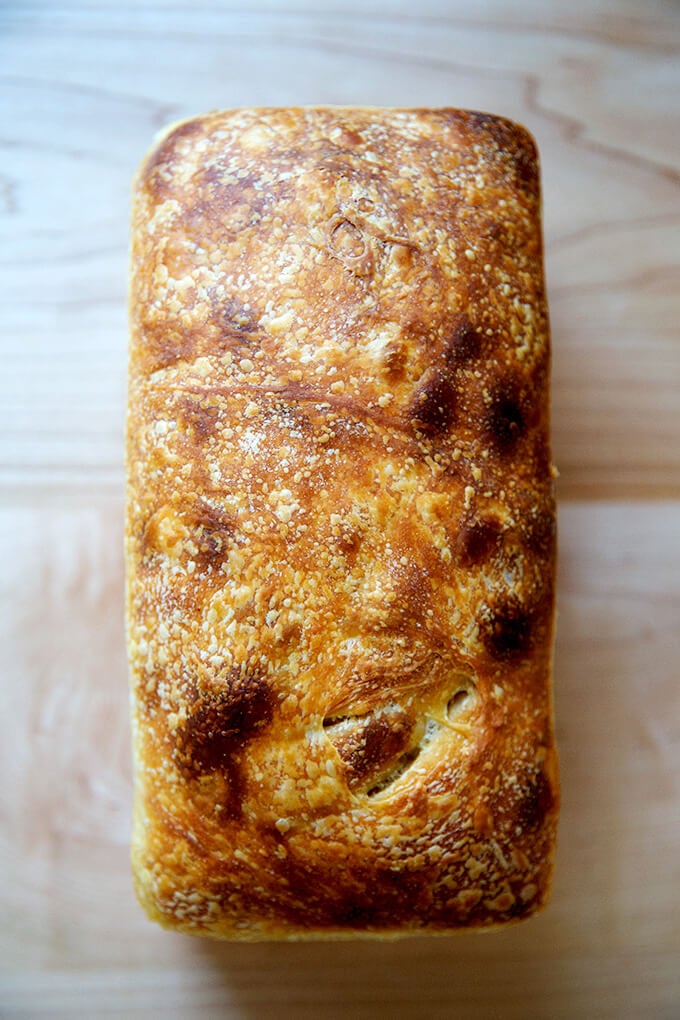
Transfer dough to loaf pan.
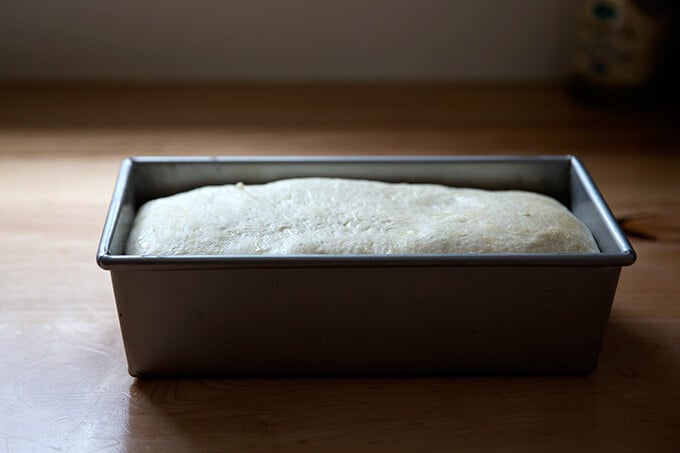
Let rise till dough just begins to crown the rim of the pan, about 6 hours.
Bake for about 45 minutes.
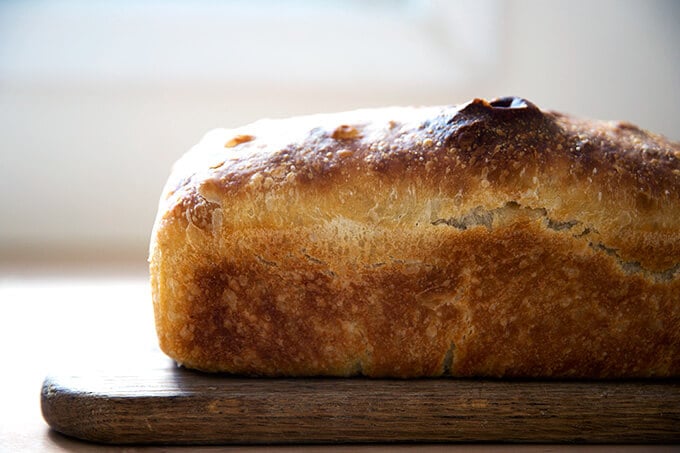
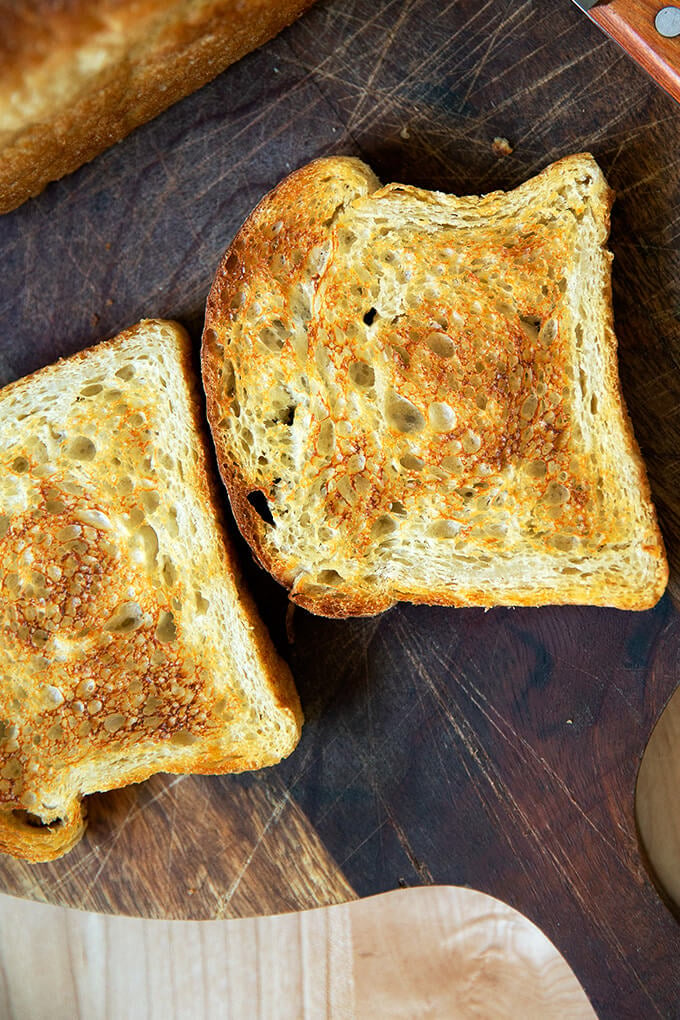

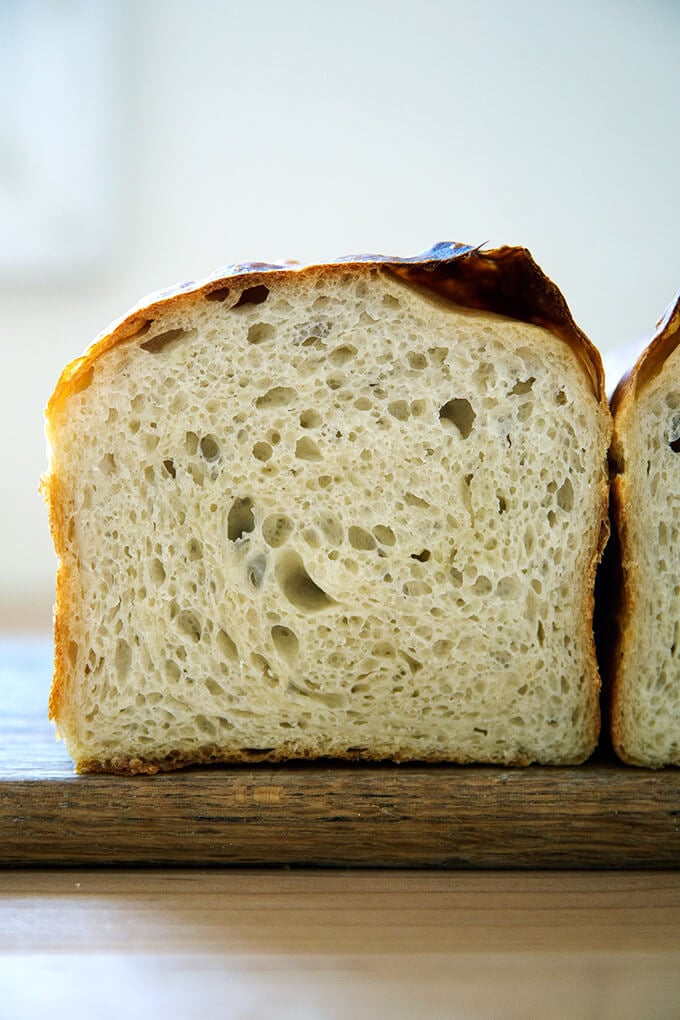
I baked this loaf in a tall-sided pullman loaf. Love the shape!
Easy Sourdough Sandwich Bread
- Total Time: 24 hours 40 minutes
- Yield: 1 loaf
Description
** UPDATE: VIDEO GUIDANCE IS HERE **
The makeup of this dough is the same as this sourdough focaccia. Here, the dough is baked in a loaf pan, and there is no sea salt on top.
This recipe yields one large loaf. You’ll need a 10 x 5-inch loaf pan, such as this one. If you only have two smaller loaf pans, such as 8.5 x 4.5-inch pans, you should probably split the dough in half after the first rise.
Plan ahead: This dough rises first for 6 to 18 hours (or less if it is super hot out or if you live in a humid area) or until the dough doubles in volume; then again for about 4 to 6 hour or until the dough crowns the rim of the baking vessel.
Troubleshooting: If you have issues with your dough being too sticky, please read this post: Why is my sourdough so sticky? The 4 common mistakes.
If you’re just getting started with sourdough, check out this post first. You’ll find tips there on procuring a starter as well as how to feed it and maintain it. If you’re up for making your starter from scratch, you can do so in just about 1 week.
Water: Chlorine in water can adversely affect sourdough. Leaving water at room temperature for 24 hours will allow most of the chlorine to escape. When I am in the habit of making sourdough bread, I fill a large pitcher with water and leave it out at room temperature. I use this for my sourdough breads and starter. Truth be told, I’ve used water straight from the tap and have not noticed a difference.
Water quantity: Also, depending on where you live and the time of year, you may need to cut the water back. If you live in a humid environment, for instance, I would suggest starting with 400 g or 420 g water. If you are not using bread flour, you also may need to cut the water back a bit. So much success with sourdough relies on getting the water quantity right.
Starter: I use a 100% hydration starter, meaning it is equal parts by weight flour and water. If you need guidance on how to maintain a starter, see this post.
Ingredients
- 100 g (about 1/2 cup) active starter, see notes above
- 10 g (about 2.5 teaspoons) kosher salt
- 430 g water, (or less, see notes above) room temperature
- 512 g (4 cups) bread flour, such as King Arthur Flour
- a few tablespoons extra-virgin olive oil
- room temperature butter, for greasing
Instructions
- Mix the dough: Place the starter, salt, and water in a large bowl. Stir with a spatula to combine — it doesn’t have to be uniformly mixed. Add the flour. Mix again until the flour is completely incorporated. If you have a straight-sided vessel, transfer the dough to it — it really helps monitor the rise and allows you to see the true growth in volume of the dough.
- Perform one (or more) “folds”: 30 minutes after you mix the dough, reach into the bowl and pull the dough up and into the center. Turn the bowl quarter turns and continue this pulling 8 to 10 times. See video for guidance. If time permits, repeat this “folding” step every 30 minutes for the first two hours. (Note: even if you perform just 1 fold, your dough will be in good shape.)
- Drizzle with a splash of olive oil and rub to coat. Cover bowl with a tea towel or bowl cover and set aside to rise at room temperature (70ºF/21ºC) for 4 to 18 hours — if it is super hot out or if you live in a humid environment, it may only take 4-6 hours. When the dough has nearly doubled in volume (or UPDATE: increased in volume by 50%, which is when I now end the bulk fermentation), it is ready. (Note: Do not use an oven with the light on for the bulk fermentation — it will be too warm. It is best to rely on visual cues (increasing in volume by 50% or doubling if you’ve had success with doubling) as opposed to time to determine when the bulk fermentation is done. A straight-sided vessel makes monitoring the bulk fermentation especially easy.)
- When the dough has nearly doubled, grease a 10 x 5-inch loaf pan with butter (or nonstick spray). Drizzle dough with a few tablespoons of olive oil. Rub your hands with a little bit of oil to coat. Use your hand to release the dough from the sides of the vessel, being careful not to completely deflate the dough. Video guidance here. Turn dough out onto a work surface. Quickly, shape the dough into a rectangle — I fold the dough envelope-style first; then I use a bench scraper to shape the dough into a rough rectangle. Transfer dough, seam-side down to prepared loaf pan and gently stretch into an oblong shape. (At this point, you can transfer the pan to the fridge if it makes sense with your schedule: rub the dough with oil and cover with a cloth bowl cover or plastic wrap. Transfer to the fridge will the next day. Then proceed with the recipe.)
- Leave alone for 5 to 6 hours or until dough begins reaching the rim of the pan — this may take less time when it is very warm out. Do be patient with this second rise: to get good height, the dough should be near the rim of the pan before you transfer it to the oven.
- Heat oven to 425ºF. Transfer pan to the oven and bake for about 20 minutes. Reduce heat to 375ºF. Bake for 20 to 25 minutes more or until golden all around. If you have an instant read thermometer, it should register 206-210ºF or so before removing. Remove pan from oven and turn bread out onto a cooling rack. Cool at least 30 minutes before slicing.
- Prep Time: 24 hours
- Cook Time: 40 minutes
- Category: Bread
- Method: Sourdough/Natural Leavening
- Cuisine: American
This post may contain affiliate links. Please read my disclosure policy.


898 Comments on “Easy Sourdough Sandwich Bread”
when this came out the oven this morning i could barely keep myself from eating half the loaf while standing in the kitchen. i’m new to breadbaking and have had mixed results with a lot of recipes, but this is the first one where i sliced off the butt, took a bite and immediately filled with excitement and soft, tangy, success!
since i only have one 8×5″ bread pan, i cut the recipe in half and just made 1 loaf. it turned out perfectly. thank you so much!!
So nice to hear this, Kim! And I hear you: it is impossible for a loaf of bread to last more than half a day around here … we’re like vultures when hot bread is around 🙂 🙂 🙂 Great to hear half a recipe worked out well.
I just got your book and i’m in love!
Quick question, could I somehow combine this recipe (which I’ve made countless times) with your cheesy cheddar and parmigiano bread recipe from your book?
So nice to hear this, Justine, thank you! And yes, absolutely. I would add the grated cheese after one set of stretches and folds. Let me know how it turns out if you make it!
Hey!
Thank you for your recommendation. I made it and it turned out amazing! I am wondering if I can do the same with your Simple Sourdough Bread (in the dutch oven).
Thank you!
You sure can! So great to hear it turned out well. Thanks so much for writing 🙂 🙂 🙂
Can I double this recipe?
Yes, absolutely!
I have made this bread at least 5x now and I will NEVER go back to buying sandwich bread at the store!!! I literally have one in the oven right now and I used 25% WWF and I can’t wait to see how she turns out.
Not only is the process of making your own bread really fun, but the bread is truly phenomenal. I use it to make buttered toast, avocado toast, tuna melts, cold cut sandwiches, etc and it never fails.
There is nothing like cutting a slice after it has cooled but while it’s still a little warm and spreading irish salted butter all over it. Thank you so much for teaching me how to do this, it has been such a fun and rewarding new skill to learn this year.
So great to hear this, Anna!! And YES to salted Irish butter … truly the best toast topper. Thanks so much for writing!
Hi Anna, just wondering how you went with 25% WWF, trying to get my son to eat WWF, we love your recipes Alexandra. We make the focaccia, bread and scrolls always come out perfect. Another yes to salted Irish butter. Thank you for your videos Alexandra.
So nice to hear this, Liz! Thanks for writing. Regarding WWF, I would just go for it. If you are worried about the texture, you could start with 12.5% whole wheat flour; then adjust the next time around based on your results.
Turned out beautifully! Great crumb, perfectly sour, and golden/crisp crust. My dough was a bit wet at 420 g of water using bread flour (I live in a dry climate, so I went for it), so next time I will drop the amount of water just a tad. Such an easy, enjoyable recipe. I love the accompanying video as well. Thanks, Ali!
So great to hear this, Jackelin! And yes, definitely play with the water amount. I find as the seasons change, I’m constantly tinkering with the amount of water to get the consistency just right. Thanks for writing!
Just a note about removing chlorine from water: Most public water is treated with Chloramine which is less volatile than chlorine and won’t just release over time. The easiest thing to do is use filtered water and not worry about the chlorine content. If your water has a strong odor even after filtering, buy a $1 jug of filtered (not Distilled) water at the store
https://www.hydroviv.com/blogs/water-smarts/chloramine-water-filter
Thank you so much for this, Bob! So helpful. Thank you for the link to the article as well. Reading it now!
Very lovely recipe.
Thank you for sharing and the videos really helped a new baker like me.
Question: can I do a cold rise in the fridge for the first rising?
Hi Ayesha! I would do at least some of the first rise at room temperature. That said, you could certainly stick the dough in the fridge first thing after mixing it, if the timing works better for you. You will likely need to do some room temperature bulk fermentation because sourdough doesn’t grow much in the fridge.
I have tried this recipe, I like it . But the bread turns out very sour, how to avoid this .?
Hi! After you feed your starter, how many hours (roughly) afterward are you using it in a recipe?
Hi, the starter was about few hours . I lets the Dough proved overnight in the table top , we are Summer now. After shaped, i let it proof for another 5 hours.
one more question, my bread turn out a little bit dense. can i know why?
Hi Layean! It’s possible your dough over fermented. I would shorten your bulk fermentation. You really don’t want the dough to grow beyond double during the bulk fermentation (less than double is ideal in fact). I can’t recommend using a straight-sided vessel for the bulk fermentation for this reason. Density can be a sign of over fermentation. It also might mean you are using too much water. You could try cutting back the water a bit.
Thanks for your suggestions. I will try and let you know 😉
I love the simplicity of this recipe after searching out many. My dough (I thought) was ready for pan so I put in fridge overnight but it never rose much next day and I accidentally left out overnight. Now what? Can it be revived or do I start over? What did I do wrong?
Thank you!
Hi Thea! Sorry for the delay here. What did you end up doing? How many hours was it left out in the pan?
Regarding what went wrong: are you confident in the strength of your starter? This troubleshooting post is a great place to start if you need help pinpointing where things may have gone wrong.
Sorry I’m late and thank you for responding within a day! I tossed first one and then redid and baked loaf even though it did not rise to top of pan, it tasted wonderful! I since bought a King Arthur starter and cannot believe how much simpler it is to get a good feed in and see bubbles and growth quickly. I will be doing another loaf of sandwich bread tomorrow. I also hate waste so I’m baking a lot but think I’ll start freezing some bread once I get ahead. I brag on your site and share with everyone interested in doing sourdough and more!. Do you do anything with making fermenting as the batches look similar and I want to move in that direction as well. Thea
Great to hear, Thea! And I know, sometimes the purchased starter is the way to go — it can make all the difference for someone. Freezing loaves is a great idea. They freeze beautifully. Regarding your last question, can you clarify what you mean by “Do you do anything with making fermenting?”
Many ferment food for health reasons – like eating sourdough bread is great for gut health – and since the process involves making a culture for food to ferment in, I wondered if if was similar and if you had done this with “modified” starter (so-to-speak). Hope that clarifies question
Got it, Thea, thanks for clarifying. I have not done much other fermenting apart from quick pickles and Kombucha, though I can’t take credit for the Kombucha… my husband does it all.
I just made this bread for the first time. It was simple to make, turned out perfectly, and tastes like a dream. I will definitely be saving this recipe!
So nice to hear this, Jill! Thanks for writing 🙂
Hello, thanks for this recipe! This is the first “successful” sandwich bread that I’ve made yet and I’ve had great success in other sourdough loaves. I just had a question on the density, my holes are quite tiny and when slicing the bread (after prolonged cooling) the bottom thin layer had a bit too much density, slightly gummy. My starter was ready and I bulked it until it doubled and then refrigerated overnight in the pan and the next morning, I let it proof for a few more hours in a proofing box at 78 degrees. It tastes delicious, I’m just wondering if its a shaping issue and I perhaps need to scale back on water since it wasn’t sticky but quite wet. Thank you!
Hi Samra! Sorry for the delay here. Great to hear all of this. And yes: I think you will have great success if you simply reduce the water by 25 grams or so. Your method and timing all sounds great.
No worries, thank you so much for the feedback, I will try this again!
This bread is delicious, even though I messed it up slightly. I didn’t have bread flour on hand, so I used all purpose. I apparently didn’t grease the pans well enough because I had to wrestle and mangle the bread getting it out. It still tastes GREAT, just isn’t in good shape to use for sandwiches. (Insert sad face here.) I let it proof in the bread loafs overnight and it over proofed and spilled out onto the counter. I degased (right terminology?) it and put it back in and let it rise again, then baked it. Smells delish, tastes delish, just looks mangled. Any tips for next time? More oil in my pans? What about parchment? Can I use parchment to line my pans to make it easier to lift the loaves out?
Hi Tracy! Great to hear this, or most of it anyway 🙂
OK: A few thoughts:
1. Butter. Butter (or nonstick spray) will provide a nonstick barrier. With some pans, oil is enough; with others, you have to butter or grease it first.
2. Parchment will definitely work, too.
3. Know this: you can always put your pan in the fridge with the dough in it overnight and pick up where you left off in the morning. I like to tuck the pans into some sort of bag — produce bags work great — or be sure to slick the top with oil to prevent a crust from forming.
If you think you cannot bake this great bread and more with a convection microwave, think again! I live f/t in my RV and made it and more! For this recipe, I dropped temp 25 degrees each time and got perfect bread! Thank you, Ali.
Wow, Thea, this is amazing! Thanks so much for writing and sharing this.
Hi Thea…I have a convection microwave but have never used that function. Could you share the time and temps for this recipe?
My loaf of was AMAZING! Best recipe ever.
Now hoe did your trial with WWF go? could I also try spelt or rye?
Hi Francesca! Great to hear. I have had success using a small amount of wwf here: 25 g stoneground rye + 25 g stoneground red fife. It’s a tiny amount, but it makes a difference. I think you could probably successfully use up to 100 g of ww flour here.
Yes to spelt! Rye: I would start small: no more than 25 g to start.
Hi! My family and I absolutely love this recipe. Your videos are so easy to follow and the bread is so delicious. One question – would it be okay if I scored the top of the bread before putting it in the oven? Thanks so much!
Hi Erica! Yes, you definitely can. I find scoring room temp dough a little tricky, but if you have a sharp blade and use a swift motion, it should work just fine.
Amazing, my family devoured this! So easy to make, time consuming but worth it. Just plan ahead.
Great to hear, Allie 🙂
Made this for the first time tonight – lovely sour taste, lovely texture! The only thing I’d like to change is the colour of the crust – it looks anemic, kind of reminds me of Lord Voldemort! Any ideas for next time?
Hi Sarah! Great to hear. Question: what type of flour are you using?
One thought: After the bulk fermentation, shape the dough, stick it in your prepared pan, slick it very lightly with oil, place the pan inside a bag — a produce bag works well — and tie a knot. Stick this package in your fridge for 24 hours (or 12 to 14 hours); then remove the pan from the fridge and let it rise until it begins to reach the top of the pan.
The cold fermentation might improve the color, because during that time in the fridge, the enzymes in the flour and yeast have time to break down the starches in the flour into simple sugars, which contribute both to flavor and to browning. Hope that makes sense!
Thanks for your reply! I’m using Anita’s Organic APF (12.5% protein content, I believe). I will try your suggestion and report back!
Oh, great to hear! I was mostly just checking to make sure it wasn’t bleached flour. Good luck!
Thank you for the excellent recipe! I have made this bread nearly a dozen times and it’s always super tasty! Nice sourdough flavor. Great texture. Just lovely bread.
I have made a couple of changes to the process I thought I’d share. I mix the dough and put it through 3 or 4 folds over 2 hours. Then let it relax for an hour or so. Then I oil coat it, cover bowl with plastic wrap and park the dough in the fridge for a long bulk fermentation. I leave it in there anywhere from 2 to 5 days. When I’m ready to bake I pull it out–all big and bubbly now–and gently shape and put in pans while still cold. Then I cover pans with a cloth and let warm up and rise 4 to 6 hours. Then bake as you direct.
Love this Noel! Thanks so much for sharing your timeline. I love how you can use the refrigerator with sourdough to make it work with your schedule. Thanks so much for writing!
I made this recipe twice,. The first time I used my 9×5 loaf pan and left it out overnight to rise. Don’t do that. It rose all over my kitchen. Then I made 1-1/2 times the recipe and used two loaf pans, refrigerated it overnight then let rise the next day. It took forever in my cold house but I love the bread. It has a texture that is crunchy outside and soft but with lots of body inside. It holds up very well as a sandwich bread. Very tasty.
My only question is how I should prepare the pans? I have non-stick but the loaves were a little difficult to get out.
So great to hear this, Laura! Regarding the pans: I find a generous coating of butter does the best job of providing that nonstick barrier. Nonstick spray will also work. Olive oil alone, with certain pans, won’t provide that nonstick barrier.
Glad you found a method that works! I love doing the cold proof for this bread in the loaf pan as well. Thanks for writing!
I love this recipe, I’ve made it twice and it’s soo good! and the kids love it too.
I have tried twice your other rye and white sandwich recipes but I must be getting something wrong because they did’t work. I will try again tho :- )
Hi Francesca! So great to hear. Which other recipes are you referring to? I don’t have a rye and white sandwich bread recipe on the blog … unless I’m losing my mind 🙂 🙂 🙂
Hi, they’re from your book.
X
Oh, OK! If you are up for giving them a go, try them without the oil — I almost never add oil to any of my breads anymore. With the rye, too, depending on the variety of rye flour you are using, you may need to cut the water back a teensy bit. I soooo wish I had included weights for the water/liquids in my book. Alas.
Hey Alexandra,
I have been baking this bread almost every week for the past 6 months and absolutely love it.
However, off late my bread has been cracking a lot. First, during the final proof in the pan it cracks when it rises and then in the oven too. Any idea why that may be happening ? I have not changed the flour or anything else.
Hi Geetika! When you say crack, do you mean the dough splits on the top? I’m wondering if you cut the water back a little bit that might help? When the seasons change, I often find I have to adjust water levels. Sometimes using 20 g more or less of water will bake a big difference.
Thank you so much.
I have made this recipe at least a dozen times and it is always wonderful. Recently I used 10g. of rye, 15 grams of cornmeal, 60 grams of sprouted wheat and 427 of bread flour. I seeded the outside with poppy, sesame, pumpkin and sunflower seeds. So delicious. I’ve also made your easy SD focaccia at least a dozen times, sometimes making two smaller pans to give away. Such a great gift. Thank you for your wonderful site and recipes.
So nice to hear this! Thanks so much for writing. I love playing around with the flours as well … a little bit of rye is so good!
This bread is delicious and so easy to make!
One question though – the crust of my loaf cracked quite a lot as it rose in the oven. The cracking is mostly around where the loaf lifted up from the rim of the pan. Do you think scoring the top of the bread next time would help? Or any other tips to minimize the cracking?
Thanks for the amazing recipe!!
Hi Sami! Great to hear. You could try scoring the bread, though I find scoring a room temperature dough to be very hard. A few thoughts: You could try reducing the water content slightly. And when you shape the dough (as shown in the video), you could shape it more tightly — try getting a little more tension before you transfer it to the loaf pan. Another thought: after you transfer the pan to the loaf pan, you could try doing a cold proof by sticking the pan into a plastic produce bag and transferring it to the fridge for 8 to 24 hours; then pick up where you left off, letting the dough rise at room temperature until it nears the rim.
I split my dough In half to fit into the 8.5 inch pan. Will it be the same baking time as with the 10 inch pan?
Thank you!
Hi Jill! It might take a little bit less time. I would just keep an eye on it. I would imagine it will take 35 – 40 minutes or so.
Thank you for the quick response. I have it in the oven right now, so excited to try it!!!
Hi Alexandra,
I tried this recipe today and it came out really good. Super soft inside and slightly crunchy on outside!
Thank you for the simple recipe.
My previous (4) attempts at sourdough baking were a disaster. Your tips on troubleshooting really really helped me understand what was going wrong. I was able to buy an amazing starter and turns out that made all the difference.
Thank you for the wonderful recipe!
Oh Yay! Wonderful to hear this, Sailaja! Thanks so much for writing and sharing all of this 🙂
Thank you for this recipe! I love the bread I made with it! Do you think I could substitute some whole wheat flower in there when I make this bread again? Thanks!
Great to hear! And yes, absolutely. I always suggest starting small: use 1 cup (128 g) whole wheat flour and 3 cups (384 g) ap flour; then adjust with more whole wheat flour next time around based on your results.
Hey Ali I just made the dough and giving the folds for 2hrs..iam a newbie for baking sourdough sandwiches. So my question is I want this bread very very mild taste of sourness so what can i do with the fermentation and rises to reduce the sourness? Thank you
Hi Sai! There are a few things you can do to make it less sour, which you can find in this troubleshooting and FAQ post: Why is my sourdough so sticky? 4 Common Sourdough Mistakes + Answers to FAQ’s
Jump to the FAQs! Let me know if there is anything else.
This recepie is awesome! Would I be able to add seeds to this? Or would it throw everything off? Thank you very much for the recipe!
Definitely! Add them right to the flour.
This is, without a doubt, the best bread I have ever eaten in my life. It is so easy to make it’s almost embarrassing to say you’re making bread. I have to double the recipe and make two loaves at a time because the first one is gone within 24 hours. I never knew making bread with four simple ingredients could be this delicious and easy. I do adjust the water, as suggested because I use all-purpose flour and not bread flour as well as long sandwich loaf pans. I have also added more started and adjusted accordingly. It is beautiful every single time. Thank you for the fantastic recipe and for all of the instructions and suggestions. It is easy to tackle sourdough because you leave no stone unturned.
Oh Sherry! This is so wonderful to hear. Thanks so much for writing. I appreciate you sharing your notes and noting that you used less water — sourdough is all about finding that sweet spot in regard to using the amount of water that is right for you given the flour you are using and environment, too. So happy you love this one 🍞🍞🍞🍞🍞
Hi Ali, I successfully made this sourdough bread thanks for all the detailed instruction they were very helpful. I m knew on sourdough making and I m so happy that I find you. now I m consedering to get the pullman pan can you please kindly tell me which size should I get for this specific recipe small medium large?
Hi. I don’t have a scale to measure the water…How much water should I use? I am in a dryer climate. Thanks so much
Hi Becky! It’s about 1.75 cups water.