
The Best Double Chocolate Cake with Black Velvet Icing
This post may contain affiliate links. Please read my disclosure policy.
 or to snack on with your morning coffee! // alexandracooks.com")
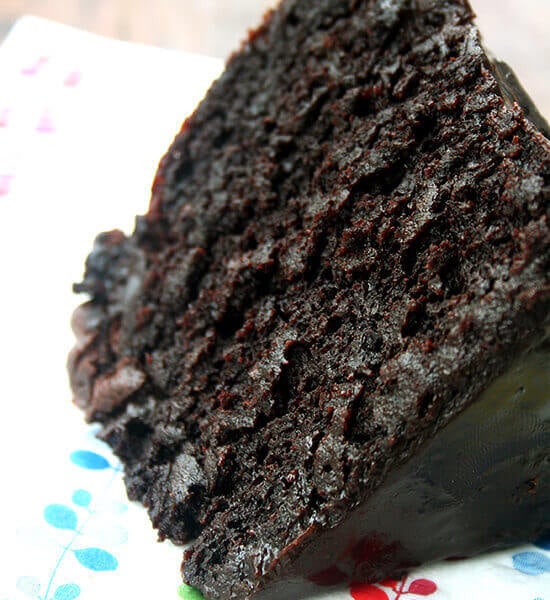
This double chocolate cake is everything a chocolate cake should be: fudgy, moist, intensely chocolaty. When assembled into layers with chocolate ganache slathered in between, as the original recipe instructs, this cake becomes the perfect birthday finale for any chocolate lover; when topped with black velvet icing, as pictured here, this cake becomes an elegant dessert, a perfect treat to enjoy with morning coffee or afternoon espresso.
Why Is This Cake So Good?
A few things:
- Unsweetened cocoa powder, which imparts a deep, intense chocolate flavor and a rich, fudgy texture.
- Buttermilk, the magic ingredient in many a cake, namely this buttermilk blueberry breakfast cake.
- Oil (as opposed to butter), which keeps cakes incredibly moist (read: The Case For Making Cakes with Oil as Opposed to Butter).
The difference between Dutch-process and natural cocoa powder:
This info comes from Regan Daley’s In the Sweet Kitchen:
- Natural cocoa powder is produced if virtually all of the cocoa butter is removed from the cocoa liquor, leaving a dry cake that is then ground to a fine powder. Natural cocoa powder is quite acidic, so can be used as the necessary acid to activate baking soda in leavened baked goods, if present in sufficient quantity. Because of its high acidity and unpalatable bitterness, natural cocoa powder is best used only in baked or cooked desserts.
- Dutch-process cocoa (also called alkalized cocoa powder) has been treated with a small quantity of an alkaline solution to reduce the natural acidity. The process darkens the cocoa’s color, making it rich, often redder brown, and gives it a smoother, more mellow flavor.
- Both natural and Dutch-process cocoa have had about 75% of the cocoa fat removed.
- Although some recipes can be made with wither form of cocoa powder, many rely on the properties of one or the other. For this reason, be careful when substituting Dutch-process for natural and vice versa. In recipes for baked goods using baking soda as the leavener in which no other acid is present, Dutch-process cocoa is not appropriate as it does not contain sufficient acid to activate the baking soda. (You could use Dutch process for natural cocoa but an additional acid such as cream of tartar would need to be added.) Similarly, using natural cocoa powder in a recipe originally calling for Dutch process cocoa may cause the mixture to become overly acidic. Adding a small amount of baking soda, or increasing the amount already called for, will compensate for this.
- Natural cocoa is better for brownies, old-fashioned chocolate cakes and simple chocolate cookies. Dutch-process cocoa, more palatable than natural cocoa when raw, is good for icings, custards, creams and sauces that will not undergo further cooking. It has a more subtle, delicate flavor, one well suited to many to many elegant European-style cakes, biscuits, pastries and creams, and in any recipe where an overt, sharp chocolate flavor would overpower more delicate flavors. It is very good in nut cakes and ice creams, where a refined, un-bitter chocolate taste can complement the soft flavors of the other ingredients.
- If the cocoa will be tasted raw, as it is when dusted on cakes, cookies or truffles, opt for Dutch-processed. If the recipe is for a traditionally rich and fudgy baked good, use the stronger flavor of natural cocoa powder.


 or to snack on with your morning coffee! // alexandracooks.com")

Double Chocolate Cake with Black Velvet Icing
- Total Time: 2 hours 10 minutes
- Yield: 10 to 12 servings
Description
Adapted from: Gourmet via Epicurious
Notes:
- The original recipe calls for making a chocolate ganache, which sounds heavenly, but I have always adored my grandmother’s chocolate glaze recipe — it’s called black velvet icing and it contains eggs, which is odd, but it’s so good — so that is the one I use. If you want to use Gourmet’s chocolate ganache, find it here.
- Some commenters have found the amount not to be enough for a full cake, so I’ve updated the quantities below to be a double batch, which should leave you with more than enough icing.
- If you want to make a half recipe, see this post: Gourmet’s Double Chocolate Cake, Revisited. I love these 6-inch cake pans for making half recipes of all sorts of cakes, namely this one. You need two.
Ingredients
for the cake:
- 3 ounces (85 g) fine-quality semisweet chocolate
- 1 1/2 cups hot brewed coffee
- 3 cups (648 g) sugar
- 2 1/2 cups (320 g) all-purpose flour
- 1 1/2 cups (144 g) unsweetened cocoa powder
- 2 teaspoons baking soda
- 3/4 teaspoon baking powder
- 1 1/4 teaspoons salt
- 3 large eggs
- 3/4 cup vegetable oil
- 1 1/2 cups well-shaken buttermilk
- 3/4 teaspoon vanilla
for the black velvet icing (*updated to a double recipe April 2020, see notes above):
- 8 oz semi-sweet chocolate
- a heaping 1/2 cup of confectioners’ sugar
- 6 eggs, well beaten
- 8 tablespoons butter, room temperature
Instructions
- Make the cake: Preheat oven to 300°F. and grease two 9- or 10-inch by 2-inch round cake pans with unsalted butter or nonstick spray. Line bottoms with rounds of parchment paper. Finely chop chocolate and in a bowl combine with hot coffee. Let mixture stand, stirring occasionally, until chocolate is melted and mixture is smooth.
- Into a large bowl sift together sugar, flour, cocoa powder, baking soda, baking powder, and salt. In another large bowl with an electric mixer, beat eggs until thickened slightly and lemon colored (about 3 minutes with a standing mixer or 5 minutes with a hand-held mixer). Slowly add oil, buttermilk, vanilla, and melted chocolate mixture to eggs, beating until combined well. Add sugar mixture and beat on medium speed until just combined. Divide batter between pans (being sure not to fill pans higher than 2/3 full—they will overflow if you do; it’s not worth it) and bake in the middle of oven until a tester inserted in center comes out clean, 1 hour to 1 hour and 10 minutes.
- Meanwhile, make the icing: Because several commenters have had trouble, with the icing, I am suggesting you use a double boiler. If you know how to set up a double boiler, do so; otherwise, fill a pot with an inch of water. Place a medium bowl over top. Turn the heat to medium. Place the chocolate in the bowl. Once it has melted, stir in the confectioners’ sugar, whisking until smooth. Stir in the eggs a little at a time, whisking vigorously after each addition — a flat-bottomed whisk is good for this. (I use a whisk until the ingredients are blended and then switch to a heat-proof spatula.) Cook over low to medium-low until thick. Stir in the butter one tablespoon at a time. Set aside to cool. Transfer to a glass measuring cup with a spout for easy pouring or store in whatever vessel you wish.
- Cool layers completely in pans on racks. Run a thin knife around edges of pans and invert layers onto racks. Remove parchment paper. Cake layers may be made 1 day ahead and kept, wrapped well in plastic wrap, at room temperature.
- If you are making a layer cake, halve each cake round crosswise to create 4 layers. Spread icing over one cake layer. Top layer with other cake layer. Repeat until all layers are stacked. Pour icing on top of top layer and with an off-set spatula (if you have one) spread it all over the sides. Cake keeps, covered and chilled, 3 days. Bring cake to room temperature before serving. (I keep mine at room temperature always…there’s never space in the fridge.)
- Prep Time: 30 minutes
- Cook Time: 60 minutes
- Category: Dessert
- Method: Oven
- Cuisine: American
This post may contain affiliate links. Please read my disclosure policy.


436 Comments on “The Best Double Chocolate Cake with Black Velvet Icing”
I made a few mistakes and some substitutions when making this cake. The biggest mistake, against my better judgement, was using a springform pan. Yikes! During the first few minutes of baking, some of the batter did seep out from the bottom of the pan 🙄. I also baked at 350F because currently the oven’s digital touchpad is not responsive. I wrapped the cake pan’s side using a cake wrap (hoping to offset the higher baking temperature) and naturally, I reduced the total baking time. Not having any buttermilk, I used 1/3 full fat Greek yogurt (because that’s the amount I had) and 1/3 diy buttermilk. Suprisingly, the cake turned out well 🙂.
The ganache recipe is fabulous, especially when allowed to set a bit and then whipped up with a little bourbon! This was piped on the middle layer and the entire cake was crumb coated with the remaining ganache. I opted to go with a chocolate mirror glaze (cocoa powder, gelatin leaf, heavy cream..) cake exterior for the long lasting ‘shine’ and stable nature. And, as I wanted to add halved strawberries on top, the mirror glaze completely preserves the strawberries for quite a long time.
Thank you for sharing this recipe, as it inspired me to create an impressive birthday cake that everyone loved ❤.
So nice to read all of this, Ang! Except, of course, about the leaking springform pan… the worst! I’m so intrigued by the chocolate mirror glaze and would love to learn more if you have the time. Sounds lovely!
(adapted from recipetineats – youtube)
Chocolate Mirror Glaze
Note: It’s important that your cake’s surface be smooth and frozen to semi frozen.
I semi freeze a cake that has a (thin layer, my prefetence) ganached layer on top and sides before pouring on the prepared chocolate mirror glaze.
Step 1 Prepping Ingredients
– In saucepan combine:
1 cup sifted unsweetened cocoa with 2/3 cup water
– Stir until it forms a thick paste.
ADD
2/3 cup heavy cream/ cream and
1 cup + 2tbsp superfine sugar
(I used regular sugar)
Stir well to combine. Set aside.
(It will be THICK)
Step 2 Blooming Gelatine Leafs
– Place 7.5 gelatine leafs in a bowl of cold water (making sure they’re not clumped together.)
Requires a maximum of 5 minutes for it to bloom/ soften*)
Step 3 ..in the meantime
– Place saucepan on medium (then medium high) heat slowly bringing the ingredients to a boil.
(note: I use a heat-proof silicone spatula to slowly stir & ensure that all of the sugar has melted, once melted turn on medium high heat)
– Remove from heat when the mixture comes to a boil.
Step 4 Squeeze out water from gelatine leafs using your hands
And add them to the cocoa sugar mixture slowly stirring to dissolve the gelatine.
Step 5 First straining & Cool to 86 degrees/ 94 degrees*, meat thermometer will do!
-Strain the mixture through a fine sieve (keeping the strainer low to the bowl so as to avoid the formation of air bubbles)
Place plastic wrap directly on the surface of the glaze. Set aside to cool. Approx. time 2 hours*
Step 6 Second Straining (ensuring no air bubbles)
-Strain the glaze again when the it has reached or is close to the given temperatures in to a spouted (glass measuring cup/other) container.
Step 7 Prepping to Glaze
– Set your cake on an overturned, slightly smaller, cake pan that is placed on a cooling rack that is set on a large clean (oven) tray to catch the drippings.
Step 8 Glazing the Cake
– Begin thinly pouring the glaze working from the cake’s top center spiraling outwards. To ensure the sides get covered pour close to the cake’s edge. The glaze is forgiving and a warm palette knife can smooth out any imperfections and used to wipe off the drippings from the bottom of the cake.
Step 9 Placing Glazed Cake onto Serving Platter/ Cake Round
TIP: I insert and leave a long offset spatula under the cake for the entire pouring of the glaze and with the help of a large knife carefully transfer the cake to it’s final resting surface.
The glaze will set in 10 minutes or so. A successful glaze will remain shiny both in and out of the fridge.
PS I added cut strawberry halves after the ganached cake was removed from the freezer, using a dap of reserved ganache to affix them in place. The mirror glaze will ensure they stay well preserved.
See recipetineats for further assistance! 🙂
Oh my goodness, Ang, THANK YOU!! This is awesome. I am deep in editing land for my pizza book, but as soon as I turn in my next draft, I am going to try this. I love Recipe Tin Eats! Thanks so much for taking the time to send this 🙂 🙂 🙂
🙂❤ I think you will love the Chocolate Mirror Glaze and the possibilities it presents.
PS Did I hear PIZZA!
So yum 🙂! I grew up making pizza in my family’s pizza restaurant.
Oh my goodness no way!!?? That’s amazing. Yes, PIZZA!!!
I forgot to clarify that I made the ‘half’ recipe (Gourmet’s Double Chocolate Cake with Chocolate Ganache ) and the diy buttermilk I used was 1/2 c along with the 1/4 c yogurt and not 1/3 and 1/3 as I incorrectly had written.
The cake will not be blackish just by using semi sweet chocolate or a good cocoa… you must specify Dutch process cocoa….. that is only way to get dark dark brown black color.
After I got the cakes in the oven and was getting ready to set my timer I noticed the comment ‘posted near the end of the recipe’ that the pans should not be more than 2/3 full. It would have been very helpful to post that instruction nearer the beginning of the recipe so that I wouldn’t have had to pull the cakes out of the oven about 7 minutes into the baking to spoon out some of the batter 😫😫😫😫 – I would suggest you alter the instructions and add that the 9 inch cake pans should be deeper than normal. The cakes are now back in the oven and I have about 1 1/2 cups of batter which I don’t know what to do with except pour it down the drain. What a waste. I hope this cake is worth it. I’ve been using a recipe called midnight sin chocolate cake for years and decided to give this one a try. I will post a review after the taste test. I am very frustrated at this moment.
I hope it all came out good for you! I sometimes use the litle extra batter by makeing a very small cake or cakeish in a well buttered oven froof dish.i like have the “sample cake”!
Can I use olive oil? Or will that be too strong of a flavour
I think it should be fine! Go for it 🙂
Can’t wait to make this! Just to confirm – if looking to make the recipe as written, are you supposed to use natural cocoa powder or Dutch-process for the cake?
Great question, because I don’t actually make it clear. The truth is that you can use either. I’ve used both, and both work well. Originally, I though that “natural” cocoa powder was best for this cake, and then I realized that I had in fact been using Dutch-process all along. I’ve no made this with Droste’s Dutch processed and Hershey’s unsweetened natural cocoa powder, and it always turns out well.
Hi, it says 3 cups of sugar is 648g, but 3 cups of sugar is 600g. I always bake with metric for accuracy. Could you please clarify this?
600 grams will be fine!
I have also noticed that you have 3/4 tsp vanilla in this recipe, but in the half recipe it says 1tsp vanilla. Not sure about the quantities?
Hmmm… that’s confusing 🙂 I think I use 1 teaspoon of vanilla for both the full and half recipe — the truth is that you can’t go wrong.
If I don’t want to make a layered cake, what size tin and how long, and on what heat, would the cake be baked. Thank you. It looks smashing.
Hi! I might consider making this recipe instead: https://alexandracooks.com/2013/10/29/beattys-chocolate-cake-plus-two-fair-trade-giveaways-lake-champlain-chocolates-hot-cocoa-bag-of-fair-trade-goodies/
You can make it in a 9×13-inch pan, so just one layer — follow the temp and time instructions there.
That was a no reply. Could you please answer my questions. 🙏
Hi Stewball… I have yet to try this recipe but for pan size equivalents, I have used this information successfully! Sorry you haven’t gotten an answer from the author yet!
https://sallysbakingaddiction.com/cake-pan-sizes/
That’s not an answer. O asked a few things to which I got no response. Is it possible to have one or should I just delete the recipe?
Wow… Can you just come over to my house and make this cake for me? Lol.
I mean, it’s no longer enough to just give people a recipe to follow. You should be able to make them their own personal recipe, that suits their needs and tailors to their personal situation!?!
Also, please answer the question promptly or they’ll repeatedly spam the comments page and give you a low rating. Smh
Some people.
Jokes aside, I can’t wait to try this recipe!!
🤣🤣🤣🤣🤣 omg thank you!! And I hope you do love the recipe if you make it 🙂
My 3 year old son and I made this cake for my wife’s birthday!! Let me preface this by saying that I am by no means, a Master Baker! I do have a stand mixer, which I believe made a huge difference, but this was only the second cake that I’ve made from scratch in my life. The recipe was super easy to follow and came out exactly as I expected. When baking with a toddler, measurements are usually loosely followed. Some gets in the bowl, and some gets on the floor. Happy little accidents, you know!?! It seems to me that this one is hard to screw up. I popped it in the over for an hour, went for a nap, and came back to pull it out of the oven. I used premium semi sweet chocolate and cocoa, and it was so rich and decadent. The cake was super moist and fudgy, and had that perfect black appearance. I added some mini eggs just for show, and everyone loved it!! It definitely checked all the boxes from my wife’s “chocolate cake” request!! Thank you so much!! 🙏
Dylan, it’s so nice to read all of this! I don’t know how I missed your comment! And I hear you, I was just baking a birthday cake with my 9-year-old, and basically everything got added into one bowl all at once and whisked together. I thought for sure it would turn out terribly, but it was delicious.
Glad your wife approved, too! Thanks for writing 🙂
I can’t even remember when I 1st saved this recipe. I have been using it as my go to chocolate cake recipe for a LONG time! I have even used it as the inspiration to make other cakes. Every time I make it, people rave about it!!
I have used this for all different shaped and sized cakes and even cupcakes. I have used it for celebrations and for the random Tuesday that called for cake (especially during my pregnancies!). I have used just about every kind of frosting with it and it never ceases to be the star of the show!
Amazing 🙂 🙂 🙂 Love reading all of this, Melissa. Thanks so much for writing and sharing.