
Easy Sourdough Bread (Whole Wheat-ish)
This post may contain affiliate links. Please read my disclosure policy.
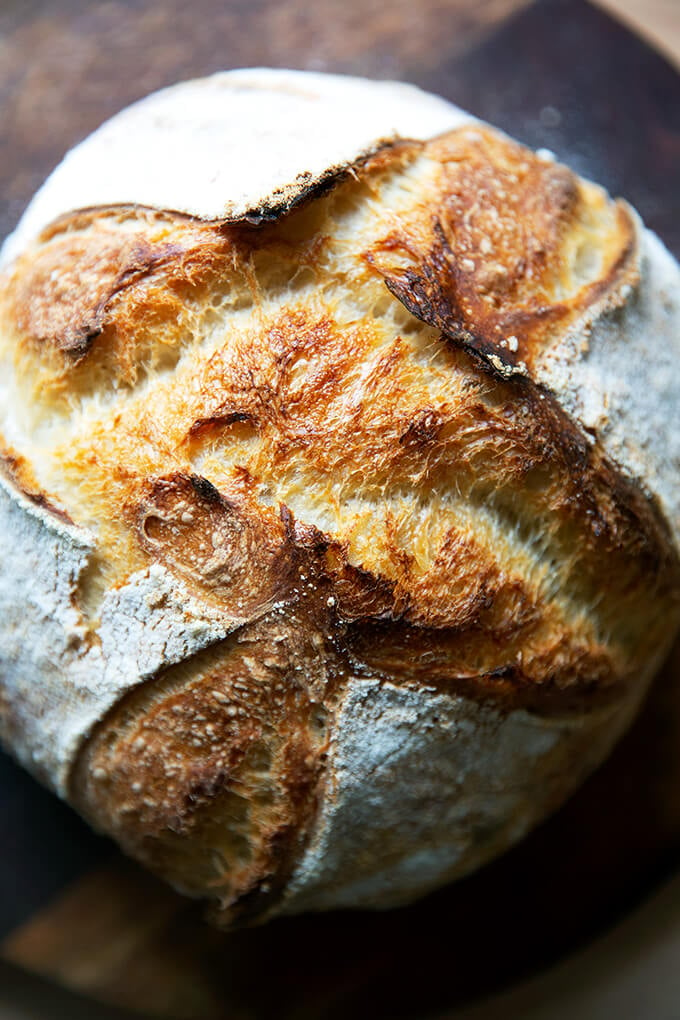
This is my favorite sourdough bread: It’s high hydration, whole wheat(ish), and just so darn tasty. As far as sourdough recipes go, this is about as simple as it gets. Below, you’ll find video guidance for every step of the process. Let’s do this! 🍞🍞🍞🍞
Sourdough is often described as a journey. The more I make it, the more this sentiment becomes a truth. For the past few years, I’ve been tinkering with various sourdough recipes, and though I can’t say I won’t stop tinkering, this is the current snapshot of my sourdough journey.
These are the characteristics I like in a sourdough boule:
- high hydration (at least 75%)
- whole wheat-ish
- crusty but not super crusty
- nicely salted
- tangy though not super sour
I’ve outlined the process below to create this type of loaf, which as far as sourdough recipes go, is on the simple side — there’s no kneading, no autolyse-ing, no pre-fermenting, no levain-ing, no fancy scoring.
It’s a little bit smaller than most sourdough boules, too, reasons for which I explain below. And as with all sourdough baking (and bread baking in general), it does take time, though the time is mostly hands off.
This post is organized as follows:
- Two Sourdough Fermentation FAQs
- Two Tips for Assessing Fermentation
- Whole Wheat Flour
- Roller-Milled vs. Stone-Milled Flour
- 75% Hydration
- Mixing Sourdough Bread
- Bulk Fermentation
- Shaping + Bench Rest
- Proofing Sourdough
- Scoring and Baking Sourdough
- The Best Way to Store Bread
2 Sourdough Fermentation FAQs
Two of the most frequently asked questions I receive about sourdough bread baking are:
- How do I know when the dough has risen sufficiently and is therefore ready to be shaped?
- How do I know if it has proofed sufficiently and is therefore ready to be baked?
If you are unfamiliar with sourdough baking, these two questions relate to two distinct phases of fermentation:
- The first question relates to the bulk fermentation (the first rise), which takes place after the dough is mixed.
- The second question relates to proofing (the second rise), after the dough is shaped.
One thing I have learned through troubleshooting with various people is that it’s very hard to put a timeline on these two phases. Sourdough is much more sensitive than yeast-leavened breads to the environment in which it is being baked.
The bulk fermentation for me in my cold Upstate New York kitchen often takes 12 hours regardless of the time of year. For someone baking in humid Hawaii, it may take 6 hours (or less! or more!). Similarly, the proofing phase may vary by many hours depending on the environment. Additionally, there are countless variables that affect fermentation: type of flour, water, salt quantity, strength of the starter, to name a few.
Yes, there are textural/visual cues to help discern when each phase of fermentation is complete, but it still can be hard to judge.
If you struggle with these assessments, I have two tips for you:
2 Tips for Assessing Sourdough Fermentation
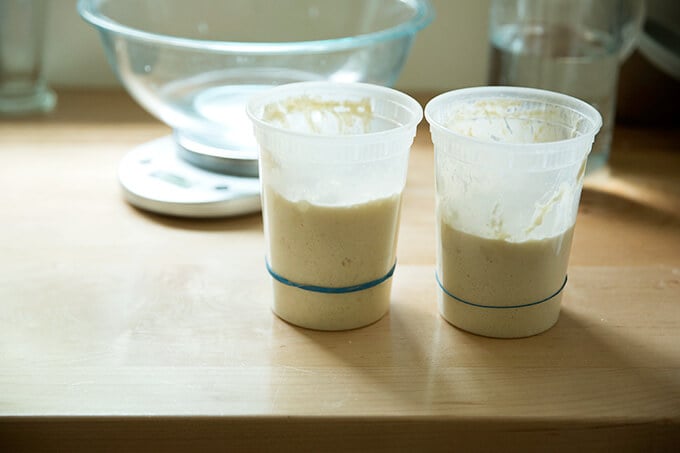
Tip #1: Buy a clear, straight-sided vessel.
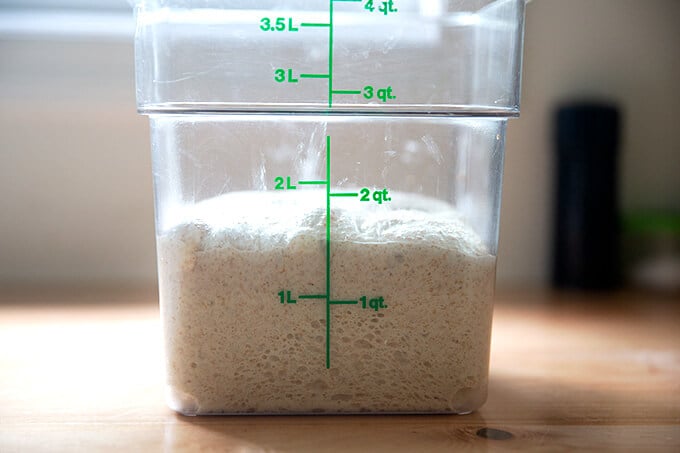
After my digital scale, my clear, straight-sided 4-qt Cambro (**this one is BPA-free!**) has become my most important tool when it comes to sourdough bread baking. Why? For two reasons:
- Because it’s clear, it allows me to see when the dough is filled with bubbles and activity throughout — top, bottom, sides, etc.
- Because it’s straight sided, I know exactly when the dough has risen sufficiently (roughly 50% increase in volume) and is therefore ready to be shaped. When dough rises in a bowl, it’s very hard to gauge how much the dough has grown.
If I could single out the biggest lesson I’ve learned in my sourdough baking journey, it’s this: Do not allow sourdough rise beyond double during the bulk fermentation.
Why? When sourdoughs rise for too long, the dough weakens. A weak, fragile dough is hard to handle and difficult to shape into a tight round, which in turn makes for a dense loaf. Most recently I shoot to shape the dough when it has increased by 50% in volume.
Tip #2. Use Your Refrigerator & Be Flexible
Because judging bulk fermentation and proofing can be tricky, you can use your refrigerator during both phases.
Using your fridge for the bulk fermentation:
If, for instance, you see your dough rising nicely but all of a sudden it’s 10 pm and you’re ready for bed, and you know if you let the dough continue to rise, it will be way beyond double in the morning, stick the vessel in the fridge. The following morning, take it out and let the dough rise at room temperature until it has nearly doubled or, as I advise more and more, increased by 50% in volume.
With sourdough baking, you have to be patient, and you have to be flexible with the timing.
Using your fridge for proofing:
Using my fridge for the proofing phase has been the biggest change in my sourdough process of late. Previously, after shaping the boule and placing it in a towel-lined bowl, I would transfer the dough to the fridge for 1 hour, then bake it. These days, I like to stick the shaped boule in the fridge for at least 12 hours, but ideally 18-24 hours. Why?
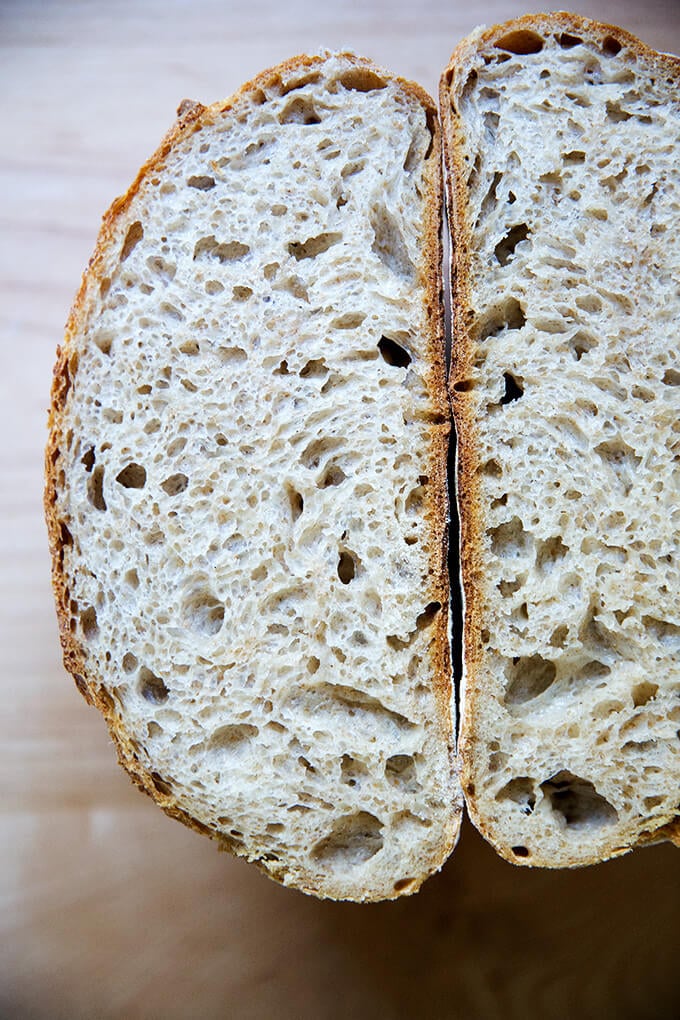
- The extended cold proof creates a lighter, airier crumb.
- A cold round of dough is so much easier to handle from scoring it to transferring it to the Dutch oven.
Whole Wheat Flour FAQ

In my email course, Foolproof Bread Baking, I receive a lot of questions about how to incorporate more whole grain flours into bread.
This is a tricky one to answer for me for two reasons:
- I like white bread. A good loaf of bread for me has so much to do with texture. I love a pillowy, oily focaccia; a soft, squishy brioche bun; a ballooned, crisp-tender Neapolitan pizza. As soon as whole grain flour is entered into the mix, the texture changes, becoming heavier, denser.
- Commercial whole wheat flour isn’t necessarily healthier than commercial white flour. Wait, what? Read on.
Roller-milled Flour vs. Stone-milled Flour
Without getting too far into the weeds, most of the commercial flour on the market is made from wheat that has been roller milled, meaning a roller mill has separated the wheat kernel into three parts: the endosperm, germ, and bran. White flour is made from the endosperm.
Whole wheat flour, similarly, is made from rolled-milled wheat: again, first the kernel is separated into three parts: the endosperm, germ, and bran; BUT then the germ and the bran are added back in various proportions. Much research shows that as soon as the wheat kernel is separated into the various parts, much of the nutritional value is lost — even when the bran and germ are added in after the fact.
So what’s the solution?
Stone-Milled Flour
Stone-milled flour, contrary to roller-milled flour, is flour made from wheat that passes through a stone mill, the process of which keeps the endosperm, bran, and germ together. Much research shows that keeping the components together preserves the nutritional value.
The rub with stone-milled flour? Stone-milled flour is more perishable due to the presence of both the bran and the germ, but the germ in particular, which is packed with vitamins, minerals, and fats, which can go rancid quickly.
The boon? Because the bran and germ are present in the flour, it’s also more flavorful.
Anything else to consider? Baking with stone-milled flours requires a little more finesse. Even a small amount of bran and germ in the mix makes for a denser loaf. Many millers offer high-extraction stone-milled flours — meaning stone-milled flours that have been sifted to remove some of the bran and endosperm. But even when you bake with high-extraction, stone-milled flour, the finished loaf, when made from 100% of this type of flour, will be very dense.
For this reason, I use at the most 25% stone-milled flour (100 g for this recipe), but preferably in terms of texture, 12.5% stone-milled flour (50 g for this recipe). 12.5% may seem like a tiny amount, but I am constantly surprised by how much flavor, texture, and color this small proportion of stone-milled flour offers to a loaf of bread.
In fact, I now prefer a partially whole wheat loaf to an all white loaf. The freshly milled, stone-milled flours offer so much flavor.
Where to Buy Stone-Milled Flour?
In the past few years, it has become easier to find stone-milled flour, and if you are up for it, you should seek out locally, stone-milled flour. Why? Because if you’re buying locally milled flour, you likely can find out how recently it was milled. Because stone-milled flour perishes more quickly than roller-milled flour, it’s best if you can find a local source, which will ensure it will be fresh. Note: Store stone-milled flour in the freezer if you don’t bake regularly.
Final note: I no longer buy commercial whole wheat flours. I buy commercial white flours: King Arthur Flour’s all-purpose flour and bread flour are staples. I find locally milled stone-milled flours at a local co-op, Honest Weight Food Co-op, and I also order online from various sources. Here are a few I love:
Finally: Here’s a great resource if you’re interested in learning more about wheat and flour: The Bread Lab. Also, Dan Barber’s The Third Plate was eye opening.
75% Hydration
Standard sourdough recipes often call for 500g of flour per loaf. As noted above, the recipe below makes a loaf that’s a little bit smaller for two reasons:
- I’m often asked if the bread recipes here on the blog as well as in my book can be halved. The answer is yes, but in an effort to make a loaf that may not feel quite so overwhelming for people, I’ve reduced the flour to 400g.
- I wanted to include quantities that make hydration easier to understand. Hydration is something I don’t discuss too often because I find it can turn people off (me included). In short, hydration is: the ratio of water relative to flour in a bread dough. The proportions in this recipe — 300g water and 400g flour — make it a little easier to see it’s a 75% hydration dough: 300/400=0.75.* With this baseline, you can increase the amount of water to make it higher hydration or decrease the amount of water to make it lower hydration depending on your preference.
*Note: This is a crude calculation. If you want to be super accurate when calculating hydration, you include the weight of the starter in the equation, too, which will throw off the percentage slightly.
Salt
I love salt. The standard percentage of salt in a bread recipe is 2% by weight of the flour. For 400g flour, this means 8g salt. I use 10g. The amount of salt, fortunately, is a variable that can easily be tailored to your liking. If 10g of salt is too much for you or if you know from the start you are sensitive to salt, start with 8g, then adjust accordingly. Also, higher amounts of salt will slow down the rise a bit as well.
5 Phases: Simple Sourdough Bread
This videos and photos below shows how to make from start to finish the high-hydration, whole wheat(-ish) sourdough bread recipe included at the end of the post.
Phase 1: Mix the Dough
Step 1: Gather your ingredients — flour, salt, water, a sourdough starter — and equipment, namely a digital scale. I recommend buying a starter (reasons for which I explain here). But if you’re up for it, you can make a sourdough starter from scratch in just about a week. I only recommend doing so if it currently is summer (or a very warm fall) where you are.
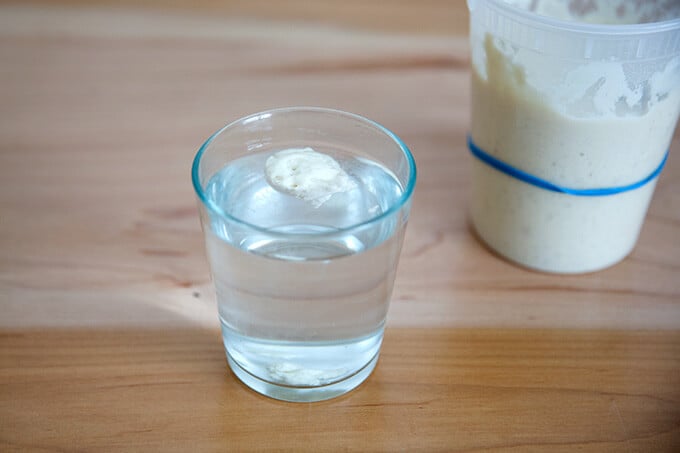
Most important, you need a fed, active starter.

To ensure it is ready, drop a spoonful of it in a glass of water. If it floats, it’s ready:
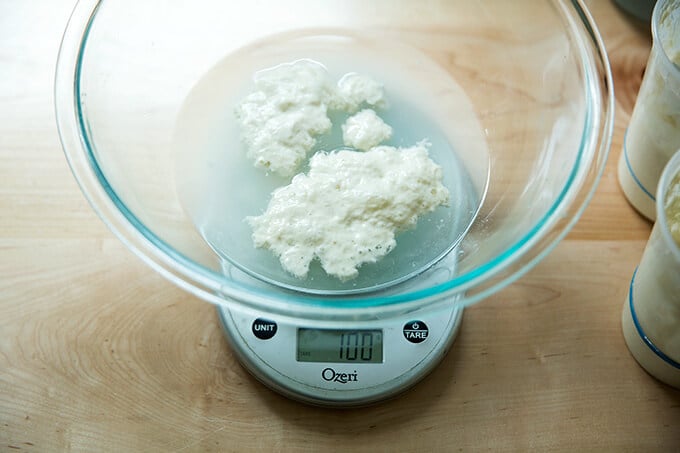
Start by weighing 300g water, 100g starter, and 10g salt.
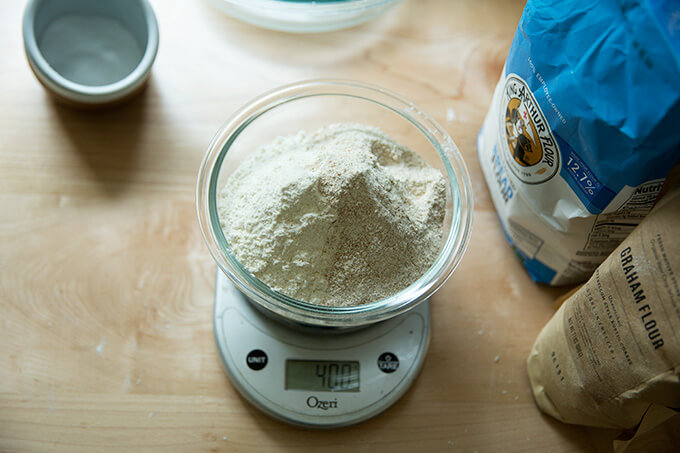
You’ll need 400g flour. You can use all bread flour of a mix of bread flour and whole wheat flour. My preferences is 350g bread flour (King Arthur Flour) and 50g stone-milled, freshly milled flour (I use a mix of Anson Mills rye and graham).
Mix to form a sticky dough ball.
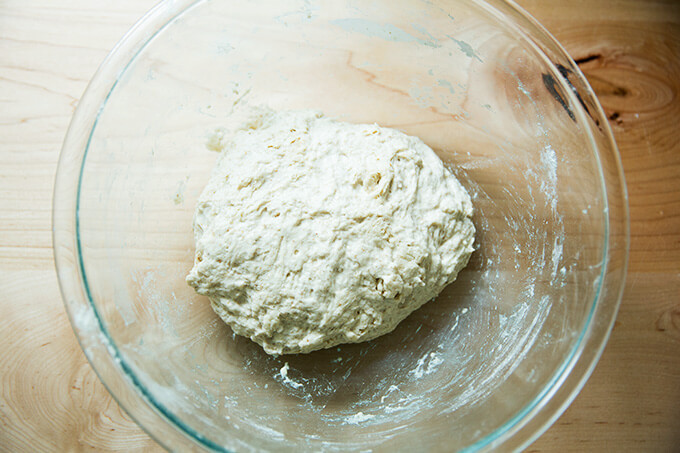
Then transfer to a straight-sided vessel for the bulk fermentation (the first rise).
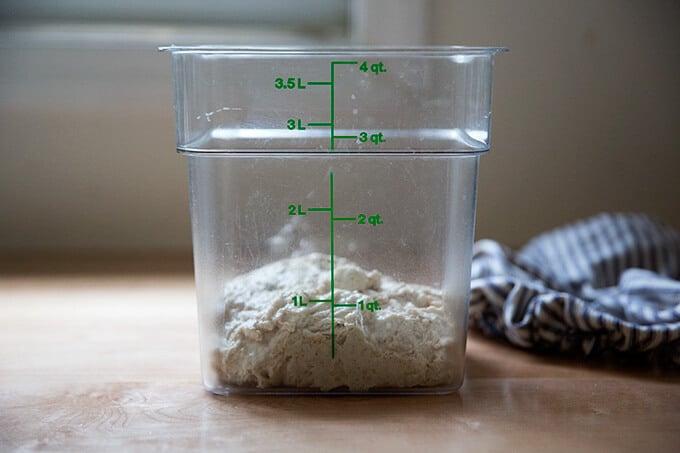
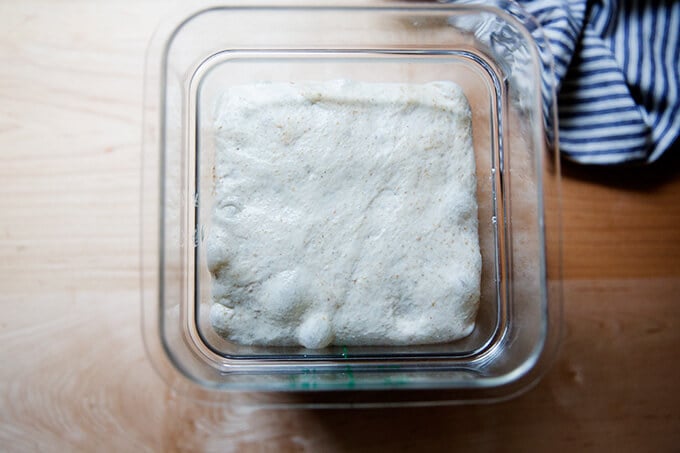
Phase 2: Bulk Fermentation
After 30 minutes, stretch and fold the dough:
You’ll repeat this stretching and folding 3x at 30-minute intervals; then you’ll leave the dough to rise until it increases in volume by 50-75%.
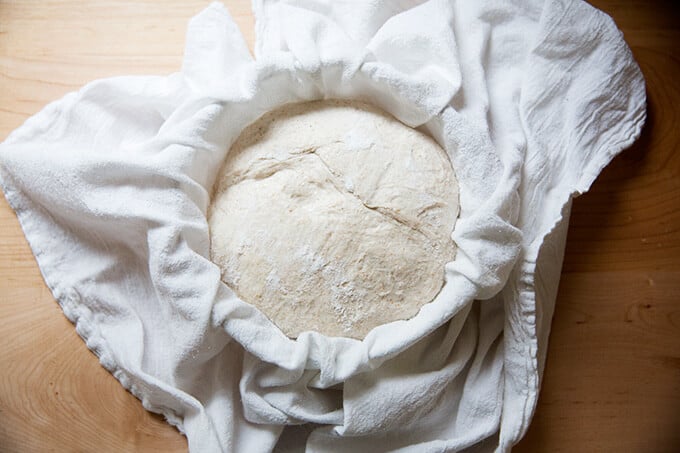
Phase 3: Shape + Bench Rest
Transfer dough to a clean work surface. I prefer to use no flour and minimal handling to shape it into a ball.
After the initial shape, let the dough rest for 20-40 minutes; then shape again and transfer to a flour sack-lined bowl.
Phase 4: Proof
Transfer bowl to fridge to proof (second rise) for 18 to 24 hours

Phase 5: Score + Bake
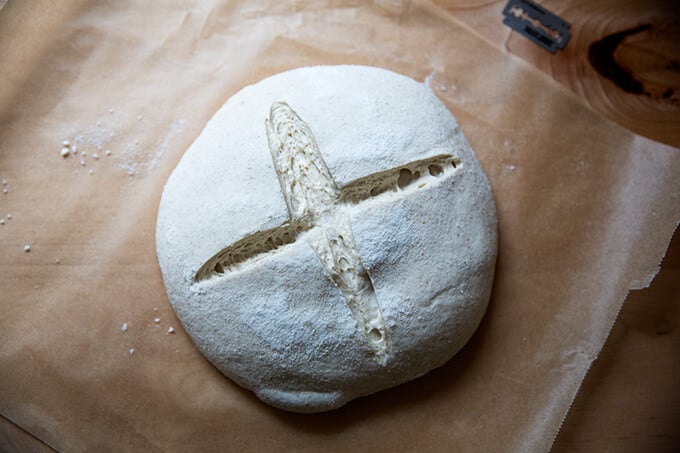
After 18 to 24 hours, transfer dough to a sheet of parchment paper. This video shows how:
Score as you wish; simple is fine.
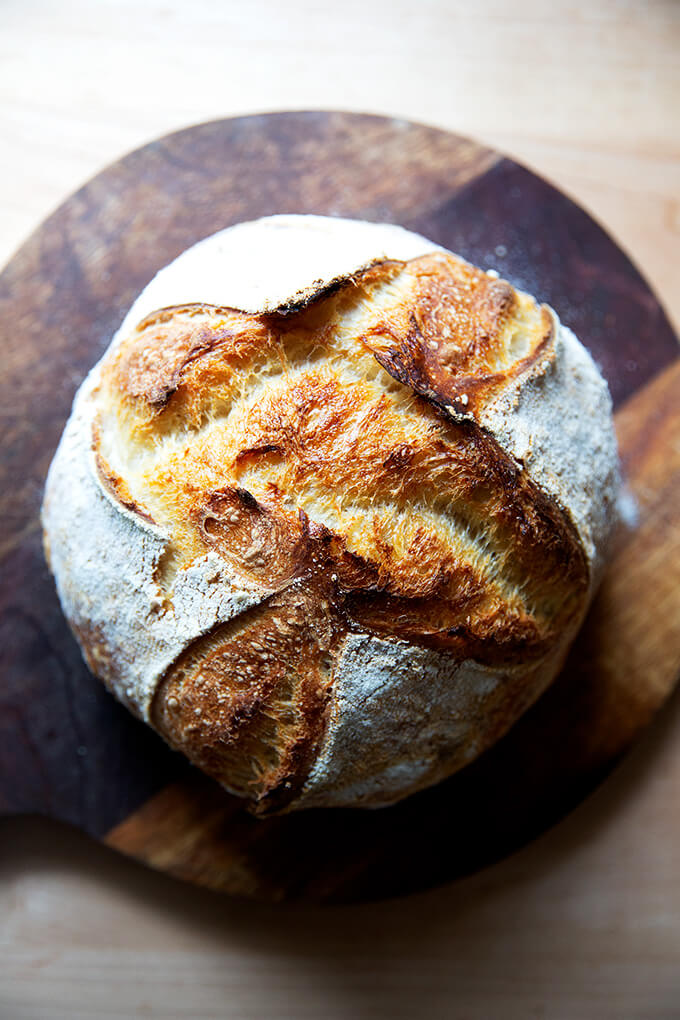
Transfer to a Dutch oven and bake at 450ºF covered for 30 minutes, then uncovered for 10 minutes at 400ºF.
The Best Way to Store Bread
How do I store bread? is one of the most frequently asked questions I receive.
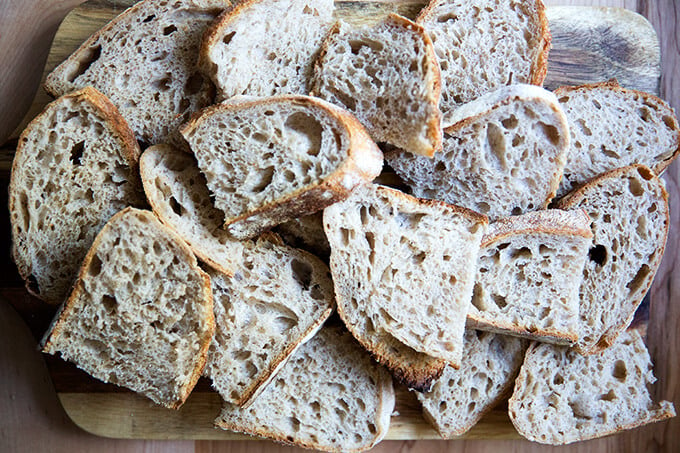
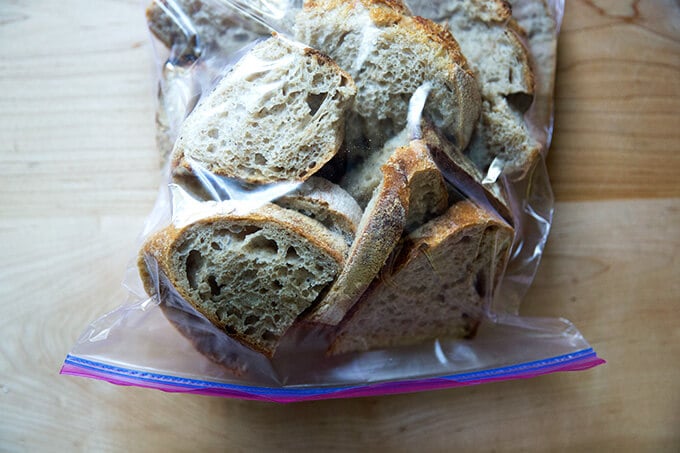
If you want to store the bread at room temperature for 3 to 4 days, I think the best method is in a ziplock bag. I’ve tried other reusable/environmentally friendly options, but nothing seems to keep bread freshest — the crumb the softest — better than a ziplock bag.
If you intend to keep the bread for longer, I would stick the ziplock bag in the freezer, and pull out slices or hunks as you wish. I often slice bread as soon as it cools completely, transfer the slices to a ziplock bag, then freeze. This way, I know the bread was frozen at its freshest.
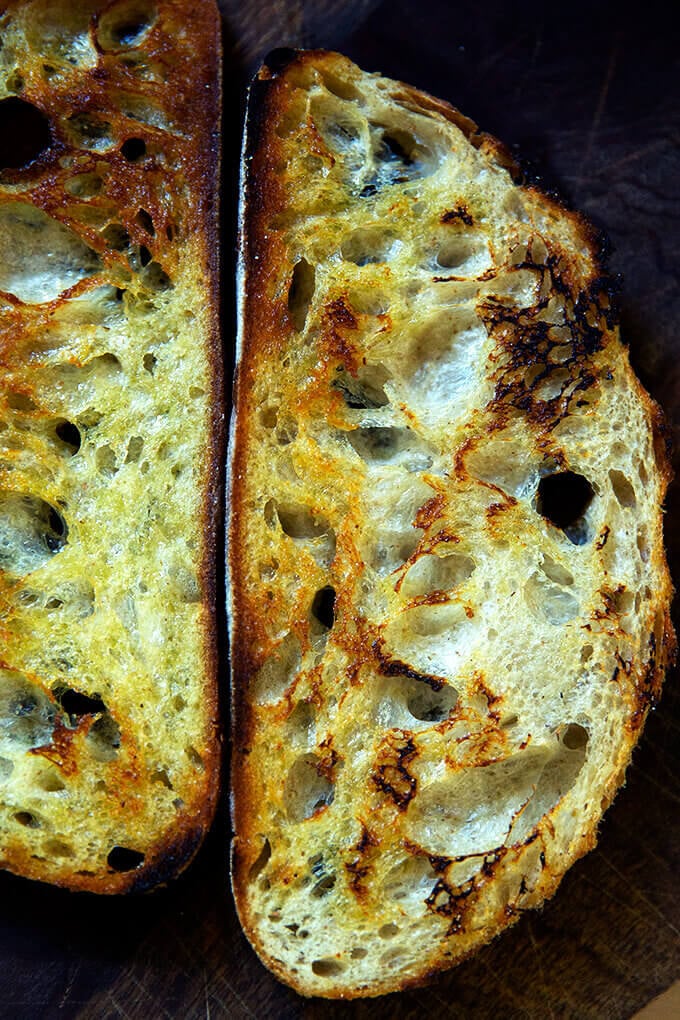
A ziplock bag will not prevent the crust of bread from turning soft, which is why I suggest always reheating day-old bread. I use a toaster at breakfast for slices of bread, and I reheat half or quarter loaves in the oven at 350ºF for 15 to 20 minutes when serving for dinner.
Bread revives so beautifully in the oven or toaster.
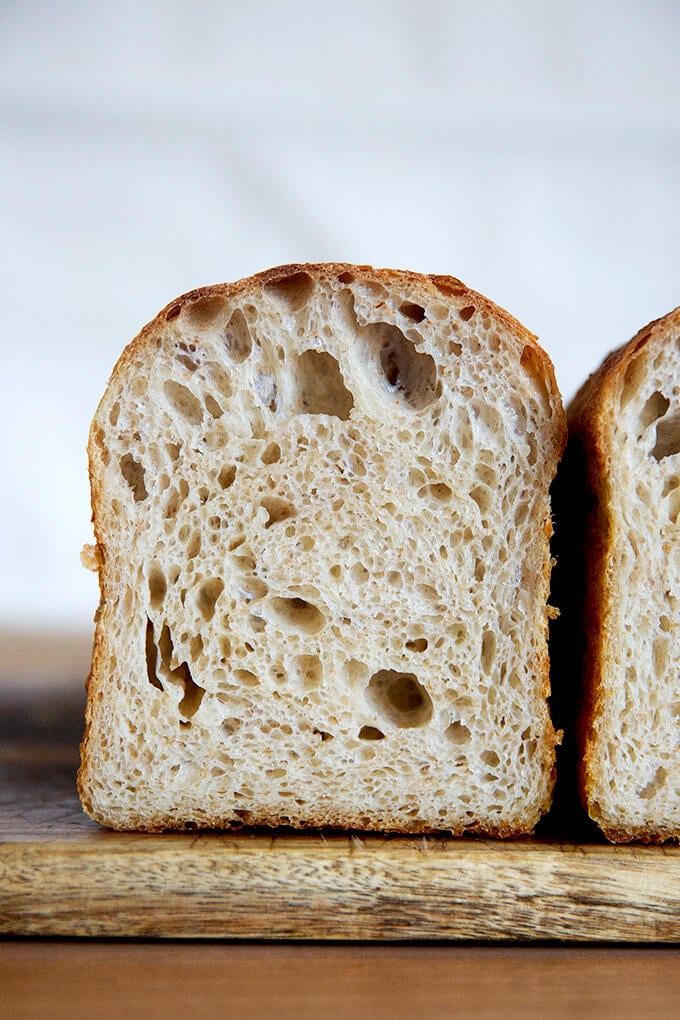
I baked this loaf in a tall-sided pullman loaf. Love the shape! I proofed this in the fridge for about 12 hours; then let rise at room temperature for roughly 5-6 hours before baking at 400ºF for about 40 minutes.
Easy Sourdough Bread (Whole Wheat-ish)
- Total Time: 48 hours 45 minutes
- Yield: 1 loaf
Description
Special equipment: Straight-sided vessel for the bulk fermentation, Dutch oven, flour-sack towel
Here’s my list of essentials for sourdough bread baking.
Digital Scale: Do not attempt this recipe without a scale. This one costs $9. Troubleshooting what goes wrong with sourdough bread is impossible if you’ve measured with cups. They’re simply not accurate.
Troubleshooting: If you have issues with your dough being too sticky, please read this post: Why is my sourdough so sticky? The 4 common mistakes.
Flour:
- I prefer making this bread with 350g bread flour and 50g of freshly milled, stone-milled flour, which provides both flavor and color. (Read the post above for more details and why I suggest stone-milled flour as opposed to commercial whole wheat flour.) I’ve been using a mix of Anson Mills graham flour and rye flour, but there are many great stone-milled flours out there, and you may have a local source, which is even better.
- 50g may seem like a tiny amount of stone-milled flour for this recipe, but I am constantly amazed by how much flavor this small amount of freshly milled flour adds. If you are new to sourdough baking, I recommend starting with 100% bread flour (King Arthur Flour is my preference) because it’s so forgiving and easy to work with. Once you get the hang of it, start incorporating stone-milled flour a little bit at a time. I don’t like using more than 100g (25%) of stone-milled flour in this recipe.
- If you cannot find bread flour — I know supplies are limited at the moment — you can use all-purpose flour. If you live in a humid climate, consider reducing the water by 20 g. You can add the 20 g of water in slowly while you mix until the dough resembles that in the video/photos.
Salt:
I like breads to be a little bit saltier than standard. If you are sensitive to salt, start with 8g. Next time, adjust salt as you wish.
Ingredients
*Please read notes above before proceeding. Watching the video is helpful, too.*
- 400 g bread flour, see notes above
- 8g to 10g kosher salt or sea salt, see notes above
- 300 g water
- 100 g active sourdough starter
- rice flour, for dusting
Instructions
- Mix the dough. In a large bowl, combine the water, starter, and salt. Stir with a rubber spatula to loosely combine. Add the flour, and stir with a spatula to combine — it will be a wet, sticky dough ball. Transfer to a straight-sided vessel and cover with a tea towel or bowl cover for 30 minutes.
- Stretch and fold. After 30 minutes, grab a corner of the dough and pull it up and into the center. Repeat until you’ve performed this series of folds 4 to 5 times with the dough. Let dough rest for another 30 minutes and repeat the stretching and folding action. If you have the time: do this twice more for a total of 4 times in 2 hours. [Video guidance here.] Note: Even if you can only perform one series of stretches and folds, your dough will benefit. So don’t worry if you have to run off shortly after you mix the dough.
- Bulk fermentation: Cover the vessel with a tea towel or bowl cover and let rise at room temperature (70ºF/21ºC) for 4 to 18 hours (times will vary based on the time of year, the humidity, and the temperature of your kitchen). The bulk fermentation will end when the dough has nearly doubled in volume and you can see bubbles throughout the dough and on the surface. (Note: Do not use your oven with the light on for the bulk fermentation — it is too warm for the dough. To determine when the bulk fermentation is done, it is best to rely on visual cues (doubling in volume) as opposed to time. A straight-sided vessel makes monitoring the bulk fermentation especially easy because it allows you to see when your dough has truly doubled.)
- Shape: Gently transfer the dough to clean work surface. I prefer to use no flour and a bench scraper at this step, but if you find an un-floured work surface to be difficult, feel free to lightly flour it. [Video guidance is especially helpful for this step.] Fold the dough, envelope style: top third over to the center; bottom third up and over to the center. Then repeat from right to left. Turn the dough over and use your bench scraper to push the dough up, then back towards you to create a tight ball. Repeat this pushing and pulling till you feel you have some tension in your ball. Place the dough ball top side down and let rest 30 to 40 minutes. (FYI: This is called the bench rest.)
- Proof. Line a shallow 2-qt bowl (or something similar) with a tea towel or flour sack towel. Flour sack towels are amazing because the dough doesn’t stick to them, and therefore you need very little rice flour, but if you only have a tea towel, you will be fine. If you are using a tea towel, sprinkle it generously with rice flour. If you are using a flour sack towel, you can use a lighter hand with the rice flour. After the 30-to 40-minute bench rest, repeat the envelope-style folding and the bench scraper pushing and pulling till you have a tight ball. [Video guidance here.] Place the ball top side down in your prepared towel-lined bowl. Cover bowl with overhanging towel. Transfer bowl to the fridge for 12 to 24 hours. (Note: When you remove your dough from the fridge, visually it will likely look unchanged. This is OK. You do not need to let it then proof at room temperature before baking.)
- Bake. Heat oven to 500ºF. Remove your sourdough from the fridge. Open the towel. Place a sheet of parchment over the bowl. Place a plate over the parchment. With a hand firmly on the plate and one on the bowl, turn the dough out onto the parchment-paper lined plate. [Video guidance here.] Carefully remove the bowl and towel. Carefully remove the plate. Brush off any excess rice flour. Use a razor blade to score the dough as you wish. I always do a simple X. Grab the ends of the parchment paper and transfer to the Dutch oven. [Video guidance here.] Cover it. Lower oven temperature to 450ºF, bake covered for 30 minutes. Uncover. Lower temperature to 400ºF. Bake for 10 minutes more or until the loaf has darkened to your liking. Transfer loaf to a cooling rack.
- Cool. Let loaf cool for at least 30 minutes before cutting.
- Prep Time: 48 hours
- Cook Time: 45 minutes
- Category: Bread
- Method: Sourdough
- Cuisine: Global
This post may contain affiliate links. Please read my disclosure policy.


988 Comments on “Easy Sourdough Bread (Whole Wheat-ish)”
What happens if I forgot to “bench rest” for 30-40 minutes before putting the dough in the fridge for the final proofing? I suppose I can just bake it and find out but I’m wondering if I can increase my chance of success if I ever forget that part again…
Hi Ben! Sorry for the delay here! Forgetting the bench rest truthfully shouldn’t make much of a difference. And I wouldn’t advise doing anything to fix it — I would just bake it and see how it turns out.
How did it turn out?
It turned out excellent! Not sure if it even made *any* difference, I guess next time I’ll try to be patient and rest (it) at all designated points!
Wonderful to hear this, Ben!
I made this bread today and OMG it was SO GOOD!!!
Amazing! And it really is quite simple as long as your sourdough culture is “ready” and you follow the steps carefully.
And I say this as very much a novice baker!
Wonderful to hear this, Asya!
Hi,
I used your recipe for the first time a month ago (using all whole wheat bread flour) and it was delicious!! I tried again and took it out of the fridge this morning and it didn’t rise at all. It looks very heavy (not round and airy), so I reKneaded and am going to leave at room temperature to see if I can salvage it. Was this a mistake? Thanks for your help!
Hi Liz! How did it turn out?
What type of flour did you use this time? Did the bulk fermentation and shaping part go OK?
One thing to keep in mind: sourdough doesn’t change much visually in the fridge (unlike kneaded dough), so the dough may have been OK. That said, if it looked heavy, that’s not ideal.
This is the best and easiest sour dough bread I’ve made. I am trying to vary the ingredients for variety and am wondering if I could add a little olive oil and rosemary to the recipe? I’ve made your loaf bread with olive oil, but am wondering if the boule cooked in a dutch oven would work with olive oil added to the ingredients?
I think you absolutely can! I would start with something like 2-4 tablespoons of olive oil here. And maybe a teaspoon of minced rosemary?
It worked beautifully with 3 TBLS of olive oil, chopped fresh rosemary and fresh garlic. Thank you for your delicious recipes and quick responses!
Oh yay! So nice to hear this, Elizabeth! Thanks for reporting back.
I’ve made this several times now and it tastes very good but, my loaves are always flat. I’m following the instructions which are very thorough by the way (thank you). I’m using an all purpose blend of organic hard red wheat. If you have any advice I’d appreciate it. Thank you.
Hi Molly! Sorry for the delay here.
Let’s start with your starter. Is it very healthy and active? As in, does it double in volume within 4-6 hours of feeding it? And does it float when you drop a spoonful of it in water? And have you had success (loftier loaves) using it with other recipes?
Hi . How long can I leave my shaped loaf in the fridge for . Its there for 24 hrs and would rather bake it tomorrow or Saturday
I have kept it as long as 48 hours, so you can definitely bake it tomorrow (maybe even Saturday morning).
This is an excellent recipe for a tasty, light bread! The instructions are very thorough and clear, and there is some flexibility in the duration of each phase and also in the ingredients. This recipe has become a classic in my list of recipes and I return to it often, as I am doing this morning! Thanks!
Wonderful to hear this, Astrid!
Hi I have tried this recipe twice, weighed the ingredients, and both times my dough was sticky after the rise (once 6 hours and 2d time 12 hours- which more than doubled the dough). Both times the bread tasted great- but did not look as pretty as yours? Why is my dough sticky?
Hi Cynthia!
Questions for you: how strong is your starter? Have you had success using it with other recipes?
What type of flour are you using?
I have used it for other recipes Which worked and weee not sticky, and I always test before using by dropping in a glass of water. 2d time I let it rise 12 hours and it more than doubled-but it was overnight. Too strong? I’m using King Arthur Bread Flour.
OK, great!
I might try decreasing the water by 50 g or so to make the dough more manageable. Do you live in a humid environment?
Also: when you shape the dough into a round does it have strength and elasticity or is it very slack? 12 hours might be too long if you live in a very hot/humid environment.
Great that your starter floats. One other test: does it double in volume within 4-8 hours of feeding it? And are you feeding it equal parts by weight flour and water?
Hi-thank you for getting back to me on 7/4! My husband thinks I am obsessed. I feed the starter 1 part water 2 parts flour, to 1 part sd starter. It does double with nice bubbles in about 5 hours when left out. I live in a pretty dry environment-CA. If I decrease the water by 50g, do I need to increase the amount of starter? After the bulk fermentation, when I initially was shaping it started out more elastic (but not as stretchy as yours in the video) but I repeated the stretch and formation of the ball, and it became very stick so I just let it rest. It never really was “dough” like. I am going to try again this week with 50g less water.
Sourdough quickly becomes an obsession! If you decrease the water by 50g, you do not need to increase the amount of starter. Definitely use flour as needed during the shaping process to make the dough less sticky and easy to work with.
Hello! Is it possible to increase the amount of starter, and correspondingly decrease amount of flour and water? How would it affect the dough?
Hi Cheryl! Theoretically, yes, but sourdough is finicky, so I can’t say for sure how it will work. Keep in mind that when you increase the amount of starter, your dough may rise more quickly, so keep an eye on the bulk fermentation.
Hi! I love this recipe and its just wonderful. If I wanted to make more, can I just double the recipe? or triple it to make 3 at a time? We consume it so fast!!
Thanks!
Wonderful to hear this, Joanna! Yes, absolutely, double or triple it! Do you have a vessel large enough to handle all of the dough??
Dear Ali .. when you take out the dough from the fridge, it’s ready to bake right away …? or it has to rest a little on the counter?
It’s ready to bake right away! No need to rest.
This recipe is so easy to follow! Waiting on my bread to finish baking now!
I had some trouble with the rising/proofing. I waited 6 hours for the first proof, but was on a timeline, so it wasn’t really doubled but I went ahead and put it in the fridge. After 12 hours in the fridge, I went on to baking the dough. It didn’t rise much at all to begin with, and turned into a tiny little dough loaf when I put it in the oven. Any tips??? I think it may be an issue with my starter. If I had had more time, I would’ve waited for it to rise more in the first proofing, so I think I will try that next time…
Also, do you leave your bread in the oven while your oven cools down to 400?
Another update….. I baked for 30 mins at 450 in my dutch oven and it barely rose, if any… Do you have any tips??? I definitely messed up with not letting it proof enough the first time, so I’ll have to try this recipe again.
Hi Allie! Can you tell me about your starter? Is it very active? Does it double in volume within 4-8 hours of feeding it?
Yes, leave the bread in the oven when you turn the oven down to 400ºF.
Today is the second time I have used this recipe. I have had the same problem both times with the dough being too sticky. I am using King Arthur Bread Flower and some whole grain wheat. I have a scale and measured everything and my starter is very active (doubles in 4-6 hours). I live in Toledo Ohio and it has been around 38% humidity outside but our home is kept at 30% humidity. I saw someone else post about the dough being sticky so I will try to reduce the water a bit next time.
Hi Stephanie! Keep me posted on your trials. Reducing the water sounds like a good idea.
Question: when you do the stretches and folds, does the dough become elastic and strong? Or is it sticky the entire time? What kind of whole grain wheat are you using?
I am so disappointed and especially when I read all these glowing comments from those who have had such success. I have just turned the dough out to shape it – impossible! Its just a molten mass that I can do nothing with………help!
WendyB
Hi Wendy! It sounds as though it over-fermented. How many hours was your bulk fermentation? And at what room temperature? Unfortunately, when dough over ferments and becomes totally slack, there’s nothing you can do to salvage it.
I just baked my 2nd loaf from this recipe last night. It actually looks like the bread in the pictures!
First loaf was good overall, but came out a bit blonde. I used an old, oval, aluminum roasting thing that I didn’t preheat. This time around, I used my cast iron paella pot and preheated the pan. My oven needs all the help it can get to reach the really high temps.
Bothe loafs had some timing issues as far as when I could do the steps, so in the fridge it all went.
The crust came out nice and the bubbles seem spread out nicely and it tastes pretty good!! I’m pretty happy with my efforts. This is a good recipe for this beginner!
Wonderful to hear all of this, Colin! Thanks so much for writing and sharing your notes. My oven needs all the help it can get, too 😍😍😍 A long preheat makes a big difference for me.
I love your simple directions with video links. Fabulous. The focaccia recipe is spot on so trying the boule now. How big/many quarts should the dutch oven be? Thank you.
Thank you, Diane! My Dutch oven is 5 qts, but I think you could get away with using one a little larger or even a little smaller. Good luck! Keep me posted 😍😍😍
Super easy and clear directions helped to make this a great sourdough! Taste was excellent and was generally pleased with the turnout. I didn’t get quite as high of a rise as you did – any idea what I might’ve done wrong?
Hi Rachel! Great to hear.
Questions: Is your starter very active? As in, does it double in volume within 4-6 hours of a feeding?
What types of flours are you using?
When you shaped the round, did you feel you were able to get good tension?
I am very new to the art of sourdough bread. I was given some starter and couldn’t wait to start. I was given a recipe link with the starter and it was ok, not sure if it was me or the recipe. The directions were vague. I knew there had to be something better! i searched and thank goodness found this recipe and the fabulous directions! I also like the quick video clips for guidance. It turned out perfect! Thank you so much! I wish i could show you a picture, it is beautiful! Thank you so much!
Wonderful to hear this, Karin! Thanks so much for writing. 🍞🍞🍞🍞🍞🍞
As many times as I read through the instructions, I am still processing, apparently. I am about to turn my dough out onto the counter to form my ball….I wanted to bake it for supper tonight. Does it have to sit a full 12 hours in the fridge?
Hi Ashley! The process takes some time to get used to … I’ve been where you are. The flavor and texture will be much improved with at least 12 hours in the fridge, but do what you want: next time, you can compare how a longer proof changes the final outcome.
I made my first sourdough loaf with this recipe and the results were superb. I accidentally purchased whole wheat bread flour instead of normal white – and I used 50 grams of buckwheat flour to give additional depth of color and flavor. The turning and folding was a bit more tricky – and the both the bulk fermentation and final bench proof took a bit longer – but the loaf was beautiful.
Gorgeous rise and elastic crumb. The tip of having a long final proof was great. It meant that once the dough was finally benched – I could bake it at my convenience, and not be beholden to some of the crazy schedules that I’ve seen other recipes ask you to adhere to.
A definite keeper.
Wonderful to hear all of this, Lee! So great to hear you were able to make this work with whole wheat flour + buckwheat flour. Thanks for writing!
Help! I tried your focaccia and it totally bombed, I think because my starter had already started to fall? Or was too young. My starter has improved and is reliably rising and falling now (though honestly, just over double, not getting near a tripling), so I decided to try this boule. This morning I can downstairs and the dough had nearly doubled – I was encouraged (the focaccia dough proofed for over 18 hours and never doubled)! I carefully dumped it on the counter and tried the envelope method – the dough was SUPER sticky. I managed to get it folded like the video, and I used the shaping method from the video, but the dough was sticking to the dough scraper like crazy, I kept flouring the dough shaper between each tighten because otherwise it wasn’t working. With each “turn” it looked good, but then the shape would sort of fall. I did it a number of times – 10? 15? and finally flipped the loaf over, where it’s resting and has become a blob instead of a ball. Did I overproof? underproof? Was the starter still not ready? It’s done resting and I’m going to continue on and hope it improves with resting in the fridge..
Hi Randi! It doesn’t sound as though it over proofed, but it sounds as though you may need to reduce the amount of water you are using. What types of flour are you using?
Let me know how it turns out after baking it.
It’s possible you need to strengthen your starter. Does it double in volume within 4-6 hours after a feeding?
Came out great. Tangy. Wheat flavor came through. I am new to handling wet sticky dough. Also had doubts about not proofing after removing from fridge (I admit, I let it rise a bit)
Wonderful to hear this, Leslie! Letting it rise a bit is just fine 😍
Absolutely terrific results – I used whole wheat bread flour (which I mistakenly purchased instead of normal bread flour), and a measure of buckwheat, which wanted to use up. Terrific texture and elasticity despite the high proportion of whole grain in my loaf. Very flexible recipe in terms of timing – and I did not feel like I was tied to a tight schedule as other recipes would have you follow.
Took the loaf to a friend’s house for dinner – and it was devoured in seconds. Will be my go to recipe going forward. Quick question – how well does the recipe scale up? I like the current yield, since it’s hard to get through alot of bread on my own. But just in case I feel like making extra and giving to friends.
Your website is absolutely amazing.
So wonderful to hear all of this, Lee! I have doubled the recipe successfully, but haven’t scaled up beyond that. Hope that helps. Thanks so much for writing!
Whoops – looks like I double posted. Please delete my last comments.
Sorry!
Still love this recipe though
No worries! Thanks, Lee!
I made this recipe for the first time this week, I have tried multiple recipes that have let me down in the past but this one turned out perfect! Thank you so much for your wisdom.
Wonderful to hear this, Marlies!
Hi Alexandra- I’ve made two loaves so far, and very happy with the results.
– thank you for the fantastic instructions.
I’m just about to feed my starter and, to my horror, realised that last night I fed it with half plain flour and half self raising flour!!!
Should I throw out the starter and start again!
Many thanks, Angela
I think you might be able to salvage it! I would discard most of it, leaving behind 2 tablespoons or so; then feed with equal parts flour and water: start with 40 g each or so. Let it rise till it doubles; then repeat. Before you know it, you’ll be back to a mostly naturally leavened starter.
Wonderful to hear you were happy with your results!
Alexandra,
Your recipe looks doable to a newbie like me, but I like a bread with more texture (multi-grain). Can I add a soaker (cereal and seeds) and if I do, do I subtract the amount of gram weight of the soaker from the flour, or do I add more water (although I will have used water to make the soaker)? Hope I can do it with your recipe because tried two others that were more complicated and I got big hockey pucks as a result (in fairness I waaaay overproofed it last time).
I think you could! Could you give me an estimate of what the makeup of the soaker will be in grams? What is the weight of the cereal/seeds? And what is the weight of the water? I think more likely, you might have to cut back on some of the water as this is a pretty high hydration dough.
i really like this recipe and the flavor is always fantastic, but I am now consistently getting flat loaves that have 0 oven spring when I follow this to the letter….
I have an active starter that doubles in about 4-5 hours when fed, and have even added some extra kneading in to try to build strength in the dough, but it always feels too runny – mainly after the proof but after the bulk fermentation too it feels too liquid and has no structure..
I think I might be doing bulk fermentation for too long or proofing too long in the fridge
Hi Joe!
I think especially in these warmer months two things are important: really monitoring the bulk fermentation and being sure it’s not going too long. Recently, I have been finding all of my sourdoughs after the bulk fermentation to be on the wet side, so I’ve cut the bulk fermentation back so that I’m shaping well before the dough doubles. I can’t give an exact time, but if you are using a straight-sided vessel to monitor the bulk fermentation, I would stop the bulk fermentation when the dough has grown 1.5x or a little bit highter.
Finally: you definitely could try holding back some of the water. Hold back 25 g and see if that makes a difference.
Great bread! I make it often!
Wonderful to hear this, Margaret!
Ever since i received a starter i used your recipes to make bread and they’ve always been great! My only issue is my dough is also too sticky to shape. I live in toronto, so not very humid and it takes me 5-6 hours to bulk ferment these days. I just use 100% bread flour, and when i do my stretches the dough feels strong and elastic. It feels like that when i shape it too, so i dont think im over fermenting. Its just so sticky that i cant get a nice top and i feel like im lacking tension. I think i’ve kinda found a solution though. Once my dough ball is on my cloth on a bowl, i’ll kinda stretch the dough from the outside of the bowl to the middle and pinch it together. I dont want to reduce the amount of water too much, as i heard this affects the crumb, but I think that’s going to be my only solution at this point. Thank you for the great recipes!
Hi Cee! Wonderful to hear this. It is definitely a wet, sticky dough. It doesn’t sound as though you are over-fermenting the dough with a 5-6 hour bulk. I think you could try holding back 25 g water and see if that makes the dough more manageable. You could also potentially use 50 g of starter. Both options will reduce the hydration a bit. Keep me posted on your trials!
Hi Alexandra! Just a quick update, i did most of the bulk fermentation in the fridge and shaped it about an hour out of the fridge and it was much easier to handle! Maybe i’ll continue to finish the bulk fermentation in the fridge from now on haha. Thanks for the reply!
Wonderful to hear this, Cee! The fridge is such an amazing tool for sourdough.
This recipe is fantastic! Super easy to follow the instructions especially if you already have a starter ready.
Wonderful to hear this, Mia!
Great recipe to start out with! I have a few questions…
-when you use your starter, for something like pancakes, or other “discard” recipes, do you first make sure it’s active, or do you just use the pour off stuff you get before you feed the starter?
I’ve been keeping a separate bin of like extra starter/discard in the fridge…if I feel like the starter isn’t active I’ll pour out all but a little and then feed & wait.
-so then, could you just use this “discard” as a starter: just put a little in a jar on counter, feed, and wait a couple hrs till double/active?
(I’ve noticed it’s a huge difference on these hot days!! (No ac so my kitchen is like 80!)
So greatly appreciate your time and help! (I love and have well-useduour book too!!👌
So nice to hear this, Leanne 🙂 🙂 🙂 Thank you re book. OK, questions answered below:
-when you use your starter, for something like pancakes, or other “discard” recipes, do you first make sure it’s active, or do you just use the pour off stuff you get before you feed the starter?
The idea is to use the unfed starter — what you would otherwise discard. So, no need to make sure it’s active.
-so then, could you just use this “discard” as a starter: just put a little in a jar on counter, feed, and wait a couple hrs till double/active?
Yes! You may have to feed it a couple of times, but yes, absolutely. You’re looking for a starter that doubles in volume within 4-6 hours of a feeding.
(I’ve noticed it’s a huge difference on these hot days!! (No ac so my kitchen is like 80!)
Right?! It’s crazy to see how quickly things develop in these hotter months.