
How to Parbake (and Blind Bake) Pie Crust + Foolproof Flaky Pie Dough
This post may contain affiliate links. Please read my disclosure policy.
Below you will find guidance for both making pie dough and parbaking or blind baking it. This trusted method will ensure your crusts do not shrink in the oven and will prevent your finished pies from having soggy bottoms.
About this time of year last year, Erin McDowell’s The Book on Pie made its way into the world. It is a stunning book, overwhelming in its breadth and beauty, a tome filled with recipes and techniques for making any pie your heart desires, a comprehensive guide promising to answer any pie question to have ever crossed your mind.
For me, the big question was: Is parbaking pie crust necessary?
To prevent a soggy bottom, parbaking is a step required of many a Thanksgiving pie, and it’s a step I dislike for several reasons, including:
- Pie weights are ineffective. Many times I’ve gone through the effort of filling my pie shell with weights (or dried beans) only to have it shrink as soon as I remove those weights.
- Overbaking. While parbaking would indeed ensure a crisp bottom crust, I always found the exposed crust to get overcooked.
My lack of parbaking success over the years has led me to skip the step altogether — to be honest, no one seemed to notice. It also pushed me squarely onto team galette.
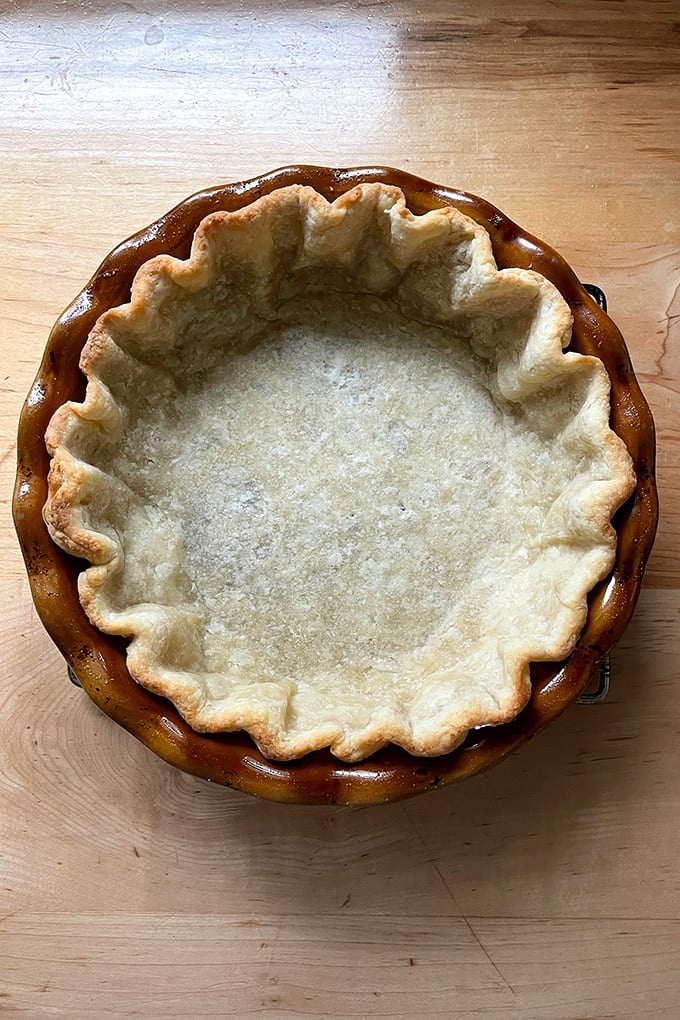
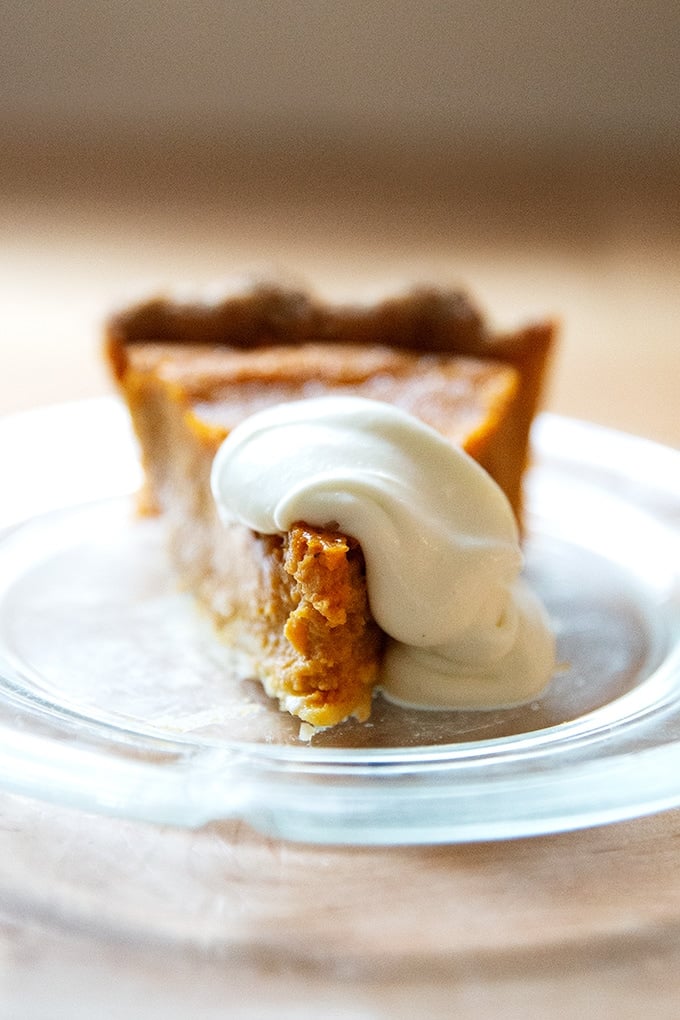
But last year, reading through Erin’s book, I realized I was doing it wrong: I have been severely overbaking my parbaked pie crusts. On page 46 of the book, a photo depicting a correctly baked, underbaked, and overbaked parbaked pie crust showed me my error: the bottom of a correctly baked parbaked crust should be barely toasted, mostly blonde with the faintest hint of brown; the edges should be lightly golden.
Erin’s method calls for baking the pies with weights (or dried beans) for 15-17 minutes and for just 2 to 3 minutes more without the weights. I had never seen such a short time frame for parbaking, but I tested the method on my favorite Thanksgiving pie, Ronnie Hollingsworth’s most excellent squash pie, and the method worked beautifully! Do you see how nicely golden but not overly so the crust looks?:
Friends, I am so excited to have this piece of the pie (ha!) resolved. But this is not all I’ve learned. Let me share a few more findings.
The Importance of Chilling Your Pie Dough
After you make your pie dough, you should let it rest in the fridge for at least 30 minutes or better, 12 to 24 hours, before you roll it out. Why? For two reasons:
- As noted in The Book on Pie: “If your dough isn’t chilled enough at this stage, the fat will be soft and likely to smush into the dough during rolling, resulting in a shorter, crumblier texture rather than the desired tender, flaky effect.”
- Moreover: Chilling the dough after mixing makes it easier to roll out. This is because chilling allows the natural protein stands (i.e. the gluten) that form when flour is hydrated to soften and relax, making the dough easier to roll out.
Why You Shouldn’t Freeze Your (Rolled-Out) Pie Dough
Although pie dough freezes beautifully in portioned discs, once you roll it out and fit it into your pie plate, you shouldn’t freeze it. This is because:
“Freezing can mess with the way fat acts in the oven. While you do want dough to be cold, if it is baked from frozen, it may take a while for the butter to soften and thus delay the flaky puff-up effect that occurs when the dough hits the oven heat. This can lead to the butter melting out of the crust, making a greasy and/or smoky mess in your oven and a tough crust.”
I tested this theory by baking one shell immediately after rolling it out and one I had frozen for 24 hours. I had suspected that the frozen one would hold its shape better, but I was wrong! It actually shrunk more, and, as Erin noted, made a smoky mess in the process because the butter melted out of the crust.
Two Parbaking Tips
- Do not bake pies directly on the rack — butter will seep out and when it hits the oven floor (or Baking Steel), it will make a smoky mess. Instead, place your pies on sheet pans and use parchment paper, if you wish, for easy clean up.
- If you have a Baking Steel or pizza stone, use it. Because Steels and stones retain heat well, they encourage proper and even browning on the bottoms of pie. They also help keep the oven temperature’s even as you open and close the door to check on your pie.
Friends, there are a few photos below, but I think the video will be most helpful here. It starts with my favorite foolproof food processor pie dough recipe, which employs a tea towel trick I learned from a French woman years ago, and ends with a parbaked shell.
Pie-Making Schedule
This is a great schedule to follow if you are making pies for Thanksgiving or any holiday:
Tuesday (or 2 days prior to when you plan on serving your pies): Make the dough and chill it.
Wednesday: Parbake the crust.
Thursday: Fill and bake the pie.

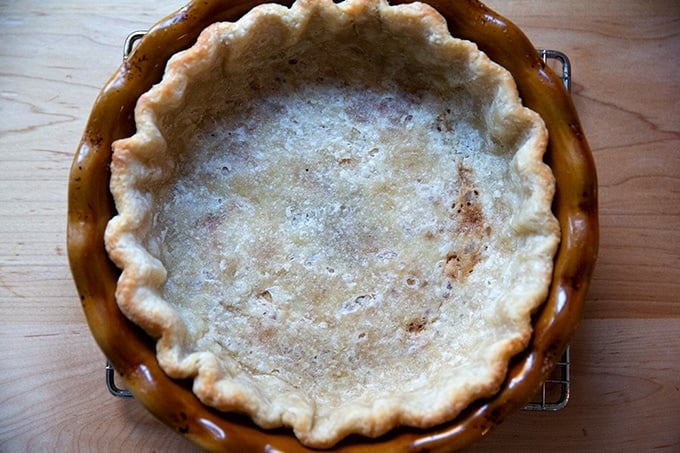
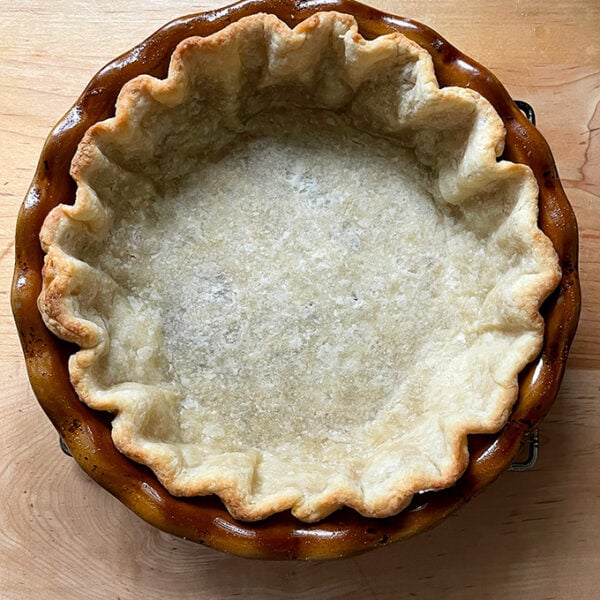
Above: This pie shell is about to enter the oven. Note: You can save those dried beans and use them again and again: let them cool; then stash them in a Ziplock bag.
Below: This is a just-baked parbaked pie crust.
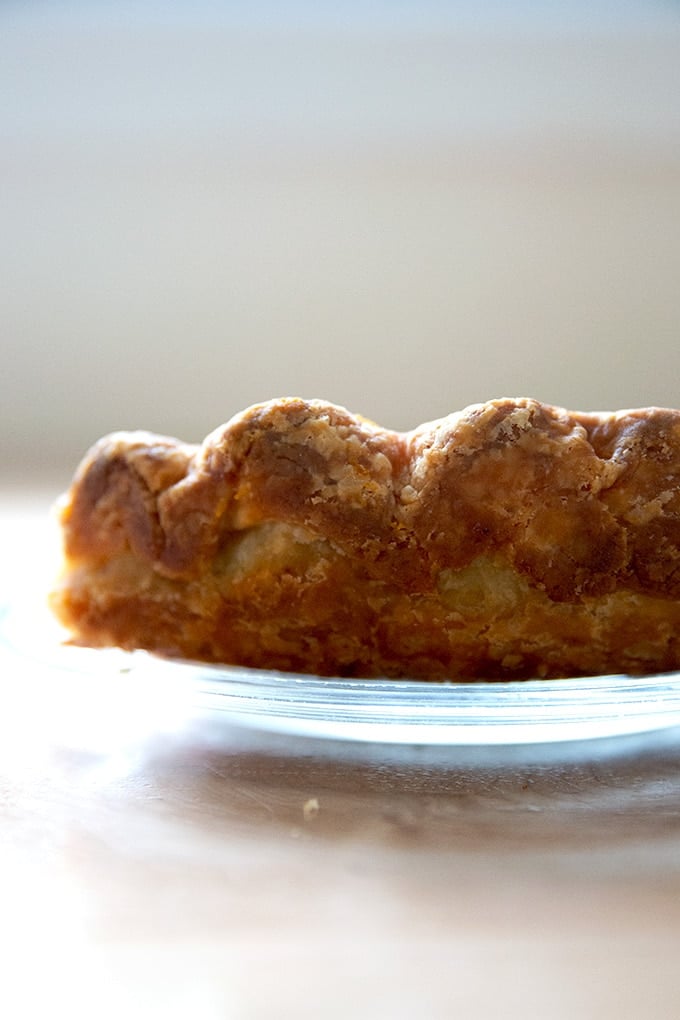
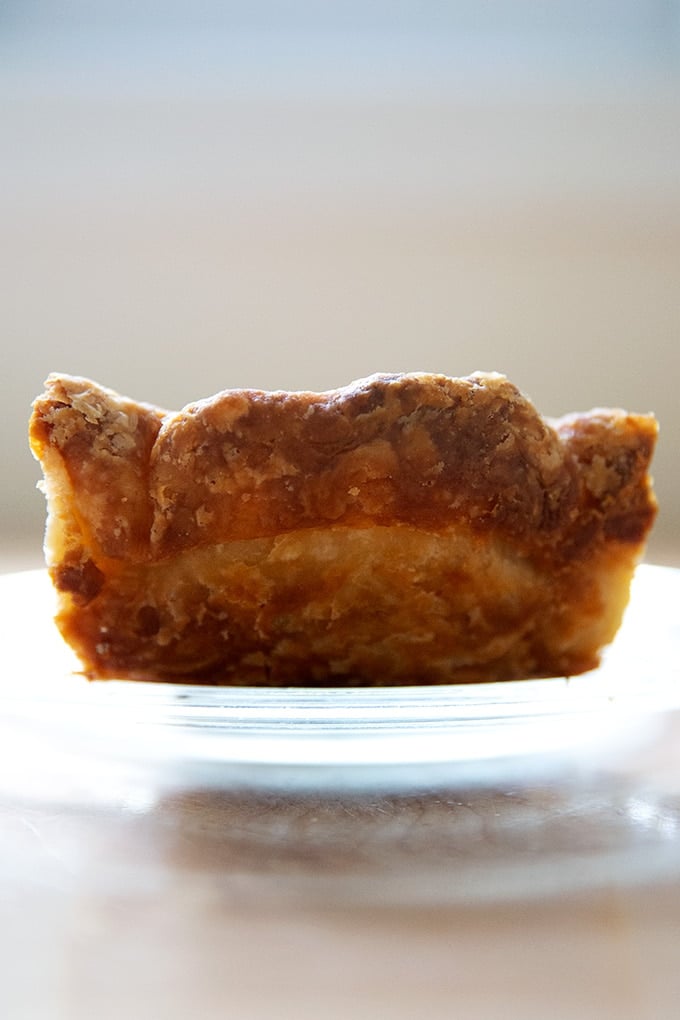
This is Ronnie Hollingsworth’s Most Excellent Squash Pie, which I made with a can of pumpkin purée in place of the roasted squash for this recent experiment. It was good, but I missed the squash.

Can you see how flaky the crust is?

How to Parbake (and Blind Bake) Pie Crust + Foolproof Flaky Pie Dough
- Total Time: 1 hour 25 minutes
- Yield: 2 pie crusts
Description
This is the pie dough recipe I use for every tart, pie, galette I make. In this recipe and video, I show how to make the pie dough as well as how to parbake and blind bake it. Parbaking is a step that ensures the bottom crust of your pie will not be soggy. Here are a few recipes that benefit from a parbaked crust:
- Bourbon Pecan Pie
- Roasted Butternut Squash Pie (i.e. The Best Pumpkin Pie)
- Salted Maple Pie
Notes:
- Ideally make your dough 12 to 24 hours before you plan to roll it out. Doing so allows the flour to fully hydrate and allows the gluten to relax. This makes rolling the dough out more easily and also helps minimize shrinking in the oven.
- Dough can be made up to three days in advance and stored in the fridge or made weeks in advance and stored in the freezer. To thaw, place dough in the fridge overnight before baking.
- To make a double batch: do not load your food processor with double quantities. Make the dough in separate batches — no need to wash the food processor in between batches.
- Favorite Pie Plate: I swear by my ceramic Emile Henry 9-inch Pie Plate.
- Once you parbake your pie shells, let them cool completely; then store in an airtight vessel or bag — an XLarge (2-gallon) Ziplock works well. Store at room temperature for up to 3 days or freeze for up to 3 months.
Ingredients
- 2½ cups (320g) all-purpose flour
- 2 tablespoons (25 g) sugar
- ½ teaspoon (3 g) kosher salt
- 16 tablespoons (227g) unsalted butter, cut into small pieces and chilled
- ½ cup + 2 tablespoons (142g) ice water
For baking and storing:
- pie weights or dried beans/rice — I always use dried beans/rice. You can store them in a Ziploc and use them again and again.
- parchment paper
- Jumbo Ziploc — the 2-gallon size
Instructions
- In the bowl of a food processor, pulse the flour, sugar, and salt together. Add the chilled, cubed butter. Pulse at 1-second intervals until butter is the size of peas — should be about ten 1-second pulses. Add the ice water and pulse again about 10 times until the mixture is crumbly but holds together when pinched. (To make without a food processor: In a large bowl, whisk flour, sugar, and salt together. Add the butter to the flour mixture, and using the back of a fork or a pastry cutter, incorporate it until it is in small pieces. Add ice water and continue to stir with a fork until mixture is crumbly but holds together when pinched.)
- Lay two clean tea towels on a work surface. Dump half of the crumbly dough mixture (roughly 350 grams) into the center of each. Grab the four corners of the towel together and twist to create a beggar’s purse, pressing the dough into a round. Use your hands to pack and flatten the round. Wrap in plastic wrap or parchment paper, place in ziplock or other airtight bag/vessel, and stash in the fridge for at least 30 minutes, but ideally 12 to 24 hours or for as long as 3 days. You also can store it in the freezer for as long as 3 months.
- To parbake or blind bake the pie crust: Heat your oven to 425ºF. If you have a Baking Steel or pizza stone, place it on a rack in the lower third of your oven. On a lightly floured work surface, roll out one of the chilled rounds of pie dough, flipping the round over every few strokes, until you have a circle roughly 15 inches in diameter. Note: If you are using very chilled dough, you may find it helpful to pound it gently with your rolling pin before beginning the rolling.
- Transfer the round to a pie plate. Trim any excessive overhanging pie dough — there should be roughly 1/2 inch of dough overhanging the edge. Save the scraps in an airtight container in the fridge. Tuck the overhanging dough behind itself; then use your fingers to crimp the edge into a fluted pattern — video guidance here. If time permits, chill the shell for 30 minutes. Lay a sheet of parchment across the pie plate and pour pie weights or dried beans into the center until they reach the top of the pie crust. Use your hands to press the weights down and fit them into the edges of the fluted crust.
- Transfer the filled pie crust to a parchment-lined sheet pan and transfer to the oven for 15-20 minutes or until the edges are just beginning to color — do rely on the visual cues here. It sometimes takes my crusts a little longer to take on that light color at the edges.
- Remove the pan from the oven and carefully remove the pie weights or dried beans (which you can use again and again — let them cool completely; then transfer to a storage bag). Return the pan to the oven. For a parbaked crust, bake the shell for another 2 to 3 minutes — it should take on only the slightest bit of more color all around. For a blind-baked crust, return the shell to the oven for another 10 to 12 minutes or until the crust is evenly golden brown.
- Once you parbake or blind bake your pie shells, let them cool completely; then store in an airtight vessel or bag — an XLarge Ziplock (2-gallon) works well. Store at room temperature for up to 3 days or in the freezer for up to 3 months. From here, proceed with whichever pie recipe you are making. I use this pie crust for every pie I make. See notes above.
- Prep Time: 1 hour
- Cook Time: 25 minutes
- Category: Dessert
- Method: Food Processor, Oven
- Cuisine: American, French
This post may contain affiliate links. Please read my disclosure policy.


107 Comments on “How to Parbake (and Blind Bake) Pie Crust + Foolproof Flaky Pie Dough”
I never seem to have success with partaking, and wonder if you have thoughts as to where I might be going wrong. One, the covered bottom of the crust that is in contact with the parchment and weights seems to get soggy from all the melted butter and trapped steam. Also, the pleats of the parchment around the edge where they slope up around the sides of the crust inevitably get trapped or poke into the crust as it bakes, breaking the integrity of the edge when I pull it out. And finally, the sides seem to slump down when I remove the weights. Where am I going wrong here? Am I not chilling enough, or baking long enough, or using the wrong temperature? I do use an Emile Henry pie dish, though I have had these troubles with my tinned tart pan as well.
Hi Christine!
Questions for you: Are you using a scale to measure? What type of flour are you using? Are you using this recipe? Or a different one? And finally, are you using weights as opposed to something like rice? And if weights, do the weights fill the pie all the way to the top?
Hi! I’ve used a few different recipes, including this one, but it’s been a year since my last attempt so I can’t remember the details! I do usually weigh ingredients. For weights, I’ve been using a mix of rice and garbanzo beans. It’s very possible I didn’t have enough, though, so maybe having insufficient weight and coverage might have led to the slumping edges. I do always get a little weirded out by the sizzling melted butter when I remove the parchment — is this normal? When I see it I always assume I’ve done something wrong! One other thought is – I often use European style butter. Could that be a factor in what I’m seeing? Anyway, happy for any feedback. I may need to just jump in and experiment a bit! Thanks!
Hi and yes! I would try Cabot butter if you can find it — I actually always use salted, but unsalted is fine, too. Land O’ Lakes works fine, too, if you can’t find Cabot.
Definitely try using more beans/rice.
The sizzling melted butter is normal!
Have you ever worked with an olive oil pie crust? I want to make one for a pecan pie. Do you parbake it and can you make it ahead. Thank you so much.
Susan, I have not ever made an olive oil crust, so I don’t know how to speak with real certainty to your other questions, but my guess is that yes you should still parbake it, and yes you can make it ahead of time.
I’ve been using your pie crust recipe with great success! Thank you! I want to try parbaking this year. How does parbaking affect the total time of cooking the pie once it’s filled?
Thank you! I love your recipes!
Hi! Graet to hear 🙂 The bake time of the filled pie shouldn’t change much — you need to make sure the filling is set. That’s what’s most important. The crust shouldn’t overbake during that time if it is parbaked correctly — light browning at the edges. Good luck!
Thanks for these helpful tips and tutorials; they’re very helpful!
If I’m going to parbake and bake on the same day, do I need to cool the crust completely before filling it?
Nope! Fill it when it’s hot if that timing works for you 🙂
Hello! I am once again making the delicious butternut squash pie for Thanksgiving. I made the pie crust last night and it did not turn out good. It was extremely doughy/sticky. I tossed it and will try again today. Do you have any suggestions? I weighed my ingredients and used King Arthur flour. I am using Harris teeter brand unsalted butter. As I’ve read some of the other comments on here, maybe I need to use a higher quality butter. Help!
Amanda
Hi! I always use Cabot butter and I have used Land O lakes in the past. Are you using a food processor? Are you chilling the dough after you shape it into a disc?
Question though: did you toss it before you rolled it out?
Yes, I am using a food processor. The crust was doughy/sticky right out of the food processor. I made another batch and still doesn’t look like yours. However, I kept it and have it in the refrigerator. Will try rolling it out today. Keeping my fingers crossed it turns out okay. 🤞🏻
OK, so, in other words, it’s not crumbly? It sounds as though you may be over-pulsing it. You are doing the 10 one-second pulses? And the butter is cold, correct?
Most recipes (including yours) are for 9 inch pie pans. I happen to have deeper 10” pyrex pans that I like to use – more filling! Is there a reliable way to adjust the recipe for these bigger pans? I usually make 2 or 3 single crust pies at the same time and just make an extra recipe of pie dough to split among and add to the others so they fit the larger pans, but it would be nice to have an accurate recipe for a 10” pan. Also…. I only have Kerrygold butter in the house. Is that going to cause a problem? Thank you!
Hi Robin! Unfortunately, I don’t know how to advise. The pie dough recipe will yield 2 crusts each big enough for a 10-inch pie. I never adjust filling recipes because I find more often than not the filling is plenty if not too much for the 9-inch pan so probably better suited for a 10-inch pan. The filling often grows/rises, too, upon baking. Wish I had better advise for you here!
Hi Ali, Sorry – I didn’t word my question very well. I was only asking about adjusting the pie dough ingredient amounts to yield enough for two 10 inch rounds (not the filling). Several weeks ago, I had printed out your recipe for Foolproof Pie Dough (https://alexandracooks.com/2018/11/13/favorite-all-purpose-pie-dough-recipe-all-the-pies-i-use-it-with/). The instructions say: “yield: 2 nine-inch rounds”. The pie dough recipe on this page is identical – same ingredient amounts – but doesn’t specify the size of the rounds. So….I was worried that the pie rounds wouldn’t be big enough for my deeper pans. When you say 9″ round or 10″ round does that mean it will fit that size pie pan or does it literally mean it will only roll out to a 9 or 10″ diameter. I just double checked my Pyrex pans – on the bottom it says 9.5 inches. When I measure the diameter from the top edge of the rim down the side and across the bottom to the top edge of the rim on the other side, the measurement is 11.5 inches. Maybe I’m overthinking this?? Thank you!
Hi Robin! That is confusing… so sorry. The recipe will yield enough dough for two pie crusts, for either a 9- or 10-inch pan. With two 9-inch pans, you’ll have more scrap dough to repurpose afterward; with two 10-inch pans you’ll have very little leftover trimmed dough to repurpose afterward.
You’re not overthinking this! I find it very hard to tell the actual size of my pie plates. I just measured the three I am using by simply measuring the diameter straight across (from one outer edge to another) and they very from between 9 to 10.5 inches.
Regardless, this recipe will yield enough dough for two crusts and should work just fine with whatever size pie plate you have (unless it’s enormous!).
Hope that helps!
Just tried parbaking my crust (your recipe) tonight and it smells lovely BUT it has shrunk down on the sides. Not totally unusable but I have the other round and would love tips for how to make it not do that the second time?
I did notice when I rolled it out that it was rather firm. It also needed a lot of flour so as not to stick to my countertop and I couldn’t quite get it to roll out without a little bit of effort.
I’m going to try it again tomorrow for the butternut squash pie recipe on your site!
Hi Laura!
Bummer to hear this. Questions:
Are you using a scale to measure the ingredients?
What type of flour are you using?
How long did the disc of pie dough chill before you rolled it out?
And were you able to chill the pie plate fitted with the dough before parbaking it?
What are you using as pie weights?
Finally, what material is your pie plate?
Used a scale to measure everything exactly! I’m using Bob’s All Purpose Organic flour. I managed to get the dough to about 15” in diameter but admittedly it wasn’t as round as yours so I think that could be improved. It was a bit tough to do that without it cracking.
I didn’t try putting it back in the fridge after – I read that bit after reviewing the recipe again so I’m going to try that! Some people have suggested putting it in the freezer – should I try that?
My pie weights were raw black beans but didn’t put it all the way to the top (more like halfway of the pie pan) so that was probably part of it too.
And then I’m just using a regular metal pie pan, 9”! Where do you get a cute one? Probably won’t be able to before Christmas but I loved the smells of this pie crust even if it shrunk a touch so I want to try making more pie!
OK, great to hear about the scale and Bob’s.
A few thoughts:
• Not perfectly round is just fine!
• Do try chilling the pie plate in the fridge after you fit the dough into the pan. Don’t freeze it though (read why in the post above).
• I think more pie weights will help. I do love rice for its ability to nicely fit into the crevices. You could top off the black beans you are using with rice so that the weights fill the shell all the way to the top.
• Metal pie plates are great! I do love my Emile Henry pie plate, but using one isn’t a foolproof way to prevent shrinkage.
• Finally, I do think the dough will shrink less after it has spent time in the fridge after the initial mix — when it’s still in a disc. I think 12-24 hours minimum is ideal. So, with your second disc, you may see less shrinkage, especially if you chill the pie plate after the dough is fitted inside and use a sufficient amount of pie weights.
Good luck!!!
Much more success the second time! I put the dough back in the fridge after laying it in the pan and it was in much better shape! I also put my pie weights up to the top – I learned a tip which is to use sugar! It can get into all the little crevices and can be reused afterwards!
Lastly, I realized that I’m actually using a cake pan not a pie pan. After looking it up, that’s an added 1″ of space that I was trying to accommodate, so no wonder my dough was struggling to have any overhang. Time to invest in some pie pans! But everything smelled and looked fabulous – I can’t wait to eat it tomorrow!
Oh yay! So great to read all of this! And yes, add pie plates to your holiday wish list 🙂 🙂 🙂 Happy Thanksgiving!!
I know par bake so many of my cross thanks to you! It really improves the texture of the pie. I have never par baked a pie crust the night before but I am planning on doing that this Thanksgiving. Can you just leave them out on the counter possibly covered in aluminum foil. Do you have recommendations for keeping pie crusts over night? Thank you and thank you for AlL your delicious recipes.
So nice to read this, Camille! I would suggest (if you have time) buying the jumbo ziplock bags — 2 gallon size. Once the par baked crust cools, you can tuck it in the bag or you can place the pie plate with crust into the bag and seal it. I find an airtight environment is best for keeping the crust fresh. I am doing the same tomorrow!
Thank you!!!!!! Last year I attempted my first pie crust and it was so hard you could break a tooth. I just made this recipe this morning using King Arthur Gluten Free Flour and dairy free butter….absolutely amazing and no broken teeth!!!
Wow, amazing! Great to hear this, Ginna!
HI….a pop up ad for Kohl’s with a full width black background keeps popping up as I’m watching the video and scrolling down the page. There is no way to close that ad. It’s incredibly annoying!!! Have to CLOSE the page, re-open it, and then start again. I give up!!
this is my favorite all-butter pastry recipe and I absolutely love the beggars purse approach! Thanks for that. I have trouble using parchment with the weights. the parchment seems to lose strength as it bakes and getting the weights out of the crust is tricky because the parchment wants to break. and It has :(. any suggestions? would aluminum foil work here?
Hi Katy! Great to hear. Yes, I think foil would work great… I should try that. I do use Reynolds parchment paper for the pie weights, which I like for its larger size, and I do find it to be strong… but I totally can relate to the parchment paper “sling” being tricky to remove.
My crust was so hard we could hardley cut it but it looked beautiful. What could have been wrong? I believe it was my fault but need guidance on how to correct it.
Kathy, you likely overworked the dough. Did you use a food processor? Was the dough still crumbly when you were finished pulsing? Or did the dough begin to gather round the blade in a cohesive mass?
I think not crumbly enough, when I went to roll it out I saw large peices of butter so I had a feeling I did something wrong.
Are you using a scale to measure your flour and water? What type of flour are you using?
Do you recommend parbaking for pumpkin pie…? I always have put the filling on top of raw dough. Love your insta! And your recipes.
Hi! And thank you 🙂 I do parbake for pumpkin pie now. I didn’t always, but I do think it makes for a superior crust. That said, I am a believer in doing what you like and what works for you, and if you’ve had success not parbaking, keep doing it!